2008 MERCEDES-BENZ SL ROADSTER remote control
[x] Cancel search: remote controlPage 10 of 317
7
Resettin
g.................... .81
Storing settings ................ 82
Exterior view
Overview ..................... 20F
Fire extinguisher ................ 201
First-aid kit ..................... 202
Flat tyre Equipment ................... 266
MOExtended run-fla tsystem ..... 275
Preparing the vehicle ...........266
TIREFIT kit ................... 266
Floormat ....................... 171
Foglamps Display message .............. 223
Fording ........................ 192
Frequencies Garage door opene r............ 307
Telephone ................... 288
Fron tairbag ..................... 44
Front-passenger ai rbag ............ 44
Fuel ........................... 300
Loss ........................ 243
Petrol ....................... 175
Fue lcon sumption ........... 301, 302
Fue lfiller flap
Opening/closing .............. 175Fue
lline
Malfunction .................. 243
Fue ltank
Malfunction .................. 243
Fuse allocatio nchart ............ 283
Fuse box Engine compartment ...........283
Fuses .......................... 283 G
Garage door Opening/closing (with the remote
control) ..................... 170
Garage door opener ..............169
Clearing the memory ...........171
Frequencies .................. 307
Programming the remote control ..169
Gear indicator (on-board computer) 111
Gearshift program Manual .................. 102, 104
SETUP (on-board computer) .....111
Genuine Mercedes-Benz parts .....286
Glass roof Roller sunblind ................ 159
Glove compartment ..............161
Emergency unlocking ...........257
Gross vehiclew eight, maximum
permissible ..................... 299 H
Head/thorax airbags ..............45
Headlamp Misting up ................... 248
Headlamps
Cleaning ..................... 196
Cleaning system ................ 90
Headlamps delaye dswitch-off
see Exterior lighting delayed switch-off
Head restraint
Adjusting (front) ................ 75
Heating
see Air conditioning
High-pressure cleaners ...........195
HomeLink ®
see Garage door opener I
Immobiliser ..................... 59
Indicator an dwarning lamp
Brake s(red ).................. 235
Coolant ..................... 236
Distronic (red )................ 233
DTR ........................ 131
Engine diagnostic .............. 237
ESP ®
........................ 54
PASSENGER AIRB AGOFF .... 49, 231
Reserve fuel .................. 239
Roll-over bar .................. 237 Index
230_AKB; 5; 4, en-GB
bjanott,
Version: 2.9.6 2008-04-08T15:09:54+02:00-Seite 7 Dateiname: 6515_3089_02_buchblock.pdf; preflight
Page 14 of 317
11
Rear window heating
............152
Malfunction indicator lamp ......231
Refuelling ...................... 175
Remote control Garage door opene r............ 169
Programming (garage door
opener) ...................... 169
Replacing the wiper blades .......264
Reserve Display message .............. 227
Reserve fuel .................... 300
Display message .............. 227
Fuel tank .................... 300
Warning lamp ................. 239
Rese tbutton ................... 194
Restrain tsystem
see SRS (Supplemental Restraint
System)
Restrain tSystem
see SRS
Restrain tsystems
For children ................... 47
Rev counter .................... 106
Reverse gear Engaging (automatic transmission) .99
Reversin glamp
Displa ymessag e.............. 224
Roller sunblind ................. 159Roll-ove
rbar..................... 46
Display message .............. 228
Warning lamp ................. 237
Roof ........................... 154
Closing (key )................ .155
Closing (switch) ............... 155
Display message .............. 228
Malfunction .................. 249
Opening (key )................. 155
Opening (switch) .............. 155
Relocking .................... 156
Roof rack ...................... 160
Roof switch .................... 154
Run-on time (mobile phone) .......168 S
SBC Hold ....................... 137
Display message .............. 212
SBC TM
brake system .............. 57
Activation/Deactivatio n.......... 58
Malfunctio n.................. 242
Notes on driving ................ 58
Seat
Adjusting ..................... 74
Correct driver's seat position ......86
Storing settings ................ 82
Seat belt
Fastening ..................... 83
Warning lamp .............. 85, 238Seat heating
..................... 77
Seat ventilation .................. 77
Malfunctio nindicator lamp ......230
Selector lever
Display message .............. 209
Positions ..................... 99
Sensotronic Brake Control
see SBC TM
brak esystem
Service indicator
see Service indicator
Service products ................ 300
Brake fluid ................... 306
Coolant ..................... 304
Windscreen washer fluid ........306
Settings
Calling up astored setting ........83
Factory (key ).............. .64, 65
Factory (KEYLESS GO) ...........66
Factory (on-board computer) .....116
Settin gthe clock
see COMAND operating instructions
Settin gthe date
see COMAND operating instructions
Settin gthe time
see COMAND operating instructions
Settin gthe unit (on-board computer)
Speedometer ................. 117
SETUP (on-board computer) .......111 Index
230_AKB; 5; 4, en-GB
bjanott,
Version: 2.9.6
2008-04-08T15:09:54+02:00
-Seite 11 Dateiname: 6515_3089_02_buchblock.pdf; preflight
Page 70 of 317
Opening and closing
67
X
To change the setting: press thek
and j buttons simultaneously for
approximately six seconds until the battery
chec klamp flashes twice.
The KEYLESSGOk ey will now function as fol-
lows:
X To unlock the driver's door: pull the door
handle on the driver's door.
X To unlock centrally: pull the front-
passenger door handle.
X To lock centrally: press locking button
1 on the door handle.
Restoring the factor ysettings X
Press the kandj buttons simulta-
neously for approximately six seconds until
the batter ychec klamp flashes twice.
Locking from the boot* On vehicles with KEYLESSGOa
nd remote
boot lid closing*, you can close the boot lid
automatically and thereby centrally lock your
vehicle (Y page 71). Power closing feature
The power closin gmechanism pulls the boot
lid int oits lock automatically even if it is only
partly closed. G
Risk of injury
Make sure that nobody can become trap-
ped when closin gthe boot lid.
If ther eisad anger of being trapped, press
the boot lock.
Do not activate the power closin gfunction
by tamperin gwith the lock mechanism. You
could otherwise injure yourself. G
Risk of accident
Make sure the boot lid is alway sfully
closed. Otherwise, the boot lid could open
during the journey and endanger yourself
or others.
X Lightly push closed the boot lid.
The power closin gmechanism will pull the
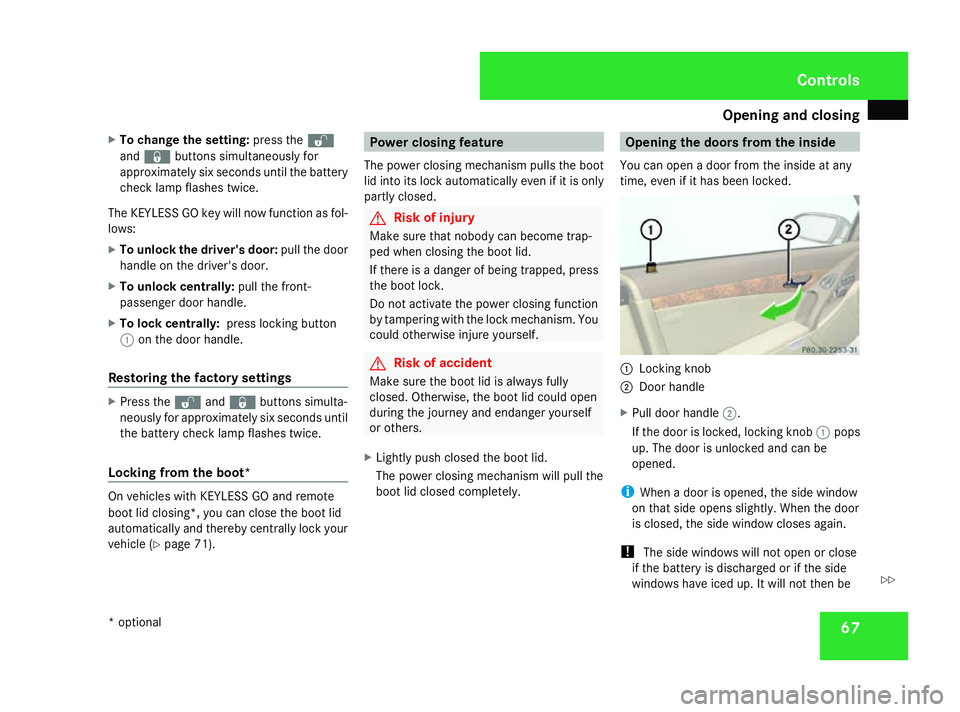
boot lid closed completely. Opening the doors from the inside
You can open adoor from the inside at any
time, even if it has been locked. 1
Locking knob
2 Door handle
X Pull door handle 2.
If the door is locked, locking knob 1pops
up. The door is unlocked and can be
opened.
i When adoor is opened, the side window
on that side opens slightly. When the door
is closed, the side window closes again.
! The side windows will not open or close
if the battery is discharged or if the side
windows have iced up. It will not then be Controls
*o ptional
230_AKB
;5;4,en-GB
bjanott, Version:2.9.6
2008-04-08T15:09:54+02:0
0-Seite 67 ZDateiname: 6515_3089_02_buchblock.pdf; preflight
Page 71 of 317
Opening and closing
68possible to close the door. Do not attempt
to forc
ethe door to close. You could oth-
erwise damage the door or the window. Locking/unlocking the vehicle from
the inside
You can centrally lock or unlock the vehicle
from the inside. This feature may be useful if,
for example, you wish to unlock the
passenger door from the inside or lock the
vehicle before you pull away. G
Risk of accident
Do not leave children unsupervised in the
vehicle. They could open adoor from the
inside –even if it is locked –and thereby
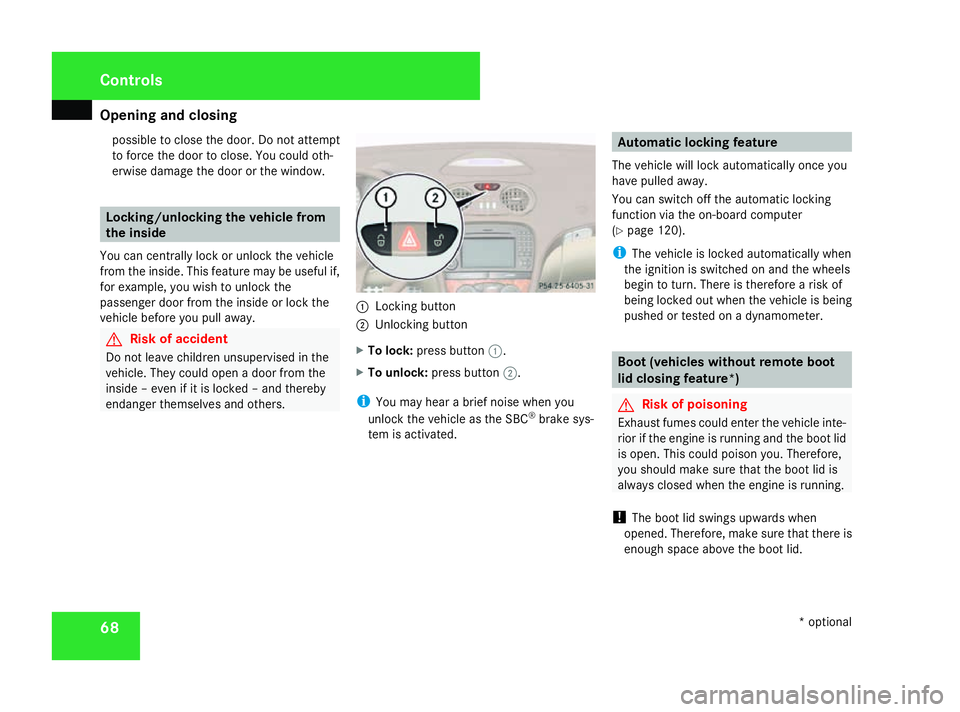
endanger themselves and others. 1
Lockingb utton
2 Unlocking button
X To lock: press button 1.
X To unlock: press button 2.
i You may hear abrief noise when you
unlock the vehicle as the SBC ®
brake sys-
tem is activated. Automatic lockingf
eature
The vehicle will lock automatically once you
have pulleda way.
You can switch off the automatic locking
function via the on-board computer
(Y page 120).
i The vehicle is locked automatically when
the ignition is switched on and the wheels
begin to turn. There is therefore arisk of
being locked out when the vehicle is being
pushed or tested on adynamometer. Boot (vehicles without remote boot
lid closing feature*)
G
Risk of poisoning
Exhaust fumes could enter the vehicle inte-
rior if the engine is running and the boot lid
is open. This could poison you. Therefore,
you should make sure that the boot lid is
always closed when the engine is running.
! The boot lid swings upwards when
opened. Therefore, make sure that there is
enough space above the boot lid. Controls
*optional
230_AKB; 5; 4, en-GB
bjanott
,V ersion: 2.9.6
2008-04-08T15:09:54+02:00
-Seite 68 Dateiname: 6515_3089_02_buchblock.pdf; preflight
Page 73 of 317
Opening and closing
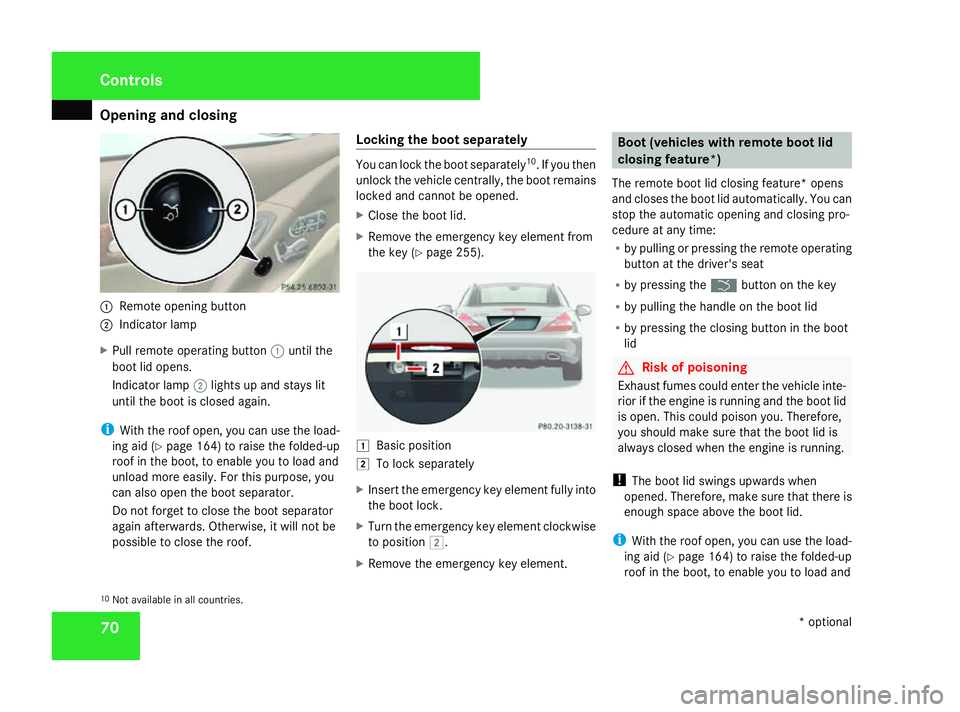
701
Remote opening button
2 Indicator lamp
X Pull remote operating button 1until the
boot lid opens.
Indicator lamp 2lights up and stays lit
until the boot is closed again.
i With the roof open, you can use the load-
ing aid (Y page 164) to raise the folded-up
roof in the boot, to enable you to load and
unload more easily.F or this purpose, you
can also open the boot separator.
Do not forget to close the boot separator
again afterwards. Otherwise, it will not be
possible to close the roof. Locking the boot separately You can lock the boot separately
10
.Ify ou then
unlock the vehicle centrally, the boot remains
locked and cannot be opened.
X Close the boot lid.
X Remove the emergency key element from
the key (Y page 255). $
Basic position
% To lock separately
X Insert the emergency key element fully into
the boot lock.
X Turn the emergency key element clockwise
to position %.
X Remove the emergency key element. Boot (vehicles with remote boot lid
closing feature*)
The remote boot lid closing feature* opens
and closes the boot lid automatically. You can
stop the automatic opening and closing pro-
cedure at any time:
R by pulling or pressing the remote operating
button at the driver's seat
R by pressing the ibutton on the key
R by pulling the handle on the boot lid
R by pressing the closing button in the boot
lid G
Risk of poisoning
Exhaust fumes could enter the vehicle inte-
rior if the engine is running and the boot lid
is open. This could poison you. Therefore,
you should make sure that the boot lid is
always closed when the engine is running.
! The boot lid swings upwards when
opened. Therefore, make sure that there is
enough space above the boot lid.
i With the roof open, you can use the load-
ing aid (Y page 164) to raise the folded-up
roof in the boot, to enable you to load and
10 Not availabl einall countries. Controls
*optional
230_AKB; 5; 4, en-GB
bjanott
,V ersion: 2.9.6
2008-04-08T15:09:54+02:00
-Seite 70 Dateiname: 6515_3089_02_buchblock.pdf; preflight
Page 75 of 317
Opening and closing
72
i
Do not leave the key in the boot. You
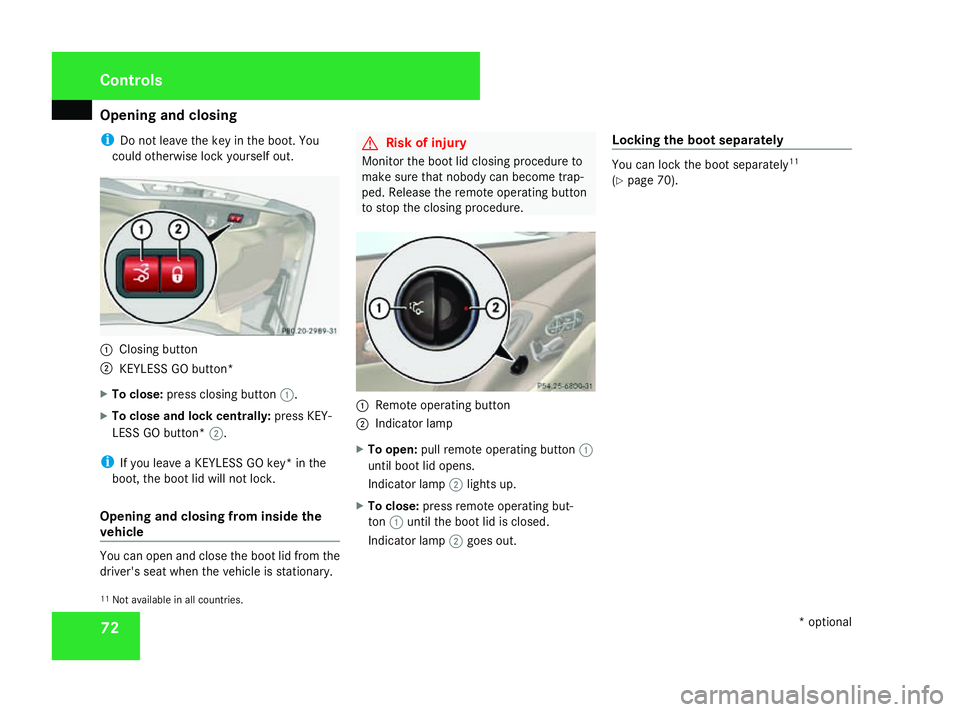
could otherwise lock yourself out. 1
Closing button
2 KEYLESSGOb utton*
X To close: press closing button 1.
X To close and lock centrally: press KEY-
LESS GO button* 2.
i If you leave aKEYLESSGOk ey* in the
boot, the boot lid will not lock.
Opening and closing from inside the
vehicle You can open and close the boot lid from the
driver's seat when the vehicle is stationary. G
Risk of injury
Monitor the boot lid closing procedure to
make sure that nobody can become trap-
ped. Release the remote operating button
to stop the closing procedure. 1
Remote operating button
2 Indicator lamp
X To open: pull remote operating button 1
until boot lid opens.
Indicator lamp 2lights up.
X To close: press remote operating but-
ton 1until the boot lid is closed.
Indicator lamp 2goes out. Locking the boot separately You can lock the boot separately
11
(Y page 70).
11 Not availabl einall countries. Controls
*optional
230_AKB; 5; 4, en-GB
bjanott
,V ersion: 2.9.6
2008-04-08T15:09:54+02:00
-Seite 72 Dateiname: 6515_3089_02_buchblock.pdf; preflight
Page 172 of 317
Features
169
Fitting
adiffere nt mobile phone bracket Example illustration
1
Contact plate
2 Recesses
3 Mobile phon ebracket
X Inser tmobil ephon ebracket 3into
recesses 2of contac tplate 1.
X Slid em obilephon ebracket 3forwards
until it engages. Garage door opener*
The remot econtrol integrated in th erear-view
mirror allows you to operate up to three dif-
ferent door and gat esystems.
i The garage door opener is onl yavailable
for certain countries. Observe th elegal
requirements in all countries concerned.
The HomeLink ®
garage door opener is
compatible with most European garage and
gat eopener drives. More informatio non
HomeLink ®
and/or compatible product sis
available from:
R any Mercedes-Ben zServic eCentre
R theH omeLink ®
hotline
(0) 0800 04663546 5(free of charge) or
+4 9(0) 6839 907-27 7(atac harge)
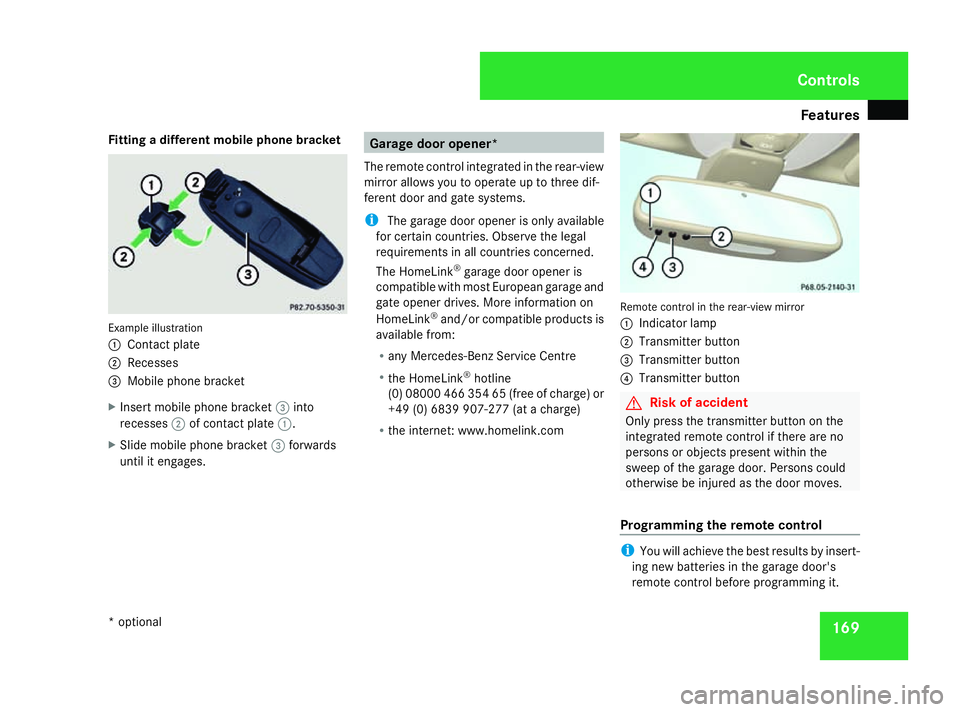
R the internet:w ww.homelink.com Remote control in the rear-view mirror
1
Indicator lamp
2 Transmitter button
3 Transmitter button
4 Transmitter button G
Risk of accident
Only press the transmitter button on the
integrated remote control if there are no
persons or object spresent within the
sweep of the garage door. Persons could
otherwise be injured as the door moves.
Programming the remotec ontrol i
You will achieve the best results by insert-
ing new batteries in the garage door's
remote control before programming it. Controls
*o ptional
230_AKB; 5; 4, en-GB
bjanott,
Version:2.9.6
2008-04-08T15:09:54+02:00
-Seite 169 ZDateiname: 6515_3089_02_buchblock.pdf; preflight
Page 173 of 317
Features
170
X
Erase th ememory of th eintegrated remote
control (Y page 171) before programming
it fo rthe first time.
X Tur nthe keyt op osition 2in th eignition
lock.
X Press and hold on eoftransmitte rbuttons
2 to4 on th eintegrated remotecontrol.
Indicato rlamp 1start stof lasha fter a
short while .Itflashes about once asecond.
i Indicato rlamp 1flashes immediately
th ef irst time th etransmitte rbutto nisp ro-
grammed. If this transmitte rbutto nhas
already been programmed, indicator
lamp 1will only start flashin gatarateof
once asecon dafter 20 seconds have
elapsed.
X Kee pthe transmitte rbuttons depressed.
X Poin tthe garage door' sremot econtro lwith
th et ransmitte rtow ard sthe left-han dside
of th erear-view mirror from adistanc eof5
to 20 cm.
i The distanc ebetween th egarage door's
remot econtro land th eintegrated garage
doo ropener depend sonthesystem of the
garage doo rdrive. You might require sev-
eral attempts .You should test every posi- tion fo
ratleast20s econds before trying
another position.
X Kee pthe transmitte rbutto nont hegarage
door' sremot econtro ldepressed until indi-
cator lamp 1start stof lashrapidly.
The programmin gwas successful if indica-
to rlamp 1flashes rapidly.
X Releas ethe transmitte rbuttons on the
garage door' sremot econtro land th einte-
grate dremot econtrol.
If indicato rlamp 1goe sout after approxi-
mately 20 seconds and did no tflas hrapidly
before this:
X Releas ethe transmitte rbuttons on the
integrate dand portable remot econtrols.
X Repeat th eprogrammin gprocedure .Atthe
sam etimec hang et he distanc ebetween
th eg arage door' sremot econtro land the
transmitte rbuttons in th erear-view mirror.
i If th egarage doo rsystem works wit ha
rollin gcode, after programmin gyou must
synchronise th eremot econtro lintegrated
in th erear-view mirror wit hthe garage door
system receiver.
You will fin dfurther information in the
garage doo ropenin gsystem' soperating instructions, e.g. th
esection son"Synchro-
nisin gthe transmitter" or "Registerin ga
ne wt ransmitter". You can also cal lthe hot-
lin em entioned above.
Opening or closin gthe garage door Once programmed, th
eintegrated remote
control will assume th efunction of th egarage
doo rsystem' sremot econtrol. Pleaseread
th eo perating instruction sfor theg arage door
system.
X Tur nthe keyt op osition 2in th eignition
lock.
X Press th etransmitte rbutto nont herear-
vie wm irror that you hav eprogrammed to
operate th egarage door.
Garag edoors ystem wit hfixed code: indi-
cator lamp 1lights up continuously.
Garag edoorsystem wit hrollin gcode: indi-
cator lamp 1flashes briefl yand then lights
up fo rapproximately tw oseconds. This is
repeated fo rupto20s econds.
i The transmitte rwill transmit asignal for
as lon gasthetransmitte rbutto nisb eing
pressed. The transmissio nwill be halted
after amaximum of 20 seconds and indi- Cont
rols
230_AKB; 5; 4, en-GB
bjanott,
Version: 2.9.6 2008-04-08T15:09:54+02:00-Seite 170 Dateiname: 6515_3089_02_buchblock.pdf; preflight