2008 MERCEDES-BENZ SL ROADSTER headlamp
[x] Cancel search: headlampPage 121 of 317
On-boar
dcomputer 118
X
Press the æorç buttontos elect
kilometres ormiles as the unit of meas-
urement for distance.
X Press the j,èorÿ buttonto
select adifferen tdisplay.
Selecting the distance units for the dig-
ital speedometer This function is not available on vehicles with
speedometers in mph.
X
Press èor· to select the Set-
tings menu.
X Press the jbuttontos elect submenus.
X Press the æorç buttontoselect the
Inst. cluster submenu.
X Press the jbuttontos electDigital
speedometer.
X Press the æorç buttontos elect
kilometres ormiles as the unit of meas-
urement for distance.
X Press the j,èorÿ buttonto
select adifferen tdisplay. Selecting the language X
Press èor· to select the Set-
tings menu.
X Press the jbuttontos elect submenus.
X Press the æorç buttontoselect the
Inst. cluster submenu.
X Press jto select Language.
X Press the æorç buttontoselect the
desired language.
X Press the j,èorÿ buttonto
select adifferen tdisplay.
Selecting the status line display Vehicles for the United Kingdom
:this func-
tion is not available.
X Press èor· to select the Set-
tings menu.
X Press the jbuttontos elect submenus.
X Press the æorç buttontoselect the
Inst. cluster submenu.
X Press the jbuttontos electSelect
display . X
Press the æorç buttontoselect the
status line display: outside temperature
(Outsid etemp.)ors peed (Speed).
The selected display now appears con-
stantly in the status line of the speedome-
ter. You can see the display you have not
selected by scrolling through the Standard
display menu (Y page 110).
X Press the j,èorÿ buttonto
select adifferen tdisplay.
Setting constant headlamp mode If you have set constan
theadlamp mode and
the light switch is in position MorU,
the side lamps, dipped-beam headlamps and
licenc eplate lightin gare switched on auto-
matically when the engin eisrunning. Turning
the light switch to adifferen tposition
switches on the correspondin glights. Make
sure the light switch is set to BorU if
you switch off the constan theadlamp mode
while driving at night.
In countries in which constan theadlamp
mode is alegal requirement, Constantis the
factory setting. Controls
230_AKB
;5;4,en-GB
bjanott, Version:2.9.6
2008-04-08T15:09:54+02:0
0-Seite 118 Dateiname: 6515_3089_02_buchblock.pdf; preflight
Page 122 of 317
On-boar
dcomputer 119
X
Press èor· to select the Set-
tings menu.
X Press the jbuttontos elect submenus.
X Press the æorç buttontoselect the
Lighting submenu.
X Press the jbuttontos electHeadlamp
mode.
X Press the æorç buttontos et the
switch-on mode for the headlamps to Man-
ual orConstant (constantheadlamp
mode).
X Press the j,èorÿ buttonto
select adifferen tdisplay.
Switching the locator lighting on or off If the locator lightin
gisswitched on, the fol-
lowing lights will be switched on automati-
cally in the dark after you have unlocked the
vehicle using the key:
R the side lamps
R the tail lamps
R the licenc eplate lighting
R the fron tfoglamps The locator lightin
gswitches off automati-
cally if you open the driver's door or after
40 seconds.
X Press èor· to select the Set-
tings menu.
X Press the jbuttontos elect submenus.
X Press the æorç buttontoselect the
Lighting submenu.
X Press the jbuttontos electLocator
lighting.
X Press the æorç to switch the
Locator lighting on or off.
X Press the j,èorÿ buttonto
select adifferen tdisplay.
Activating or deactivating the exterior
lighting delayed switch-off Using the
Headlamps delayed switch-
off function ,you can set whether the exterior
lightin gshould remain on for 15 seconds after
the doors are closed when it is dark. If none
of the doors are opened after the engin eis
switched off or if an open door is not closed,
the exterior lightin ggoes out after 60 sec-
onds. When you have set
adelayed switch-off time
and then switch off the engine, the following
remain lit:
R the side lamps
R the tail lamps
R the licenc eplate lighting
R the fron tfoglamps
You can reactivate this function by openin ga
door within 10 minutes.
X Press èor· to select the Set-
tings menu.
X Press the jbuttontos elect submenus.
X Press æorç to select the Light-
ing submenu.
X Press the jbuttontoselect Headlamps
delayed switch-off.
X Press the æorç buttontoa ctivate
or deactivate the Headlamps delayed
switch-off function.
X Press the j,èorÿ buttonto
select adifferen tdisplay.
To temporarily deactivate the delayed switch-
off: Controls
230_AKB
;5;4,en-GB
bjanott, Version:2.9.6
2008-04-08T15:09:54+02:0
0-Seite 119 ZDateiname: 6515_3089_02_buchblock.pdf; preflight
Page 196 of 317
Service
193Driving abroad
Points to remember
An extensive Mercedes-Benz Service network
is also available in other countries. You can
obtain the relevant workshop directories
from any Mercedes-Benz Service Centre.
Only low-octane fuel is available in certain
countries.
You can find further information about fuel
grades on (Y page 175). Symmetrical dipped beam
If your journey takes you to countries where
vehicles are driven on the opposite side of the
road to the countryinw hich the vehicle is
registered, your headlamps must be switched
to symmetrical dipped beam or be partially
masked. Oncoming traffic will be dazzled
less.
X Vehicles with headlamps that cannot be
switched over: mask the headlamps with
special masking tape.
i You can obtain this masking tape from a
qualified specialist workshop, e.g. a
Mercedes-Benz Service Centre. !
Mercedes-Benz recommends that you
only use genuine Mercedes-Benz masking
tape. Your headlamps could otherwise be
damaged.
Remove the masking tape when you are
once again driving on the same side of the
road as in the countryinw hich your vehicle
is registered.
X Vehicles with headlamps that can be
switched over: have the headlamps
switched over at aqualified specialist work-
shop, e.g. aMercedes-Benz Service
Centre. G
Risk of accident
Have your headlamps switched back to
asymmetrical dipped beam if you visit a
countryinw hich traffic drives on the same
side of the road as in the countryinw hich
your vehicle was registered. You may oth-
erwise dazzle the oncomingt raffic and
could cause an accident. Service
ASSYST PLUS service interval display
ASSYST, the service interval display,t ells you
when the next service is due. Whenever a
service is due, the following message appears
in the multi-function display:
Service Ain..d ays
Service Ain..km
Service Adue now
The symbol and the letter indicate which type
of service is due:
9 Short service A
½ Long service B
The service interval display ASSYST does not
record any periods of time during which the
battery is disconnected. In order to maintain
the time-dependen tservice schedule, you
should call up the service due date and make
an ote of it before disconnectingt he battery.
The alternative is to subtract the battery dis-
connection periods from the service date
shown on the display. Operation
230_AKB; 5; 4, en-GB
bjanott
,V ersion: 2.9.6
2008-04-08T15:09:54+02:00
-Seite 193 ZDateiname: 6515_3089_02_buchblock.pdf; preflight
Page 199 of 317
Care
196R
tyres
R door joint
R electrical components
R battery
R connectors
R lights
R seals
Damaged seals or electrical components
can lead to failures or leaks.
Cleaning th ewiper blades and th eout-
sid eoft hewindscreen G
Ris
kofi njury
Turn th ekeyto position 0in th eignition
loc kb efore cleaning th ewindscree northe
wiper blades .Ther eiso therwise ariskof
th ew indscree nwiper sbein gset in motion
and causing injury.
X Turn th ekeyto position 1in th eignition
loc k(Ypage 73).
X Se tthe windscree nwiper stop osition Ion
th ec om bination switch (Y page 92).
X Turn th ekeyto position 0or remove it when
th ew iper arm sare vertical (Y page 73). !
Only fol dthe wiper arm saway from the
windscree nwhen they are in avertical posi-
tion ,otherwise you will damag ethe bonnet.
X Fold th ewiper arm saway from th ewind-
scree nuntil you fee lthe me ngage.
X Clean th ewindscree nand th ewiper blades.
X Fold th ewindscree nwiper sbacka gain
before th eignition is switched on.
! Do no tclean th ewiper blades to ooften
as this will result in th erubber becoming
porous, leadin gtowiper noise.
Cleaning th ewindows !
Do no tuse dry cloths, abrasive products,
solvents or cleaning agents containing sol-
vents to clean th einside of th ewindows.
Clean th einsides of th ewindows wit ha
damp cloth or commercially-available glass
cleaner. Avoid touching th einside of the
rear windscree nand th eside windows with
hard objects ,e.g.ice scrapers or rings. You
could otherwise caus edamag etothewin-
dows ,rear window heating or aerial on the
rear window. i
Anti-glare film retrofitte dtotheinsides of
th ew indows could interfere wit hradio or
mobile phon ereception ,especially if it is
conductive or metal-coate dfilm .Inf orma-
tion about anti-glare film can be obtained
from any Mercedes-Benz Service Centre.
Cleaning th eheadlamps X
Clean th eplastic lenses of th eheadlamps
wit had amp sponge.
! Only use washe rfluid whic hissuitable
for plastic lenses .Unsuitable washe rfluid
could damag ethe plastic lenses of the
headlamps.
Do no tuse th efollowing:
R dry cloths
R abrasive cleaning agents
R solvents
R cleaning agents containing solvent
You could otherwise scratch or damag ethe
surfac eofthelenses. Operation
230_AKB; 5; 4, en-GB
bjanott
,V ersion: 2.9.6
2008-04-08T15:09:54+02:00
-Seite 196 Dateiname: 6515_3089_02_buchblock.pdf; preflight
Page 223 of 317
Displa
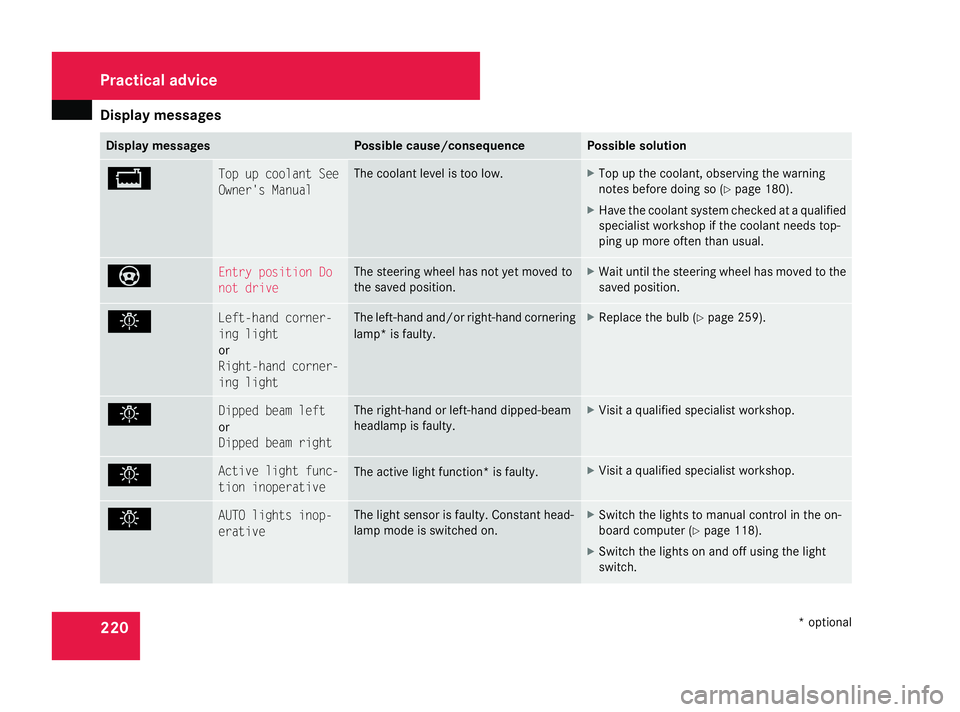
ymessages 220 Display messages Possible cause/consequence Possible solution
B To
pupc oolant See
Owner' sManual Th
ec oolant leve listoo low. X
To pupt he coolant, observing the warning
note sbefor ed oing so (Y page 180).
X Have the coolant syste mchecked at aqualified
specialis tworksho pifthe coolant needs top-
ping up mor eoften tha nusual. _ Entr
ypositio nDo
no td rive Th
es teering whee lhas not ye tmoved to
the save dposit ion. X
Wait until the steering whee lhas moved to the
save dposit ion. . Left-han
dcorner-
in gl ight
or
Right-hand corner-
in gl ight Th
eleft-han dand/o rright -hand cornering
lamp *isfaulty. X
Replac ethe bulb (Y page 259). . Dipped beam left
or
Dipped beam right Th
er ight -hand or left-han ddipped- beam
headlamp is faulty. X
Visi taq ualified specialis tworkshop. . Active ligh
tfunc-
tion inoperative Th
ea ctiv elight function* is faulty. X
Visi taq ualified specialis tworkshop. . AUTO lights inop-
erative Th
elight senso risfaulty. Constant head-
lamp mod eisswitche don. X
Switc hthe lights to manual control in the on-
boar dcomputer (Y page 118).
X Switc hthe lights on an doff using the light
switch. Practical advi
ce
*optional
230_AKB; 5; 4, en-GB
bjanott,
Version: 2.9.6
2008-04-08T15:09:54+02:0
0-Seite220 Dateiname: 6515_3089_02_buchblock.pdf; preflight
Page 225 of 317
Displa
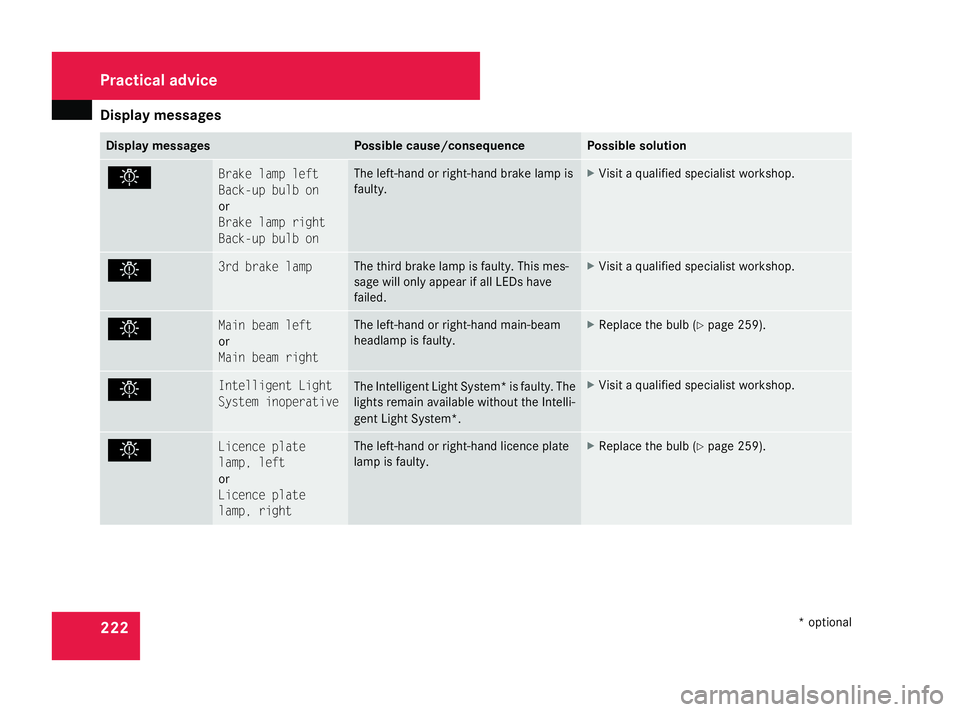
ymessages 222 Display messages Possible cause/consequence Possible solution
. Brak
elampl eft
Back-u pbulbon
or
Brak elampr ight
Back-u pbulbon Th
eleft-han dorr ight-hand brak elam pis
faulty. X
Visi taq ualified specialis tworkshop. . 3r
db rake lamp Th
et hird brak elam pisf aulty. This mes-
sage will onl yappea rifallLEDs have
failed. X
Visi taq ualified specialis tworkshop. . Main beam left
or
Main beam right Th
eleft-han dorr ight-hand main-beam
headlamp is faulty. X
Replac ethe bulb (Y page 259). . Intelligen
tLight
System inoperative Th
eIntelligent Ligh tSystem* is faulty .The
lights remain availabl ewithout the Intelli-
gent Ligh tSystem*. X
Visi taq ualified specialis tworkshop. . Licenc
eplate
lamp ,left
or
Licenc eplate
lamp ,right Th
eleft-han dorr ight-hand licenc eplate
lamp is faulty. X
Replac ethe bulb (Y page 259). Practical advi
ce
*optional
230_AKB; 5; 4, en-GB
bjanott,
Version: 2.9.6
2008-04-08T15:09:54+02:0
0-Seite222 Dateiname: 6515_3089_02_buchblock.pdf; preflight
Page 251 of 317
Troubleshooting
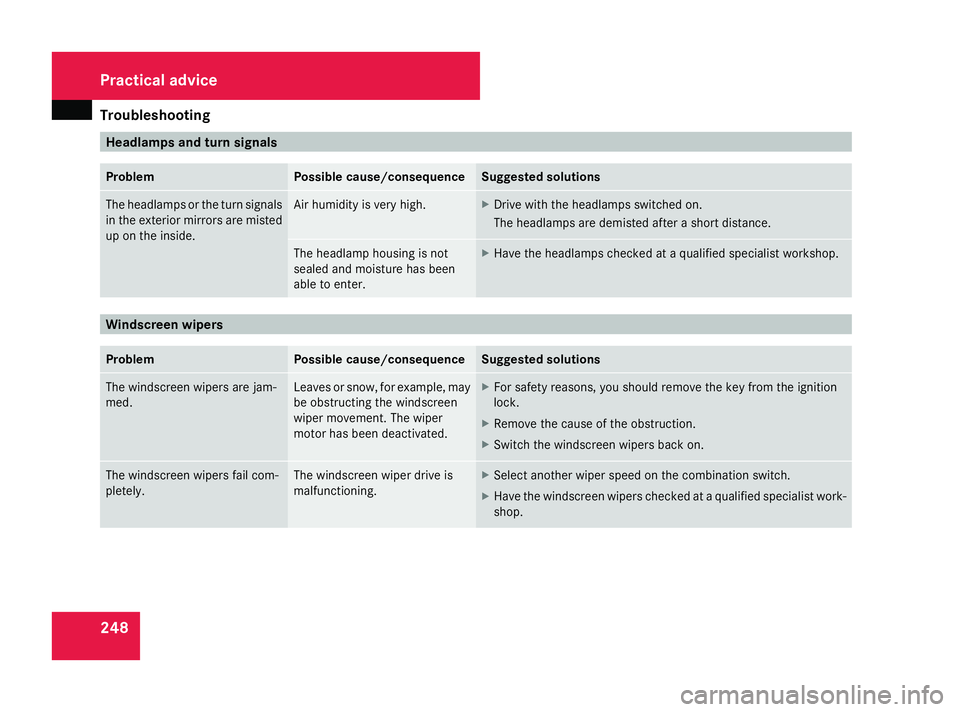
248 Headlamps and turn signals
Problem Possible cause/consequence Suggeste
dsolutions Th
eh eadlam ps or the tur nsignals
in the exterior mirrors ar emisted
up on the inside. Air humidity is ver
yhigh. X
Drive with the headlamps switched on.
Th eh eadlam ps aredemis teda fter as hort distance. Th
eh eadlam phousin gisnot
sealed and moisture ha sbeen
able to enter. X
Have the headlamps checked at aqualified specialis tworkshop. Windscreen wipers
Problem Possible cause/consequence Suggeste
dsolutions Th
ew indscreen wipers ar ejam-
med. Leaves or snow, for example, may
be obstructing the windscreen
wipe
rmovement. Th ewiper
moto rhas been deactivated. X
For safety reasons, yo ushoul dremove the key fro mthe ignition
lock.
X Remov ethe caus eofthe obstruction.
X Switch the windscreen wipers back on. Th
ew indscreen wipers fail com-
pletely. Th
ew indscreen wipe rdrive is
malfunctioning. X
Select anothe rwiper spee dont he combination switch.
X Have the windscreen wipers checked at aqualified specialis twork-
shop. Practical advice
230_AKB; 5; 4, en-GB
bjanott,
Version: 2.9.6 2008-04-08T15:09:54+02:00-Seite 248 Dateiname: 6515_3089_02_buchblock.pdf; preflight
Page 263 of 317
Changing th
ebulbs 260 Do no
tchang ex enon bulbs yourself ,but
have them replace dataqualified specialist
workshop whic hhas th eneces saryspecial-
ist knowledge and tools to carry out the
wor krequired.
Mercedes-Benz recommends that you use
aM ercedes-Benz Service Centr efor this
purpose .Inparticular, wor krelevan tto
safet yoro nsafety-related systems must be
carried out at aqualified specialist work-
shop.
! Do no tchang et he LEDs yourself .You
could otherwise damag ethe LEDs or parts
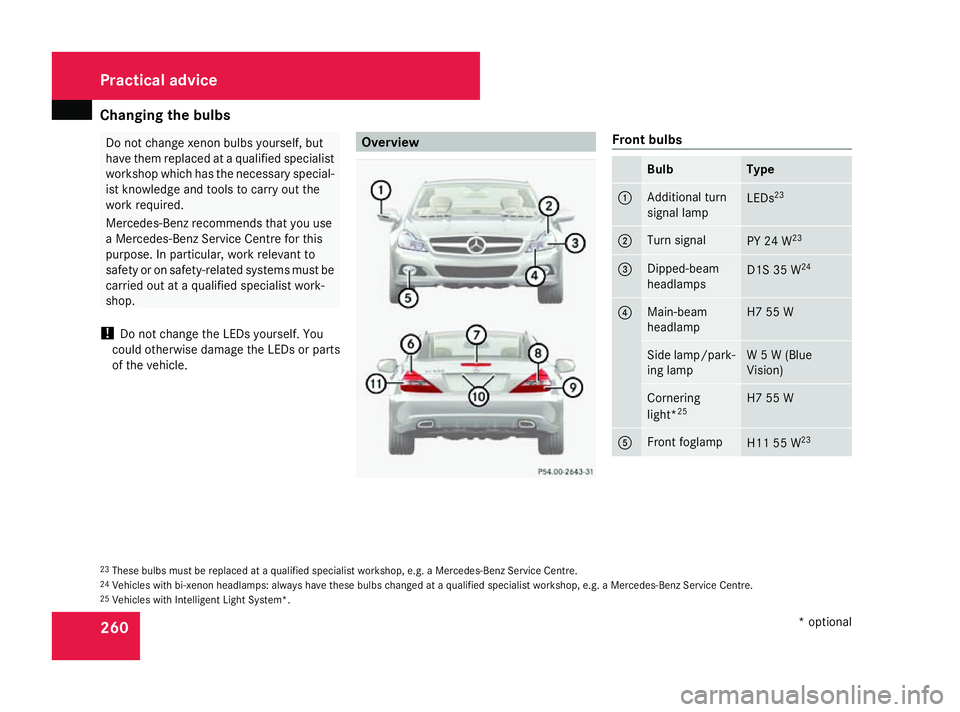
of th evehicle. Overview Front bulbs
Bulb Type
1 Additional turn
signal lamp LEDs
23 2 Turn signal
PY 24 W
23 3 Dipped-beam
headlamps
D1S35W
24 4 Main-beam
headlamp H7 55 W
Side lamp/park-
ing lamp W5W(
Blue
Vision) Cornering
light*
25 H7 55 W
5 Front foglamp
H11 55 W
23 23
These bulbs must be replaced at aqualifie dspecialist workshop, e.g .aMercedes-Ben zServic eCentre.
24 Vehicles with bi-xenon headlamps: always have these bulbs changed at aqualifie dspecialist workshop, e.g .aMercedes-Ben zServic eCentre.
25 Vehicles with Intelligen tLight System*. Practical advice
*optional
230_AKB; 5; 4, en-GB
bjanott ,V ersion: 2.9.6
2008-04-08T15:09:54+02:00
-Seite 260 Dateiname: 6515_3089_02_buchblock.pdf; preflight