2008 MERCEDES-BENZ SL ROADSTER headlamp
[x] Cancel search: headlampPage 84 of 317
Mirrors
81
Resetting the exterior mirrors If the battery has been disconnected or has
become discharged, the exterior mirrors
must be reset. Otherwise, they wil lnot fold in
whe nyou select the "Fol dinmirrors when
locking" function in the on-board computer
(Y pag e121).
X Make sure that the key is in position 1in
the ignition lock.
X Briefl ypress button 1.
Folding the exterior mirrors in or out
automatically* If the "Fol
dinmirrors whe nlocking" function
is activated in the on-board computer
(Y pag e121):
R The exterior mirrors fold in automatically as
soon as you lock the vehicle from the out-
side.
R The exterior mirrors fold out again auto-
matically as soon as you unlock the vehicle
and then open the driver's or front-
passenger door.
i If you have activated this function and fold
in the exterior mirrors using button 1,they
wil lnot be folded out automatically .You can then only fold out the exterior mirrors
using button
1. Automatic anti-dazzle mirrors
The rear-view mirror and the exterior mirror
on the driver's side automatically go into anti-
dazzle mode if the ignition is switched on and
incident light from headlamps strikes the sen-
sor in the rear-view mirror.
The mirrors do not go into anti-dazzle mode if
reverse gea risengaged or the interior lighting
is switched on. G
Risk of accident
If incident light from the headlamps of other
vehicles is prevented from striking the sen-
sor in the rear-view mirror, for instance if
the draught stop is fitted, the mirror's auto-
matic anti-dazzle function wil lnot operate.
Incident light coul dthen dazzle you .This
may distract you from the traffic conditions,
and you may thereby cause an accident. In
this case, adjust the rear-view mirror man-
ually. Passengers
ide exterior mirror park-
ing position
To make it easier to park, you can store the
front-passenger side exterior mirror position
in such awaythat you can see the rear wheel
on that side as soon as you engag ereverse
gear.
You can store aparking position for the exte-
rior mirror on the front-passenger side using
the memory button.
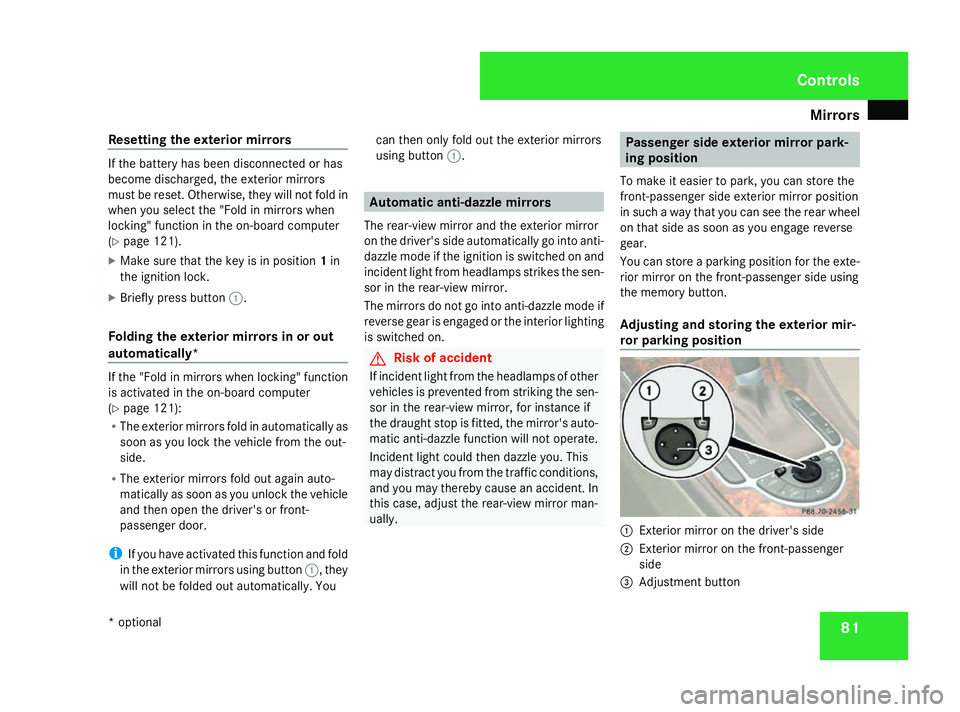
Adjusting and storin gthe exterior mir-
ror parking position 1
Exterior mirror on the driver's side
2 Exterior mirror on the front-passenger
side
3 Adjustment button Controls
*o ptional
230_AKB; 5; 4, en-GB
bjanott,
Version: 2.9.6 2008-04-08T15:09:54+02:00-Seite 81 ZDateiname: 6515_3089_02_buchblock.pdf; preflight
Page 90 of 317
Lights
87Lights
Light switch
For reason sofsafety, Mercedes-Ben zrecom-
mends that you driv ewith th elight sswitched
on eve ndurin gthe daytime. In som ecoun-
tries, daytime operatio nofheadlamps varies
due to legal requirements and self-imposed
obligations .Inthese countries, th edipped-
beam headlamps are automaticall yswitched
on when th eengineiss tarted.
i If you driv eincountries in whic htraffic
drives on th eopposit eside of th eroad to
th ec ountr ywher ethe vehicle is registered,
oncomin gtraffic may be dazzle dbythe
asymmetrical dipped-beam headlamps.
Hav ethe headlamps changed to symmet-
rical dipped beam when driving in these
countries. You can obtain information
about this from any Mercedes-Ben zService
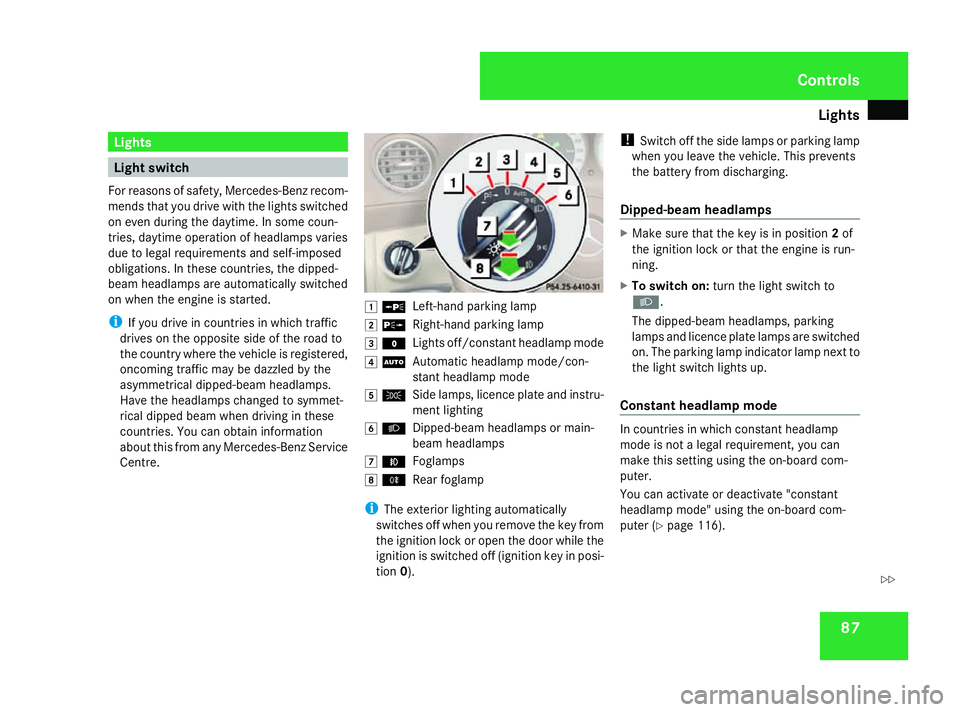
Centre. $
a
Left-han dparking lamp
% g
Right-hand parking lamp
& M
Lightsoff/constan theadlamp mode
( U
Automatic headlamp mode/con-
stant headlamp mode
) C
Side lamps, licence plate and instru-
mentlighting
* B
Dipped-beam headlamps or main-
beam headlamps
, ¥
Foglamps
. †
Rear foglamp
i The exterior lighting automatically
switches off when you remove the key from
the ignition lock or open the door while the
ignition is switched off (ignition key in posi-
tion 0). !
Switch off the side lamps or parking lamp
when you leave the vehicle. This prevents
the battery fro mdischarging.
Dipped-beam headlamps X
Make sure that the key is in position 2of
the ignition lock or that the engin eisrun-
ning.
X To switch on: turnthe light switc hto
B .
The dipped-beam headlamps, parking
lamps and licence plate lamps are switched
on. The parking lamp indicator lamp nex tto
the light switc hlight sup.
Constant headlam pmode In countries in which constant headlamp
mode is not
alegal requirement, you can
make thi ssettin gusing the on-board com-
puter.
You can activat eordeactivat e"constant
headlamp mode" using the on-board com-
puter (Y page 116). Controls
230_AKB; 5; 4, en-GB
bjanott
,V ersion: 2.9.6
2008-04-08T15:09:54+02:00
-Seite 87 ZDateiname: 6515_3089_02_buchblock.pdf; preflight
Page 91 of 317
Lights
88
X
To switch on: turnthe light switch to
M orU.
The dipped-beam headlamps, side lamps
and licenc eplatelamp are switched on
when th eengineisr unning.
i When you tur nthe light switch to any
position other than MorU,t hecor-
respondin glight goes on.
Automatic headlamp mode The side lamps
,dipped-beam headlamps and
licenc eplatelamp are switched on or off
automatically, dependin gonthebrightness of
th ea mbient light. G
Ris
kofa ccident
If th elight switch is set to the Uposi-
tion, th elight will no tcom eona utomati-
cally in foggy conditions. This coul dendan-
ger you and others. Therefore, tur nthe light
switch to Bin thedark or in fog.
The automatic headlam pfeature is only an
aid. The driver is responsible for th evehi-
cle's lighting at all times. G
Ris
kofa ccident
When it is dark or foggy, tur nthe light
switch from UtoB in good time.
Otherwise, th eheadlamps could switch off
temporarily and you could caus eanacci-
dent.
X To switch on: turnthe light switch to
U.
The side lamps are switched on and off
automaticall ywhen th ekeyis in position
1 in th eignition lock.
The dipped-beam headlamps, side lamps
and licenc eplatelamp are switched on
automaticall ywhen th eengineisr unning.
When th eparking lamp or dipped-beam
headlamps are switched on ,the indicator
lamp next to th elight switch light sup.
Fron tfoglamps/Rear foglamp G
Ris
kofa ccident
If you suspect that driving conditions will be
foggy, tur nthe light switch to Bbefore
you start your journey. Otherwise, your
vehicle may no tbevisible and you could
endanger yourself and others. G
Ris
kofa ccident
When it is dark or foggy, tur nthe light
switch from UtoB in good time.
Otherwise, th eheadlamps coul dswitch off
temporarily and you coul dcaus eana cci-
dent.
When th elight switch is set to Uyou can-
no tswitch on th efront or rear foglamp.
X Mak esure that th ekeyis in position 2in
th ei gnition lock.
X To switch on th efront foglamps: turnthe
light switch to the BorC position.
X Pull th elight switch out to th efirst stop.
The ¥ green indicator lamp next to the
light switch light sup.
X To switch on th erearfoglamp: turnthe
light switch to BorC.
X Pull th elight switch out to th esecond
detent.
The † yellow indicator lamp next to the
light switch light sup.
X To switch off th efront foglamps/rear
foglamp: push in thelight switch to the
stop.
The corresponding indicator lamp goes out. Controls
230_AKB
;5;4,en-GB
bjanott ,V ersion: 2.9.6
2008-04-08T15:09:54+02:00
-Seite 88 Dateiname: 6515_3089_02_buchblock.pdf; preflight
Page 92 of 317
Lights
89Combination switch (turn signals,
main-beam headlamp
sand headlamp
flasher)
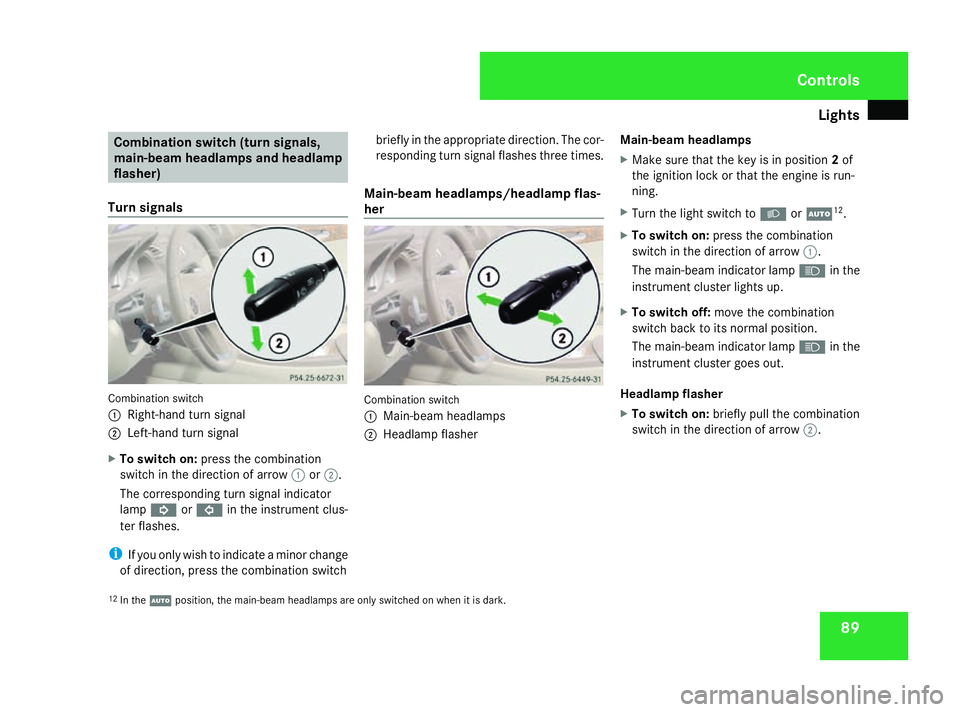
Turn signals Combination switch
1
Right-hand tur nsignal
2 Left-han dturns ignal
X To switch on: pressthe combination
switch in th edirection of arrow 1or2.
The corresponding tur nsignal indicator
lamp K orL in theinstrumen tclus-
te rf lashes.
i If you only wish to indicat eaminor change
of direction ,pres sthe combinatio nswitch briefly in th
eappropriat edirection .The cor-
respondin gturns ignal flashes three times.
Main-beam headlamps/headlamp flas-
her Combination switch
1
Main-beam headlamps
2 Headlamp flasher Main-beam headlamps
X
Mak esure that th ekeyis in position 2of
th ei gnition loc korthatthe engin eisrun-
ning.
X Turn th elight switch to BorU 12
.
X To switch on: pressthe combination
switch in th edirection of arrow 1.
The main-beam indicator lamp Ain the
instrumen tcluste rlight sup.
X To switch off: movethe combination
switch back to its normal position.
The main-beam indicator lamp Ain the
instrumen tcluste rgoes out.
Headlamp flasher
X To switch on: briefly pull thecombination
switch in th edirection of arrow 2.
12 In the Uposition, th emain-beam headlamps are only switched on when it is dark. Controls
230_AKB
;5;4,en-GB
bjanott ,V ersion: 2.9.6
2008-04-08T15:09:54+02:00
-Seite 89 ZDateiname: 6515_3089_02_buchblock.pdf; preflight
Page 93 of 317
Lights
90 Hazard warning lamps
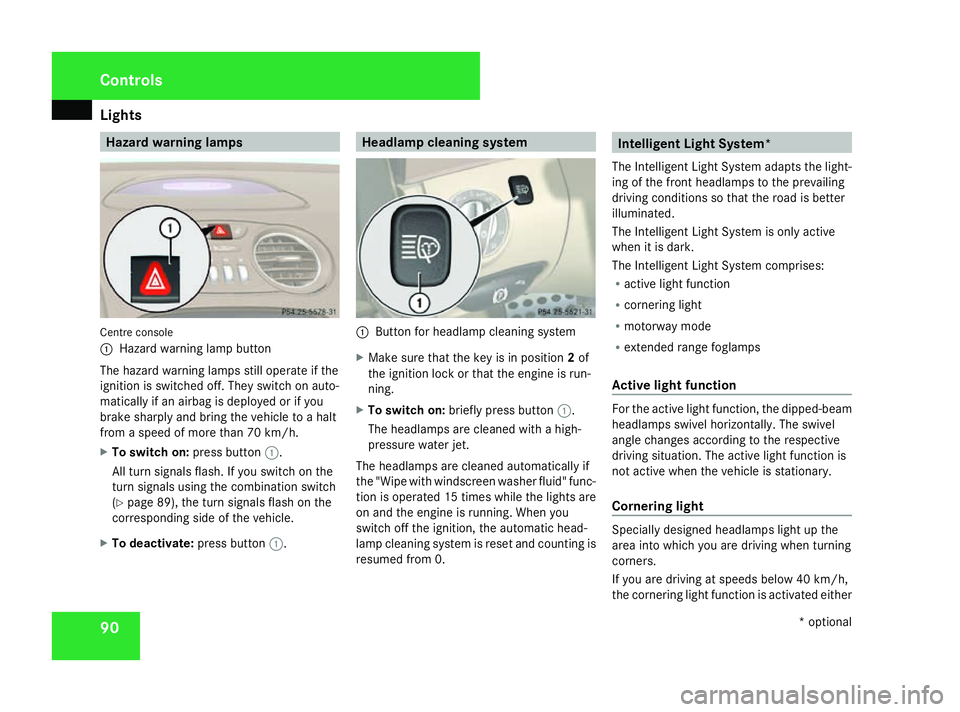
Centre console
1
Hazard warnin glamp button
The hazar dwarnin glamps still operat eifthe
ignition is switched off .They switc honauto-
matically if an airbag is deployed or if you
brak esharply and brin gthe vehicle to ahalt
fro mas peed of more than 70 km/h.
X To switch on: press button1.
All tur nsignals flash. If you switc honthe
tur ns ignals using the combination switch
(Y page 89), the tur nsignals flash on the
correspondin gside of the vehicle.
X To deactivate: press button1. Headlam
pcleaning system 1
Button for headlamp cleaning system
X Make sure that the key is in position 2of
the ignition lock or that the engin eisrun-
ning.
X To switch on: briefly press button 1.
The headlamps are cleaned with ahigh-
pressure water jet.
The headlamps are cleaned automatically if
the "Wipe with windscreen washer fluid" func-
tion is operated 15 times while the light sare
on and the engin eisrunning. When you
switc hoff the ignition, the automatic head-
lamp cleaning system is reset and countin gis
resume dfrom0. Intelligent Light System*
The Intelligent Light System adapts the light-
ing of the front headlamps to the prevailing
driving conditions so that the road is better
illuminated.
The Intelligent Light System is only active
when it is dark.
The Intelligent Light System comprises:
R active light function
R cornering light
R motorway mode
R extended rang efoglamps
Active light function For the active light function
,the dipped-beam
headlamps swivel horizontally. The swivel
angle changes accordin gtothe respective
driving situation .The active light function is
not active when the vehicle is stationary.
Cornering light Specially designed headlamps light up the
area int
owhich you are driving when turning
corners.
If you are driving at speeds below 40 km/h,
the cornering light function is activated either Controls
*optional
230_AKB; 5; 4, en-GB
bjanott
,V ersion: 2.9.6
2008-04-08T15:09:54+02:00
-Seite 90 Dateiname: 6515_3089_02_buchblock.pdf; preflight
Page 94 of 317
Lights
91
by th
eturns ignal or when th esteering wheel
is turned. At speeds between 40 km/h and
70 km/h, only asteering wheel movement
activates th ecornerin glight function .Ifyou
are driving at speeds abov e70km/ hthe cor-
nerin glight function is deactivated.
Activating
X Mak esure that th eengineisr unning.
X Switch on th edipped-beam headlamps.
X Switch off th efoglamp.
X Switch on th eturns ignal.
The cornerin glight on th esame side as the
indicator lamp comes on ,even if you turn
th es teering wheel in th eopposit edirection
after indicating.
or
X Turn th esteering wheel in th edesired
direction.
When in aforwards gear :the cornering
lamp on th einside of th ebendc omes on.
When in revers egear :the cornerin glight on
th eo utside of th ebendc omes on. Deactivating
X
Turn th esteering wheel back to th estraight
ahead position.
The indicator lamp goes out .The cornering
lamp may remain lit for ashort time.
or
X Switch off th eindicator lamp.
The cornerin glamp may remain lit for a
short time.
The cornerin glight will go out after amaxi-
mum of three minutes.
Motorwa ymode Motorway mod
eoptimises th eilluminatio nof
th er oad by:
R controlling th ebrightness
R adapting th eheadlam prange
Motorway mod eisactivated if you are driving
faster than 11 0km/ hand do no tmakea ny
large steering movements for 1,000 m.
Extended range foglamps The extende
drange foglamps reduc ethe
glare experienced by th edriver and improve
th ei lluminatio noftheedge of th ecarriage-
way. X
To switch on: switch on therear foglamp.
The fron tfoglamps and rear foglamp are
switched on .The extende drange foglamps
are activated if you are driving slowe rthan
70 km/h.
X To switch off: switch off therear foglamp.
i The extende drange foglamps switch off
automaticall ywhen you driv efaster than
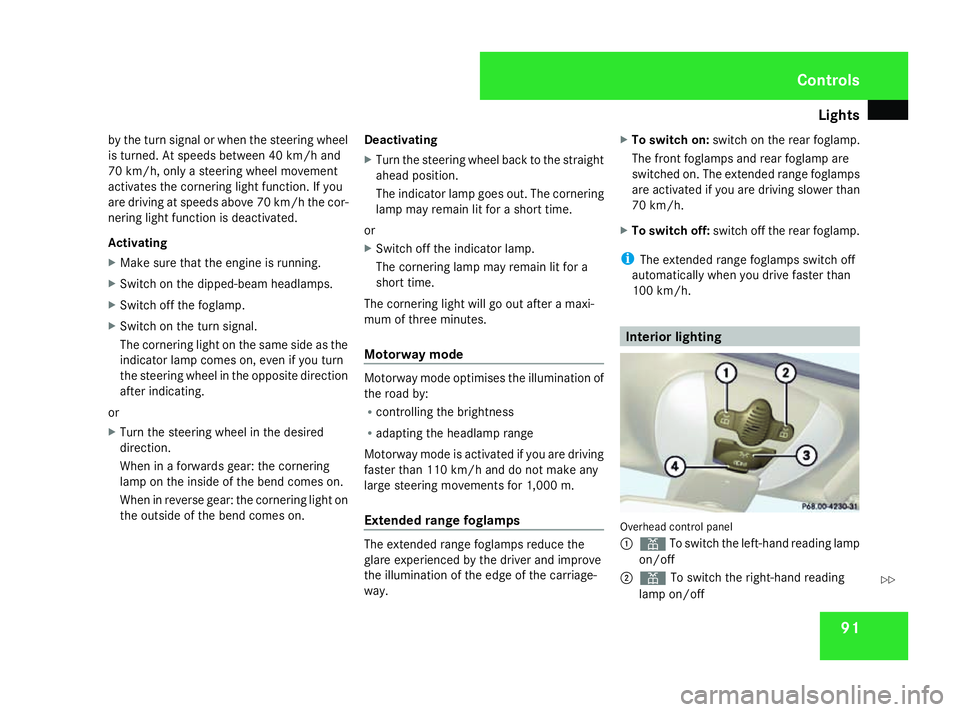
10 0k m/ h. Interior lighting
Overhead control panel
1
X To switch th eleft-hand reading lamp
on/off
2 X To switch th eright-han dreading
lamp on/off Controls
230_AKB
;5;4,en-GB
bjanott ,V ersion: 2.9.6
2008-04-08T15:09:54+02:00
-Seite 91 ZDateiname: 6515_3089_02_buchblock.pdf; preflight
Page 119 of 317
On-boar
dcomputer 116
i
Menu overview: see (Y page 109).
Displaying messages Use the buttons on the multi-function steer-
ing wheel.
X Press the èor· buttonrepeatedly
until either the original menu or the Mes-
sage memory menu appears.
If the Message memory menu does not
appear, ther eare no display messages.
If ther eare messages, the following mes-
sage may appear in the multi-function dis-
play, for example: 2messages.
X Use the jork buttontos croll
through the display messages. Settings menu
There are two function sintheSettings
menu. You can use the To reset: Press
reset button for 3seconds function to
restore most settings to factory settings. You
can also use the submenus here to make indi-
vidual settings for your vehicle.
i Menu overview: see (Y page 109).
Use the buttons on the multi-function steer-
ing wheel.
Resetting to factor ysettings For safety reasons
,not all function sare reset:
permanen tSpeedtronic can only be set in the
Vehicle submenu. The Headlampmode
function in the Lightingsubmenu is only
reset if the vehicle is stationary.
X Press the èor· buttontoselect the
Settings menu.
X Press and hold the reset butto nonthe
instrument cluster for approximately three
seconds.
Ap rompt appears in the multi-function dis-
play asking you to press the reset button
again to confirm. X
Press the reset butto nagain.
The function sofmost submenus are
restored to factory settings.
or
X If you want to retain the settings, do not
press the reset butto nasecon dtime.
The Settings menu appears again after
approximately 5seconds.
X Press the èor· buttontos elect a
differen tmenu.
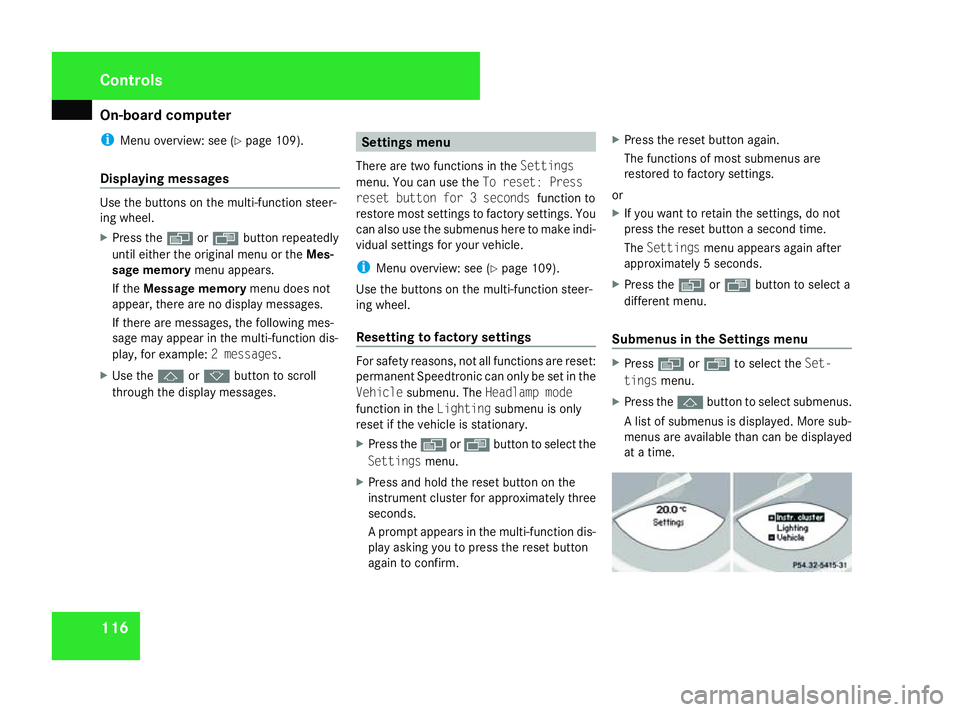
Submenus in the Settings menu X
Press èor· to select the Set-
tings menu.
X Press the jbuttontos elect submenus.
Al ist of submenus is displayed. More sub-
menus are available than can be displayed
at at ime. Controls
230_AKB
;5;4,en-GB
bjanott, Version:2.9.6
2008-04-08T15:09:54+02:0
0-Seite 116 Dateiname: 6515_3089_02_buchblock.pdf; preflight
Page 120 of 317
On-boar
dcomputer 117
X
Press the æorç buttontos elect a
submenu.
The selected submenu is highlighted.
X Press the jbuttontos electafunction
within the submenu.
X Press the æorç buttontoc hange
the setting.
The changed setting is stored.
X Press the èorÿ buttontos elect a
differen tdisplay.
The following tables show the settings you
can make in the individual submenus. You will
find additional information on the pages
shown. Instrument cluster submenu
R
unit of measuremen tfor distance
(Y page 117)
R distanc eunits for digital speedometer
(Y page 118)
R language (Y page 118)
R status line display (Y page 118) Lighting submenu
R
constan theadlamp mode (Y page 118)
R locator lightin g(Ypage 119)
R exterior lightin gdelayed switch-off
(Y page 119)
R interior lightin gdelayed switch-off
(Y page 120)
R Intelligent Light System *(Ypage 120) Vehicle submenu
R
permanen tSpeedtronic (Y page 136)
R automatic locking feature (Y page 120)
R interior motion sensor *(Ypage 121) Convenience submenu
R
easy-entry/exit feature (Y page 121)
R fold the exterior mirror sinwhen locking
the vehicle* (Y page 121) Selecting the unit of measurement for
distance
This function is not available on vehicles with
speedometers in mph.
The selected unit of measuremen
tfor dis-
tanc eapplies to:
R the analogue speedometer
R the total distanc erecorder and the trip
meter
R the trip computer
R cruise control
R Speedtronic
R Distronic*
X Press èor· to select the Set-
tings menu.
X Press the jbuttontos elect submenus.
X Press the æorç buttontoselect the
Inst. cluster submenu.
X Press the jbuttontos electSpeedom-
eter. Controls
*o ptional
230_AKB
;5;4,en-GB
bjanott, Version:2.9.6
2008-04-08T15:09:54+02:0
0-Seite 117 ZDateiname: 6515_3089_02_buchblock.pdf; preflight