Page 44 of 232
44 Audio
Audio operation
� Audio operation
In chapter “Audio” you will find detailed
information regarding
�radio operation
�CD operation (CD drive, CD changer*)
�MP3 CD operation
�AUX operation
If you have not done so already, please
familiarize yourself with these functions by
reading chapter “At a glance”.
�Press A.
Audio menu (M, GL and R-Class illustrated)
WarningG
In order to avoid distraction which could
lead to an accident, the driver should enter
system settings with the vehicle at a
standstill and operate the audio system only
if permitted by road, weather and traffic
conditions.
Bear in mind that at a speed of just 30
m.p.h. (approximately 50 km/h), your
vehicle is covering a distance of 44 feet
(approximately 14 m) every second.
Opening the Audio menu
Page 45 of 232
45 Audio
Audio operation
�If an audio submenu is displayed, press
the
Back soft key until the Audio menu
is displayed.or
�Press A again.
�In the Audio menu, press the soft key
for the desired audio source.
Switching on
�Press J.
The system mutes the active audio
source and theß symbol is displayed
in the status bar. The soft keys on the
left side are greyed out in some
submenus.Switching off
�Press J again.
i
The CD or the MP3 soft key is
available, depending on the medium
inserted in the CD AUDIO slot.
The
CD soft key is available if a CD
changer* is connected to the
COMAND.
Selecting an audio source
Muting
i
COMAND will also deactivate muting if
you
�Press A, B, g, h
�Change the volume at COMAND or
the multifunction steering wheel
�Operate the joystick
�Press any keypad button except #
�Press j or k at the
multifunction steering wheel if the
audio menu is selected.
Page 53 of 232

53 Audio
CD operation
� CD operation
General information on CD operation
WarningG
In order to avoid distraction which could
lead to an accident, the driver should insert
CDs with the vehicle at a standstill and
operate the audio system only if permitted
by road, weather and traffic conditions.
Bear in mind that at a speed of just 30
m.p.h. (approximately 50 km/h), your car
covers a distance of 44 feet (approximately
14 m) every second.
Health hazardG
The CD drive and CD changer* are Class 1
laser products. There is a danger of invisible
laser radiation when you open or damage
the cover.
Do not remove the cover. The CD drive and
the CD changer* do not contain any parts
which can be serviced by the user. For safe-
ty reasons, have any necessary service work
performed by qualified personnel.
i
Only use CDs, which bear the label
shown and that conform to the compact
standard (IEC 60908). You can
therefore only use CDs with a maximum
thickness of 1.3 mm.
i
The system may not be able to
play CDs with copy protection or
copied CDs.
!
Use only CDs with a diameter of 12 cm,
do not use 8-cm CDs.
An 8-cm CD adapter may cause
damage to the CD drive and to the CD
changer* and should not be used.
i
Your CD drive has been designed to
play CDs which correspond to the IEC
60908 standard.
If you insert thicker data carriers, e.g.
ones that have data on both sides (one
side with DVD data, the other side with
audio data), they cannot be ejected
and will damage the drive.
Page 57 of 232

57 Audio
CD changer* operation
� CD changer* operation
The CD changer* can play audio or MP3
CDs. When playing MP3 CDs, only the first
99 tracks will be played back in successive
order. After that, playback will begin with
track 1 of the MP3 CD. Folder selection is
not possible.
Multi session CDs include mixed file types
(e.g. MP3 and audio CD) in either succes-
sive or random order on the disc. Audio
tracks will be played back first, followed by
MP3 tracks until 99 tracks are reached.
Refer to additional MP3 information:
�Permissible MP3 CDs (�page 72)
�Permissible file systems (�page 72)
�Permissible MP3 formats (�page 73)
�Permissible bit and scan rates
(
�page 73)
Refer to additional CD information:
�General information on CD operation
(
�page 53)
�Activate the CD changer* main menu
(
�page 63).
or
�Load a CD into the CD changer*
(
�page 58) for M, GL and R-Class or
(
�page 62) for CLK-Class.
Accessing the CD changer*
The CD changer* is located in the glove
box.
�Open the glove box.
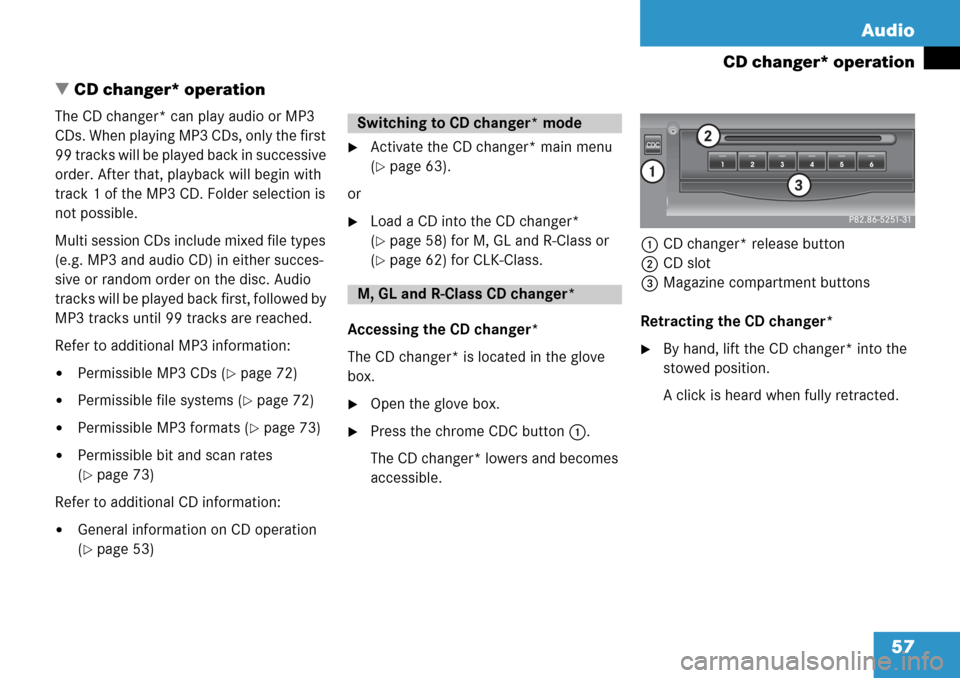
�Press the chrome CDC button 1.
The CD changer* lowers and becomes
accessible.1CD changer* release button
2CD slot
3Magazine compartment buttons
Retracting the CD changer*
�By hand, lift the CD changer* into the
stowed position.
A click is heard when fully retracted.
Switching to CD changer* mode
M, GL and R-Class CD changer*
Page 58 of 232

58 Audio
CD changer* operation
Loading CDsThe CD changer* has a built-in magazine
which can hold up to six CDs. The CD
changer* has six magazine compartment
buttons 3 for controlling the loading
procedure. LEDs in the buttons indicate
the status of the corresponding magazine
compartment.
�Button LED off:
Magazine compartment empty
�Button LED continuously red:
Magazine compartment loaded with a
CD
�Button LED flashes green:
CD changer requesting CD to be
loaded
�Button LED flashes red:
CD is loading
The status of a magazine compartment can
also be seen when selecting a CD in the
Magazine menu (
�page 66).
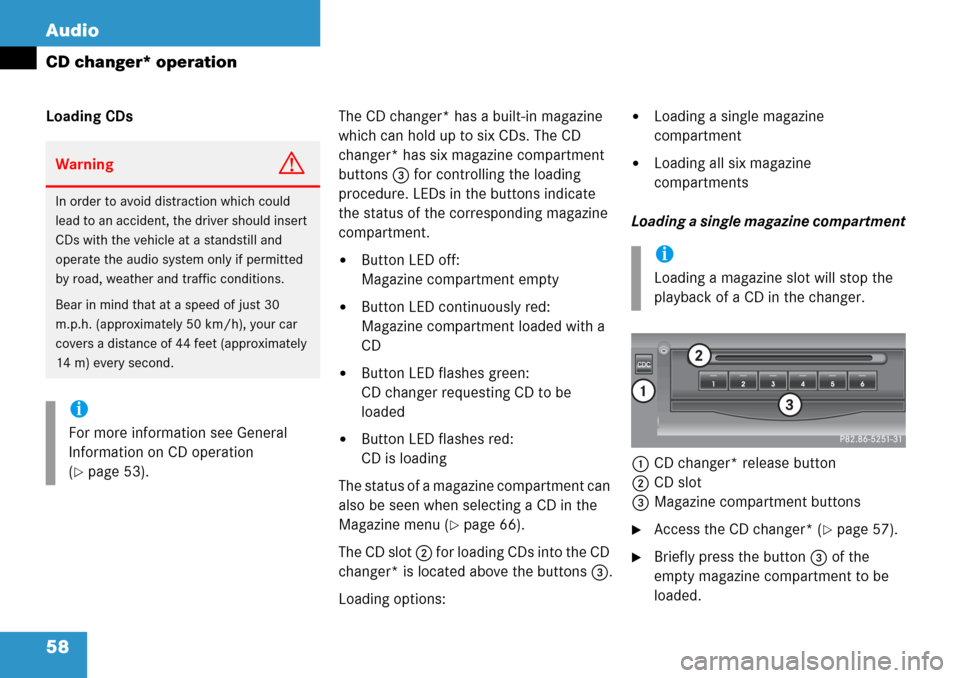
The CD slot 2 for loading CDs into the CD
changer* is located above the buttons 3.
Loading options:
�Loading a single magazine
compartment
�Loading all six magazine
compartments
Loading a single magazine compartment
1CD changer* release button
2CD slot
3Magazine compartment buttons
�Access the CD changer* (�page 57).
�Briefly press the button 3 of the
empty magazine compartment to be
loaded.
WarningG
In order to avoid distraction which could
lead to an accident, the driver should insert
CDs with the vehicle at a standstill and
operate the audio system only if permitted
by road, weather and traffic conditions.
Bear in mind that at a speed of just 30
m.p.h. (approximately 50 km/h), your car
covers a distance of 44 feet (approximately
14 m) every second.
i
For more information see General
Information on CD operation
(
�page 53).
i
Loading a magazine slot will stop the
playback of a CD in the changer.
Page 59 of 232

59 Audio
CD changer* operation
�Wait until the LED in the button 3
flashes green.
This indicates that the CD changer*
requests a CD.
�Insert an audio CD or a MP3 CD into
the CD slot 2 within approx. 15
seconds. Insert the CD face up.
The CD is pulled in. The red LED in the
corresponding magazine compartment
button 3 lights up continuously. The
system starts playing the CD.
The loading procedure is completed.
�Retract the CD changer* (�page 57).Loading all six magazine compartments
1CD changer* release button
2CD slot
3Magazine compartment buttons
Initial situation: all magazine compart-
ments empty.
The CD changer* loads all magazine com-
partments beginning with compartment 1.
�Access the CD changer* (�page 57).
�Press and hold the button 3 of an
empty magazine compartment for
more than 2 seconds.
The LEDs of all magazine compartment
buttons 3 briefly light up green
several times.
�Wait until the LED in the first magazine
compartment button 3 flashes green.This indicates that the CD changer*
requests a CD.
�Insert an audio CD or a MP3 CD into
the CD slot 2 within approx. 15
seconds. Insert the CD face up.
The CD is pulled in. The magazine
compartment is loaded.
The red LED in the corresponding
magazine compartment button 3
lights up continuously.
The CD changer* then requests
insertion of the next CD. The LED in the
corresponding magazine compartment
button 3 flashes green.
�Repeat the last step until all six
magazine compartments are loaded.
The system plays the sixth CD. The
LEDs in all magazine compartment
buttons 3 light up red continuously.
The loading procedure is completed.
�Retract the CD changer* (�page 57).
Page 60 of 232

60 Audio
CD changer* operation
Ejecting CDs
The following options are available:
�Ejecting one CD
�Ejecting all CDs (�page 61)Ejecting one CD
1CD changer* release button
2CD slot
3Magazine compartment buttons
�Access the CD changer* (�page 57).
�Briefly press the appropriate magazine
compartment button 3.
The button LED 3 flashes red. The CD
changer* ejects the CD.
�Within 15 seconds, remove the CD
from the slot 2.
The CD will be pulled in again if it is not
removed from the slot within approx.
15 seconds. The system starts playing
the CD again.
The ejection process is completed.
�Retract the CD changer* (�page 57).i
If, for example, only compartments 1
through 4 are to be loaded instead of
all six compartments, simply do not
insert the fifth CD into the slot 2. The
CD changer* attempts to load the fifth
CD, yet aborts the loading procedure.
The system automatically plays the last
(fourth) CD.i
If you are listening to a CD in the CD
changer* and you eject another CD
from the changer:
�While ejecting the CD, the system
interrupts CD playback.
�The CD you were last listening to
starts from the beginning once the
ejection procedure is completed.
If you eject the CD you are currently
listening to:
�The next available audio CD is
played.
�If there are no other CDs available,
the system switches to the audio
source listened to before CD
changer* mode.
Page 61 of 232
61 Audio
CD changer* operation
Ejecting all CDs
1CD changer* release button
2CD slot
3Magazine compartment buttons
�Access the CD changer* (�page 57).
�Press and hold the button of a loaded
magazine compartment 3 for more
than 2 seconds.
The button LEDs of all loaded magazine
compartments will briefly flash red,
several times.
The CD changer* ejects the CDs one
after another.
�Within 15 seconds, remove each CD
from the slot 2.The CD will be pulled in again if it is not
removed from the slot within
approx.15 seconds. The system starts
playing the CD again.
The ejection procedure is completed
when all CDs are removed, or when the
procedure is aborted by the CD
changer*.
Retract the CD changer* (
�page 57).