2008 MERCEDES-BENZ GLK SUV warning light
[x] Cancel search: warning lightPage 117 of 261
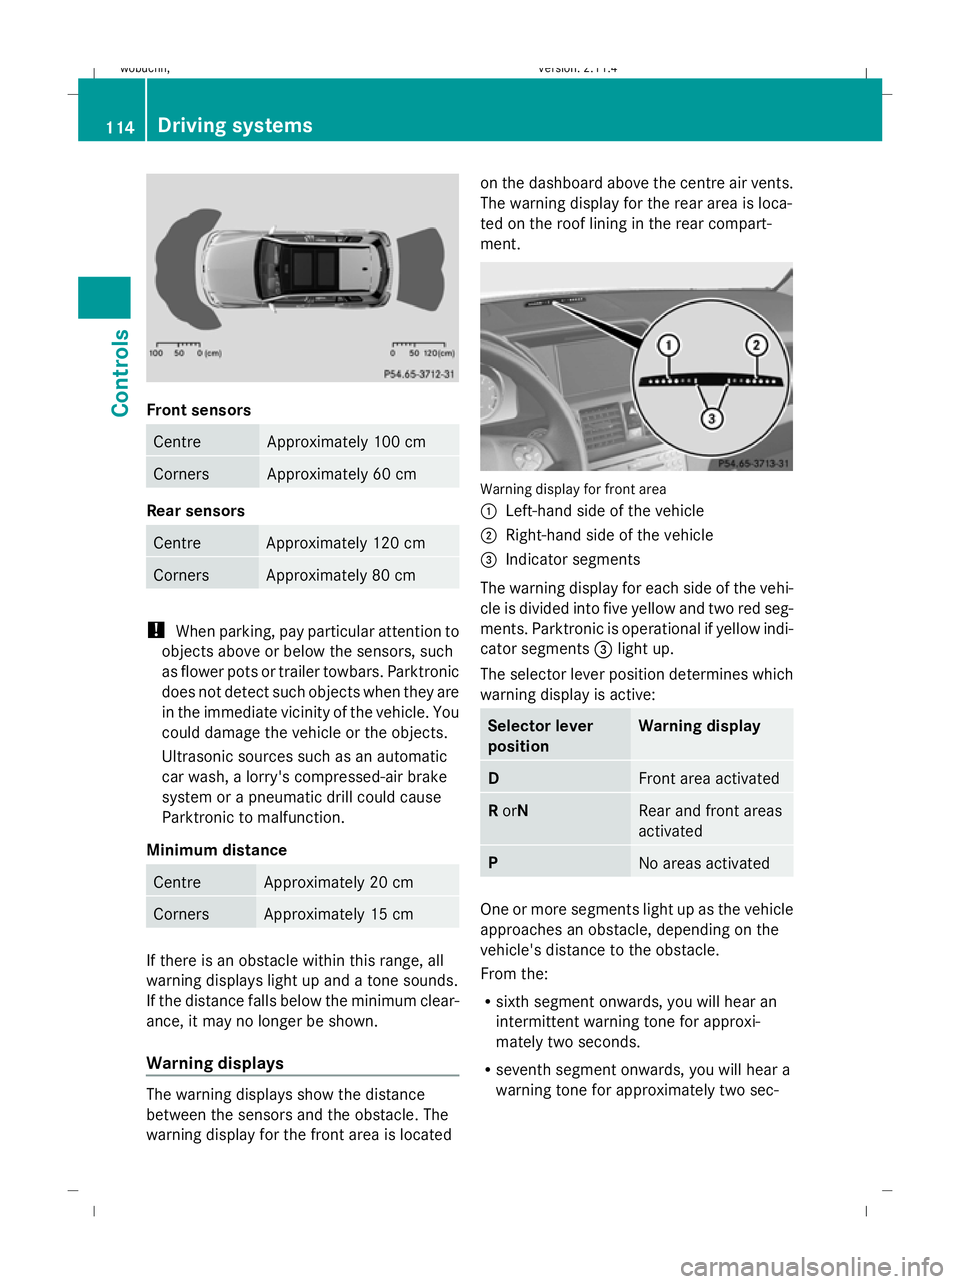
Front sensors
Centre Approximately 100 cm
Corners Approximately 60 cm
Rear sensors
Centre Approximately 120 cm
Corners Approximately 80 cm
!
When parking, pay particular attention to
objects above or below the sensors, such
as flower pots or trailer towbars. Parktronic
does not detect such objects when they are
in the immediate vicinity of the vehicle. You
could damage the vehicle or the objects.
Ultrasonic sources such as an automatic
car wash, a lorry's compressed-air brake
system or a pneumatic drill could cause
Parktronic to malfunction.
Minimum distance Centre Approximately 20 cm
Corners Approximately 15 cm
If there is an obstacle within this range, all
warning displays light up and a tone sounds.
If the distance falls below the minimum clear-
ance, it may no longer be shown.
Warning displays The warning displays show the distance
between the sensors and the obstacle. The
warning display for the front area is located on the dashboard above the centre air vents.
The warning display for the rear area is loca-
ted on the roof lining in the rear compart-
ment.
Warning display for front area
:
Left-hand side of the vehicle
; Right-hand side of the vehicle
= Indicator segments
The warning display for each side of the vehi-
cle is divided into five yellow and two red seg-
ments. Parktronic is operational if yellow indi-
cator segments =light up.
The selector lever position determines which
warning display is active: Selector lever
position Warning display
D
Front area activated
R
orN Rear and front areas
activated
P
No areas activated
One or more segments light up as the vehicle
approaches an obstacle, depending on the
vehicle's distance to the obstacle.
From the:
R
sixth segment onwards, you will hear an
intermittent warning tone for approxi-
mately two seconds.
R seventh segment onwards, you will hear a
warning tone for approximately two sec- 114 Driving systemsControls
X204_AKB; 1; 5, en-GB
wobuchh,
Version: 2.11.4 2008-10-15T13:20:56+02:00 - Seite 114Dateiname: 6515_0671_02_buchblock.pdf; preflight
Page 156 of 261
H
Environmental note
Check the tyre pressure regularly, at least
every 14 days. Tyre pressure loss warning
While the vehicle is in motion, the tyre pres-
sure loss warning system monitors the set
tyre pressure using the rotational speed of
the wheels. This enables the system to detect
significant pressure loss in a tyre. If the speed
of rotation of a wheel changes as a result of
a loss of pressure, a corresponding warning
message will appear in the multi-function dis-
play. G
Risk of accident
The tyre pressure loss warning system does
not warn you of an incorrectly set tyre pres-
sure. The table on the inside of the fuel filler
flap will help you decide whether the tyre
pressures should be corrected.
The tyre pressure loss warning system does
not replace the need to regularly check your
vehicle's tyre pressures, since an even loss of
pressure on several tyres at the same time
cannot be detected by the tyre pressure loss
warning system.
The tyre pressure monitor is not able to warn
you of a sudden loss of pressure, e.g. if the
tyre is penetrated by a foreign object.
In the event of a sudden loss of pressure, bring
the vehicle to a halt by braking carefully. Do
not make any sudden steering movements
when doing so.
The function of the tyre pressure loss warning
system is limited or delayed if:
R snow chains are fitted to your vehicle's
tyres
R road conditions are wintry
R you are driving on sand or gravel R
you adopt a very sporty driving style (cor-
nering at high speeds or driving with high
rates of acceleration)
R you are towing a very heavy or large trailer
R you are driving with a heavy load (in the
vehicle or on the roof)
Restarting the tyre pressure loss warn-
ing system Restart the tyre pressure loss warning system
if you have:
R
changed the tyre pressure
R changed the wheels or tyres
R fitted new wheels or tyres
X Before restarting, consult the table of tyre
pressures on the inside of the fuel filler flap
to ensure that the tyre pressure in all four
tyres is set correctly for the operating con-
ditions concerned.
X Also observe the notes in the section on
tyre pressures ( Ypage 152). G
Risk of accident
The tyre pressure loss warning system can
only give reliable warnings if you have set the
correct tyre pressure.
If an incorrect tyre pressure is set, these
incorrect values will be monitored.
A tyre with insufficient pressure results in
vehicle instability when driving, thus increas-
ing the risk of an accident.
Configuring using the multi-function
steering wheel
X Make sure that the key is in position 2in
the ignition lock.
X Press èto select Tyre pressure
menu: R.
X Press the íbutton.
The following appears in the multi-function
display: RFI active Reactivate: R
X Press the íbutton.
The following appears in the multi-function
display: Tyre press. OK? Tyres and wheels
153Operation
X204_AKB; 1; 5, en-GB
wobuchh, Version: 2.11.4 2008-10-15T13:20:56+02:00 - Seite 153 ZDateiname: 6515_0671_02_buchblock.pdf; preflight
Page 157 of 261
Yes+ Cancel-
To confirm the restart of the tyre pressure
loss warning system:
X Press the +button.
The following appears in the multi-function
display: Run Flat Indicator restar-
ted.
After a teach-in period, the tyre pressure
loss warning system will monitor the set
tyre pressures of all four tyres.
or
To cancel the restart of the tyre pressure
loss warning system:
X Press the -button.
The previous settings will not be changed.
Configuring with the luxury multi-func-
tion steering wheel*
X Make sure that the key is in position 2in
the ignition lock.
X Press the (or& button to select the
Service menu.
X Press the $or% button to select
Tyre pressure.
X Press #.
The following appears in the multi-function
display: Run Flat Indicator active
Restart with OK
X Press #.
The following appears in the multi-function
display: Tyre press. now OK?
To confirm the restart of the tyre pressure
loss warning system:
X Press $or% to select Yes.
X Press #.
The following appears in the multi-function
display: Run Flat Indicator restarted
After a teach-in period, the tyre pressure
loss warning system will monitor the set
tyre pressures of all four tyres.
or
To cancel the restart of the tyre pressure
loss warning system: X
Press $or% to select Cancel.
X Press #.
The previous settings will not be changed. Interchanging the wheels
G
Risk of accident
Interchange the front and rear wheels only if
they have the same dimensions: for example
size, offset, etc.
After every wheel interchange/change, have
the tightening torque checked at a qualified
specialist workshop that has the necessary
specialist knowledge and tools to carry out
the work required. Mercedes-Benz recom-
mends that you use a Mercedes-Benz Service
Centre for this purpose. In particular, work
relevant to safety or on safety-related sys-
tems must be carried out at a qualified spe-
cialist workshop.
The wheels could work loose if they are not
tightened to a torque of 150 Nm.
For safety reasons, Mercedes-Benz recom-
mends that you only use wheel bolts of the
correct size which have been approved for
Mercedes-Benz vehicles.
The wear patterns on the front and rear tyres
differ, depending on the operating conditions.
Interchange the wheels before a clear wear
pattern has formed on the tyres. Front tyres
typically wear more on the shoulders and the
rear tyres in the centre.
Interchange the wheels every 5,000 km to
10,000 km depending on the degree of tyre
wear, provided that the vehicle has the same
size front and rear tyres. Do not reverse the
direction of tyre rotation.
Clean the contact surfaces of the wheel and
the brake disc thoroughly every time a wheel
is interchanged. Check the tyre pressure and,
if necessary, restart the tyre pressure loss
warning system. 154 Tyres and wheelsOperation
* optional
X204_AKB; 1; 5, en-GB
wobuchh,
Version: 2.11.4 2008-10-15T13:20:56+02:00 - Seite 154Dateiname: 6515_0671_02_buchblock.pdf; preflight
Page 158 of 261
Winter driving
Points to remember
Have your vehicle winterproofed at a qualified
specialist workshop, e.g. at a Mercedes-Benz
Service Centre, at the onset of winter. Winter tyres
In temperatures below +7 °C, always use all-
weather tyres or winter tyres and always use
winter tyres in wintry road conditions.
Only winter tyres displaying the snowflake
symbol in addition to the M+S marking pro-
vide optimum grip in wintry road conditions.
Only these tyres will allow the ABS and ESP
driving systems to function optimally in win-
ter, as these tyres have been designed spe-
cifically for driving on snow.
Use winter tyres of the same make and tread
on all wheels to maintain safe handling char-
acteristics. G
Risk of accident
Winter tyres with a tread depth of less than
4 mm must be replaced immediately. They are
no longer suitable for winter use and can no
longer provide sufficient grip. This could
cause you to lose control of your vehicle and
cause an accident.
Always observe the maximum permissible
speed specified for the winter tyres you have
fitted. If you fit winter tyres which have a
lower maximum permissible speed than that
of the vehicle, affix an appropriate warning
sign in the driver's field of vision. This can be
obtained at a qualified specialist workshop,
e.g. from a Mercedes-Benz Service Centre.
Under these circumstances, you should also
restrict the maximum speed of the vehicle
using permanent Speedtronic* 26
to the max-
imum permissible speed for the winter tyres
(Y page 110).
Once you have fitted the winter tyres: X
Check the tyre pressures (Y page 152).
X Restart the tyre pressure loss warning sys-
tem (Y page 153). G
Risk of accident
If you fit the spare wheel* when driving with
winter tyres, bear in mind that driving stability
will be impaired owing to unstable cornering
characteristics caused by the different tyres.
You should therefore adapt your driving style
and drive carefully.
Have the spare wheel* replaced at the near-
est qualified specialist workshop which has
the necessary specialist knowledge and tools
to carry out the work required. Mercedes-
Benz recommends that you use a Mercedes-
Benz Service Centre for this purpose. In par-
ticular, work relevant to safety or on safety-
related systems must be carried out at a quali-
fied specialist workshop. Snow chains
For safety reasons, Mercedes-Benz recom-
mends that you only use snow chains which
have been specially approved for your vehicle
by Mercedes-Benz, or are of a corresponding
standard of quality.
If you intend to fit snow chains, please bear
the following points in mind:
R snow chains cannot be fitted to all wheel/
tyre combinations.
R snow chains must not be fitted to emer-
gency wheels, e.g. a collapsible emergency
spare wheel.
R Fit snow chains only in pairs and only to the
rear wheels. Comply with the manufactur-
er's installation instructions.
Do not exceed the maximum permissible
speed of 50 km/h.
i You may wish to deactivate ESP ®
when
pulling away with snow chains fitted
(Y page 52). This way, you can allow the
26 Only available for certain countries. Winter driving
155Operation
* optional
X204_AKB; 1; 5, en-GB
wobuchh,
Version: 2.11.4 2008-10-15T13:20:56+02:00 - Seite 155 ZDateiname: 6515_0671_02_buchblock.pdf; preflight
Page 163 of 261
angle
;is maximum 25° when the vehicle is
loaded and ready to drive.
Loaded and ready to drive means: a full tank,
all fluids topped up and the driver is in the
vehicle.
R Follow the line of fall when driving on slopes
and steep gradients.
R Before driving on extreme uphill and down-
hill gradients, select the off-road drive pro-
gram*.
R Observe the warnings for off-road driving
(Y page 158).
R Drive slowly.
R Accelerate gently and make sure that the
wheels are gripping.
R Avoid high engine speeds, except when
driving on sandy and muddy routes with
high driving resistance.
R Select a shift range appropriate to the gra-
dient.
R Before tackling steep downhill gradients,
select shift range 1.
i Depress the brake pedal when stopping
on steep uphill gradients. Hill start assist
will aid you when you pull away again
(Y page 84).
Maximum gradient-climbing capability On good road surfaces, 70% of the maximum
gradient-climbing capability is available.
i If the load on the front axle is reduced
when pulling away on a steep uphill slope,
the front wheels have a tendency to spin.
4ETS recognises this and brakes the
wheels accordingly. The rear wheel torque
is increased and it is easier to pull away.
Brow of hill When driving up an uphill gradient, slightly
reduce pressure on the accelerator immedi-
ately before reaching the brow of the hill. Make use of the vehicle’s own impetus to
travel over the brow.
This style of driving prevents:
R
the vehicle from lifting off the ground on the
brow of a hill
R loss of traction
R the vehicle from travelling too quickly down
the other side
Driving downhill R
Drive slowly.
R Do not drive at an angle down steep
inclines. Steer into the line of fall and drive
with the front wheels aligned straight. Oth-
erwise, the vehicle could slip sideways, tip
and overturn.
R Before tackling steep downhill gradients,
select shift range 1.
R Activate DSR. If this is not sufficient, brake
gently. When doing so, make sure that the
vehicle is facing in the direction of the line
of fall.
R Check that the brakes are working normally
after a long downhill stretch.
i Off-road ABS is activated when the off-
road drive program *is selected.
At speeds below 30 km/h, the front wheels
lock cyclically during braking. The digging-
in effect achieved in the process reduces
the stopping distance when driving off-
road. The steerability of the vehicle is con-
siderably reduced when the wheels lock. Driving over obstacles
Observe the following rules when driving over
tree stumps, large stones and other obsta-
cles:
R Select the off-road drive pro-
gram* (Y page 107).
R Avoid high engine speeds. 160 Off-road drivingOperation
* optional
X204_AKB; 1; 5, en-GB
wobuchh,
Version: 2.11.4 2008-10-15T13:20:56+02:00 - Seite 160Dateiname: 6515_0671_02_buchblock.pdf; preflight
Page 177 of 261
Where will I find...?
Where will I find...?
Warning triangle The warning triangle is located behind the
right-hand trim panel in the rear of the lug-
gage compartment. X
Turn release button :90° in the direction
of the arrow and remove warning triangle. X
Remove warning triangle ;.
Setting up the warning triangle X
Fold feet =down and out to the side.
X Pull side reflectors ;up to form a triangle
and lock them at the top using press-
stud :.
First-aid kit i
Check the expiry date of the first-aid kit
annually, and replace the contents when
necessary.
The first-aid kit is located in the luggage net
on the left-hand side at the rear of the boot. X
Remove first-aid kit :from the luggage
net.
Fire extinguisher* i
Have the fire extinguisher refilled after
each use and checked every two years.
Otherwise, it may fail in an emergency.
Observe the legal requirements in all coun-
tries concerned. 174 Where will I find...?Practical advice
* optional
X204_AKB; 1; 5, en-GB
wobuchh,
Version: 2.11.4 2008-10-15T13:20:56+02:00 - Seite 174Dateiname: 6515_0671_02_buchblock.pdf; preflight
Page 179 of 261
Remove the collapsible emergency spare
wheel Example
X
Remove collapsible emergency spare
wheel :.
Setting up the foldable wheel chock
The folding wheel chock serves as an addi-
tional measure for securing the vehicle
against rolling away, e.g. when a wheel is
being changed. X
Fold both plates :upwards.
X Fold out lower plate ;.
X Guide the lugs on the lower plate fully into
the openings in base plate =. Display messages
Notes
The on-board computer shows warnings or
malfunctions in the multi-function display.
Certain display messages are accompanied
by a warning tone or a continuous tone.
The multi-function display shows high-priority
display messages in red. In the following
tables, these display messages are printed in
red.
Please respond in accordance with the dis-
play messages and follow the additional
notes in this Owner's Manual.
Vehicles with a multi-function steering
wheel (4 buttons) Use the
Cbutton on the multi-function
steering wheel to fade out low-priority mes-
sages. You cannot fade out display messages
of the highest priority. The multi-function dis-
play shows these messages continuously
until the causes of the messages have been
remedied.
The on-board computer saves certain display
messages. Calling up display messages
(Y page 92).
For some display messages, the +symbol
appears in the multi-function display. More
detailed information on these display mes-
sages can be found below under "Text mes-
sages" or "Symbol messages".
Vehicles with a luxury multi-function
steering wheel*(12 buttons) Use the
aor the %button on the luxury
multi-function steering wheel to fade out low-
priority messages. You cannot fade out dis-
play messages of the highest priority. The
multi-function display shows these messages
continuously until the causes of the mes-
sages have been remedied. 176 Display messagesPractical advice
* optional
X204_AKB; 1; 5, en-GB
wobuchh,
Version: 2.11.4 2008-10-15T13:20:56+02:00 - Seite 176Dateiname: 6515_0671_02_buchblock.pdf; preflight
Page 180 of 261
The on-board computer saves certain display
messages. Calling up display messages
(Y
page 101).
All vehicles G
Risk of accident
No further messages can be displayed if the
instrument cluster and/or the multi-function
display fails.
This means that you will not see information
about the driving situation, such as the speed,
outside temperature, warning/indicator
lamps, display messages or system failures.
The vehicle's handling characteristics may be
affected. Adjust your driving style and speed
accordingly.
Immediately consult a qualified specialist
workshop which has the necessary specialist
knowledge and tools to carry out the work required. Mercedes-Benz recommends that
you use a Mercedes-Benz Service Centre for
this purpose. In particular, work relevant to
safety or on safety-related systems must be
carried out at a qualified specialist workshop.
Before starting a journey, check that the
warning and indicator lamps are operating
correctly.
X Turn the key to position 2in the ignition
lock.
All warning and indicator lamps (except for
the main-beam indicator lamp and the turn
signal indicator lamps) light up and the
multi-function display is activated.
The following tables contain all the display
messages. To make it easier for you to find
the relevant display message, the display
messages are divided into text messages
(Y page 177) and symbol messages
(Y page 182). Text messages
G
Risk of accident and injury
The operating safety of your vehicle could be compromised if service work is carried out improp-
erly. You could lose control of the vehicle and cause an accident. Safety systems may also not
be able to protect you or others as intended.
Always have maintenance work carried out at a qualified specialist workshop. The workshop must
have the necessary specialist knowledge and tools to carry out the work required. Mercedes-
Benz recommends that you use a Mercedes-Benz Service Centre for this purpose. In particular,
work relevant to safety or on safety-related systems must be carried out at a qualified specialist
workshop.
Vehicles with a multi-function steering wheel (4 buttons): the text messages are listed
in the left-hand column under "Display messages".
Vehicles with a luxury multi-function steering wheel* (12 buttons):the text messages are
listed in the right-hand column under "Display messages". Display messages
177Practical advice
* optional
X204_AKB; 1; 5, en-GB
wobuchh,
Version: 2.11.4 2008-10-15T13:20:56+02:00 - Seite 177 ZDateiname: 6515_0671_02_buchblock.pdf; preflight