2008 MERCEDES-BENZ GLK SUV remove seats
[x] Cancel search: remove seatsPage 65 of 261
g
To remove the key
1 Power supply for some consumers, such
as the windscreen wipers
2 Ignition (power supply for all consumers)
and drive position
3 To start the engine
i Even if the key is not for the vehicle in
question, it will still turn in the ignition lock.
The ignition is not switched on. The engine
cannot be started. Seats
Points to remember
For information about folding the rear bench
seat forwards, see the "Luggage compart-
ment enlargement" section (Y page 132).
Depending on the vehicle's equipment, the
seats can adjusted either manually/electri-
cally or electrically*. G
Risk of injury
The seats can still be adjusted when there is
no key in the ignition lock. For this reason,
children should never be left unsupervised in
the vehicle. They could become trapped when
adjusting a seat. G
Risk of accident
Only adjust the driver's seat when the vehicle
is stationary. You will otherwise be distracted
from the road and traffic conditions and you
could lose control of the vehicle as a result of
the seat moving. This could cause an acci-
dent. G
Risk of injury
Make sure that nobody can become trapped
when you adjust the seat.
Observe the notes concerning the airbag sys-
tem.
Secure children as recommended; see "Chil-
dren in the vehicle" section. G
Risk of injury
Make sure that the central area of the head
restraint supports the back of your head at
about eye level. You could seriously injure
your neck if your head is not correctly sup-
ported by the head restraint in the event of an
accident. Never travel without a correctly
adjusted and engaged head restraint.
! When you move the seats, make sure that
there are no objects in the footwell or
behind the seats. Otherwise, you could
damage the seats and the objects.
i The head restraints in the front seats are
fitted with the NECK-PRO system
(Y page 40). For this reason, it is not pos-
sible to remove the head restraints from
the front seats.
The rear-compartment head restraints can
be removed (Y page 64).
Please contact a Mercedes-Benz Service
Centre for more information. Adjusting the seats manually and
electrically
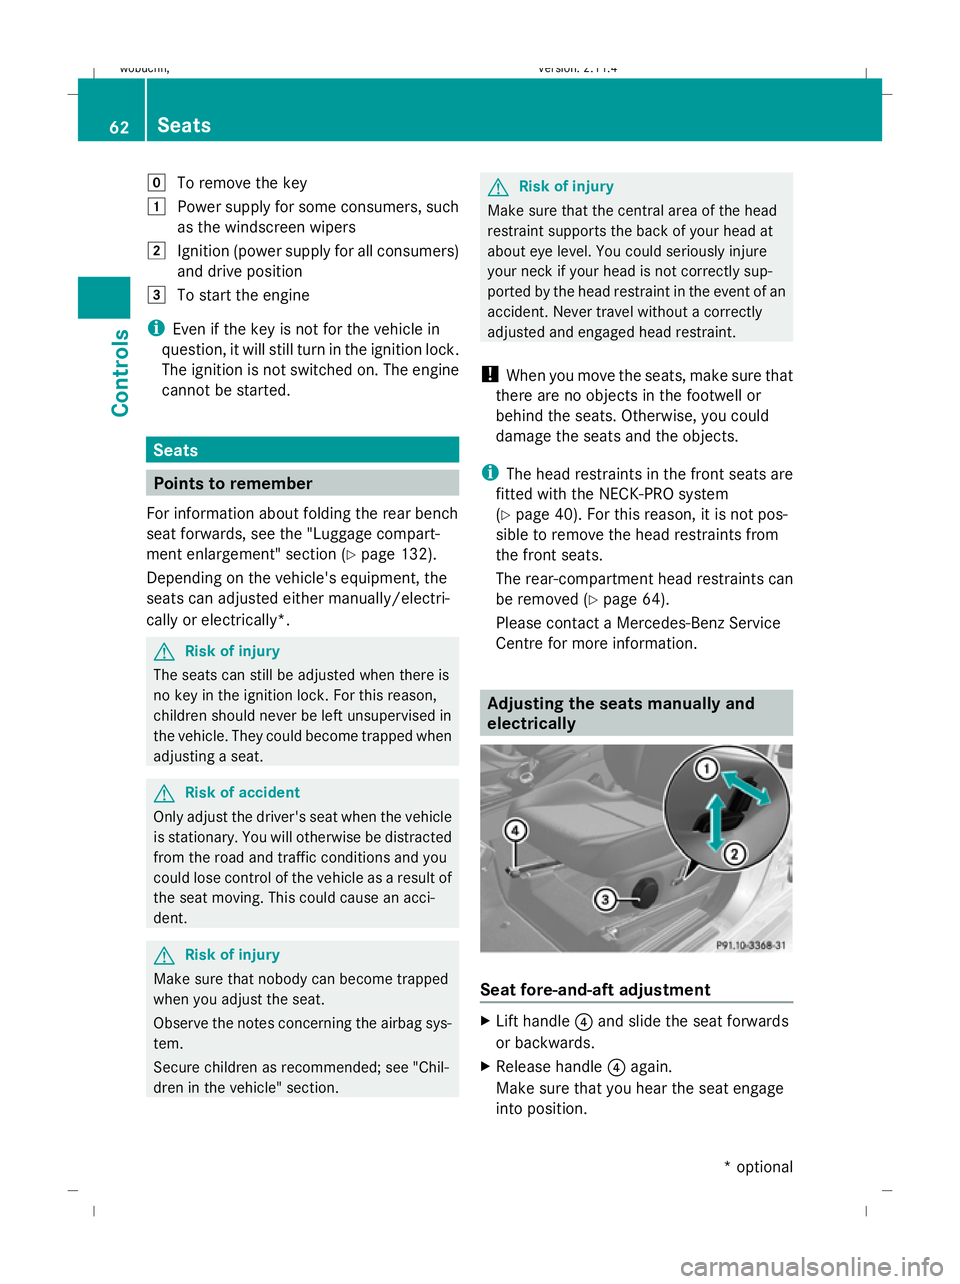
Seat fore-and-aft adjustment
X
Lift handle ?and slide the seat forwards
or backwards.
X Release handle ?again.
Make sure that you hear the seat engage
into position. 62 SeatsControls
* optional
X204_AKB; 1; 5, en-GB
wobuchh,
Version: 2.11.4 2008-10-15T13:20:56+02:00 - Seite 62Dateiname: 6515_0671_02_buchblock.pdf; preflight
Page 67 of 261
Seat height
X
Slide the button up or down in the direction
of arrow =.
Seat cushion angle Adjust the angle so that your thighs are gently
supported.
X Slide the button up or down in the direction
of arrow ;.
Head restraint height X
Slide the button up or down in the direction
of arrow :.
Head restraint angle X
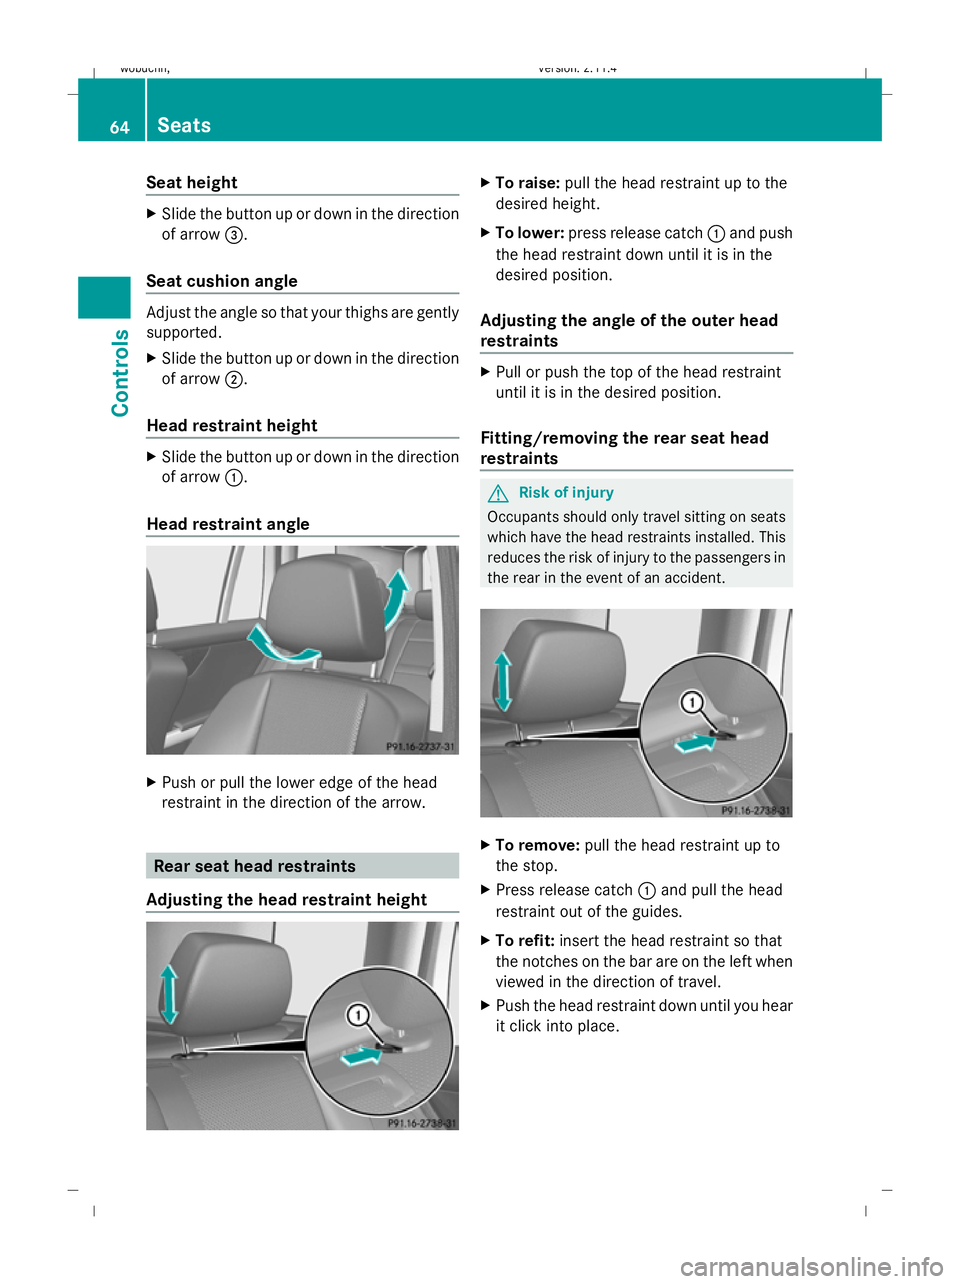
Push or pull the lower edge of the head
restraint in the direction of the arrow. Rear seat head restraints
Adjusting the head restraint height X
To raise: pull the head restraint up to the
desired height.
X To lower: press release catch :and push
the head restraint down until it is in the
desired position.
Adjusting the angle of the outer head
restraints X
Pull or push the top of the head restraint
until it is in the desired position.
Fitting/removing the rear seat head
restraints G
Risk of injury
Occupants should only travel sitting on seats
which have the head restraints installed. This
reduces the risk of injury to the passengers in
the rear in the event of an accident. X
To remove: pull the head restraint up to
the stop.
X Press release catch :and pull the head
restraint out of the guides.
X To refit: insert the head restraint so that
the notches on the bar are on the left when
viewed in the direction of travel.
X Push the head restraint down until you hear
it click into place. 64 SeatsControls
X204_AKB; 1; 5, en-GB
wobuchh,
Version: 2.11.4 2008-10-15T13:20:56+02:00 - Seite 64Dateiname: 6515_0671_02_buchblock.pdf; preflight
Page 133 of 261
are not designed to secure heavy items of
luggage.
You or other vehicle occupants could be
injured by objects being thrown around if you:
R brake sharply
R change direction suddenly
R are involved in an accident
Sharp-edged and fragile objects must not be
placed in the luggage net.
Do not place hard objects in the map pockets.
Objects must not protrude from the map
pockets.
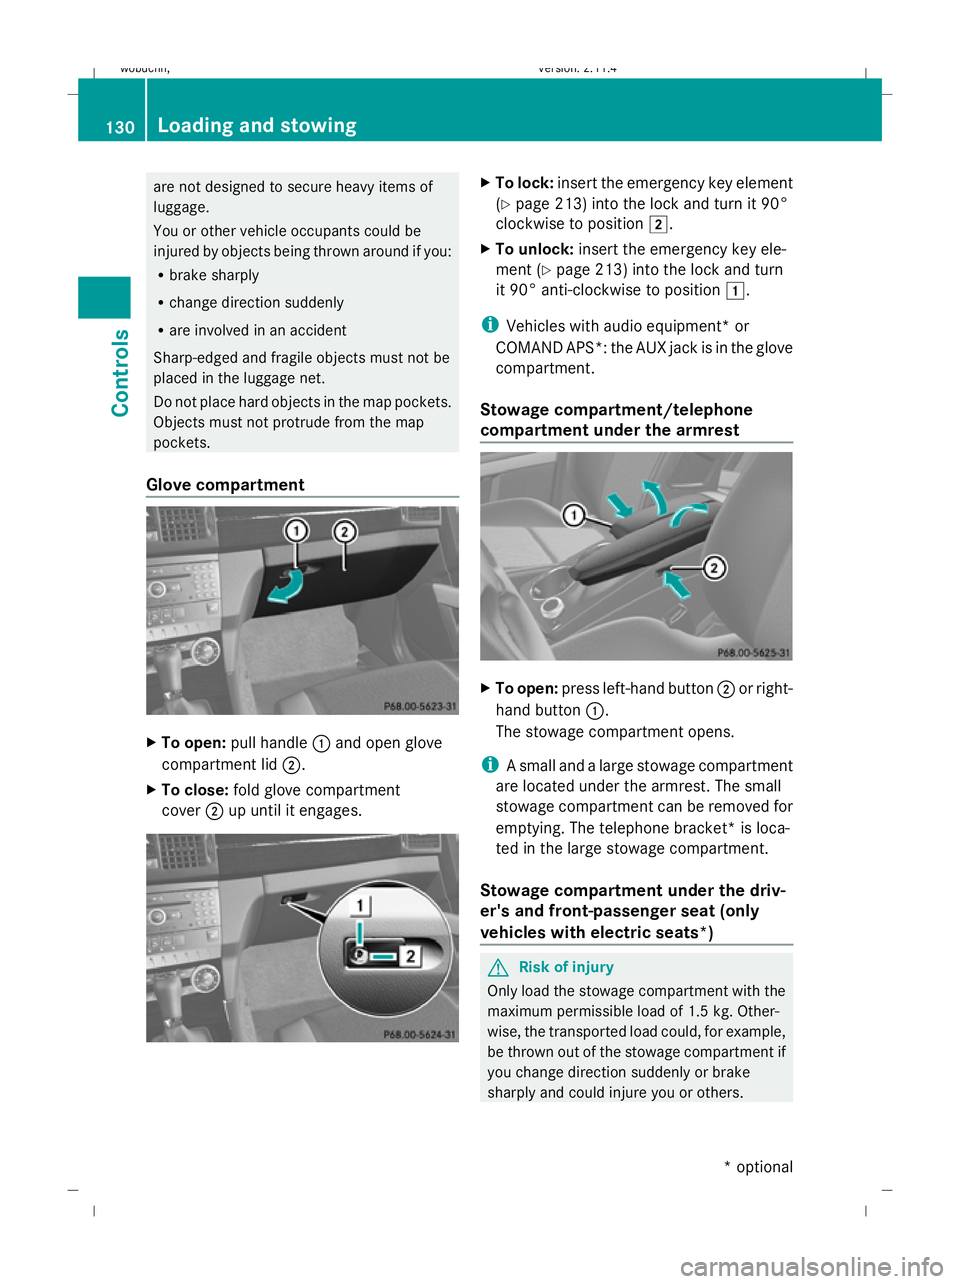
Glove compartment X
To open: pull handle :and open glove
compartment lid ;.
X To close: fold glove compartment
cover ;up until it engages. X
To lock: insert the emergency key element
(Y page 213) into the lock and turn it 90°
clockwise to position 2.
X To unlock: insert the emergency key ele-
ment (Y page 213) into the lock and turn
it 90° anti-clockwise to position 1.
i Vehicles with audio equipment *or
COMAND APS*: the AUX jack is in the glove
compartment.
Stowage compartment/telephone
compartment under the armrest X
To open: press left-hand button ;or right-
hand button :.
The stowage compartment opens.
i A small and a large stowage compartment
are located under the armrest. The small
stowage compartment can be removed for
emptying. The telephone bracket* is loca-
ted in the large stowage compartment.
Stowage compartment under the driv-
er's and front-passenger seat (only
vehicles with electric seats*) G
Risk of injury
Only load the stowage compartment with the
maximum permissible load of 1.5 kg. Other-
wise, the transported load could, for example,
be thrown out of the stowage compartment if
you change direction suddenly or brake
sharply and could injure you or others. 130 Loading and stowingControls
* optional
X204_AKB; 1; 5, en-GB
wobuchh,
Version: 2.11.4 2008-10-15T13:20:56+02:00 - Seite 130Dateiname: 6515_0671_02_buchblock.pdf; preflight
Page 138 of 261
lar
: and the lashing eyelets *in the foot-
well of the rear seat (Y page 133) are
required for tightening the net.
You can only use the safety net in position
1 if there are lashing eyelets *in the foot-
well of the rear seat.
R Position 2 behind the rear seat: the
retainers behind C-pillar ;and the lashing
eyelets in the luggage compartment are
required for tightening the net
(Y page 133).
Preparing the safety net The safety net is located in the loading tray in
the stowage well under the luggage compart-
ment floor (Y
page 136).
X Open both Velcro fasteners and remove the
safety net.
X Unroll and unfold the safety net.
The upper and lower guide rods must
engage audibly.
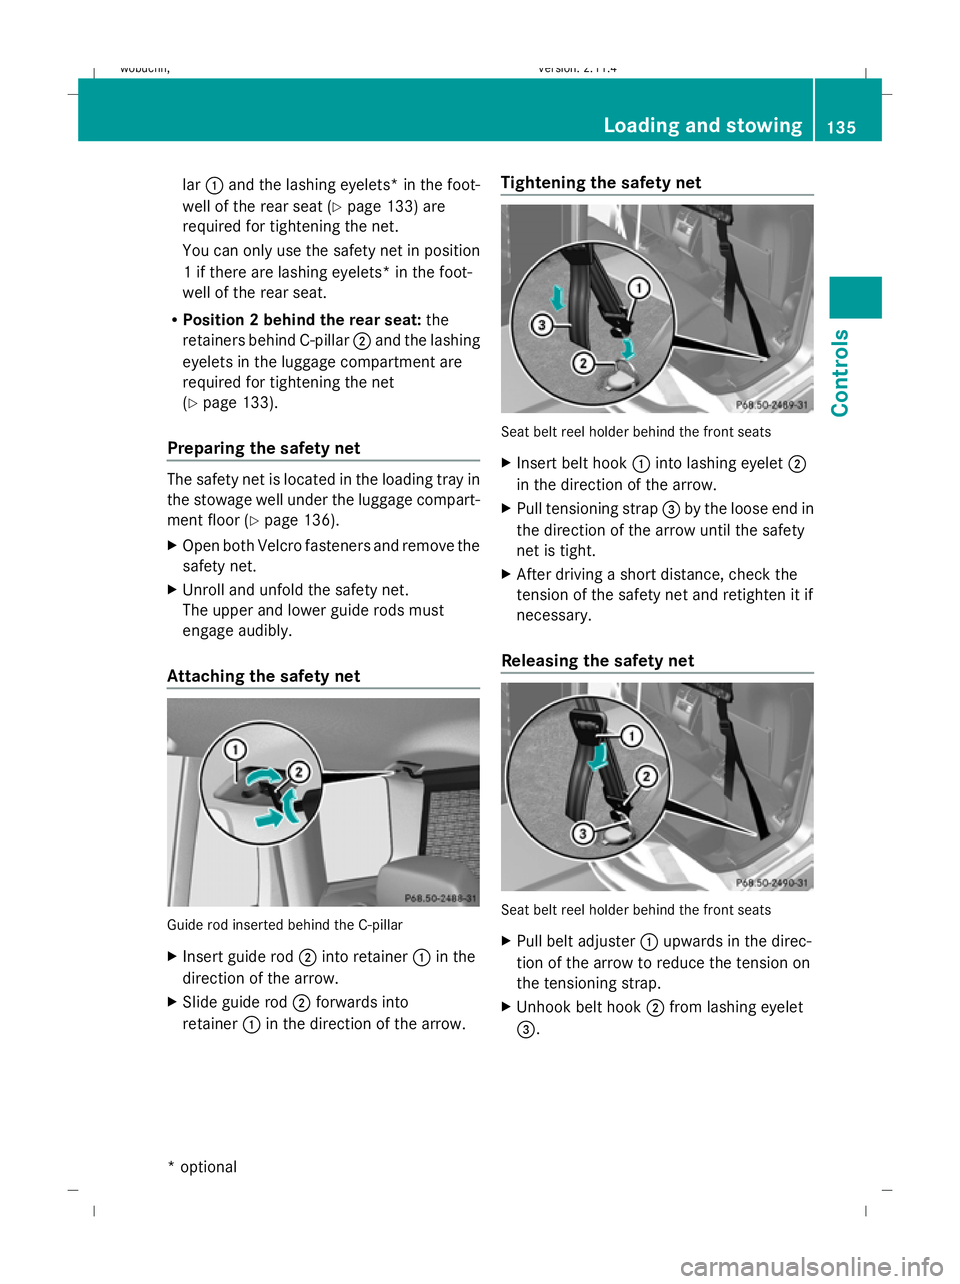
Attaching the safety net Guide rod inserted behind the C-pillar
X
Insert guide rod ;into retainer :in the
direction of the arrow.
X Slide guide rod ;forwards into
retainer :in the direction of the arrow. Tightening the safety net Seat belt reel holder behind the front seats
X
Insert belt hook :into lashing eyelet ;
in the direction of the arrow.
X Pull tensioning strap =by the loose end in
the direction of the arrow until the safety
net is tight.
X After driving a short distance, check the
tension of the safety net and retighten it if
necessary.
Releasing the safety net Seat belt reel holder behind the front seats
X
Pull belt adjuster :upwards in the direc-
tion of the arrow to reduce the tension on
the tensioning strap.
X Unhook belt hook ;from lashing eyelet
=. Loading and stowing
135Controls
* optional
X204_AKB; 1; 5, en-GB
wobuchh,
Version: 2.11.4 2008-10-15T13:20:56+02:00 - Seite 135 ZDateiname: 6515_0671_02_buchblock.pdf; preflight
Page 209 of 261
Problem
Possible causes/consequences and
X XSolutions The NECK-PRO head
restraints on the driv-
er's and the front-pas-
senger's seats have
been triggered. Your vehicle has been involved in a rear-end collision.
X
Reset the NECK-PRO head restraints (Y page 215).Fuel and fuel tank
Problem
Possible causes/consequences and
X XSolutions Fuel is leaking from the
vehicle.
G
Risk of explosion or fire
The fuel line or the fuel tank is defective.
X Turn the key to position 0(Y page 61) in the ignition lock imme-
diately and remove it.
X Do not restart the engine under any circumstances.
X Consult a qualified specialist workshop. The fuel filler flap can-
not be opened. The fuel filler flap is not released.
or
The key batteries are discharged.
X
Unlock the vehicle using the emergency key element
(Y page 213).
X Open the tailgate (Y page 60).
X Manually unlock the fuel filler flap via the emergency release
(Y page 215). The fuel filler flap is released, but the opening mechanism is jam-
med.
X
Release the fuel filler flap by hand (Y page 215).
X Consult a qualified specialist workshop. 206 TroubleshootingPractical advice
X204_AKB; 1; 5, en-GB
wobuchh,
Version: 2.11.4 2008-10-15T13:20:56+02:00 - Seite 206Dateiname: 6515_0671_02_buchblock.pdf; preflight
Page 218 of 261
X
Insert emergency key element ;into
opening in trim :.
X Turn emergency key element ;90° clock-
wise.
X Push emergency key element ;in the
direction of arrow and open the tailgate. Emergency fuel filler flap release
G
Risk of injury
The edges on the inside of the vehicle body
can be sharp. You could injure yourself when
using the fuel filler flap emergency release.
Avoid contact with the edges on the inside of
the vehicle body.
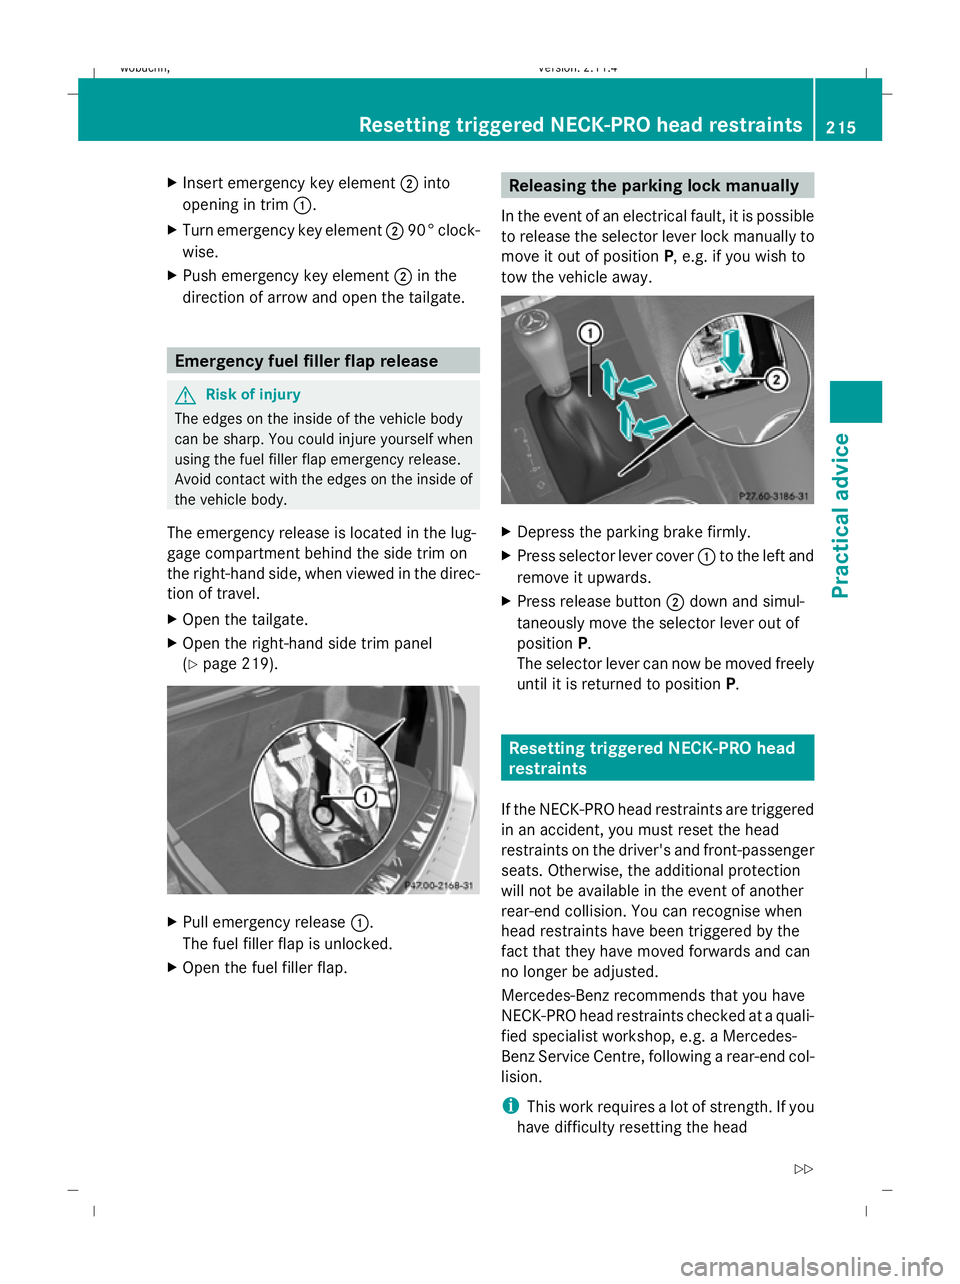
The emergency release is located in the lug-
gage compartment behind the side trim on
the right-hand side, when viewed in the direc-
tion of travel.
X Open the tailgate.
X Open the right-hand side trim panel
(Y page 219). X
Pull emergency release :.
The fuel filler flap is unlocked.
X Open the fuel filler flap. Releasing the parking lock manually
In the event of an electrical fault, it is possible
to release the selector lever lock manually to
move it out of position P, e.g. if you wish to
tow the vehicle away. X
Depress the parking brake firmly.
X Press selector lever cover :to the left and
remove it upwards.
X Press release button ;down and simul-
taneously move the selector lever out of
position P.
The selector lever can now be moved freely
until it is returned to position P. Resetting triggered NECK-PRO head
restraints
If the NECK-PRO head restraints are triggered
in an accident, you must reset the head
restraints on the driver's and front-passenger
seats. Otherwise, the additional protection
will not be available in the event of another
rear-end collision. You can recognise when
head restraints have been triggered by the
fact that they have moved forwards and can
no longer be adjusted.
Mercedes-Benz recommends that you have
NECK-PRO head restraints checked at a quali-
fied specialist workshop, e.g. a Mercedes-
Benz Service Centre, following a rear-end col-
lision.
i This work requires a lot of strength. If you
have difficulty resetting the head Resetting triggered NECK-PRO head restraints
215Practical advice
X204_AKB; 1; 5, en-GB
wobuchh,Version: 2.11.4 2008-10-15T13:20:56+02:00 - Seite 215 ZDateiname: 6515_0671_02_buchblock.pdf; preflight