2008 MERCEDES-BENZ GLK SUV brake light
[x] Cancel search: brake lightPage 112 of 261
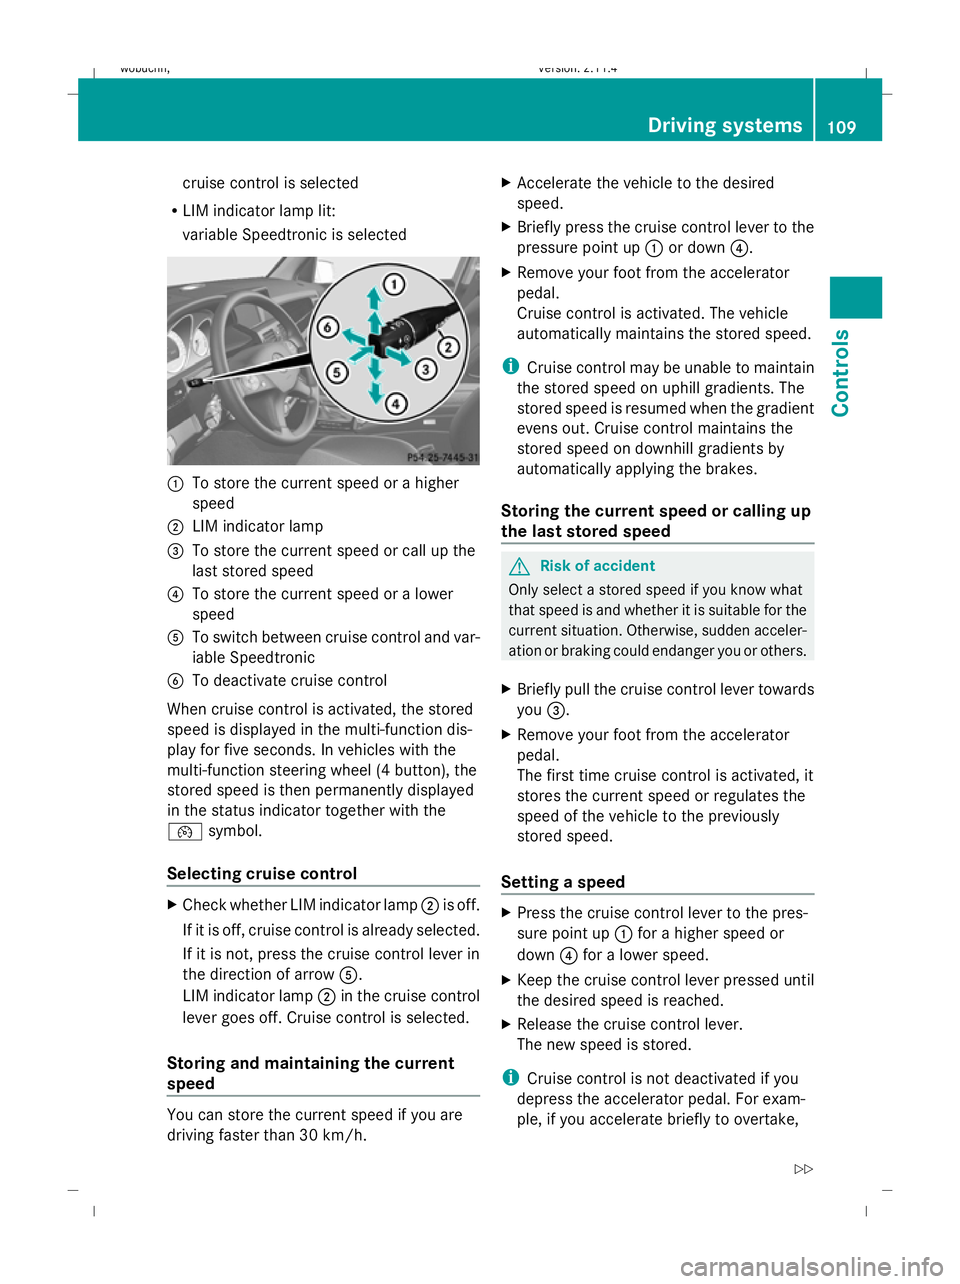
cruise control is selected
R LIM indicator lamp lit:
variable Speedtronic is selected :
To store the current speed or a higher
speed
; LIM indicator lamp
= To store the current speed or call up the
last stored speed
? To store the current speed or a lower
speed
A To switch between cruise control and var-
iable Speedtronic
B To deactivate cruise control
When cruise control is activated, the stored
speed is displayed in the multi-function dis-
play for five seconds. In vehicles with the
multi-function steering wheel (4 button), the
stored speed is then permanently displayed
in the status indicator together with the
¯ symbol.
Selecting cruise control X
Check whether LIM indicator lamp ;is off.
If it is off, cruise control is already selected.
If it is not, press the cruise control lever in
the direction of arrow A.
LIM indicator lamp ;in the cruise control
lever goes off. Cruise control is selected.
Storing and maintaining the current
speed You can store the current speed if you are
driving faster than 30 km/h. X
Accelerate the vehicle to the desired
speed.
X Briefly press the cruise control lever to the
pressure point up :or down ?.
X Remove your foot from the accelerator
pedal.
Cruise control is activated. The vehicle
automatically maintains the stored speed.
i Cruise control may be unable to maintain
the stored speed on uphill gradients. The
stored speed is resumed when the gradient
evens out. Cruise control maintains the
stored speed on downhill gradients by
automatically applying the brakes.
Storing the current speed or calling up
the last stored speed G
Risk of accident
Only select a stored speed if you know what
that speed is and whether it is suitable for the
current situation. Otherwise, sudden acceler-
ation or braking could endanger you or others.
X Briefly pull the cruise control lever towards
you =.
X Remove your foot from the accelerator
pedal.
The first time cruise control is activated, it
stores the current speed or regulates the
speed of the vehicle to the previously
stored speed.
Setting a speed X
Press the cruise control lever to the pres-
sure point up :for a higher speed or
down ?for a lower speed.
X Keep the cruise control lever pressed until
the desired speed is reached.
X Release the cruise control lever.
The new speed is stored.
i Cruise control is not deactivated if you
depress the accelerator pedal. For exam-
ple, if you accelerate briefly to overtake, Driving systems
109Controls
X204_AKB; 1; 5, en-GB
wobuchh, Version: 2.11.4 2008-10-15T13:20:56+02:00 - Seite 109 ZDateiname: 6515_0671_02_buchblock.pdf; preflight
Page 113 of 261
cruise control adjusts the vehicle's speed
to the last speed stored after you have fin-
ished overtaking.
i Deceleration of the vehicle by means of
the cruise control lever is assisted by auto-
matic application of the brakes.
On long downhill gradients, the automatic
transmission also shifts down.
Making adjustments in 1 km/hincre-
ments X
Briefly press the cruise control lever to the
pressure point, up :for a higher speed or
down ?for a lower speed.
The last speed stored is increased or
reduced.
Making adjustments in 10 km/hincre-
ments X
Briefly press the cruise control lever
beyond the pressure point up :for a
higher speed or down ?for a lower speed.
The last speed stored is increased or
reduced.
Deactivating cruise control There are several ways to deactivate cruise
control:
X
Briefly press the cruise control lever for-
wards B.
or
X Brake.
or
X Briefly press the cruise control lever in the
direction of arrow A.
Variable Speedtronic is selected. LIM indi-
cator lamp ;in the cruise control lever
lights up.
Cruise control is automatically deactivated if:
R you depress the parking brake
R you drive at less than 30 km/h R
ESP ®
intervenes or you deactivate ESP ®
R you move the selector lever to Nwhile driv-
ing
If cruise control is deactivated, you will hear
a warning tone. You see the Cruise control
off message in the multi-function display for
approximately five seconds.
i The last speed stored is cleared when you
switch off the engine. Speedtronic*
Speedtronic brakes automatically so that you
do not exceed the set speed. On long and
steep downhill gradients, especially if the
vehicle is laden or towing a trailer, you must
select shift range 1,2or3 in good time. By
doing so, you will make use of the braking
effect of the engine, which relieves the load
on the brake system and prevents the brakes
from overheating and wearing too quickly. If
you need additional braking, depress the
brake pedal repeatedly rather than continu-
ously. G
Risk of accident
Never depress the brake pedal continuously
while the vehicle is in motion, e.g. never cause
the brakes to rub by applying constant slight
pedal pressure. This causes the brake system
to overheat, increases the braking distance
and can lead to the brakes failing completely. G
Risk of accident
Do not change down for additional engine
braking on a slippery road surface. This could
cause the drive wheels to lose their grip and
the vehicle could skid. 110 Driving systemsControls
* optional
X204_AKB; 1; 5, en-GB
wobuchh,
Version: 2.11.4 2008-10-15T13:20:56+02:00 - Seite 110Dateiname: 6515_0671_02_buchblock.pdf; preflight
Page 116 of 261
Setting permanent Speedtronic
X
Press =or; to highlight the Set-
tings menu and select with a.
X Press :or9 to highlight the Vehi-
cle submenu and select with a.
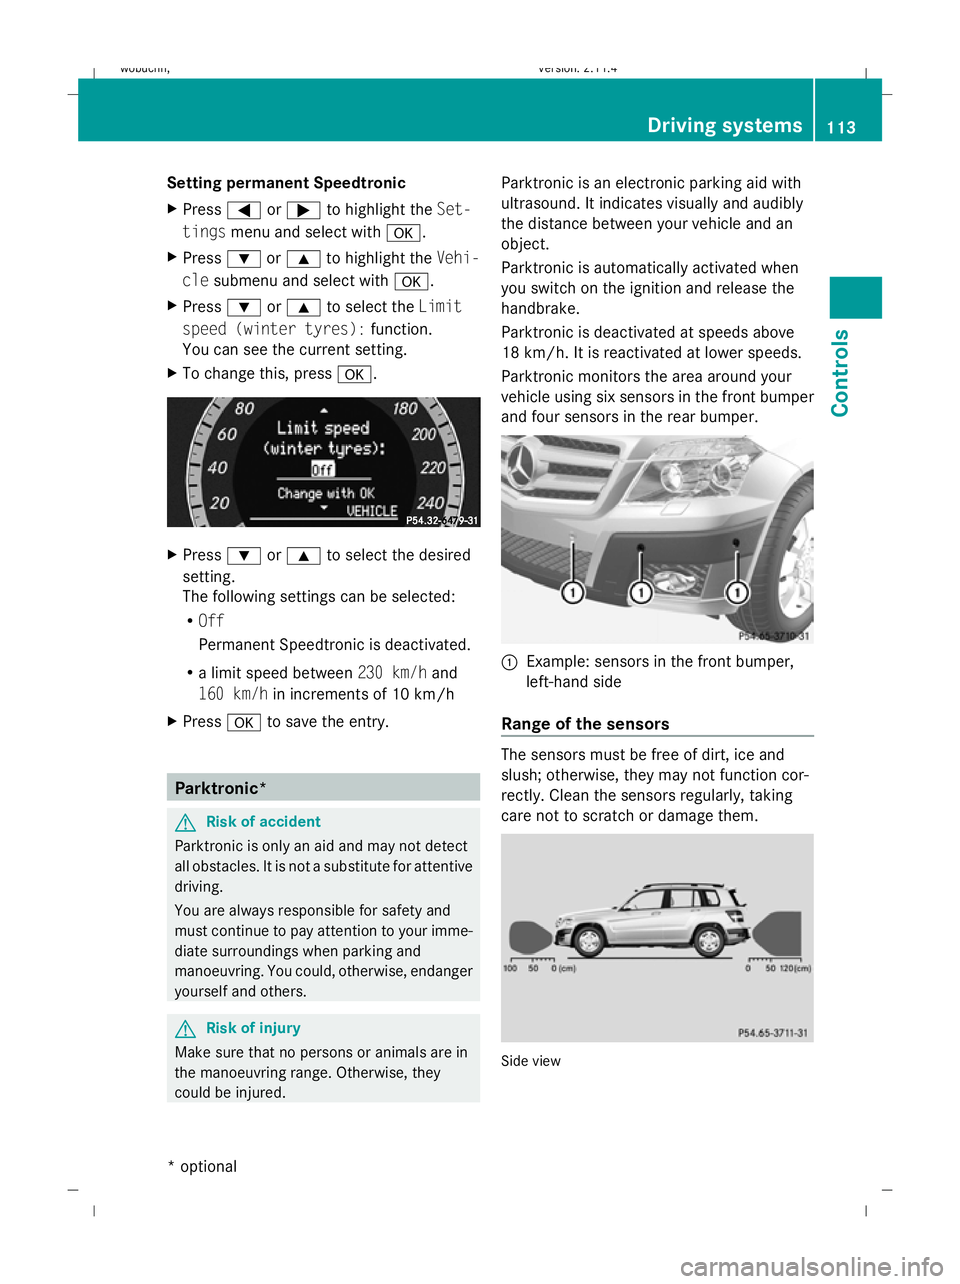
X Press :or9 to select the Limit
speed (winter tyres): function.
You can see the current setting.
X To change this, press a. X
Press :or9 to select the desired
setting.
The following settings can be selected:
R Off
Permanent Speedtronic is deactivated.
R a limit speed between 230 km/hand
160 km/h in increments of 10 km/h
X Press ato save the entry. Parktronic*
G
Risk of accident
Parktronic is only an aid and may not detect
all obstacles. It is not a substitute for attentive
driving.
You are always responsible for safety and
must continue to pay attention to your imme-
diate surroundings when parking and
manoeuvring. You could, otherwise, endanger
yourself and others. G
Risk of injury
Make sure that no persons or animals are in
the manoeuvring range. Otherwise, they
could be injured. Parktronic is an electronic parking aid with
ultrasound. It indicates visually and audibly
the distance between your vehicle and an
object.
Parktronic is automatically activated when
you switch on the ignition and release the
handbrake.
Parktronic is deactivated at speeds above
18 km/h. It is reactivated at lower speeds.
Parktronic monitors the area around your
vehicle using six sensors in the front bumper
and four sensors in the rear bumper.
:
Example: sensors in the front bumper,
left-hand side
Range of the sensors The sensors must be free of dirt, ice and
slush; otherwise, they may not function cor-
rectly. Clean the sensors regularly, taking
care not to scratch or damage them.
Side view Driving systems
113Controls
* optional
X204_AKB; 1; 5, en-GB
wobuchh,
Version: 2.11.4
2008-10-15T13:20:56+02:00 - Seite 113 ZDateiname: 6515_0671_02_buchblock.pdf; preflight
Page 117 of 261
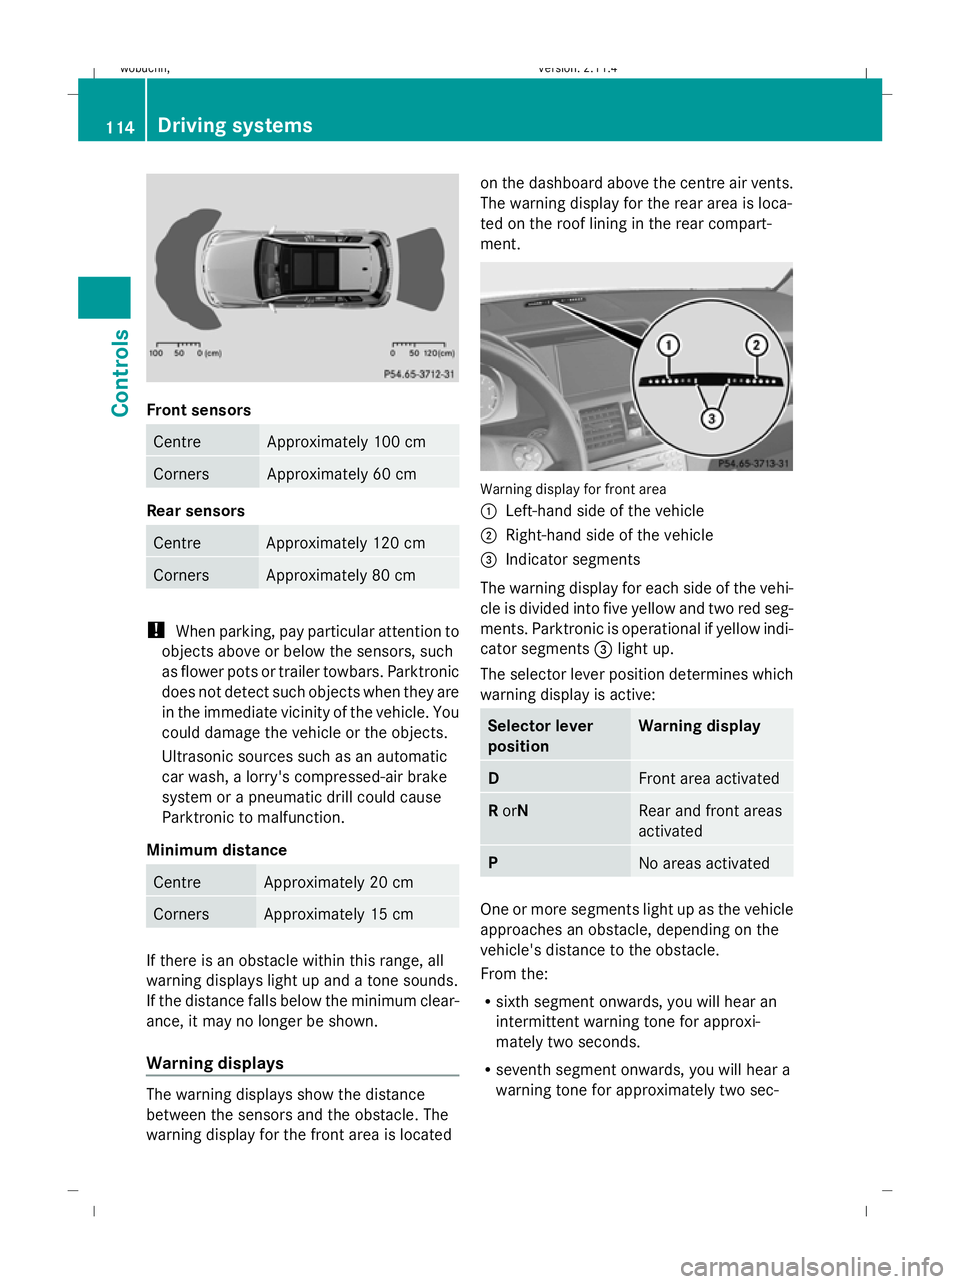
Front sensors
Centre Approximately 100 cm
Corners Approximately 60 cm
Rear sensors
Centre Approximately 120 cm
Corners Approximately 80 cm
!
When parking, pay particular attention to
objects above or below the sensors, such
as flower pots or trailer towbars. Parktronic
does not detect such objects when they are
in the immediate vicinity of the vehicle. You
could damage the vehicle or the objects.
Ultrasonic sources such as an automatic
car wash, a lorry's compressed-air brake
system or a pneumatic drill could cause
Parktronic to malfunction.
Minimum distance Centre Approximately 20 cm
Corners Approximately 15 cm
If there is an obstacle within this range, all
warning displays light up and a tone sounds.
If the distance falls below the minimum clear-
ance, it may no longer be shown.
Warning displays The warning displays show the distance
between the sensors and the obstacle. The
warning display for the front area is located on the dashboard above the centre air vents.
The warning display for the rear area is loca-
ted on the roof lining in the rear compart-
ment.
Warning display for front area
:
Left-hand side of the vehicle
; Right-hand side of the vehicle
= Indicator segments
The warning display for each side of the vehi-
cle is divided into five yellow and two red seg-
ments. Parktronic is operational if yellow indi-
cator segments =light up.
The selector lever position determines which
warning display is active: Selector lever
position Warning display
D
Front area activated
R
orN Rear and front areas
activated
P
No areas activated
One or more segments light up as the vehicle
approaches an obstacle, depending on the
vehicle's distance to the obstacle.
From the:
R
sixth segment onwards, you will hear an
intermittent warning tone for approxi-
mately two seconds.
R seventh segment onwards, you will hear a
warning tone for approximately two sec- 114 Driving systemsControls
X204_AKB; 1; 5, en-GB
wobuchh,
Version: 2.11.4 2008-10-15T13:20:56+02:00 - Seite 114Dateiname: 6515_0671_02_buchblock.pdf; preflight
Page 133 of 261
are not designed to secure heavy items of
luggage.
You or other vehicle occupants could be
injured by objects being thrown around if you:
R brake sharply
R change direction suddenly
R are involved in an accident
Sharp-edged and fragile objects must not be
placed in the luggage net.
Do not place hard objects in the map pockets.
Objects must not protrude from the map
pockets.
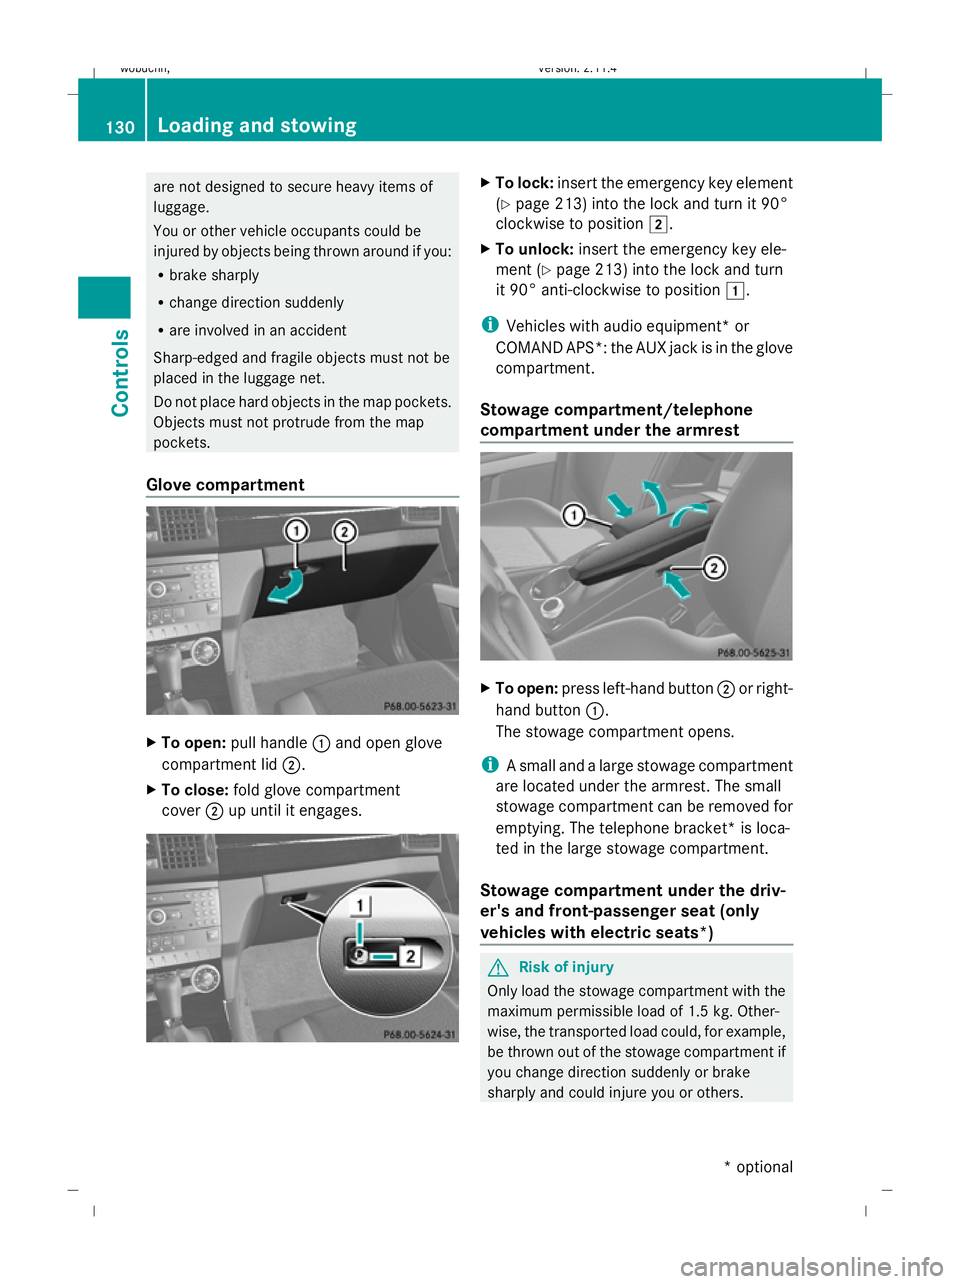
Glove compartment X
To open: pull handle :and open glove
compartment lid ;.
X To close: fold glove compartment
cover ;up until it engages. X
To lock: insert the emergency key element
(Y page 213) into the lock and turn it 90°
clockwise to position 2.
X To unlock: insert the emergency key ele-
ment (Y page 213) into the lock and turn
it 90° anti-clockwise to position 1.
i Vehicles with audio equipment *or
COMAND APS*: the AUX jack is in the glove
compartment.
Stowage compartment/telephone
compartment under the armrest X
To open: press left-hand button ;or right-
hand button :.
The stowage compartment opens.
i A small and a large stowage compartment
are located under the armrest. The small
stowage compartment can be removed for
emptying. The telephone bracket* is loca-
ted in the large stowage compartment.
Stowage compartment under the driv-
er's and front-passenger seat (only
vehicles with electric seats*) G
Risk of injury
Only load the stowage compartment with the
maximum permissible load of 1.5 kg. Other-
wise, the transported load could, for example,
be thrown out of the stowage compartment if
you change direction suddenly or brake
sharply and could injure you or others. 130 Loading and stowingControls
* optional
X204_AKB; 1; 5, en-GB
wobuchh,
Version: 2.11.4 2008-10-15T13:20:56+02:00 - Seite 130Dateiname: 6515_0671_02_buchblock.pdf; preflight
Page 134 of 261
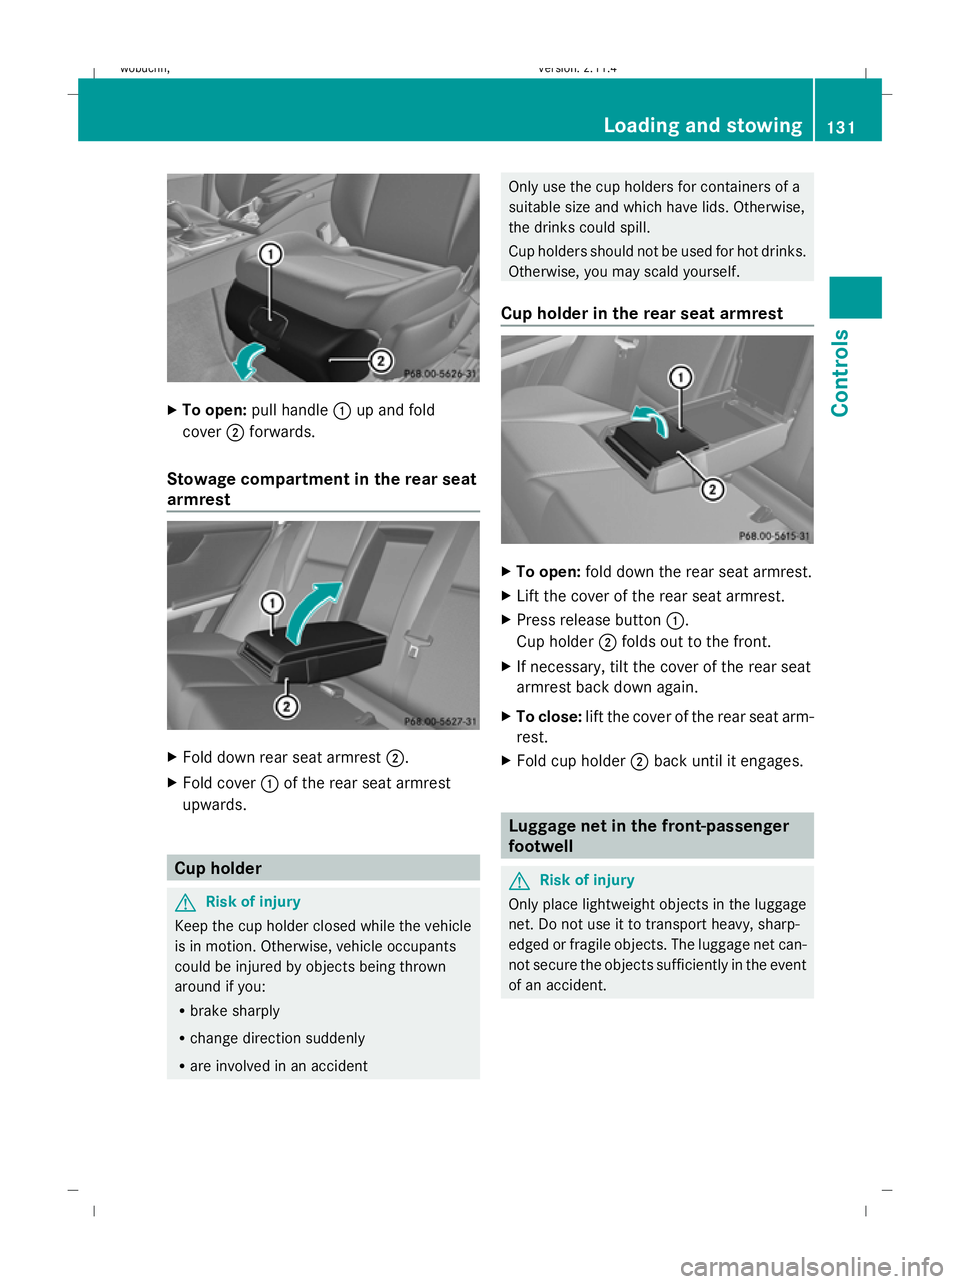
X
To open: pull handle :up and fold
cover ;forwards.
Stowage compartment in the rear seat
armrest X
Fold down rear seat armrest ;.
X Fold cover :of the rear seat armrest
upwards. Cup holder
G
Risk of injury
Keep the cup holder closed while the vehicle
is in motion. Otherwise, vehicle occupants
could be injured by objects being thrown
around if you:
R brake sharply
R change direction suddenly
R are involved in an accident Only use the cup holders for containers of a
suitable size and which have lids. Otherwise,
the drinks could spill.
Cup holders should not be used for hot drinks.
Otherwise, you may scald yourself.
Cup holder in the rear seat armrest X
To open: fold down the rear seat armrest.
X Lift the cover of the rear seat armrest.
X Press release button :.
Cup holder ;folds out to the front.
X If necessary, tilt the cover of the rear seat
armrest back down again.
X To close: lift the cover of the rear seat arm-
rest.
X Fold cup holder ;back until it engages. Luggage net in the front-passenger
footwell
G
Risk of injury
Only place lightweight objects in the luggage
net. Do not use it to transport heavy, sharp-
edged or fragile objects. The luggage net can-
not secure the objects sufficiently in the event
of an accident. Loading and stowing
131Controls
X204_AKB; 1; 5, en-GB
wobuchh,V ersion: 2.11.4
2008-10-15T13:20:56+02:00 - Seite 131 ZDateiname: 6515_0671_02_buchblock.pdf; preflight
Page 136 of 261
thrown forwards through the vehicle interior
from the luggage compartment.
X Adjust the head restraints if necessary
(Y page 64).
X If necessary, move the driver's or front-
passenger seat back. Securing a load
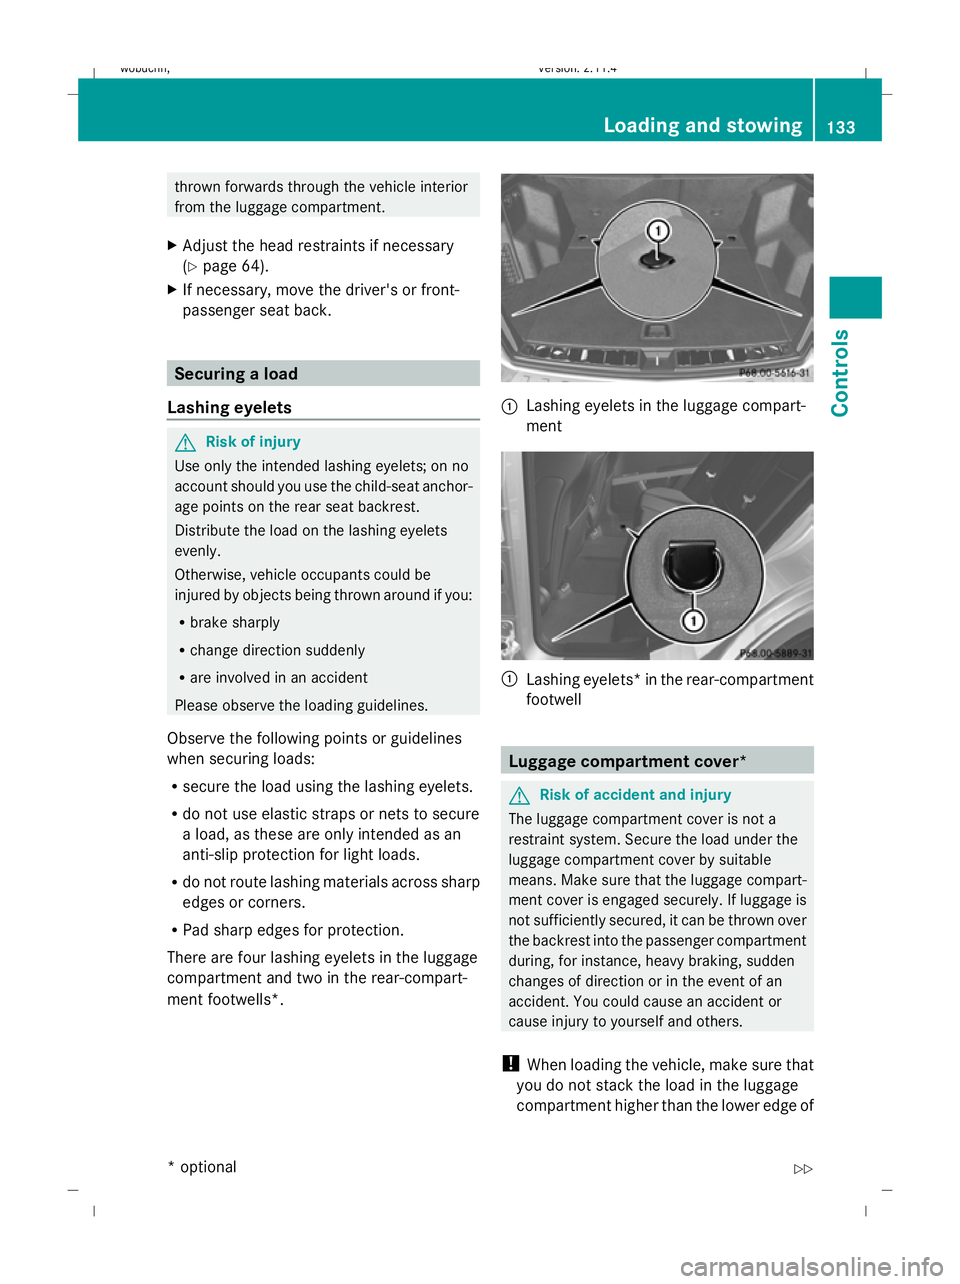
Lashing eyelets G
Risk of injury
Use only the intended lashing eyelets; on no
account should you use the child-seat anchor-
age points on the rear seat backrest.
Distribute the load on the lashing eyelets
evenly.
Otherwise, vehicle occupants could be
injured by objects being thrown around if you:
R brake sharply
R change direction suddenly
R are involved in an accident
Please observe the loading guidelines.
Observe the following points or guidelines
when securing loads:
R secure the load using the lashing eyelets.
R do not use elastic straps or nets to secure
a load, as these are only intended as an
anti-slip protection for light loads.
R do not route lashing materials across sharp
edges or corners.
R Pad sharp edges for protection.
There are four lashing eyelets in the luggage
compartment and two in the rear-compart-
ment footwells*. :
Lashing eyelets in the luggage compart-
ment :
Lashing eyelets *in the rear-compartment
footwell Luggage compartment cover*
G
Risk of accident and injury
The luggage compartment cover is not a
restraint system. Secure the load under the
luggage compartment cover by suitable
means. Make sure that the luggage compart-
ment cover is engaged securely. If luggage is
not sufficiently secured, it can be thrown over
the backrest into the passenger compartment
during, for instance, heavy braking, sudden
changes of direction or in the event of an
accident. You could cause an accident or
cause injury to yourself and others.
! When loading the vehicle, make sure that
you do not stack the load in the luggage
compartment higher than the lower edge of Loading and stowing
133Controls
* optional
X204_AKB; 1; 5, en-GB
wobuchh
,V ersion: 2.11.4
2008-10-15T13:20:56+02:00 - Seite 133 ZDateiname: 6515_0671_02_buchblock.pdf; preflight
Page 137 of 261
the side windows. Do not place heavy
objects on top of the luggage compartment
cover.
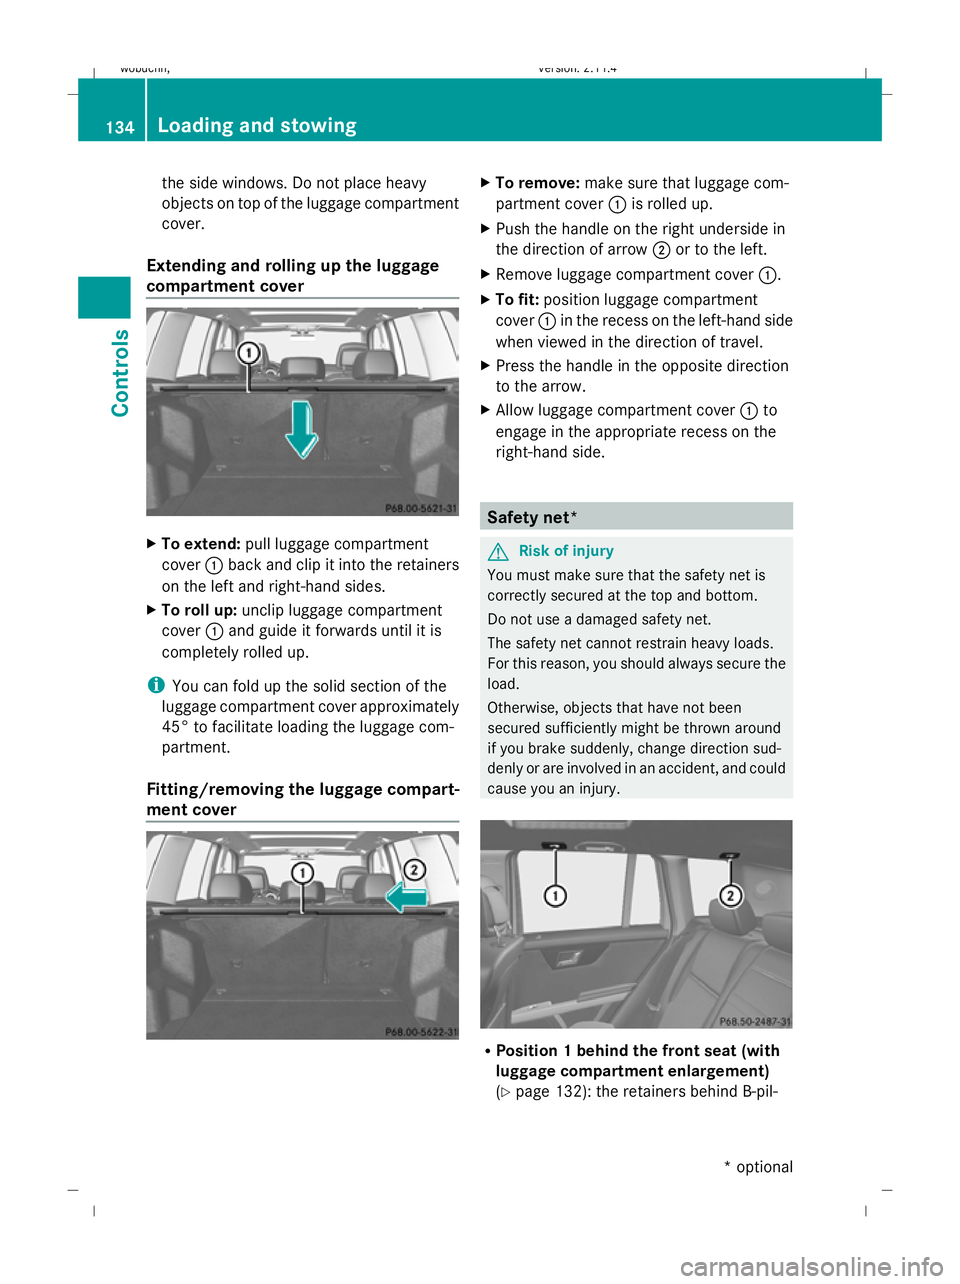
Extending and rolling up the luggage
compartment cover X
To extend: pull luggage compartment
cover :back and clip it into the retainers
on the left and right-hand sides.
X To roll up: unclip luggage compartment
cover :and guide it forwards until it is
completely rolled up.
i You can fold up the solid section of the
luggage compartment cover approximately
45° to facilitate loading the luggage com-
partment.
Fitting/removing the luggage compart-
ment cover X
To remove: make sure that luggage com-
partment cover :is rolled up.
X Push the handle on the right underside in
the direction of arrow ;or to the left.
X Remove luggage compartment cover :.
X To fit: position luggage compartment
cover :in the recess on the left-hand side
when viewed in the direction of travel.
X Press the handle in the opposite direction
to the arrow.
X Allow luggage compartment cover :to
engage in the appropriate recess on the
right-hand side. Safety net*
G
Risk of injury
You must make sure that the safety net is
correctly secured at the top and bottom.
Do not use a damaged safety net.
The safety net cannot restrain heavy loads.
For this reason, you should always secure the
load.
Otherwise, objects that have not been
secured sufficiently might be thrown around
if you brake suddenly, change direction sud-
denly or are involved in an accident, and could
cause you an injury. R
Position 1 behind the front seat (with
luggage compartment enlargement)
(Y page 132): the retainers behind B-pil- 134 Loading and sto
wingControls
* optional
X204_AKB; 1; 5, en-GB
wobuchh,
Version: 2.11.4 2008-10-15T13:20:56+02:00 - Seite 134Dateiname: 6515_0671_02_buchblock.pdf; preflight