2008 MERCEDES-BENZ GLK SUV reset
[x] Cancel search: resetPage 108 of 261
submenu is only reset if the vehicle is sta-
tionary.
X Press the =or; button to select the
Settings menu.
X Press the :or9 button to select the
Factory setting submenu.
X Press the abutton to confirm.
The Reset all settings? message is
shown.
X Press the :or9 button to select
Yes orNo.
X Press the abutton to confirm the selec-
tion.
If you have selected Yes, the multi-function
display shows a confirmation message. Off-road driving
Overview of off-road driving systems
The systems which are relevant for off-road
driving are explained on the following pages:
R 4MATIC (permanent four-wheel drive), for
optimum traction
R DSR (Downhill Speed Regulation)* (vehi-
cles with Off-Road Pro engineering pack-
age*), which assists you when driving
downhill
R Off-road driving program* (vehicles with
Off-road Pro engineering package*), which
assists you when driving off-road
You will find further information about driving
off-road in the "Operation" section
(Y page 158). 4MATIC* (permanent four-wheel
drive)
4MATIC ensures that all four wheels are per-
manently driven. Together with ESP ®
and
ETS, it improves the traction of your vehicle
whenever a drive wheel spins due to insuffi-
cient grip. G
Risk of accident
4MATIC cannot reduce the risk of an accident
if you drive too fast.
If a drive wheel spins due to insufficient grip:
R only depress the accelerator pedal as far as
necessary when pulling away.
R accelerate less when driving.
R adapt your driving style to suit road and
traffic conditions.
i In wintry driving conditions, the maximum
effect of 4MATIC can only be achieved if
you use winter tyres (M+S tyres), with snow
chains if necessary.
! When testing the parking brake, operate
the vehicle only briefly (for a maximum of
ten seconds) on a brake test dynamometer.
When doing this, turn the key to position
0 or 1in the ignition. Failure to do this can
cause damage to the drive train or the
brake system.
! A function or performance test should
only be carried out on a twin-axle dyna-
mometer. If you wish to operate the vehicle
on such a dynamometer, please consult a
Mercedes-Benz Service Centre in advance.
You could otherwise damage the drive train
or the brake system. DSR (Downhill Speed Regulation)*
(vehicles with the off-road engineer-
ing package*)
You will find information about driving off-
road in the "Operation" section
(Y page 158).
DSR is an aid to assist you when driving down-
hill. It keeps the speed of travel at the speed
selected on the on-board computer. The
steeper the downhill gradient, the greater the
DSR braking effect on the vehicle. When driv-
ing on flat stretches of road or on an uphill Off-road driving
105Controls
* optional
X204_AKB; 1; 5, en-GB
wobuchh,
Version: 2.11.4 2008-10-15T13:20:56+02:00 - Seite 105 ZDateiname: 6515_0671_02_buchblock.pdf; preflight
Page 132 of 261
ing process is started in the corresponding
direction. You can stop automatic opera-
tion by pressing again.
Resetting the panorama sliding sunroof
and the roller sunblinds Reset the panorama sliding sunroof and the
roller sunblinds if the panorama sliding sun-
roof or the roller sunblinds do not open
smoothly.
X Turn the key to position 1or 2in the ignition
lock.
X Pull the switch to the point of resistance in
the direction of arrow ;until the roller
sunblinds are fully closed.
X Keep the switch pulled for an additional
second.
X Press the switch to the point of resistance
in the direction of arrow :and hold it until
the roller sunblinds are fully open.
X Press the switch to the point of resistance
in the direction of arrow :and hold it until
the panorama sliding sunroof has opened
about 10 cm.
X Pull the switch repeatedly to the point of
resistance in the direction of arrow ;until
the panorama sliding sunroof is fully
closed.
X Keep the switch pulled for an additional
second.
X Check whether the panorama sliding sun-
roof can be opened fully again
(Y page 127).
X If this is not the case, consult a qualified
specialist workshop. Loading and stowing
Loading guidelines
The handling characteristics of a laden vehi-
cle depend on the distribution of the load
within the vehicle. You should therefore load
your vehicle as shown in the illustrations. Observe the following notes when transport-
ing a load:
R
when transporting a load, never exceed the
maximum permissible gross vehicle weight
or the permissible axle loads for the vehicle
(including occupants).
R position heavy loads as far forwards and as
low down in the luggage compartment as
possible.
R the load must not protrude above the upper
edge of the backrests.
R always place the load against the front or
rear seat backrests.
R always place the load behind unoccupied
seats if possible.
R secure the load with sufficiently strong and
wear-resistant load restraints. Pad sharp
edges for protection. Stowage compartments
G
Risk of injury
The stowage compartments must be closed
when items are stored in them. Luggage nets Loading and stowing
129Controls
X204_AKB; 1; 5, en-GB
wobuchh, Version: 2.11.4 2008-10-15T13:20:56+02:00 - Seite 129 ZDateiname: 6515_0671_02_buchblock.pdf; preflight
Page 176 of 261
Where will I find...?...........................174
Display messages ............................. 176
Troubleshooting ................................ 199
Locking/unlocking in an emer-
gency ................................................. 213
Resetting triggered NECK-PRO
head restraints .................................. 215
Changing the batteries .....................216
Changing bulbs ................................. 217
Replacing the wiper blades ..............220
Flat tyre ............................................. 222
Battery ............................................... 232
Jump-starting .................................... 234
Towing and tow-starting ..................236
Fuses .................................................. 238
173
Practical advice
X204_AKB; 1; 5, en-GB
wobuchh, Version: 2.11.4
2008-10-15T13:20:56+02:00 - Seite 173 Dateiname: 6515_0671_02_buchblock.pdf; preflight
Page 209 of 261
Problem
Possible causes/consequences and
X XSolutions The NECK-PRO head
restraints on the driv-
er's and the front-pas-
senger's seats have
been triggered. Your vehicle has been involved in a rear-end collision.
X
Reset the NECK-PRO head restraints (Y page 215).Fuel and fuel tank
Problem
Possible causes/consequences and
X XSolutions Fuel is leaking from the
vehicle.
G
Risk of explosion or fire
The fuel line or the fuel tank is defective.
X Turn the key to position 0(Y page 61) in the ignition lock imme-
diately and remove it.
X Do not restart the engine under any circumstances.
X Consult a qualified specialist workshop. The fuel filler flap can-
not be opened. The fuel filler flap is not released.
or
The key batteries are discharged.
X
Unlock the vehicle using the emergency key element
(Y page 213).
X Open the tailgate (Y page 60).
X Manually unlock the fuel filler flap via the emergency release
(Y page 215). The fuel filler flap is released, but the opening mechanism is jam-
med.
X
Release the fuel filler flap by hand (Y page 215).
X Consult a qualified specialist workshop. 206 TroubleshootingPractical advice
X204_AKB; 1; 5, en-GB
wobuchh,
Version: 2.11.4 2008-10-15T13:20:56+02:00 - Seite 206Dateiname: 6515_0671_02_buchblock.pdf; preflight
Page 218 of 261
X
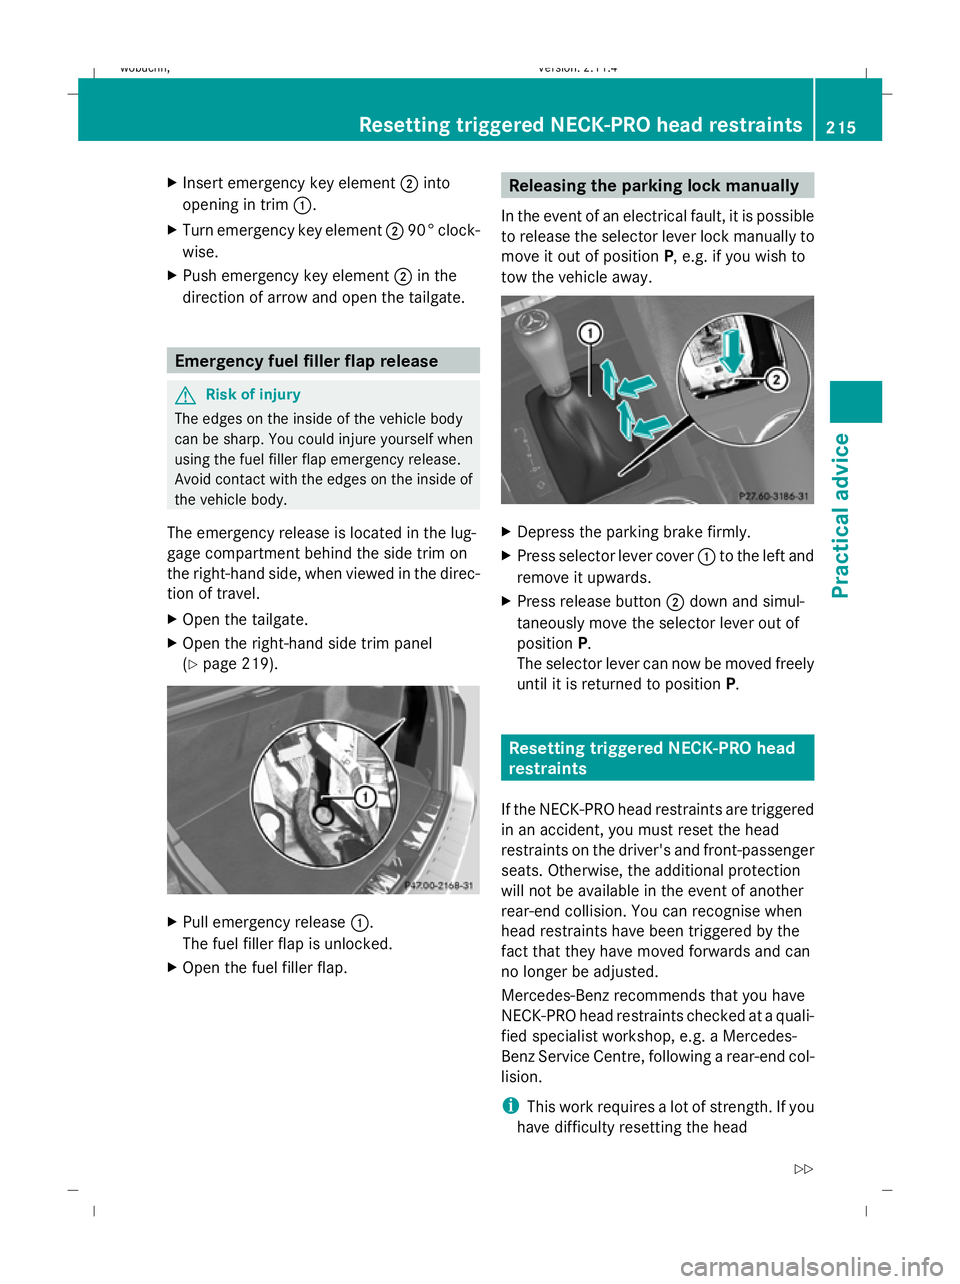
Insert emergency key element ;into
opening in trim :.
X Turn emergency key element ;90° clock-
wise.
X Push emergency key element ;in the
direction of arrow and open the tailgate. Emergency fuel filler flap release
G
Risk of injury
The edges on the inside of the vehicle body
can be sharp. You could injure yourself when
using the fuel filler flap emergency release.
Avoid contact with the edges on the inside of
the vehicle body.
The emergency release is located in the lug-
gage compartment behind the side trim on
the right-hand side, when viewed in the direc-
tion of travel.
X Open the tailgate.
X Open the right-hand side trim panel
(Y page 219). X
Pull emergency release :.
The fuel filler flap is unlocked.
X Open the fuel filler flap. Releasing the parking lock manually
In the event of an electrical fault, it is possible
to release the selector lever lock manually to
move it out of position P, e.g. if you wish to
tow the vehicle away. X
Depress the parking brake firmly.
X Press selector lever cover :to the left and
remove it upwards.
X Press release button ;down and simul-
taneously move the selector lever out of
position P.
The selector lever can now be moved freely
until it is returned to position P. Resetting triggered NECK-PRO head
restraints
If the NECK-PRO head restraints are triggered
in an accident, you must reset the head
restraints on the driver's and front-passenger
seats. Otherwise, the additional protection
will not be available in the event of another
rear-end collision. You can recognise when
head restraints have been triggered by the
fact that they have moved forwards and can
no longer be adjusted.
Mercedes-Benz recommends that you have
NECK-PRO head restraints checked at a quali-
fied specialist workshop, e.g. a Mercedes-
Benz Service Centre, following a rear-end col-
lision.
i This work requires a lot of strength. If you
have difficulty resetting the head Resetting triggered NECK-PRO head restraints
215Practical advice
X204_AKB; 1; 5, en-GB
wobuchh,Version: 2.11.4 2008-10-15T13:20:56+02:00 - Seite 215 ZDateiname: 6515_0671_02_buchblock.pdf; preflight
Page 237 of 261
Charging and fitting the battery
G
Risk of injury
Only charge the battery in a well-ventilated
area. As the battery is being charged, gases
can escape and generate minor explosions.
This may injure you and other persons or
cause damage to the paintwork or acid cor-
rosion on the vehicle.
You can obtain information about battery
chargers which allow the battery to be
charged when still installed from a qualified
specialist workshop, e.g. a Mercedes-Benz
Service Centre. G
Risk of injury
There is a risk of acid burns during the charg-
ing process due to the gases which escape
from the battery. Do not lean over the battery
during the charging process. G
Risk of injury
Battery acid is caustic. Avoid contact with the
skin, eyes or clothing.
! Only charge the installed battery with a
battery charger which has been tested and
approved by Mercedes-Benz. These battery
chargers allow the battery to be charged
while it is still installed. However, the bat-
tery must always be disconnected first.
! Only use battery chargers with a maxi-
mum charging voltage of 14.8 V.
X Charge the battery. Observe the notes in
the operating instructions for your battery
charger.
X Refit the charged battery.
To do this, follow the steps described in
"Removing the battery" (Y page 233) in
reverse order. Reconnecting the battery
! Always reconnect the battery in the
sequence described below. Never swap the
terminal clamps. You may otherwise dam-
age the vehicle electronics.
X Switch off all electrical consumers (e.g.
radio, blower, etc.).
X Connect the positive terminal clamp and
secure the cover.
X Connect the negative terminal clamp.
X Connect the breather hose. Make sure that
a cell cap is fitted on the side of the battery.
X Close the bonnet.
i If the battery power supply has been inter-
rupted (e.g. if it has been reconnected), you
must carry out the following tasks:
R set the time (Y page 102).
R reset the panorama sliding sun-
roof* (Y page 127)
R reset the function for folding the exterior
mirrors in/out automatically* by folding
the mirrors out once (Y page 68). Jump-starting
If your vehicle's battery is discharged, the
engine can be jump-started from another
vehicle or from an external battery using jump
leads.
Observe the following points:
R jump-starting may only be performed when
the engine and catalytic converter are cold.
R do not start the engine if the battery is fro-
zen. Let the battery thaw first.
R jump-starting may only be performed from
batteries with a nominal voltage of 12 V.
R only use jump leads which have a sufficient
cross-section and insulated terminal
clamps. 234 Jump-startingPractical advice
* optional
X204_AKB; 1; 5, en-GB
wobuchh,
Version: 2.11.4 2008-10-15T13:20:56+02:00 - Seite 234Dateiname: 6515_0671_02_buchblock.pdf; preflight