2008 MERCEDES-BENZ E-CLASS ESTATE door lock
[x] Cancel search: door lockPage 303 of 401
Troubleshooting
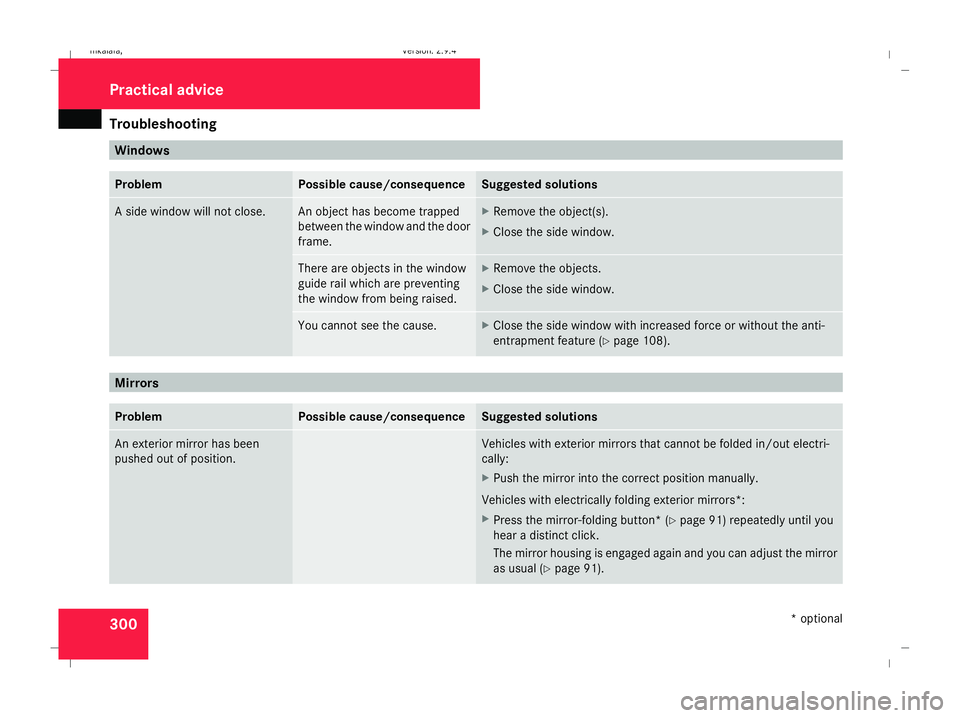
300 Windows
Problem Possible cause/consequence Suggested solutions
A side window will not close. An object has become trapped
between the window and the door
frame. X
Remove the object(s).
X Close the side window. There are objects in the window
guide rail which are preventing
the window from being raised. X
Remove the objects.
X Close the side window. You cannot see the cause. X
Close the side window with increased force or without the anti-
entrapment feature ( Ypage 108). Mirrors
Problem Possible cause/consequence Suggested solutions
An exterior mirror has been
pushed out of position. Vehicles with exterior mirrors that cannot be folded in/out electri-
cally:
X
Push the mirror into the correct position manually.
Vehicles with electrically folding exterior mirrors*:
X Press the mirror-folding button* ( Ypage 91) repeatedly until you
hear a distinct click.
The mirror housing is engaged again and you can adjust the mirror
as usual (Y page 91). Practical advice
* optional
211_AKB; 2; 5, en-GB
mkalafa
,V ersion: 2.9.4
2008-02-29T16:57:07+01:00 - Seite 300 Dateiname: 6515_3416_02_buchblock.pdf; preflight
Page 304 of 401
Troubleshooting
301Key
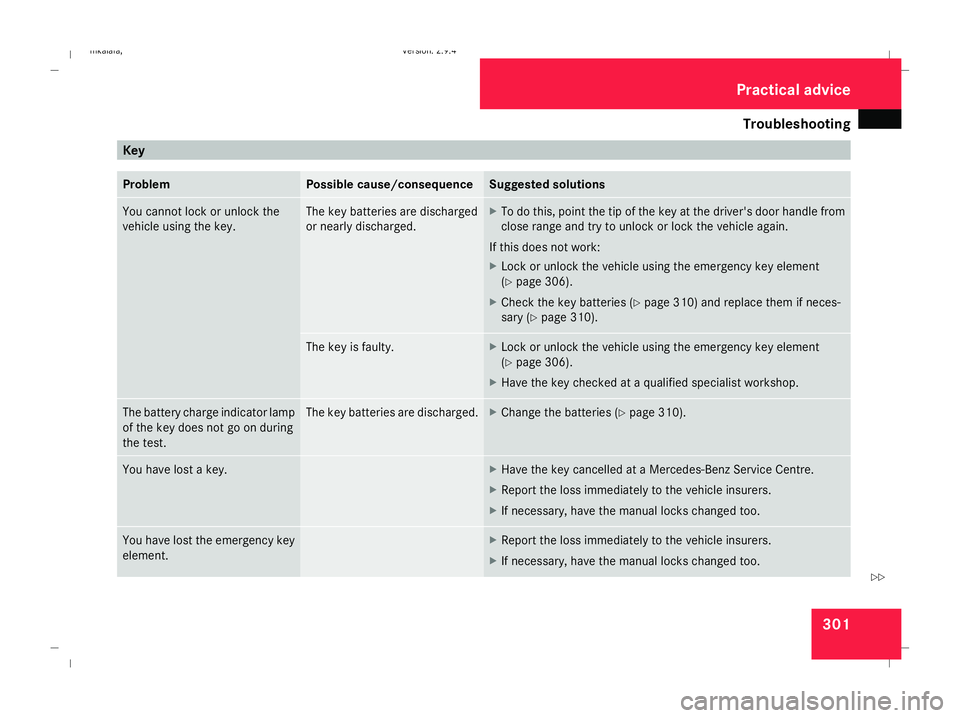
Problem Possible cause/consequence Suggested solutions
You cannot lock or unlock the
vehicle using the key. The key batteries are discharged
or nearly discharged. X
To do this, point the tip of the key at the driver's door handle from
close range and try to unlock or lock the vehicle again.
If this does not work:
X Lock or unlock the vehicle using the emergency key element
(Y page 306).
X Check the key batteries (Y page 310) and replace them if neces-
sary (Y page 310). The key is faulty. X
Lock or unlock the vehicle using the emergency key element
(Y page 306).
X Have the key checked at a qualified specialist workshop. The battery charge indicator lamp
of the key does not go on during
the test. The key batteries are discharged. X
Change the batteries (Y page 310).You have lost a key. X
Have the key cancelled at a Mercedes-Benz Service Centre.
X Report the loss immediately to the vehicle insurers.
X If necessary, have the manual locks changed too. You have lost the emergency key
element. X
Report the loss immediately to the vehicle insurers.
X If necessary, have the manual locks changed too. Practical advice
211_AKB; 2; 5, en-GB
mkalafa
,V ersion: 2.9.4
2008-02-29T16:57:07+01:00 - Seite 301 ZDateiname: 6515_3416_02_buchblock.pdf; preflight
Page 306 of 401
Troubleshooting
303KEYLESS GO*
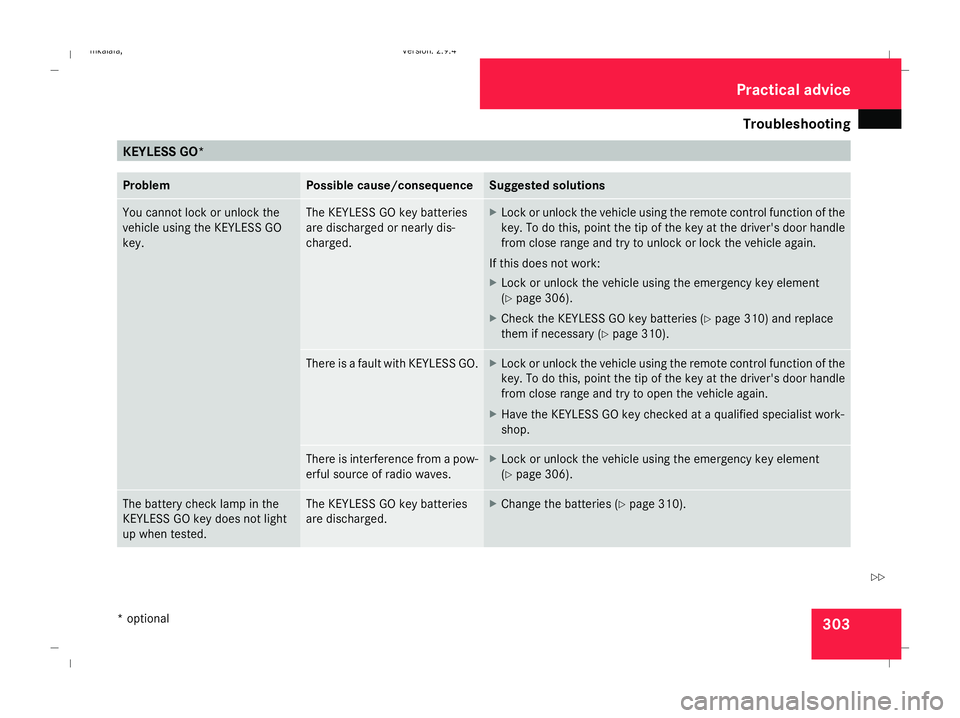
Problem Possible cause/consequence Suggested solutions
You cannot lock or unlock the
vehicle using the KEYLESS GO
key. The KEYLESS GO key batteries
are discharged or nearly dis-
charged. X
Lock or unlock the vehicle using the remote control function of the
key. To do this, point the tip of the key at the driver's door handle
from close range and try to unlock or lock the vehicle again.
If this does not work:
X Lock or unlock the vehicle using the emergency key element
(Y page 306).
X Check the KEYLESS GO key batteries (Y page 310) and replace
them if necessary (Y page 310). There is a fault with KEYLESS GO. X
Lock or unlock the vehicle using the remote control function of the
key. To do this, point the tip of the key at the driver's door handle
from close range and try to open the vehicle again.
X Have the KEYLESS GO key checked at a qualified specialist work-
shop. There is interference from a pow-
erful source of radio waves. X
Lock or unlock the vehicle using the emergency key element
(Y page 306). The battery check lamp in the
KEYLESS GO key does not light
up when tested. The KEYLESS GO key batteries
are discharged. X
Change the batteries (Y page 310). Practical advice
* optional
211_AKB; 2; 5, en-GB
mkalafa
,V ersion: 2.9.4
2008-02-29T16:57:07+01:00 - Seite 303 ZDateiname: 6515_3416_02_buchblock.pdf; preflight
Page 307 of 401
Troubleshooting
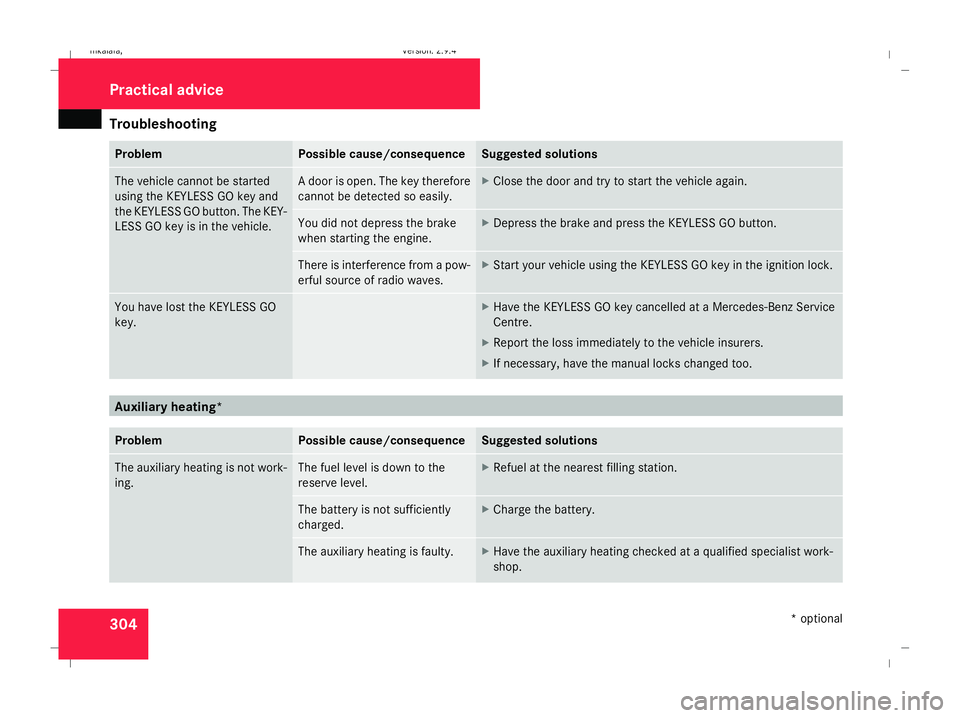
304 Problem Possible cause/consequence Suggested solutions
The vehicle cannot be started
using the KEYLESS GO key and
the KEYLESS GO button. The KEY-
LESS GO key is in the vehicle. A door is open. The key therefore
cannot be detected so easily. X
Close the door and try to start the vehicle again. You did not depress the brake
when starting the engine. X
Depress the brake and press the KEYLESS GO button. There is interference from a pow-
erful source of radio waves. X
Start your vehicle using the KEYLESS GO key in the ignition lock. You have lost the KEYLESS GO
key. X
Have the KEYLESS GO key cancelled at a Mercedes-Benz Service
Centre.
X Report the loss immediately to the vehicle insurers.
X If necessary, have the manual locks changed too. Auxiliary heating*
Problem Possible cause/consequence Suggested solutions
The auxiliary heating is not work-
ing. The fuel level is down to the
reserve level. X
Refuel at the nearest filling station. The battery is not sufficiently
charged. X
Charge the battery. The auxiliary heating is faulty. X
Have the auxiliary heating checked at a qualified specialist work-
shop. Practical advice
* optional
211_AKB; 2; 5, en-GB
mkalafa
,V ersion: 2.9.4
2008-02-29T16:57:07+01:00 - Seite 304 Dateiname: 6515_3416_02_buchblock.pdf; preflight
Page 309 of 401
Locking/unlocking in an emergency
306 Locking/unlocking in an emergency
Emergency key
If the vehicle can no longer be unlocked or
locked with the key or the KEYLESS GO
key*, use the emergency key element.
If you use the emergency key element to
unlock and open the driver's door or the boot
lid (Saloon), the anti-theft alarm system* will
be triggered (Y page 62).
There are several ways to turn off the alarm:
X Press the korj button on the key.
or
X Insert the key into the ignition lock.
or
X Press the KEYLESS GO button* on the
selector lever. The KEYLESS GO key* must
be in the vehicle.
or
X Lock or unlock the vehicle using KEYLESS
GO*. The KEYLESS GO key* must be out-
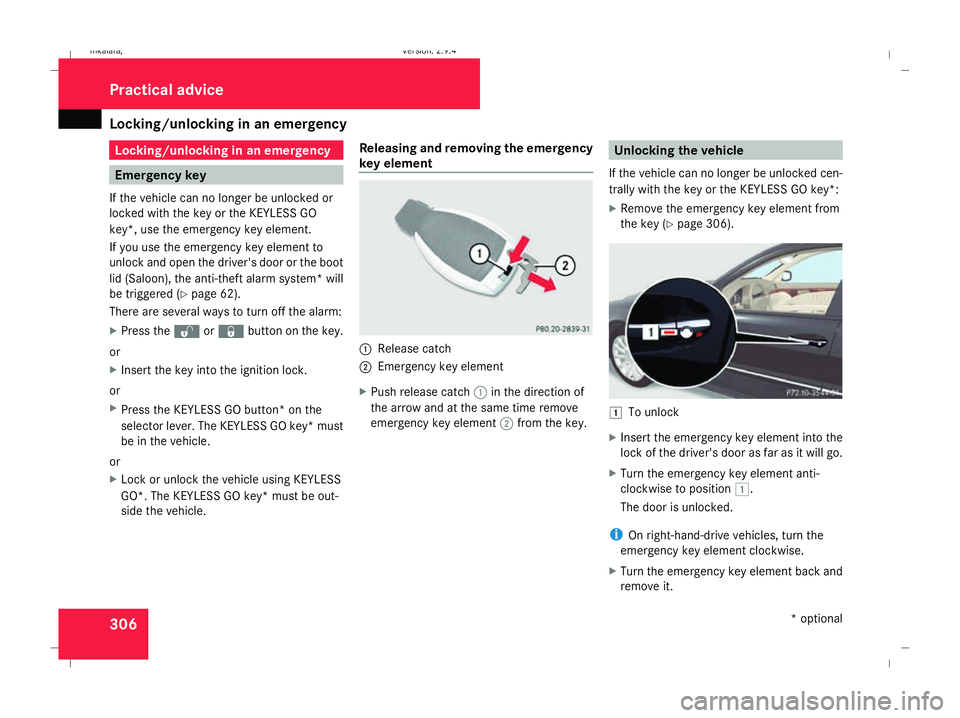
side the vehicle. Releasing and removing the emergency
key element 1
Release catch
2 Emergency key element
X Push release catch 1in the direction of
the arrow and at the same time remove
emergency key element 2from the key. Unlocking the vehicle
If the vehicle can no longer be unlocked cen-
trally with the key or the KEYLESS GO key*:
X Remove the emergency key element from
the key (Y page 306). $
To unlock
X Insert the emergency key element into the
lock of the driver's door as far as it will go.
X Turn the emergency key element anti-
clockwise to position $.
The door is unlocked.
i On right-hand-drive vehicles, turn the
emergency key element clockwise.
X Turn the emergency key element back and
remove it. Practical advice
* optional
211_AKB; 2; 5, en-GB
mkalafa,
Version: 2.9.4 2008-02-29T16:57:07+01:00 - Seite 306Dateiname: 6515_3416_02_buchblock.pdf; preflight
Page 310 of 401
Locking/unlocking in an emergency
307Locking the vehicle
If the vehicle can no longer be locked cen-
trally with the key or the KEYLESS GO key*:
X Open the driver's door.
X Close the front-passenger door, the rear
doors and the boot lid/tailgate.
X Press the locking button (Y page 70).
X Check whether the locking knobs on the
doors are still visible. Press the locking
knobs down manually if necessary.
X Close the driver's door.
X Remove the emergency key element from
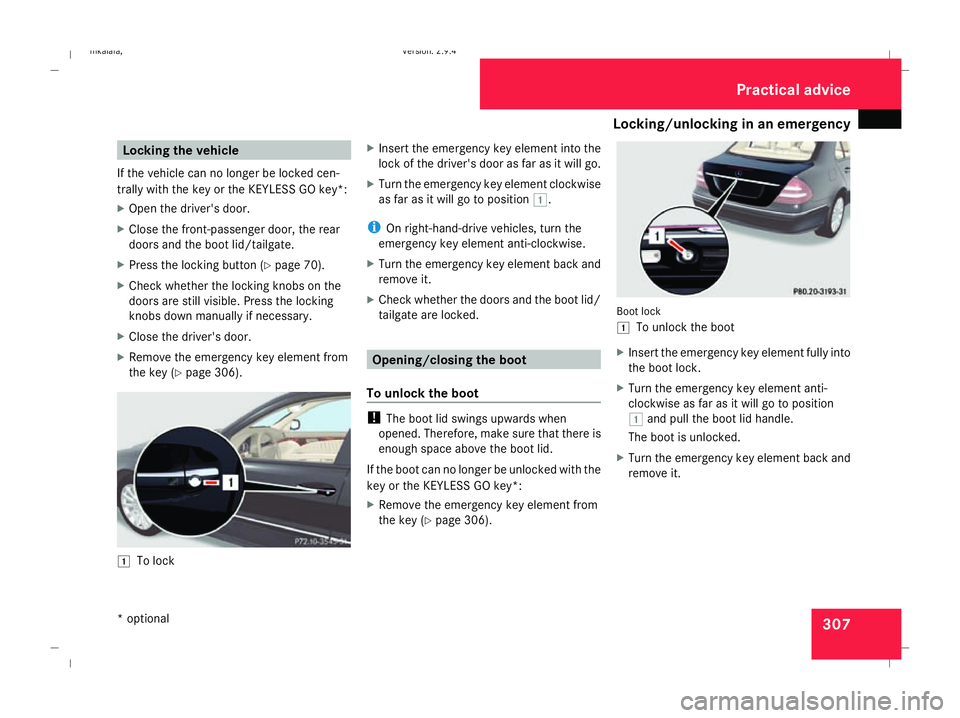
the key (Y page 306). $
To lock X
Insert the emergency key element into the
lock of the driver's door as far as it will go.
X Turn the emergency key element clockwise
as far as it will go to position $.
i On right-hand-drive vehicles, turn the
emergency key element anti-clockwise.
X Turn the emergency key element back and
remove it.
X Check whether the doors and the boot lid/
tailgate are locked. Opening/closing the boot
To unlock the boot !
The boot lid swings upwards when
opened. Therefore, make sure that there is
enough space above the boot lid.
If the boot can no longer be unlocked with the
key or the KEYLESS GO key*:
X Remove the emergency key element from
the key (Y page 306). Boot lock
$
To unlock the boot
X Insert the emergency key element fully into
the boot lock.
X Turn the emergency key element anti-
clockwise as far as it will go to position
$ and pull the boot lid handle.
The boot is unlocked.
X Turn the emergency key element back and
remove it. Practical advice
* optional
211_AKB; 2; 5, en-GB
mkalafa,
Version: 2.9.4 2008-02-29T16:57:07+01:00 - Seite 307 ZDateiname: 6515_3416_02_buchblock.pdf; preflight
Page 321 of 401
Flat tyre
318 Make sure that the jack is placed on a firm,
non-slip, level surface. Do not use wooden
blocks or similar as jacking supports. Oth-
erwise, the jack will not be able to achieve
its load-bearing capacity due to the restric-
ted height.
Do not start the engine at any time while
the wheel is being changed.
Do not lie under the vehicle when it is being
supported by the jack. If you do not raise
the vehicle as described, it could slip off the
jack (e.g. if the engine is started or a door
or the boot lid/tailgate is opened or closed)
and you could sustain serious injuries. Using the TIREFIT kit
You can use the TIREFIT kit to seal small
punctures, particularly those in the tyre tread.
You can use TIREFIT in outdoor temperatures
down to -20 °C. G
Risk of accident
In the following situations, your safety is at
particular risk and TIREFIT is unable to pro-
vide breakdown assistance: R
if there are cuts or punctures in the tyre
greater than 4 mm
R if the wheel rim is damaged
R if you have driven at very low tyre pres-
sures or on a flat tyre
Do not drive any further. Consult a qualified
specialist workshop which has the neces-
sary specialist knowledge and tools to carry
out the work required.
Mercedes-Benz recommends that you use
a Mercedes-Benz Service Centre for this
purpose. In particular, work relevant to
safety or on safety-related systems must be
carried out at a qualified specialist work-
shop.
X Do not remove any foreign objects which
have penetrated the tyre, e.g. screws or
nails.
X Remove TIREFIT, the accompanying "max.
80 km/h "sticker and the electric air pump
from the stowage well underneath the
boot/luggage compartment floor
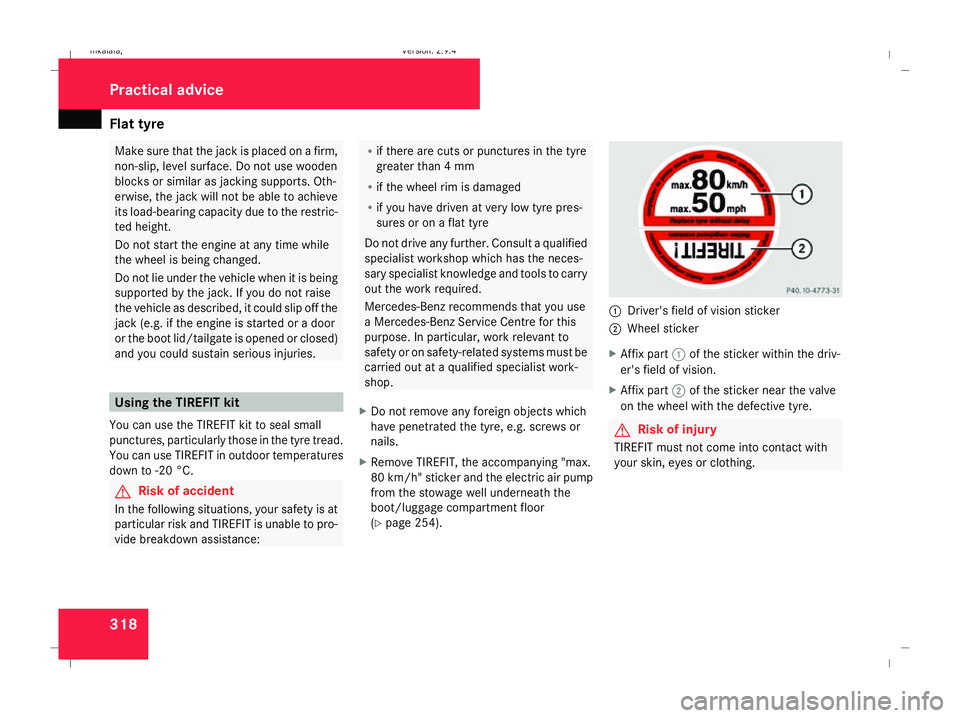
(Y page 254). 1
Driver's field of vision sticker
2 Wheel sticker
X Affix part 1of the sticker within the driv-
er's field of vision.
X Affix part 2of the sticker near the valve
on the wheel with the defective tyre. G
Risk of injury
TIREFIT must not come into contact with
your skin, eyes or clothing. Practical advice
211_AKB; 2; 5, en-GB
mkalafa
, Version: 2.9.4 2008-02-29T16:57:07+01:00 - Seite 318Dateiname: 6515_3416_02_buchblock.pdf; preflight
Page 344 of 401
Fuses
341Main fuse box
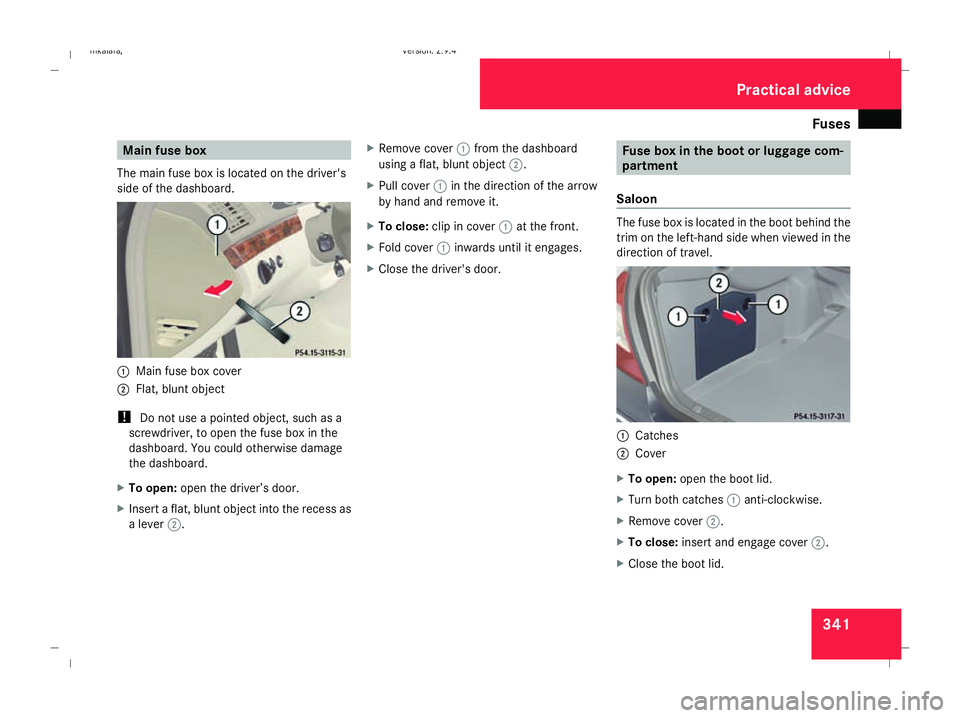
The main fuse box is located on the driver's
side of the dashboard. 1
Main fuse box cover
2 Flat, blunt object
! Do not use a pointed object, such as a
screwdriver, to open the fuse box in the
dashboard. You could otherwise damage
the dashboard.
X To open: open the driver’s door.
X Insert a flat, blunt object into the recess as
a lever 2. X
Remove cover 1from the dashboard
using a flat, blunt object 2.
X Pull cover 1in the direction of the arrow
by hand and remove it.
X To close: clip in cover 1at the front.
X Fold cover 1inwards until it engages.
X Close the driver's door. Fuse box in the boot or luggage com-
partment
Saloon The fuse box is located in the boot behind the
trim on the left-hand side when viewed in the
direction of travel.
1
Catches
2 Cover
X To open: open the boot lid.
X Turn both catches 1anti-clockwise.
X Remove cover 2.
X To close: insert and engage cover 2.
X Close the boot lid. Practical advice
211_AKB; 2; 5, en-GB
mkalafa,
Version: 2.9.4 2008-02-29T16:57:07+01:00 - Seite 341 ZDateiname: 6515_3416_02_buchblock.pdf; preflight