2008 MERCEDES-BENZ E-CLASS ESTATE door lock
[x] Cancel search: door lockPage 142 of 401
On-board computer
139ally activate the easy-entry/exit feature
and become trapped.
X Press the èor· button to select the
Settings... menu.
X Press the jbutton to call up the selec-
tion of submenus.
X Press the æorç button to select the
Convenience submenu.
X Press the jbutton to select the EASY-
ENTRY system.
X Press the æorç button to activate
or deactivate the EASY-ENTRY system.
X Press the j,èorÿ button to
select a different display.
Activating/deactivating the Fold in mir-
rors when locking* function The
Fold in mirrors when locking func-
tion allows you to determine whether the
exterior mirrors should fold in when you lock
the vehicle. When you switch on the ignition,
the exterior mirrors fold out again.
If you have switched the function on and you
fold in the exterior mirrors using the button
on the door (Y page 92), they will not fold out automatically. The exterior mirrors can then
only be folded out using the button on the
door.
X
Press the èor· button to select the
Settings... menu.
X Press the jbutton to call up the selec-
tion of submenus.
X Press the æorç button to select the
Convenience submenu.
X Press the jbutton to select Fold in
mirrors when locking .
X Press the æorç button to activate
or deactivate the Fold in mirrors when
locking feature.
X Press the j,èorÿ button to
select a different display.
Selecting a setting for the dynamic driv-
ing seat* i
For more information on the dynamic driv-
ing seat, see (Y page 84).
X Press the èor· button to select the
Settings... menu.
X Press the jbutton to call up the selec-
tion of submenus. X
Press the æorç button to select the
Driving dynamics seat adjustment
submenu.
X Press the jbutton to select Driving
dyn. seat adjust., driver orDriving
dyn. seat adjust., front-pass..
X Press the æorç button to select the
desired seat setting: Gentlefor a soft seat
setting or Vigorous for a hard seat setting.
X Press the j,èorÿ button to
select a different display. Trip computer menu
You can use the Trip computermenu to call
up or reset statistical data for your vehicle.
i You can select kmormiles as the unit of
measurement for distance (Y page 133).
i Menu overview: see (Y page 124).
Use the buttons on the multi-function steer-
ing wheel.
Consumption statistics from start The values refer to the start of the journey. Controls
* optional
211_AKB; 2; 5, en-GB
mkalafa,
Version: 2.9.4
2008-02-29T16:57:07+01:00 - Seite 139 ZDateiname: 6515_3416_02_buchblock.pdf; preflight
Page 158 of 401
Driving sys
tems 155
Permanent Speedtronic is deactivated.
R A limit speed between 240 km/hand
160 km/h in increments of 10 km/h.
X To select a different display, press the
j, èorÿ button. HOLD
HOLD relieves the strain on the driver:
R when pulling away, especially on steep
slopes
R when manoeuvring on steep slopes
R when waiting in traffic
The vehicle is kept stationary without the
driver having to depress the brake pedal.
The braking effect is cancelled and HOLD
deactivated when you depress the accelera-
tor pedal to pull away.
Activation conditions You can activate HOLD if:
R
the vehicle is stationary
R the engine is running
R the driver's door is closed
R the parking brake is not applied R
the bonnet is closed
R on vehicles with automatic transmission*,
the selector lever is in position D,Ror N
Activating HOLD X
Make sure that the activation conditions
are met.
X Depress the brake.
X Depress the brake again quickly until
HOLD appears in the display.
HOLD is activated. You can release the
brake pedal.
i If depressing the brake pedal the first
time does not activate HOLD, wait briefly
and then try again. G
Risk of accident
The vehicle's brakes are applied when
HOLD is activated. For this reason, deacti-
vate HOLD if the vehicle is to be set in
motion by other means (e.g. in a car wash
or by towing). Deactivating HOLD HOLD is deactivated if:
R
you accelerate. On vehicles with automatic
transmission*, only if the selector lever is
in position Dor R.
R the selector lever is moved to Pon vehicles
with automatic transmission*
R you release the brakes completely and
apply them again with a certain amount of
pressure until the HOLDmessage in the
multi-function display goes out G
Risk of accident
Never get out of the vehicle when HOLD is
activated.
HOLD must never be operated or deactiva-
ted by a passenger or from outside the
vehicle.
HOLD does not replace the parking brake
and must not be used for parking.
The HOLD braking effect is cancelled and
the vehicle can start moving if: Controls
* optional
211_AKB; 2; 5, en-GB
mkalafa
,V ersion: 2.9.4
2008-02-29T16:57:07+01:00 - Seite 155 ZDateiname: 6515_3416_02_buchblock.pdf; preflight
Page 159 of 401
Driving sys
tems 156 R
HOLD is deactivated by depressing the
accelerator pedal or the brake pedal
R there is a malfunction in the system or an
interruption in the power supply, e.g. bat-
tery failure
R the electrical system in the engine com-
partment, the battery or the fuses are
tampered with
R the battery is disconnected G
Risk of accident
If you wish to leave the vehicle or park it,
deactivate HOLD and secure the vehicle
against rolling away.
You will see a warning message in the multi-
function display if HOLD is activated and:
R the driver's door is opened and you release
the seat belt
R the ignition is switched off
R the bonnet is opened
Vehicles with manual transmission:
Brake immediately
X Immediately depress the brake pedal firmly
until the warning message in the multi-
function display goes out. This deactivates
HOLD. Vehicles with automatic transmission*:
Selector lever in park position
X Move the selector lever to Pto prevent the
vehicle from rolling away.
HOLD is deactivated. The warning message
in the multi-function display goes out.
A horn will also sound at regular intervals if
HOLD is activated and you:
R stop the engine and open the driver's door
R open the bonnet
The horn draws your attention to the fact that
the vehicle has been parked while HOLD is
still activated. The sound becomes louder if
you attempt to lock the vehicle. The vehicle
is not locked until HOLD is deactivated.
i If the ignition has been switched off, the
engine cannot be restarted until HOLD is
deactivated.
If there is a fault in the system or power supply
while HOLD is activated, the Brake immedi-
ately message appears in the multi-function
display. Immediately depress the brake firmly
until the warning message disappears from
the multi-function display, or in vehicles with
automatic transmission*, move the selector
lever to P. This deactivates HOLD. AIRMATIC DC*
Vehicle level Your vehicle automatically adjusts its ride
height to reduce petrol consumption and
improve driving safety.
The following vehicle levels are possible:
R
Normal
R Raised
R Lowered
The "Normal" and "Raised" vehicle levels can
be set manually.
The "Lowered" vehicle level is set automati-
cally:
R at speeds above 140 km/h
R if you have selected "Sports tuning I or
II" (Y page 157)
Setting the vehicle level manually
Select the "Normal" setting for normal road
surfaces and "Raised" for driving with snow
chains or on particularly poor road surfaces. G
Risk of injury
Make sure that nobody is in the vicinity of
the wheel housing or under the vehicle Controls
* optional
211_AKB; 2; 5, en-GB
mkalafa
,V ersion: 2.9.4
2008-02-29T16:57:07+01:00 - Seite 156 Dateiname: 6515_3416_02_buchblock.pdf; preflight
Page 179 of 401
Air conditioning
176
X
To deactivate: press the,button.
The indicator lamp in the ,button goes
out.
i Air-recirculation mode switches off auto-
matically:
R after approximately five minutes at out-
side temperatures below approximately
5 †
R after approximately five minutes if the air
dehumidification is deactivated
R after approximately 30 minutes at out-
side temperatures above approximately
5 †
Air-recirculation mode with the conve-
nience opening/closing feature G
Risk of injury
Make sure that nobody can become trap-
ped between the side window and the door
frame as the side windows are opened and
closed. Do not place objects or lean against
the side window when it is being opened or
closed. You or the objects could be drawn
in or become trapped between the side
window and the door frame as the window moves. If there is a risk of entrapment,
press the
,button again. If necessary,
press the switch that stops, opens or closes
the side window in the opposite direction.
Make sure that nobody can become trap-
ped when you open or close the sliding/
tilting sunroof*/panorama sliding sun-
roof*. If there is a risk of entrapment, press
the , button again. If necessary, press
the switch that stops, opens or closes the
sliding/tilting sunroof*/panorama sliding
sunroof* in the opposite direction.
X Convenience closing: press and hold
the , button until the side windows and
the sliding/tilting sunroof*/panorama
sliding sunroof* have closed.
The indicator lamp in the ,button
comes on. Air-recirculation mode is activa-
ted.
X Convenience opening: press and hold
the , button until the side windows and
the sliding/tilting sunroof*/panorama
sliding sunroof* have reached their original
position.
The indicator lamp in the ,button goes
out. Air-recirculation mode is deactivated. i
If you open the side windows or the slid-
ing/tilting sunroof* or panorama sliding
sunroof* manually after closing using the
convenience closing feature, it will remain
in this position when opened using the con-
venience opening feature. Switching the residual heat on and off
It is possible to make use of the residual heat
of the engine to continue heating the station-
ary vehicle for up to 30 minutes after the
engine has been switched off. The heating
time depends on the set interior temperature.
i The blower will run at a low speed regard-
less of the airflow setting.
i If you activate the "residual heat" function
at high temperatures, only the ventilation
will be activated. The blower runs at
medium speed.
X Make sure that the key is in position 0in
the ignition lock or that it has been
removed.
X To switch on: press theTbutton.
REST appears in the display. Cont
rols
* optional
211_AKB; 2; 5, en-GB
mkalafa
,V ersion: 2.9.4
2008-02-29T16:57:07+01:00 - Seite 176 Dateiname: 6515_3416_02_buchblock.pdf; preflight
Page 208 of 401
Loading and stowing
205
Installing the stowage box
X
Fold the two backrests 3forward
(Y page 198).
X Guide stowage box 1into the luggage
compartment through one of the rear doors
with the opening facing towards the front
of the vehicle.
X Press catches 4on stowage box 1into
the gap between backrest 3and the lug-
gage compartment floor.
X Fold backrest 3back (Y page 200).
i Stowage box 1is also held in place from
above by the combined luggage cover and
net.
Loading the stowage box
X Fold backrest 3forward (Y page 198).
X Load stowage box 1through the opening
on the front.
i Stowage box 1in the luggage compart-
ment is closed off by the rear bench seat
and can carry a maximum load of 20 kg.
X Fold backrest 3back (Y page 200). Removing the stowage box
X
Fold double backrest 3forward
(Y page 198).
X Slide stowage box 1with catches 4for-
wards to remove it from the mountings.
X Remove stowage box 1sideways through
a rear door.
X Fold backrest 3back (Y page 200). Stowage compartments
G
Risk of injury
The stowage compartments must be closed
when items are stored in them. Luggage
nets are not designed to secure heavy
items of luggage.
You or other vehicle occupants could be
injured by objects being thrown around if
you:
R brake sharply
R change direction suddenly
R have an accident
Sharp-edged and fragile objects must not
be carried in the luggage net. Do not carry hard objects in the ruffled
pockets. Objects must not protrude over
the top of the ruffled pockets.
i You will find an overview of the stowage
compartments on (Y page 36).
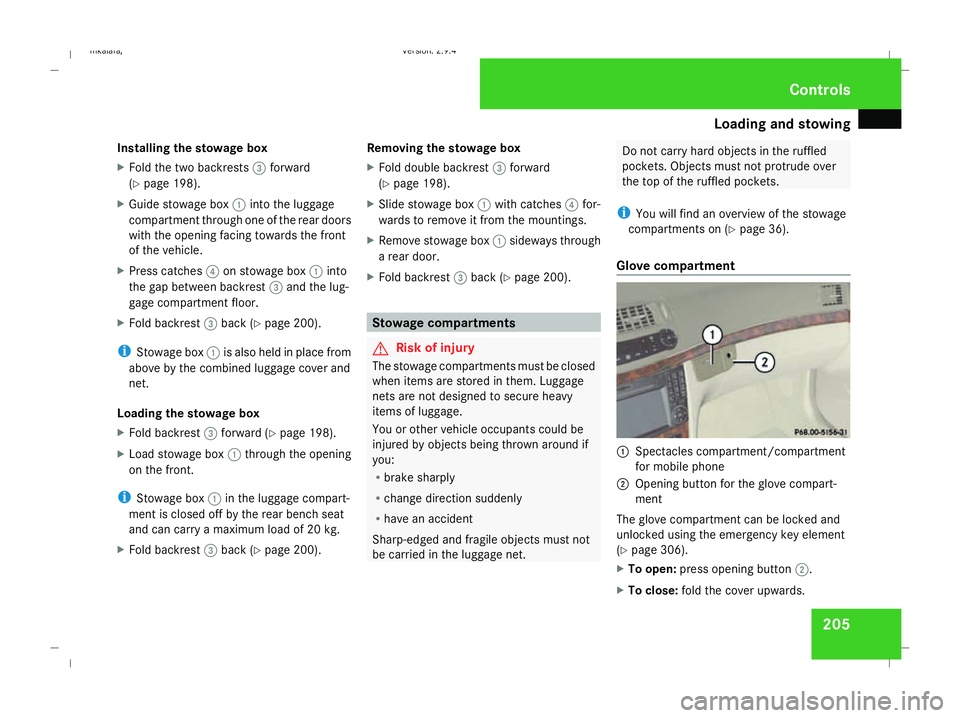
Glove compartment 1
Spectacles compartment/compartment
for mobile phone
2 Opening button for the glove compart-
ment
The glove compartment can be locked and
unlocked using the emergency key element
(Y page 306).
X To open: press opening button 2.
X To close: fold the cover upwards. Controls
211_AKB; 2; 5, en-GB
mkalafa,
Version: 2.9.4 2008-02-29T16:57:07+01:00 - Seite 205 ZDateiname: 6515_3416_02_buchblock.pdf; preflight
Page 212 of 401
Features
209
X
To extend or retract: briefly press button
1.
The rear window blind fully extends or fully
retracts.
X To stop: briefly press button 1again. Ashtray*
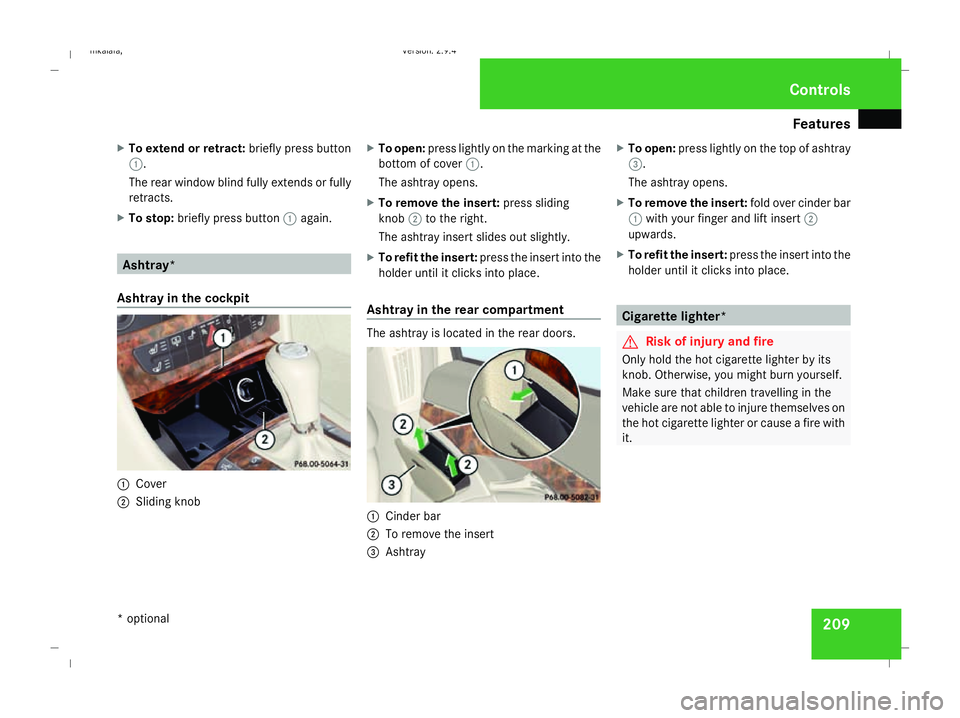
Ashtray in the cockpit 1
Cover
2 Sliding knob X
To open: press lightly on the marking at the
bottom of cover 1.
The ashtray opens.
X To remove the insert: press sliding
knob 2to the right.
The ashtray insert slides out slightly.
X To refit the insert: press the insert into the
holder until it clicks into place.
Ashtray in the rear compartment The ashtray is located in the rear doors.
1
Cinder bar
2 To remove the insert
3 Ashtray X
To open: press lightly on the top of ashtray
3.
The ashtray opens.
X To remove the insert: fold over cinder bar
1 with your finger and lift insert 2
upwards.
X To refit the insert: press the insert into the
holder until it clicks into place. Cigarette lighter*
G
Risk of injury and fire
Only hold the hot cigarette lighter by its
knob. Otherwise, you might burn yourself.
Make sure that children travelling in the
vehicle are not able to injure themselves on
the hot cigarette lighter or cause a fire with
it. Cont
rols
* optional
211_AKB; 2; 5, en-GB
mkalafa
,V ersion: 2.9.4
2008-02-29T16:57:07+01:00 - Seite 209 ZDateiname: 6515_3416_02_buchblock.pdf; preflight
Page 217 of 401
Features
214 Infrared reflecting windscreen*
The infrared reflecting glass prevents the
vehicle interior from becoming too hot. It also
blocks radio waves up into the gigahertz
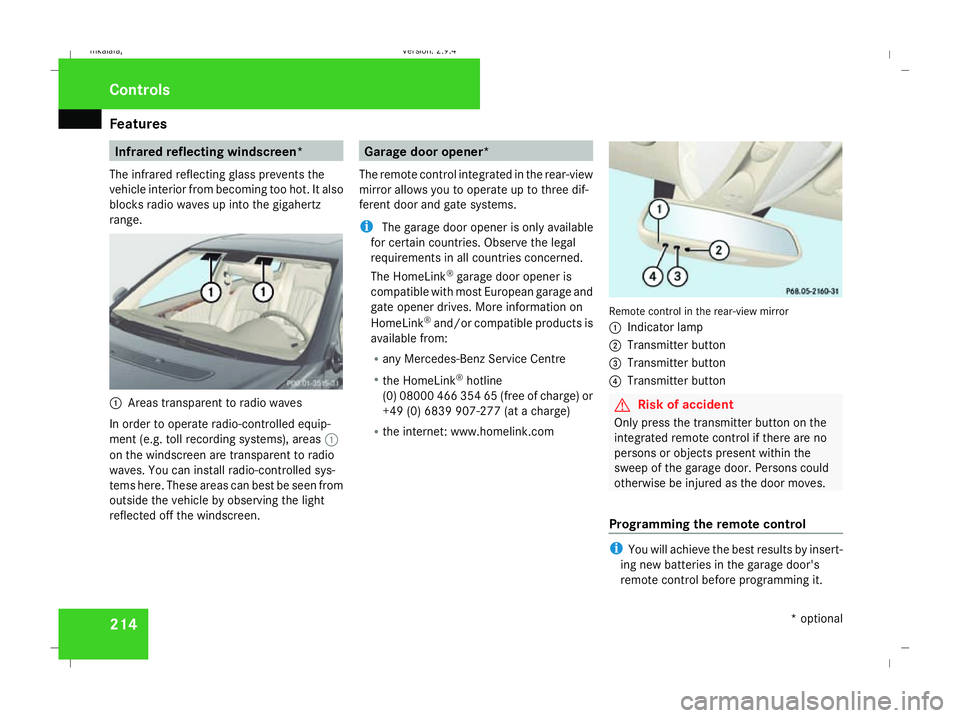
range. 1
Areas transparent to radio waves
In order to operate radio-controlled equip-
ment (e.g. toll recording systems), areas 1
on the windscreen are transparent to radio
waves. You can install radio-controlled sys-
tems here. These areas can best be seen from
outside the vehicle by observing the light
reflected off the windscreen. Garage door opener*
The remote control integrated in the rear-view
mirror allows you to operate up to three dif-
ferent door and gate systems.
i The garage door opener is only available
for certain countries. Observe the legal
requirements in all countries concerned.
The HomeLink ®
garage door opener is
compatible with most European garage and
gate opener drives. More information on
HomeLink ®
and/or compatible products is
available from:
R any Mercedes-Benz Service Centre
R the HomeLink ®
hotline
(0) 08000 466 354 65 (free of charge) or
+49 (0) 6839 907-27 7(at a charge)
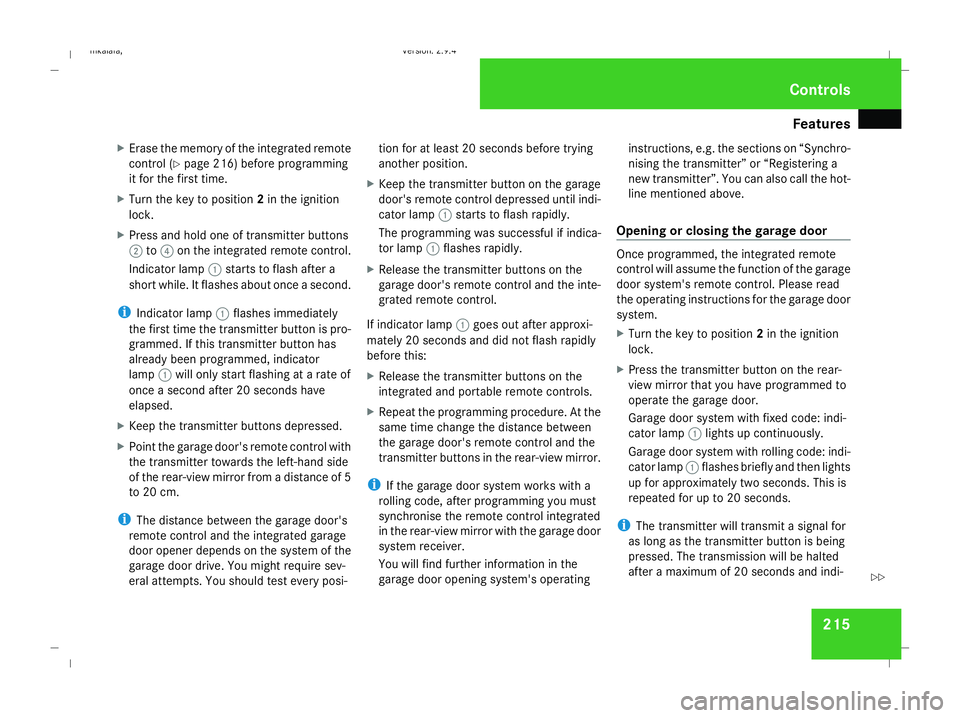
R the internet: www.homelink.com Remote control in the rear-view mirror
1
Indicator lamp
2 Transmitter button
3 Transmitter button
4 Transmitter button G
Risk of accident
Only press the transmitter button on the
integrated remote control if there are no
persons or objects present within the
sweep of the garage door. Persons could
otherwise be injured as the door moves.
Programming the remote control i
You will achieve the best results by insert-
ing new batteries in the garage door's
remote control before programming it. Controls
* optional
211_AKB; 2; 5, en-GB
mkalafa,
Version: 2.9.4 2008-02-29T16:57:07+01:00 - Seite 214Dateiname: 6515_3416_02_buchblock.pdf; preflight
Page 218 of 401
Features
215
X
Erase the memory of the integrated remote
control (Y page 216) before programming
it for the first time.
X Turn the key to position 2in the ignition
lock.
X Press and hold one of transmitter buttons
2 to4 on the integrated remote control.
Indicator lamp 1starts to flash after a
short while. It flashes about once a second.
i Indicator lamp 1flashes immediately
the first time the transmitter button is pro-
grammed. If this transmitter button has
already been programmed, indicator
lamp 1will only start flashing at a rate of
once a second after 20 seconds have
elapsed.
X Keep the transmitter buttons depressed.
X Point the garage door's remote control with
the transmitter towards the left-hand side
of the rear-view mirror from a distance of 5
to 20 cm.
i The distance between the garage door's
remote control and the integrated garage
door opener depends on the system of the
garage door drive. You might require sev-
eral attempts. You should test every posi- tion for at least 20 seconds before trying
another position.
X Keep the transmitter button on the garage
door's remote control depressed until indi-
cator lamp 1starts to flash rapidly.
The programming was successful if indica-
tor lamp 1flashes rapidly.
X Release the transmitter buttons on the
garage door's remote control and the inte-
grated remote control.
If indicator lamp 1goes out after approxi-
mately 20 seconds and did not flash rapidly
before this:
X Release the transmitter buttons on the
integrated and portable remote controls.
X Repeat the programming procedure. At the
same time change the distance between
the garage door's remote control and the
transmitter buttons in the rear-view mirror.
i If the garage door system works with a
rolling code, after programming you must
synchronise the remote control integrated
in the rear-view mirror with the garage door
system receiver.
You will find further information in the
garage door opening system's operating instructions, e.g. the sections on “Synchro-
nising the transmitter” or “Registering a
new transmitter”. You can also call the hot-
line mentioned above.
Opening or closing the garage door Once programmed, the integrated remote
control will assume the function of the garage
door system's remote control. Please read
the operating instructions for the garage door
system.
X
Turn the key to position 2in the ignition
lock.
X Press the transmitter button on the rear-
view mirror that you have programmed to
operate the garage door.
Garage door system with fixed code: indi-
cator lamp 1lights up continuously.
Garage door system with rolling code: indi-
cator lamp 1flashes briefly and then lights
up for approximately two seconds. This is
repeated for up to 20 seconds.
i The transmitter will transmit a signal for
as long as the transmitter button is being
pressed. The transmission will be halted
after a maximum of 20 seconds and indi- Cont
rols
211_AKB; 2; 5, en-GB
mkalafa
,V ersion: 2.9.4
2008-02-29T16:57:07+01:00 - Seite 215 ZDateiname: 6515_3416_02_buchblock.pdf; preflight