2008 MERCEDES-BENZ E-CLASS ESTATE door lock
[x] Cancel search: door lockPage 72 of 401
Opening and closing
69
X
To change the setting: press thek
and j buttons simultaneously for
approximately six seconds until the battery
check lamp flashes twice.
The KEYLESS GO key will now function as fol-
lows:
X To unlock the driver's door: pull the door
handle on the driver's door.
X To unlock centrally: pull the door handle
on the front-passenger door or on the rear
doors.
X To lock centrally (Saloon): press locking
button 1on the door handle, without
touching the inside of the handle.
X To lock centrally (Estate): press the lock-
ing button on the door handle or the tail-
gate.
Restoring the factory settings X
Press the kandj buttons simulta-
neously for approximately six seconds until
the battery check lamp flashes twice. Locking centrally from the luggage
compartment* (Estate) i
If the vehicle is locked centrally while the
tailgate is open, the tailgate will be locked
automatically when it is closed.
i If you leave the KEYLESS GO key in the
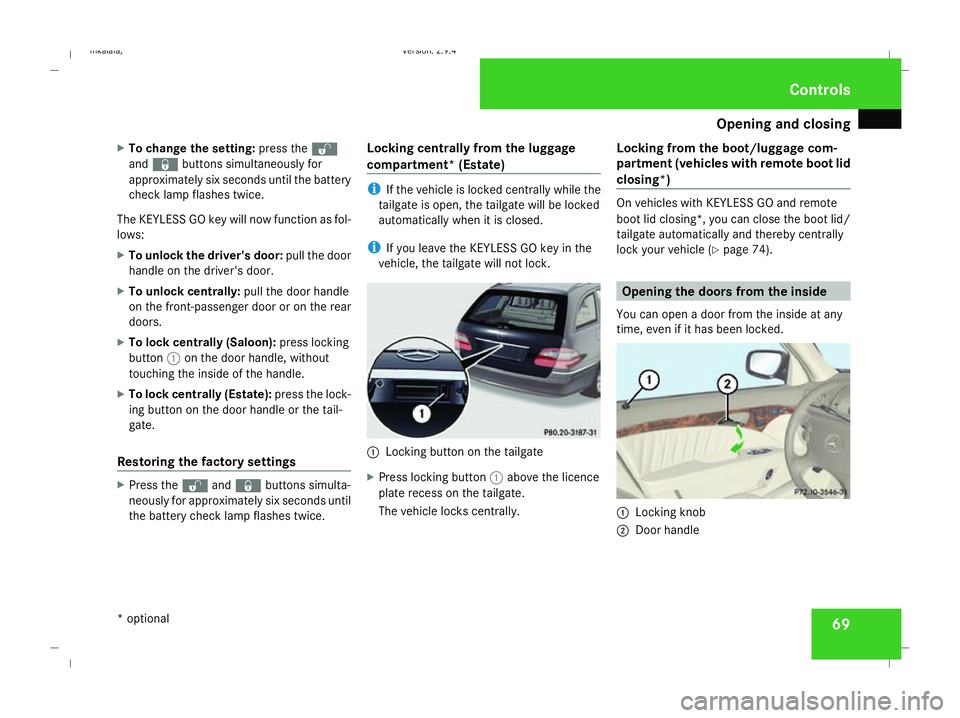
vehicle, the tailgate will not lock. 1
Locking button on the tailgate
X Press locking button 1above the licence
plate recess on the tailgate.
The vehicle locks centrally. Locking from the boot/luggage com-
partment (vehicles with remote boot lid
closing*) On vehicles with KEYLESS GO and remote
boot lid closing*, you can close the boot lid/
tailgate automatically and thereby centrally
lock your vehicle (
Ypage 74). Opening the doors from the inside
You can open a door from the inside at any
time, even if it has been locked. 1
Locking knob
2 Door handle Controls
* optional
211_AKB; 2; 5, en-GB
mkalafa,
Version: 2.9.4 2008-02-29T16:57:07+01:00 - Seite 69 ZDateiname: 6515_3416_02_buchblock.pdf; preflight
Page 73 of 401
Opening and closing
70
X
Pull door handle 2.
If the door is locked, locking knob 1pops
up. The door is unlocked and can be
opened. Automatic locking feature
The vehicle will lock automatically once you
have pulled away.
You can switch off the automatic locking
function via the on-board computer
(Y page 137).
i The vehicle is locked automatically when
the ignition is switched on and the wheels
begin to turn. There is therefore a risk of
being locked out when the vehicle is being
pushed or tested on a dynamometer. Locking/unlocking the vehicle from
the inside
You can centrally lock or unlock the vehicle
from the inside. This feature may be useful if,
for example, you wish to unlock the
passenger door from the inside or lock the
vehicle before you pull away. G
Risk of accident
Do not leave children unsupervised in the
vehicle. They could open a door from the
inside – even if it is locked – and thereby
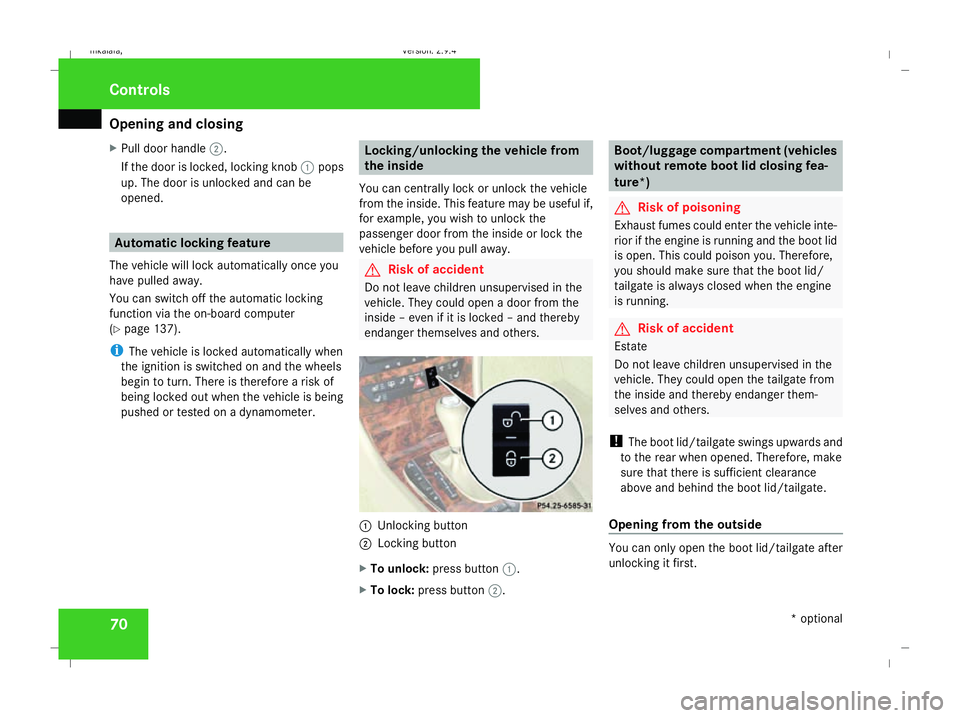
endanger themselves and others. 1
Unlocking button
2 Locking button
X To unlock: press button 1.
X To lock: press button 2. Boot/luggage compartment (vehicles
without remote boot lid closing fea-
ture*)
G
Risk of poisoning
Exhaust fumes could enter the vehicle inte-
rior if the engine is running and the boot lid
is open. This could poison you. Therefore,
you should make sure that the boot lid/
tailgate is always closed when the engine
is running. G
Risk of accident
Estate
Do not leave children unsupervised in the
vehicle. They could open the tailgate from
the inside and thereby endanger them-
selves and others.
! The boot lid/tailgate swings upwards and
to the rear when opened. Therefore, make
sure that there is sufficient clearance
above and behind the boot lid/tailgate.
Opening from the outside You can only open the boot lid/tailgate after
unlocking it first.Controls
* optional
211_AKB; 2; 5, en-GB
mkalafa,
Version: 2.9.4 2008-02-29T16:57:07+01:00 - Seite 70Dateiname: 6515_3416_02_buchblock.pdf; preflight
Page 93 of 401
Steering wheel
90
R
Easy-entry/exit feature (Y page 90)
R Storing settings (Y page 93) Steering wheel heating*
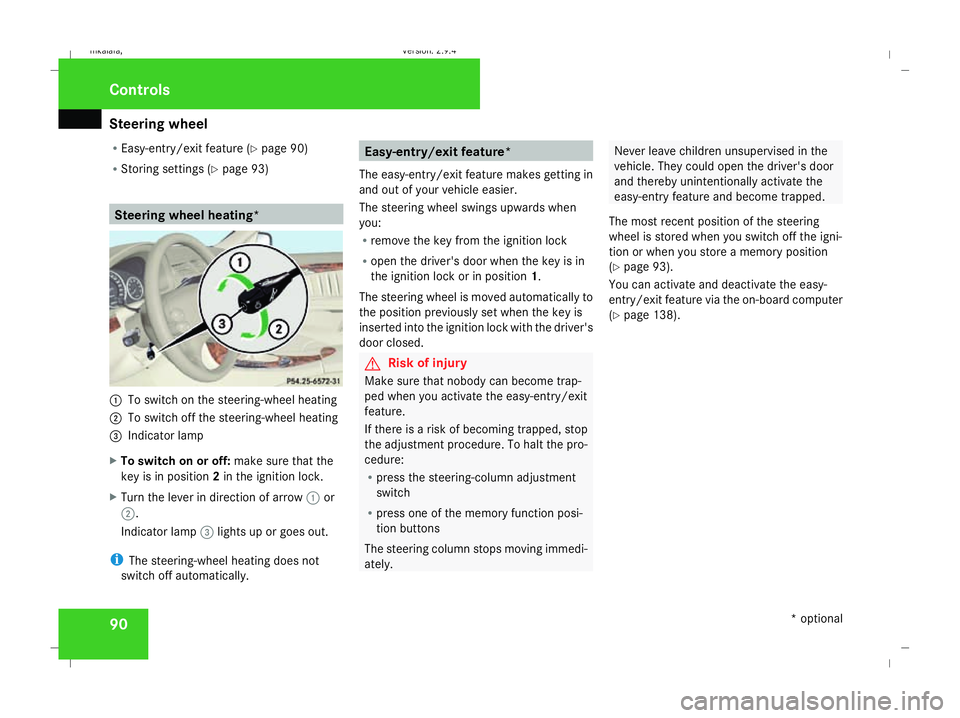
1
To switch on the steering-wheel heating
2 To switch off the steering-wheel heating
3 Indicator lamp
X To switch on or off: make sure that the
key is in position 2in the ignition lock.
X Turn the lever in direction of arrow 1or
2.
Indicator lamp 3lights up or goes out.
i The steering-wheel heating does not
switch off automatically. Easy-entry/exit feature*
The easy-entry/exit feature makes getting in
and out of your vehicle easier.
The steering wheel swings upwards when
you:
R remove the key from the ignition lock
R open the driver's door when the key is in
the ignition lock or in position 1.
The steering wheel is moved automatically to
the position previously set when the key is
inserted into the ignition lock with the driver's
door closed. G
Risk of injury
Make sure that nobody can become trap-
ped when you activate the easy-entry/exit
feature.
If there is a risk of becoming trapped, stop
the adjustment procedure. To halt the pro-
cedure:
R press the steering-column adjustment
switch
R press one of the memory function posi-
tion buttons
The steering column stops moving immedi-
ately. Never leave children unsupervised in the
vehicle. They could open the driver's door
and thereby unintentionally activate the
easy-entry feature and become trapped.
The most recent position of the steering
wheel is stored when you switch off the igni-
tion or when you store a memory position
(Y page 93).
You can activate and deactivate the easy-
entry/exit feature via the on-board computer
(Y page 138). Controls
* optional
211_AKB; 2; 5, en-GB
mkalafa,
Version: 2.9.4 2008-02-29T16:57:07+01:00 - Seite 90Dateiname: 6515_3416_02_buchblock.pdf; preflight
Page 95 of 401
Mirrors
92
X
Make sure that the key is in position 1or
2 in the ignition lock.
X Briefly press button 1.
Both exterior mirrors fold in or out.
i If you are driving faster than 47 km/h, you
can no longer fold in the exterior mirrors.
Make sure that the exterior mirrors are
always folded out fully while the vehicle is
in motion; otherwise, they may vibrate.
Resetting the exterior mirrors If the battery has been disconnected or has
become discharged, the exterior mirrors
must be reset. Otherwise, they will not fold in
when you select the "Fold in mirrors when
locking" function in the on-board computer
(Y page 139).
X Make sure that the key is in position 1in
the ignition lock.
X Briefly press button 1.
Folding the exterior mirrors in or out
automatically* If the "Fold in mirrors when locking" function
is activated in the on-board computer
(Y page 139): R
The exterior mirrors fold in automatically as
soon as you lock the vehicle from the out-
side.
R The exterior mirrors fold out again auto-
matically as soon as you unlock the vehicle
and then open the driver's or front-
passenger door.
i If you have activated this function and fold
in the exterior mirrors using button 1, they
will not be folded out automatically. You
can then only fold out the exterior mirrors
using button 1. Automatic anti-dazzle mirrors*
The rear-view mirror and the exterior mirror
on the driver's side automatically go into anti-
dazzle mode if the ignition is switched on and
incident light from headlamps strikes the sen-
sor in the rear-view mirror.
The mirrors do not go into anti-dazzle mode if
reverse gear is engaged and the interior light-
ing is switched on. G
Risk of accident
If the incident light from headlamps cannot
strike the sensor in the rear-view mirror, for
instance when the rear window blind* is extended, the mirrors' automatic anti-daz-
zle function will not operate.
Incident light could then dazzle you. This
may prevent you from observing the traffic
conditions, thereby causing an accident. In
this case, adjust the rear-view mirror man-
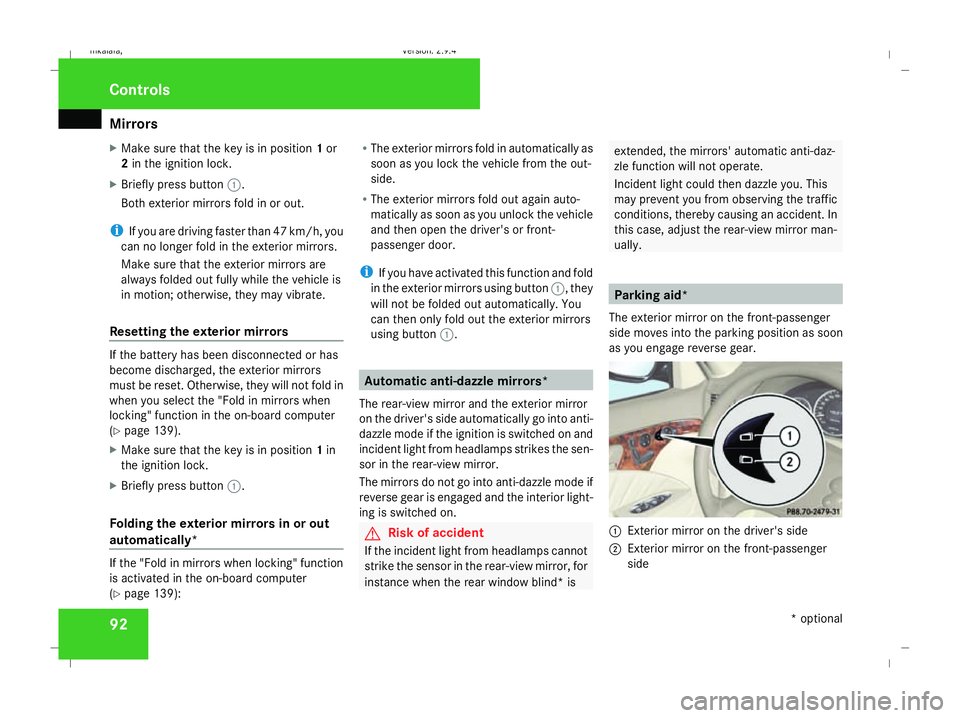
ually. Parking aid*
The exterior mirror on the front-passenger
side moves into the parking position as soon
as you engage reverse gear. 1
Exterior mirror on the driver's side
2 Exterior mirror on the front-passenger
side Controls
* optional
211_AKB; 2; 5, en-GB
mkalafa,
Version: 2.9.4
2008-02-29T16:57:07+01:00 - Seite 92 Dateiname: 6515_3416_02_buchblock.pdf; preflight
Page 102 of 401
Lights
99Lights
Light switch
For reasons of safety, Mercedes-Benz recom-
mends that you drive with the lights switched
on even during the daytime. In some coun-
tries, daytime operation of headlamps varies
due to legal requirements and self-imposed
obligations. In these countries, the dipped-
beam headlamps are automatically switched
on when the engine is started.
i If you drive in countries in which traffic
drives on the opposite side of the road to
the country where the vehicle is registered,
oncoming traffic may be dazzled by the
asymmetrical dipped-beam headlamps.
Have the headlamps changed to symmet-
rical dipped beam when driving in these
countries. You can obtain information
about this from any Mercedes-Benz Service
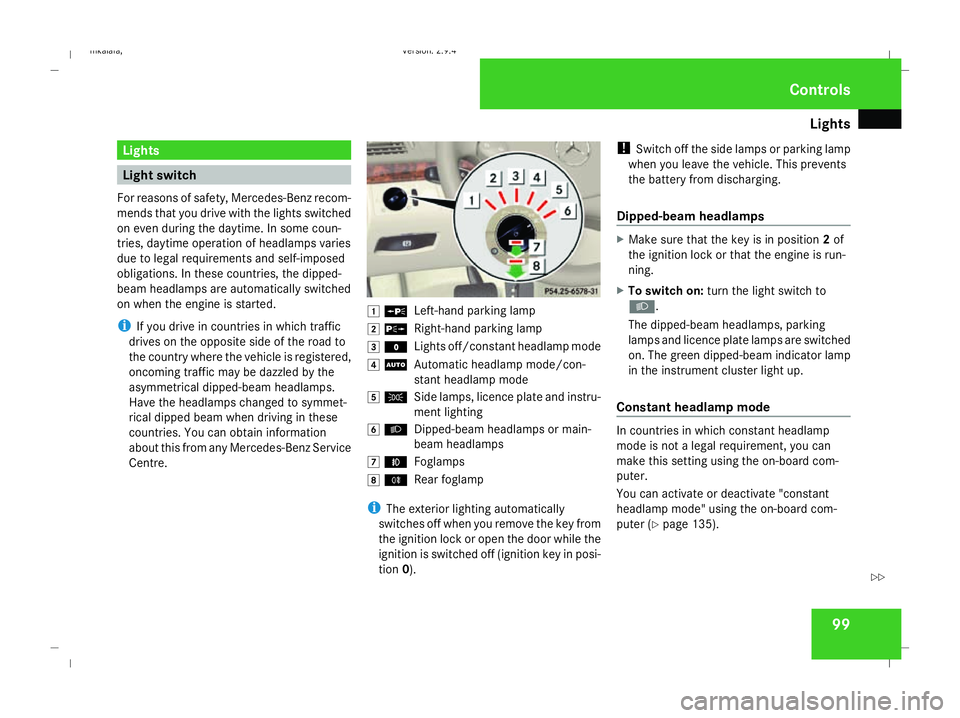
Centre. $
a
Left-hand parking lamp
% g
Right-hand parking lamp
& M
Lights off/constant headlamp mode
( U
Automatic headlamp mode/con-
stant headlamp mode
) C
Side lamps, licence plate and instru-
ment lighting
* B
Dipped-beam headlamps or main-
beam headlamps
, ¥
Foglamps
. †
Rear foglamp
i The exterior lighting automatically
switches off when you remove the key from
the ignition lock or open the door while the
ignition is switched off (ignition key in posi-
tion 0). !
Switch off the side lamps or parking lamp
when you leave the vehicle. This prevents
the battery from discharging.
Dipped-beam headlamps X
Make sure that the key is in position 2of
the ignition lock or that the engine is run-
ning.
X To switch on: turn the light switch to
B.
The dipped-beam headlamps, parking
lamps and licence plate lamps are switched
on. The green dipped-beam indicator lamp
in the instrument cluster light up.
Constant headlamp mode In countries in which constant headlamp
mode is not a legal requirement, you can
make this setting using the on-board com-
puter.
You can activate or deactivate "constant
headlamp mode" using the on-board com-
puter (Y page 135). Controls
211_AKB; 2; 5, en-GB
mkalafa,
Version: 2.9.4 2008-02-29T16:57:07+01:00 - Seite 99 ZDateiname: 6515_3416_02_buchblock.pdf; preflight
Page 108 of 401
Windscreen wipers
105
Automatic function
X
To switch on/off: press the¡button.
The interior lighting switches on if it is dark
when you:
R unlock the vehicle
R open a door
R remove the key from the ignition lock
The interior lighting switches off after a delay.
You can set the delayed switch-off using the
on-board computer.
i If the door is left open, the interior lighting
goes out after approximately five minutes.
Manual control
Front interior lighting
X To switch on/off: press theðbutton.
Rear-compartment interior lighting
X To switch on/off: press the¦button.
Front reading lamps
X To switch on/off: press theXbutton. Rear-compartment overhead control
panel
Rear-compartment overhead control panel
1 X To switch the left-hand reading lamp
on/off
2 X To switch the right-hand reading
lamp on/off
Rear-compartment reading lamps
X To switch on/off: press theXbutton. Windscreen wipers
Switching the windscreen wipers on/
off
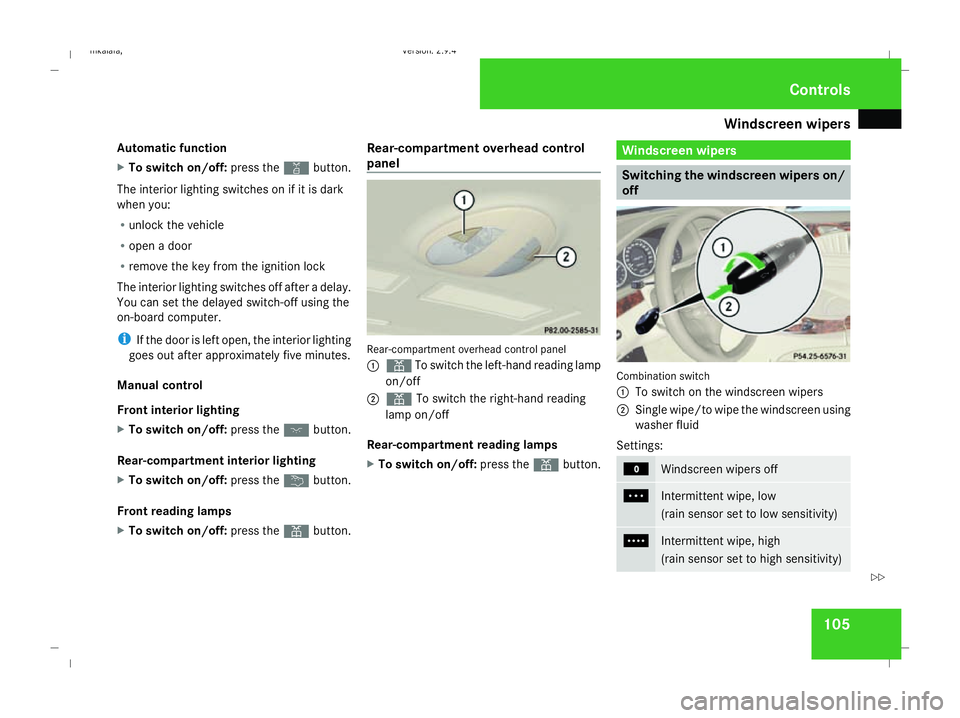
Combination switch
1
To switch on the windscreen wipers
2 Single wipe/to wipe the windscreen using
washer fluid
Settings: M
Windscreen wipers off
U
Intermittent wipe, low
(rain sensor set to low sensitivity)
V
Intermittent wipe, high
(rain sensor set to high sensitivity) Controls
211_AKB; 2; 5, en-GB
mkalafa,
Version: 2.9.4
2008-02-29T16:57:07+01:00 - Seite 105 ZDateiname: 6515_3416_02_buchblock.pdf; preflight
Page 110 of 401
Side windows
107
Wiping with washer fluid X
Make sure that the key is in position 1in
the ignition lock.
X Turn switch 1to position %or posi-
tion )and hold it there until the rear
window has been cleaned.
The rear window is wiped for a further five
seconds after the switch is released. Side windows
Opening/closing the side windows
G
Risk of injury
Make sure that nobody can become trap-
ped between the side window and the door
frame as a side window is opened. Do not
touch or lean against the side window dur-
ing the opening procedure. You could
become trapped between the side window
and the door frame as the window moves
down. If danger threatens, release the
switch or pull the switch upwards to close
the side window again. G
Risk of injury
Make sure that nobody can become trap-
ped as you close a side window. If danger
threatens, release the switch or press the
switch a second time to open the side win-
dow again. G
Risk of injury
Never leave children unsupervised in the
vehicle. Always take the key with you when
leaving the vehicle, even if you only leave it
for a short time. G
Risk of injury
Do not leave children unsupervised in the
vehicle, even if they are secured in a child
restraint system. The children could:
R be seriously or even fatally injured on
parts of the vehicle
R be seriously or even fatally injured by
prolonged exposure to extremely high or
extremely low temperatures
If children open a door, they could:
R seriously or even fatally injure other peo-
ple
R get out of the vehicle, thereby injuring
themselves or be seriously or even fatally
injured by a passing vehicle
Activate the child-proof locks if children are
travelling in the vehicle. They could other-
wise open doors or windows while the vehi-
cle is in motion and thereby injure them-
selves or others.
i It is also possible to open and close the
side windows from the outside using the
"Summer opening" (Y page 109) and "con-
venience closing" (Y page 109) features
respectively. Controls
211_AKB; 2; 5, en-GB
mkalafa,
Version: 2.9.4
2008-02-29T16:57:07+01:00 - Seite 107 ZDateiname: 6515_3416_02_buchblock.pdf; preflight
Page 111 of 401
Side windows
108
i
You can disable the controls for the rear
side windows from the driver's seat
(Y page 47).
i If PRE-SAFE ®
has been activated, the side
windows close automatically, leaving a
small gap.
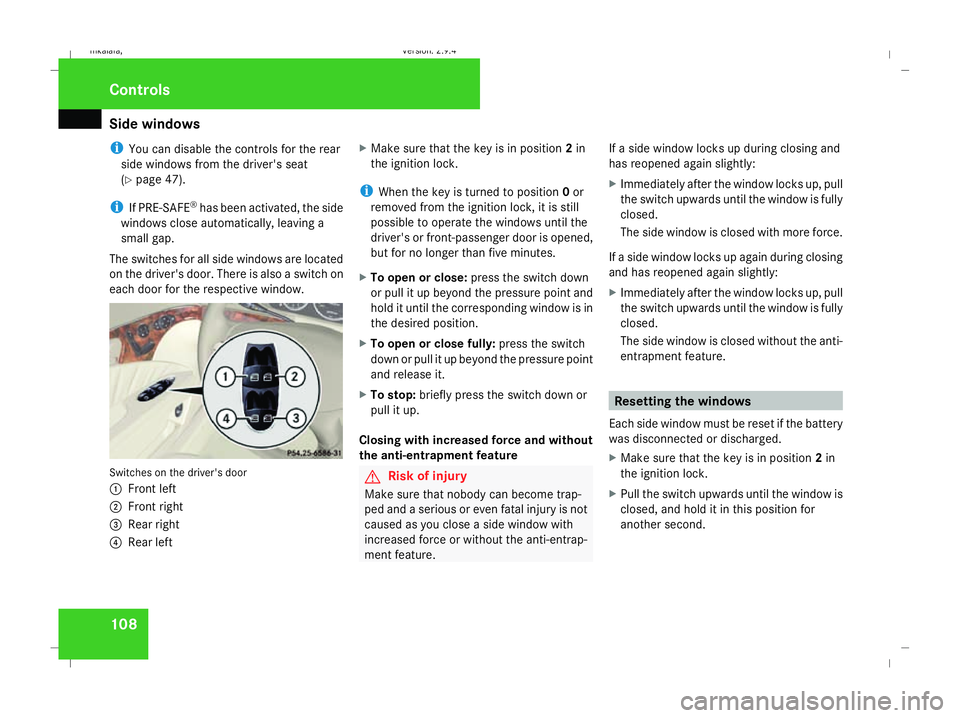
The switches for all side windows are located
on the driver's door. There is also a switch on
each door for the respective window. Switches on the driver's door
1
Front left
2 Front right
3 Rear right
4 Rear left X
Make sure that the key is in position 2in
the ignition lock.
i When the key is turned to position 0or
removed from the ignition lock, it is still
possible to operate the windows until the
driver's or front-passenger door is opened,
but for no longer than five minutes.
X To open or close: press the switch down
or pull it up beyond the pressure point and
hold it until the corresponding window is in
the desired position.
X To open or close fully: press the switch
down or pull it up beyond the pressure point
and release it.
X To stop: briefly press the switch down or
pull it up.
Closing with increased force and without
the anti-entrapment feature G
Risk of injury
Make sure that nobody can become trap-
ped and a serious or even fatal injury is not
caused as you close a side window with
increased force or without the anti-entrap-
ment feature. If a side window locks up during closing and
has reopened again slightly:
X
Immediately after the window locks up, pull
the switch upwards until the window is fully
closed.
The side window is closed with more force.
If a side window locks up again during closing
and has reopened again slightly:
X Immediately after the window locks up, pull
the switch upwards until the window is fully
closed.
The side window is closed without the anti-
entrapment feature. Resetting the windows
Each side window must be reset if the battery
was disconnected or discharged.
X Make sure that the key is in position 2in
the ignition lock.
X Pull the switch upwards until the window is
closed, and hold it in this position for
another second. Controls
211_AKB; 2; 5, en-GB
mkalafa,
Version: 2.9.4 2008-02-29T16:57:07+01:00 - Seite 108Dateiname: 6515_3416_02_buchblock.pdf; preflight