2008 MERCEDES-BENZ E-CLASS ESTATE turn signal bulb
[x] Cancel search: turn signal bulbPage 7 of 401
4
Automatic transmission Display
message
. . . . . . . . . . . . . . . . . . . . . . .261
Auxiliary heating . . . . . . . . . . ..177, 304
Display message . . . . . . . . . . . . . .280
Remote control . . . . . . . . . . . . . . .178
Setting (on-board computer) . . . . .133
Auxiliary ventilation . . . . . . . . . . . ..177
Axle load, maximum permissible
. . . . . . . . . . . . . .370, 371, 372, 373, 374 B
Ball coupling Folding in . . . . . . . . . . . . . . . . . . . .241
Folding out . . . . . . . . . . . . . . . . . . .239
BAS (Brake Assist) . . . . . . . . . . . . . . ..59
Battery Changing (auxiliary heating
remote control) . . . . . . . . . . . . . . .311
Changing (key ).. . . . . . . . . . . . . . .310
Changing (KEYLESS GO key) . . . . .310
Charging . . . . . . . . . . . . . . . . . . . . .332
Checking (key ).. . . . . . . . . . . . . . .310
Checking (KEYLESS GO key) . . . . .310
Check lamp (key ).. . . . . . . . . . . . .310
Check lamp (KEYLESS GO key) . . . . . . . . . . . . . . . . . . . . . . . . .69, 310
Disconnecting . . . . . . . . . . . . . . . .331
Display message . . . . . . . . . . . . . .266
Maintenance (vehicle ).. . . . . . . ..329
Reconnecting . . . . . . . . . . . . . . . . .333 Removing/fitting . . . . . . . . . . . . .
.332
Vehicle battery . . . . . . . . . . . . . . . .329
Voltage (on-board computer) . . . . .127
Belt force limiters
Activatio n.. . . . . . . . . . . . . . . . . . . .41
Belt height adjustment . . . . . . . . . . ..97
Belt reel (Easy-Pack fix kit) . . . . . . ..203
Belt tensioners Activatio n.. . . . . . . . . . . . . . . . . . . .41
Belt warning . . . . . . . . . . . . . . . . . . . . .97
Bonnet Bonnet catch . . . . . . . . . . . . . . . . .223
Display message . . . . . . . . . . . . . .267
Opening/closing . . . . . . . . . . . . . .222
Bonnet release lever
Release lever . . . . . . . . . . . . . . . . .222
Boot
Emergency release . . . . . . . . . . . . .307
Locking separatel y.. . . . . . . . . . . . .72
Opening/closing (manually) . . . . . . .70
Boot/luggage compartment
Opening/closing (automatically )...73
Boot lid
Display message . . . . . . . . . . . . . .266
Brake
Warning lamp . . . . . . . . . . . . . . . . .286
Brake Assist
see BAS
Brake fluid . . . . . . . . . . . . . . . . . . . . .390
Display message . . . . . . . . . . . . . .270 Brake lamps
Adaptive . . . . . . . . . . . . . . . . . . . . . .59
Display message . . . . . . . . . . . . . .274
Brake system
Display message . . . . . . . . . .268, 269
Parking brake . . . . . . . . . . . . . . . . .113
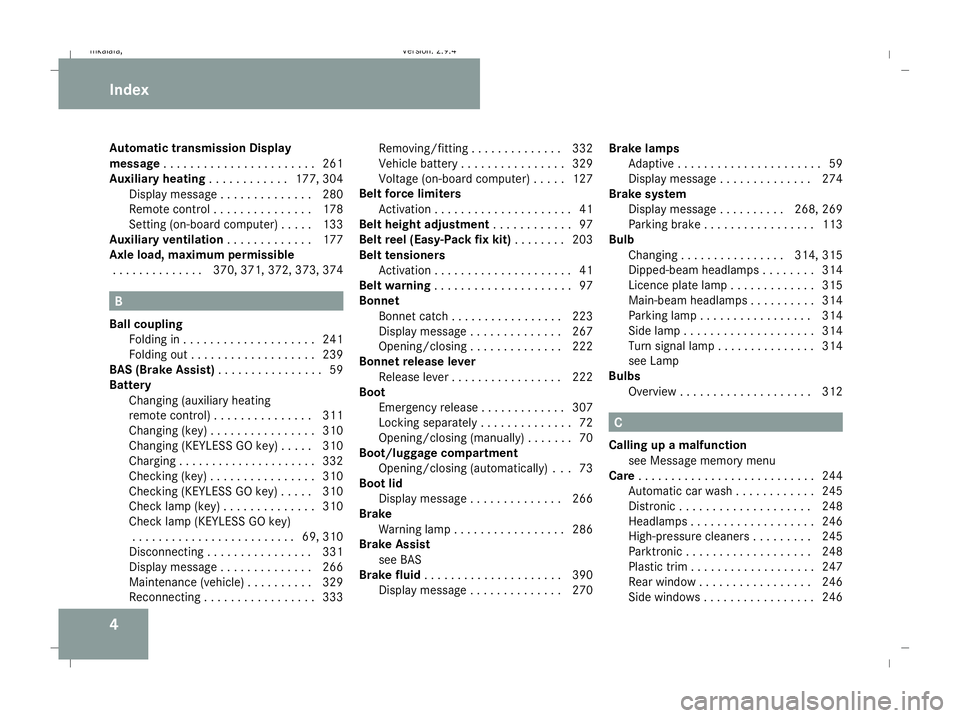
Bulb
Changing . . . . . . . . . . . . . . . .314, 315
Dipped-beam headlamps . . . . . . . .314
Licence plate lamp . . . . . . . . . . . . .315
Main-beam headlamps . . . . . . . . . .314
Parking lamp . . . . . . . . . . . . . . . . .314
Side lamp . . . . . . . . . . . . . . . . . . . .314
Turn signal lamp . . . . . . . . . . . . . . .314
see Lamp
Bulbs
Overview . . . . . . . . . . . . . . . . . . . .312 C
Calling up a malfunction see Message memory menu
Care . . . . . . . . . . . . . . . . . . . . . . . . . . .244
Automatic car wash . . . . . . . . . . . .245
Distronic . . . . . . . . . . . . . . . . . . . .248
Headlamps . . . . . . . . . . . . . . . . . . .246
High-pressure cleaners . . . . . . . . .245
Parktroni c.. . . . . . . . . . . . . . . . . .248
Plastic trim . . . . . . . . . . . . . . . . . . .247
Rear window . . . . . . . . . . . . . . . . .246
Side windows . . . . . . . . . . . . . . . . .246 Index
211_AKB; 2; 5, en-GB
mkalafa,
Version: 2.9.4 2008-02-29T16:57:07+01:00 - Seite 4Dateiname: 6515_3416_02_buchblock.pdf; preflight
Page 275 of 401
Display
messages 272 Display messages Possible cause/consequence Possible solution
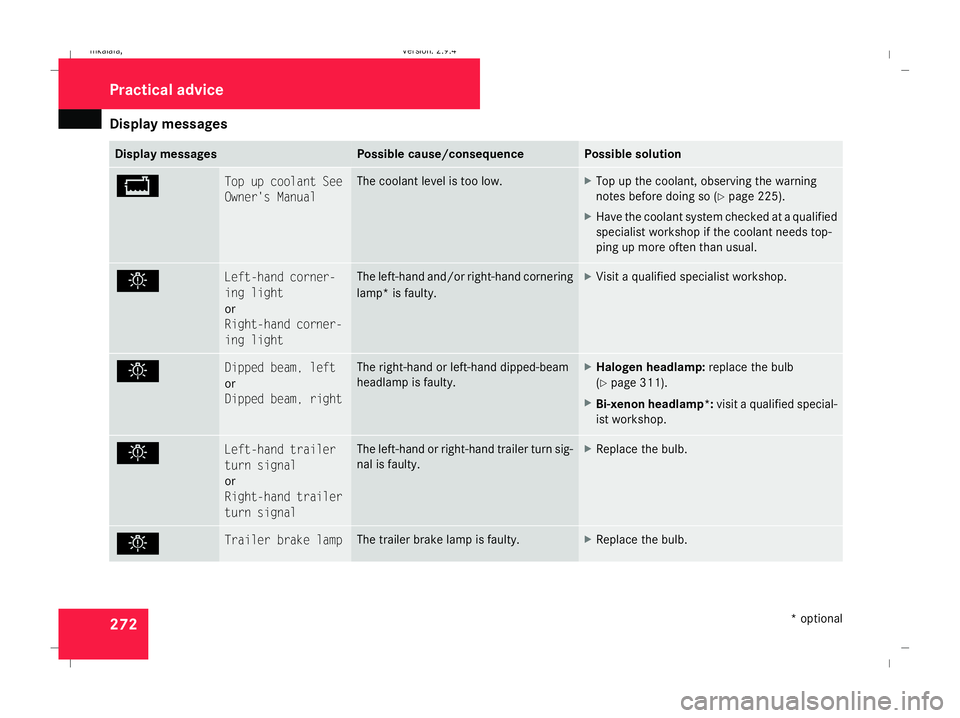
B Top up coolant See
Owner's Manual The coolant level is too low. X
Top up the coolant, observing the warning
notes before doing so (Y page 225).
X Have the coolant system checked at a qualified
specialist workshop if the coolant needs top-
ping up more often than usual. . Left-hand corner-
ing light
or
Right-hand corner-
ing light The left-hand and/or right-hand cornering
lamp* is faulty. X
Visit a qualified specialist workshop. . Dipped beam, left
or
Dipped beam, right The right-hand or left-hand dipped-beam
headlamp is faulty. X
Halogen headlamp: replace the bulb
(Y page 311).
X Bi-xenon headlamp*: visit a qualified special-
ist workshop. . Left-hand trailer
turn signal
or
Right-hand trailer
turn signal The left-hand or right-hand trailer turn sig-
nal is faulty. X
Replace the bulb. . Trailer brake lamp The trailer brake lamp is faulty. X
Replace the bulb. Practical advi
ce
* optional
211_AKB; 2; 5, en-GB
mkalafa,
Version: 2.9.4 2008-02-29T16:57:07+01:00 - Seite 272Dateiname: 6515_3416_02_buchblock.pdf; preflight
Page 276 of 401
Display
messages 273Display messages Possible cause/consequence Possible solution
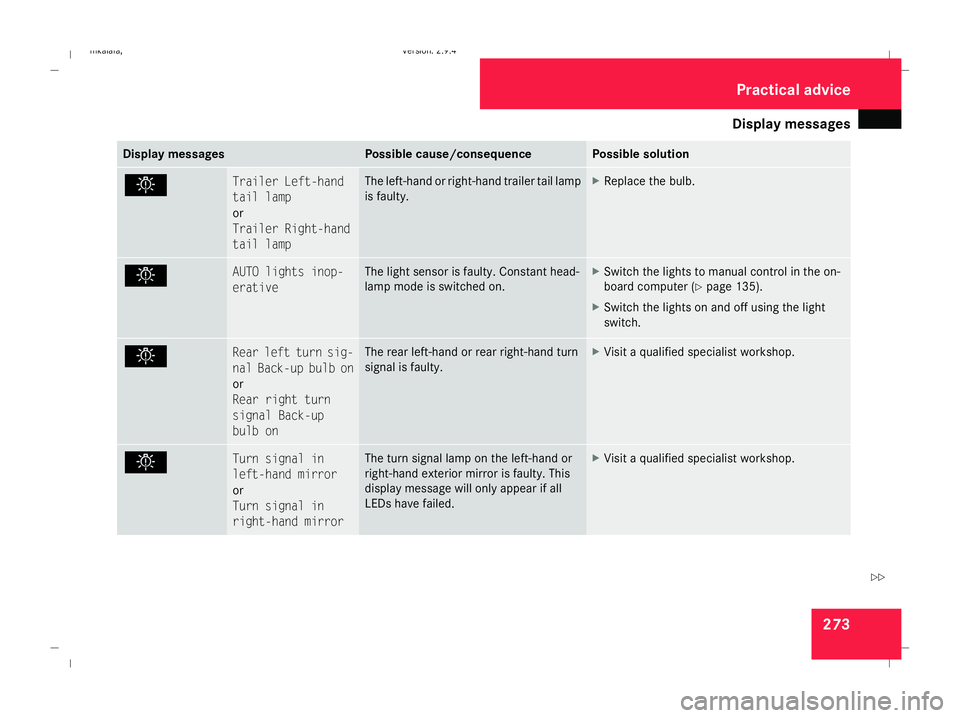
. Trailer Left-hand
tail lamp
or
Trailer Right-hand
tail lamp The left-hand or right-hand trailer tail lamp
is faulty. X
Replace the bulb. . AUTO lights inop-
erative The light sensor is faulty. Constant head-
lamp mode is switched on. X
Switch the lights to manual control in the on-
board computer (Y page 135).
X Switch the lights on and off using the light
switch. . Rear left turn sig-
nal Back-up bulb on
or
Rear right turn
signal Back-up
bulb on The rear left-hand or rear right-hand turn
signal is faulty. X
Visit a qualified specialist workshop. . Turn signal in
left-hand mirror
or
Turn signal in
right-hand mirror The turn signal lamp on the left-hand or
right-hand exterior mirror is faulty. This
display message will only appear if all
LEDs have failed. X
Visit a qualified specialist workshop. Practical advi
ce
211_AKB; 2; 5, en-GB
mkalafa,
Version: 2.9.4 2008-02-29T16:57:07+01:00 - Seite 273 ZDateiname: 6515_3416_02_buchblock.pdf; preflight
Page 277 of 401
Display
messages 274 Display messages Possible cause/consequence Possible solution
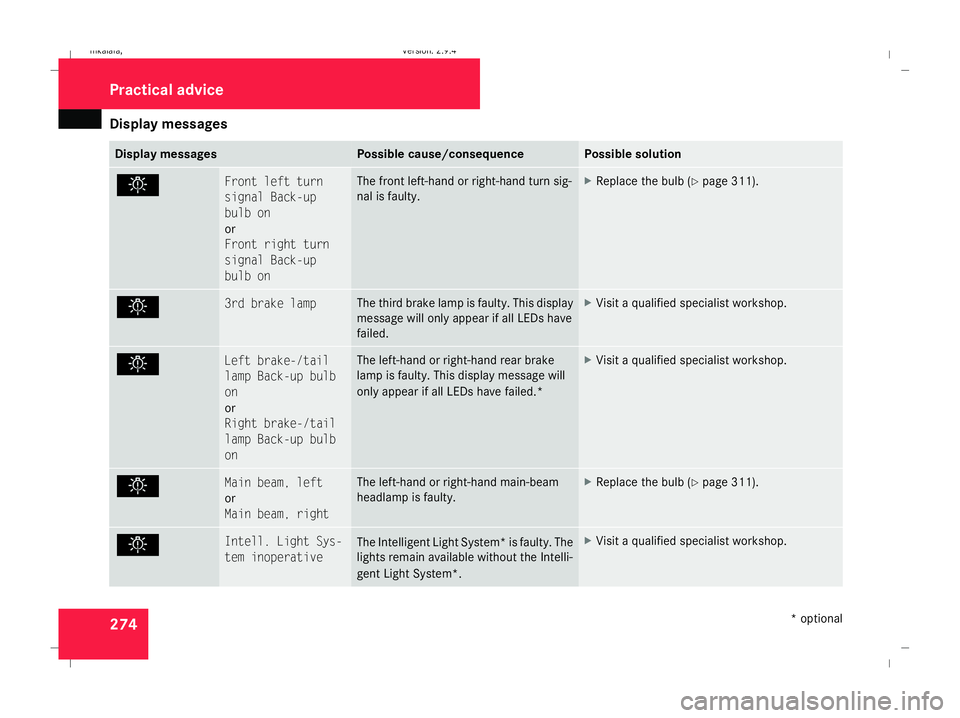
. Front left turn
signal Back-up
bulb on
or
Front right turn
signal Back-up
bulb on The front left-hand or right-hand turn sig-
nal is faulty. X
Replace the bulb (Y page 311). . 3rd brake lamp The third brake lamp is faulty. This display
message will only appear if all LEDs have
failed. X
Visit a qualified specialist workshop. . Left brake-/tail
lamp Back-up bulb
on
or
Right brake-/tail
lamp Back-up bulb
on The left-hand or right-hand rear brake
lamp is faulty. This display message will
only appear if all LEDs have failed.* X
Visit a qualified specialist workshop. . Main beam, left
or
Main beam, right The left-hand or right-hand main-beam
headlamp is faulty. X
Replace the bulb (Y page 311). . Intell. Light Sys-
tem inoperative
The Intelligent Light System* is faulty. The
lights remain available without the Intelli-
gent Light System*. X
Visit a qualified specialist workshop. Practical advi
ce
* optional
211_AKB; 2; 5, en-GB
mkalafa,
Version: 2.9.4 2008-02-29T16:57:07+01:00 - Seite 274Dateiname: 6515_3416_02_buchblock.pdf; preflight
Page 316 of 401
Changing the bulbs
313
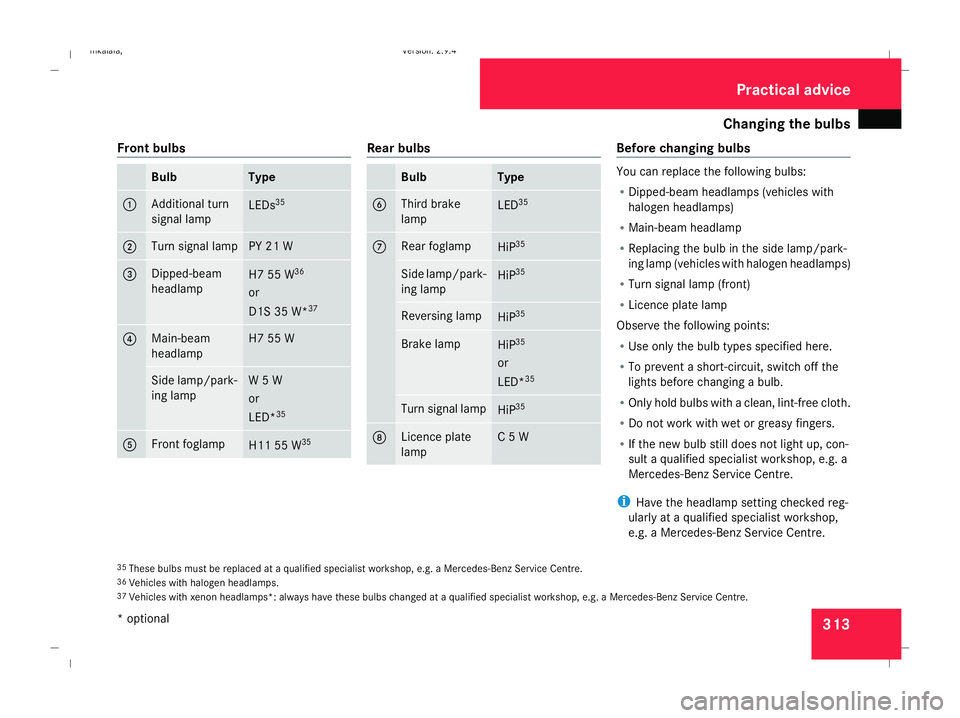
Front bulbs Bulb Type
1 Additional turn
signal lamp
LEDs
35 2 Turn signal lamp PY 21 W
3 Dipped-beam
headlamp
H7 55 W
36
or
D1S 35 W* 37 4 Main-beam
headlamp H7 55 W
Side lamp/park-
ing lamp W 5 W
or
LED*
35 5 Front foglamp
H11 55 W
35 Rear bulbs
Bulb Type
6 Third brake
lamp
LED
35 7 Rear foglamp
HiP
35 Side lamp/park-
ing lamp
HiP
35 Reversing lamp
HiP
35 Brake lamp
HiP
35
or
LED* 35 Turn signal lamp
HiP
35 8 Licence plate
lamp C 5 W Before changing bulbs
You can replace the following bulbs:
R
Dipped-beam headlamps (vehicles with
halogen headlamps)
R Main-beam headlamp
R Replacing the bulb in the side lamp/park-
ing lamp (vehicles with halogen headlamps)
R Turn signal lamp (front)
R Licence plate lamp
Observe the following points:
R Use only the bulb types specified here.
R To prevent a short-circuit, switch off the
lights before changing a bulb.
R Only hold bulbs with a clean, lint-free cloth.
R Do not work with wet or greasy fingers.
R If the new bulb still does not light up, con-
sult a qualified specialist workshop, e.g. a
Mercedes-Benz Service Centre.
i Have the headlamp setting checked reg-
ularly at a qualified specialist workshop,
e.g. a Mercedes-Benz Service Centre.
35 These bulbs must be replaced at a qualified specialist workshop, e.g. a Mercedes-Benz Service Centre.
36 Vehicles with halogen headlamps.
37 Vehicles with xenon headlamps*: always have these bulbs changed at a qualified specialist workshop, e.g. a Mercedes-Benz Service Centre. Practical advice
* optional
211_AKB; 2; 5, en-GB
mkalafa,
Version: 2.9.4
2008-02-29T16:57:07+01:00 - Seite 313 ZDateiname: 6515_3416_02_buchblock.pdf; preflight
Page 317 of 401
Changing the bulbs
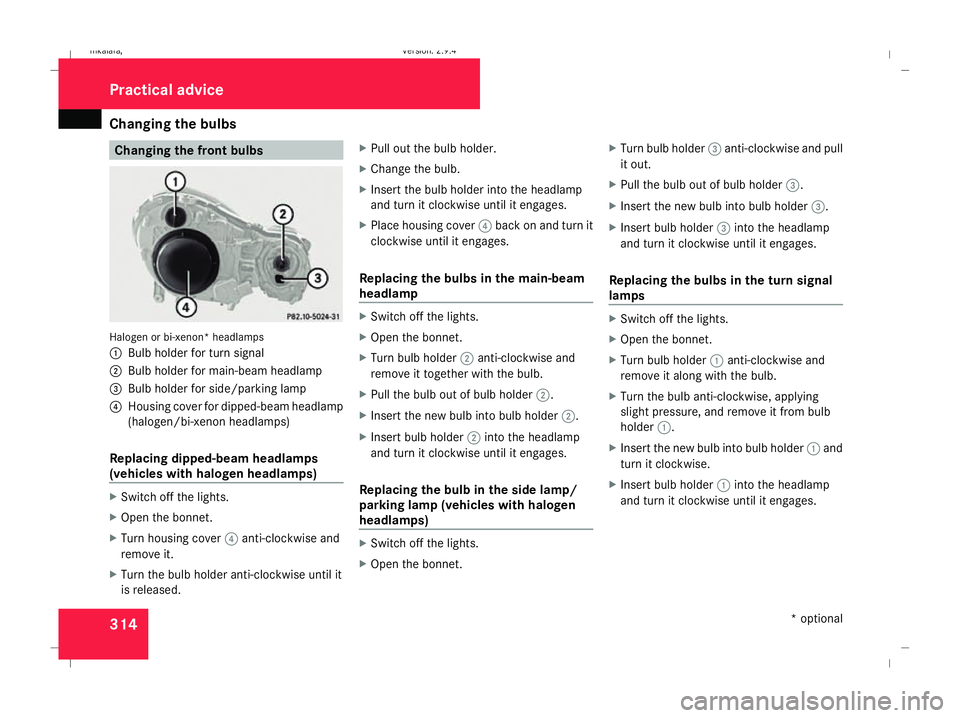
314 Changing the front bulbs
Halogen or bi-xenon* headlamps
1
Bulb holder for turn signal
2 Bulb holder for main-beam headlamp
3 Bulb holder for side/parking lamp
4 Housing cover for dipped-beam headlamp
(halogen/bi-xenon headlamps)
Replacing dipped-beam headlamps
(vehicles with halogen headlamps) X
Switch off the lights.
X Open the bonnet.
X Turn housing cover 4anti-clockwise and
remove it.
X Turn the bulb holder anti-clockwise until it
is released. X
Pull out the bulb holder.
X Change the bulb.
X Insert the bulb holder into the headlamp
and turn it clockwise until it engages.
X Place housing cover 4back on and turn it
clockwise until it engages.
Replacing the bulbs in the main-beam
headlamp X
Switch off the lights.
X Open the bonnet.
X Turn bulb holder 2anti-clockwise and
remove it together with the bulb.
X Pull the bulb out of bulb holder 2.
X Insert the new bulb into bulb holder 2.
X Insert bulb holder 2into the headlamp
and turn it clockwise until it engages.
Replacing the bulb in the side lamp/
parking lamp (vehicles with halogen
headlamps) X
Switch off the lights.
X Open the bonnet. X
Turn bulb holder 3anti-clockwise and pull
it out.
X Pull the bulb out of bulb holder 3.
X Insert the new bulb into bulb holder 3.
X Insert bulb holder 3into the headlamp
and turn it clockwise until it engages.
Replacing the bulbs in the turn signal
lamps X
Switch off the lights.
X Open the bonnet.
X Turn bulb holder 1anti-clockwise and
remove it along with the bulb.
X Turn the bulb anti-clockwise, applying
slight pressure, and remove it from bulb
holder 1.
X Insert the new bulb into bulb holder 1and
turn it clockwise.
X Insert bulb holder 1into the headlamp
and turn it clockwise until it engages. Practical advice
* optional
211_AKB; 2; 5, en-GB
mkalafa,
Version: 2.9.4 2008-02-29T16:57:07+01:00 - Seite 314Dateiname: 6515_3416_02_buchblock.pdf; preflight