2008 MERCEDES-BENZ E-CLASS ESTATE transmission
[x] Cancel search: transmissionPage 182 of 401
Air conditioning
179
i
More information about the auxiliary
heating can be found in the "Practical
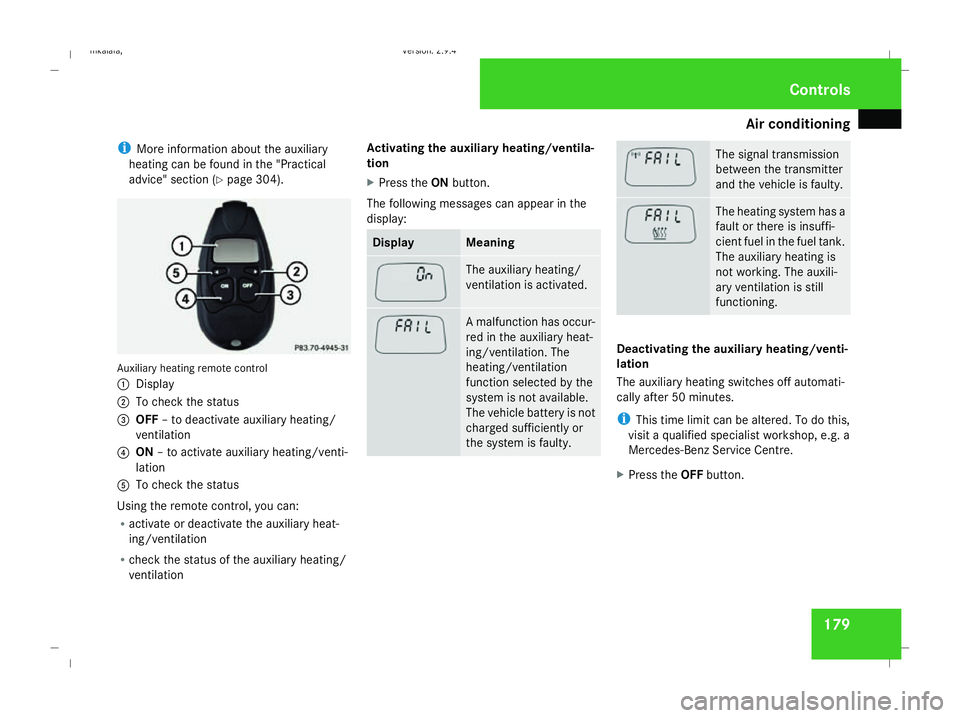
advice" section (Y page 304). Auxiliary heating remote control
1 Display
2 To check the status
3 OFF – to deactivate auxiliary heating/
ventilation
4 ON – to activate auxiliary heating/venti-
lation
5 To check the status
Using the remote control, you can:
R activate or deactivate the auxiliary heat-
ing/ventilation
R check the status of the auxiliary heating/
ventilation Activating the auxiliary heating/ventila-
tion
X
Press the ONbutton.
The following messages can appear in the
display: Display Meaning
The auxiliary heating/
ventilation is activated.
A malfunction has occur-
red in the auxiliary heat-
ing/ventilation. The
heating/ventilation
function selected by the
system is not available.
The vehicle battery is not
charged sufficiently or
the system is faulty. The signal transmission
between the transmitter
and the vehicle is faulty.
The heating system has a
fault or there is insuffi-
cient fuel in the fuel tank.
The auxiliary heating is
not working. The auxili-
ary ventilation is still
functioning.
Deactivating the auxiliary heating/venti-
lation
The auxiliary heating switches off automati-
cally after 50 minutes.
i
This time limit can be altered. To do this,
visit a qualified specialist workshop, e.g. a
Mercedes-Benz Service Centre.
X Press the OFFbutton. Cont
rols
211_AKB; 2; 5, en-GB
mkalafa
, Version: 2.9.4 2008-02-29T16:57:07+01:00 - Seite 179 ZDateiname: 6515_3416_02_buchblock.pdf; preflight
Page 183 of 401
Sliding sunroof
180
The following messages can appear in the
display: Display Meaning
The auxiliary heating/
ventilation is deactiva-
ted.
The signal transmission
between the transmitter
and the vehicle is faulty.
Checking the status of the auxiliary heat-
ing
X
Press the por obutton.
The following messages can appear in the
display: Display Meaning
The auxiliary heating/
ventilation is deactiva-
ted. A malfunction has occur-
red in the auxiliary heat-
ing/ventilation. The
heating or ventilation
function selected by the
system is not available.
The vehicle battery is not
charged sufficiently or
the system is faulty.
The signal transmission
between the transmitter
and the vehicle is faulty.
The auxiliary ventilation
is switched on. The num-
ber in the display shows
the remaining time (in
minutes) for the auxiliary
ventilation.
The auxiliary heating is
switched on. The number
in the display shows the
remaining time (in
minutes) for the auxiliary
heating. Sliding sunroof
Sliding/tilting sunroof*
G
Risk of injury
Never leave children unsupervised in the
vehicle. They could operate the sliding/tilt-
ing sunroof and injure themselves. Always
take the key with you when leaving the
vehicle, even if you only leave it for a short
time. G
Risk of injury
Make sure that nobody can become trap-
ped when you are opening and closing the
sliding/tilting sunroof. If danger threatens,
release the switch and push it briefly in any
direction to stop the sliding/tilting sunroof. G
Risk of injury
The glass in the sliding/tilting sunroof
could break in an accident. If you are not
wearing a seat belt, there is a risk that you
could be thrown through the opening in the
event of the vehicle overturning. Therefore,
always wear a seat belt to reduce the risk
of injuries. Controls
* optional
211_AKB; 2; 5, en-GB
mkalafa,
Version: 2.9.4 2008-02-29T16:57:07+01:00 - Seite 180Dateiname: 6515_3416_02_buchblock.pdf; preflight
Page 218 of 401
Features
215
X
Erase the memory of the integrated remote
control (Y page 216) before programming
it for the first time.
X Turn the key to position 2in the ignition
lock.
X Press and hold one of transmitter buttons
2 to4 on the integrated remote control.
Indicator lamp 1starts to flash after a
short while. It flashes about once a second.
i Indicator lamp 1flashes immediately
the first time the transmitter button is pro-
grammed. If this transmitter button has
already been programmed, indicator
lamp 1will only start flashing at a rate of
once a second after 20 seconds have
elapsed.
X Keep the transmitter buttons depressed.
X Point the garage door's remote control with
the transmitter towards the left-hand side
of the rear-view mirror from a distance of 5
to 20 cm.
i The distance between the garage door's
remote control and the integrated garage
door opener depends on the system of the
garage door drive. You might require sev-
eral attempts. You should test every posi- tion for at least 20 seconds before trying
another position.
X Keep the transmitter button on the garage
door's remote control depressed until indi-
cator lamp 1starts to flash rapidly.
The programming was successful if indica-
tor lamp 1flashes rapidly.
X Release the transmitter buttons on the
garage door's remote control and the inte-
grated remote control.
If indicator lamp 1goes out after approxi-
mately 20 seconds and did not flash rapidly
before this:
X Release the transmitter buttons on the
integrated and portable remote controls.
X Repeat the programming procedure. At the
same time change the distance between
the garage door's remote control and the
transmitter buttons in the rear-view mirror.
i If the garage door system works with a
rolling code, after programming you must
synchronise the remote control integrated
in the rear-view mirror with the garage door
system receiver.
You will find further information in the
garage door opening system's operating instructions, e.g. the sections on “Synchro-
nising the transmitter” or “Registering a
new transmitter”. You can also call the hot-
line mentioned above.
Opening or closing the garage door Once programmed, the integrated remote
control will assume the function of the garage
door system's remote control. Please read
the operating instructions for the garage door
system.
X
Turn the key to position 2in the ignition
lock.
X Press the transmitter button on the rear-
view mirror that you have programmed to
operate the garage door.
Garage door system with fixed code: indi-
cator lamp 1lights up continuously.
Garage door system with rolling code: indi-
cator lamp 1flashes briefly and then lights
up for approximately two seconds. This is
repeated for up to 20 seconds.
i The transmitter will transmit a signal for
as long as the transmitter button is being
pressed. The transmission will be halted
after a maximum of 20 seconds and indi- Cont
rols
211_AKB; 2; 5, en-GB
mkalafa
,V ersion: 2.9.4
2008-02-29T16:57:07+01:00 - Seite 215 ZDateiname: 6515_3416_02_buchblock.pdf; preflight
Page 221 of 401
Refuelling
218 Running-in notes
The first 1,500 km
If you treat the engine with sufficient care
from the very start, it will reward you with
excellent performance for a very long period
afterwards.
R You should therefore drive at varying road
and engine speeds for the first 1,500 km.
R Avoid heavy loads, e.g. driving at full throt-
tle, during this time. Do not exceed 2
/ 3 of
the maximum permissible engine speed for
each gear.
R Change gear in good time.
R Do not shift down a gear manually in order
to brake.
Vehicles with automatic transmission*:
R Try to avoid depressing the accelerator
pedal beyond the pressure point (kick-
down).
R Only use ranges 3,2or 1for slow driving,
e.g. in mountainous terrain.
After 1,500 km you may gradually bring the
vehicle up to full road and engine speeds.
Additional driving tips for AMG vehicles: R
Do not drive faster than 140 km/h for the
first 1,500 km.
R Only bring the engine up to a maximum
speed of 4,500 rpm for a brief period.
i You should also observe these notes if the
engine or rear axle transmission on your
vehicle has been replaced. AMG vehicles with a rear axle differ-
ential lock*
Your vehicle is equipped with a self-locking
differential on the rear axle. To better protect
the differential gear on the rear axle, you
should perform an oil change after a running-
in phase of 3,000 km. This oil change will
increase the service life of your differential.
Have the oil change performed at a qualified
specialist workshop. Mercedes-Benz recom-
mends that you use a Mercedes-Benz Service
Centre for this purpose. Refuelling
Refuelling
G
Risk of explosion
Fuel is highly flammable. Fire, naked flames
and smoking are therefore prohibited when
handling fuels.
Switch off the engine and the auxiliary heat-
ing* before refuelling. G
Risk of injury
Do not come into direct contact with fuel.
Direct skin contact with fuels or the inha-
lation of fuel vapours is a health hazard. G
Risk of fire
Do not use petrol to refuel vehicles with a
diesel engine. Never mix diesel with petrol.
This causes damage to the fuel system and
engine and could result in the vehicle catch-
ing fire.
! Do not use petrol to refuel vehicles with a
diesel engine. Do not use diesel to refuel
vehicles with a petrol engine. Even small
amounts of the wrong fuel will cause dam-
age to the injection system. Damage result-
ing from adding the wrong fuel is not
covered by the warranty. Operation
* optional
211_AKB; 2; 5, en-GB
mkalafa
,V ersion: 2.9.4
2008-02-29T16:57:07+01:00 - Seite 218 Dateiname: 6515_3416_02_buchblock.pdf; preflight
Page 238 of 401
Winter driving
235that you use a Mercedes-Benz Service
Centre for this purpose. In particular, work
relevant to safety or on safety-related sys-
tems must be carried out at a qualified
specialist workshop.
Snow chains
For safety reasons, Mercedes-Benz recom-
mends that you only use snow chains which
have been specially approved for your vehicle
by Mercedes-Benz or are of a corresponding
standard of quality.
! Information about the use of snow chain-
compatible AMG winter tyres is applicable
for AMG tyres. Use of snow chains is only
permissible with these tyres.
If you intend to fit snow chains, please bear
the following points in mind:
R Snow chains cannot be fitted to all wheel/
tyre combinations.
R Snow chains must not be fitted to emer-
gency spare wheels, e.g. the "Minispare" or
collapsible emergency spare wheel.
R Always fit snow chains to both rear wheels,
even on vehicles with 4MATIC*. Comply with the manufacturer's installation
instructions.
! If snow chains are fitted to the front
wheels, they may come into contact with
the bodywork and axle components when
the vehicle is in motion and damage the
tyre or the vehicle.
On vehicles with AIRMATIC DC*, you must
only drive at raised vehicle level if snow
chains have been fitted (Y page 156).
Do not exceed the maximum permissible
speed of 50 km/h.
i You may wish to deactivate ESP ®
when
pulling away with snow chains fitted
(Y page 60). This way you can allow the
wheels to spin in a controlled manner, ach-
ieving an increased driving force (cutting
action). Winter driving
G
Risk of accident
Do not shift down for additional engine
braking on a slippery road surface. This
could cause the drive wheels to lose their
grip and the vehicle could skid.
You should drive particularly carefully on slip-
pery road surfaces. Avoid sudden accelera-
tion, steering and braking manoeuvres.
If the vehicle threatens to skid or cannot be
stopped when moving at low speed:
X Vehicles with manual transmission: engage
neutral.
X Vehicles with automatic transmission*:
shift the selector lever to N.
X Try to bring the vehicle under control using
corrective steering. Operation
* optional
211_AKB; 2; 5, en-GB
mkalafa,
Version: 2.9.4
2008-02-29T16:57:07+01:00 - Seite 235 ZDateiname: 6515_3416_02_buchblock.pdf; preflight
Page 239 of 401
Driving
tips 236 Driving tips
Rolling with the engine switched off
G
Risk of accident
Do not switch off the engine while the vehi-
cle is in motion.
There is no power assistance for the steer-
ing or the service brake when the engine is
not running.
Steering and braking require significantly
more effort and you could lose control of
the vehicle and cause an accident as a
result. Braking
G
Risk of accident
Do not change down for additional engine
braking on a slippery road surface. This
could cause the drive wheels to lose their
grip and the vehicle could skid. G
Risk of accident
Make sure that other road users are not
endangered by your braking. Downhill gradients On long and steep downhill stretches, espe-
cially if the vehicle is laden or towing a trailer,
you must shift to a lower gear in good time or,
on vehicles with automatic transmission*,
select shift range
1,2or 3.
i This also applies if you have activated
cruise control, Speedtronic or Distronic*.
This uses the braking effect of the engine and
you will not have to brake to such an extent
to maintain the same speed. This relieves the
load on the brake system and prevents the
brakes from overheating and wearing too
quickly. If you need additional braking,
depress the brake pedal repeatedly rather
than continuously.
Heavy and light loads If the brakes have been subjected to a heavy
load, do not stop the vehicle immediately, but
drive on for a short while. This allows the air-
flow to cool the brakes more quickly.
G
Risk of accident
Never depress the brake pedal continu-
ously while the vehicle is in motion, e.g.
never cause the brakes to rub by applying constant slight pedal pressure. This causes
the brake system to overheat, increases
the braking distance and can lead to the
brakes failing completely.
If the brakes have been used only moderately,
you should occasionally test their effective-
ness. To do this, brake more firmly from a
higher speed. This improves the grip of the
brakes.
Wet roads If driving in heavy rain for a prolonged period
of time without braking, there may be a
delayed reaction from the brakes, when brak-
ing for the first time. You must brake harder.
You must therefore maintain a greater dis-
tance from the vehicle in front.
Brake firmly after driving on a wet road. This
way the brake discs will become warm, drying
more quickly, which will protect them against
corrosion. Operation
* optional
211_AKB; 2; 5, en-GB
mkalafa
,V ersion: 2.9.4
2008-02-29T16:57:07+01:00 - Seite 236 Dateiname: 6515_3416_02_buchblock.pdf; preflight
Page 241 of 401
Driving ab
road 238 Driving on wet roads
If water has accumulated to a certain depth
on the road surface, there is a danger of aqua-
planing occurring, even if:
R you drive at low speeds
R the tyres have adequate tread depth
For this reason, do not drive in tyre ruts, and
brake carefully. Driving on flooded roads
If you have to drive on stretches of road on
which water has collected, please bear in
mind that:
R the maximum permitted still water depth is
25 cm.
R you should drive no faster than at walking
pace.
! Note that vehicles in front or oncoming
vehicles create waves. This could mean
that the maximum permitted water depth
is exceeded.
You must observe these notes, otherwise
damage may occur to the engine, electrics
or transmission. Driving abroad
Points to remember
An extensive Mercedes-Benz Service network
is also available in other countries. You can
obtain the relevant workshop directories
from any Mercedes-Benz Service Centre.
Only low-octane fuel is available in certain
countries.
You can find further information about fuel
grades on (Y page 218). Symmetrical dipped beam
If your journey takes you to countries where
vehicles are driven on the opposite side of the
road to the country in which the vehicle is
registered, your headlamps must be switched
to symmetrical dipped beam. Oncoming traf-
fic will be dazzled less. G
Risk of injury
Vehicles with xenon headlamps*:
Xenon bulbs are under high voltage. You
could get an electric shock and be seriously
or even fatally injured if you touch the elec-
tric contacts on xenon bulbs. Do not, there-
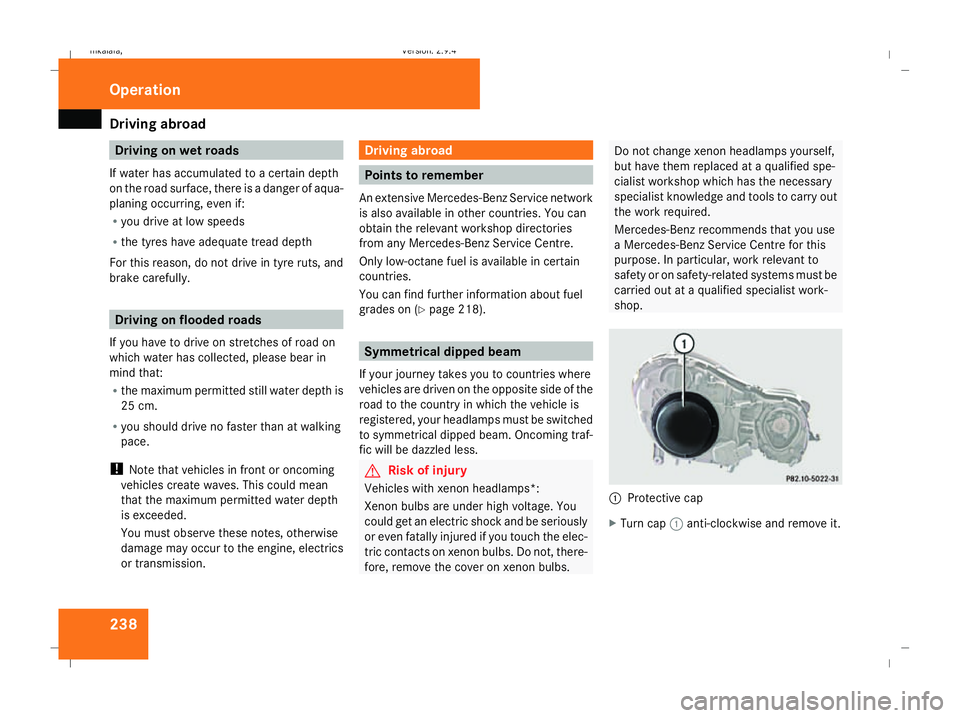
fore, remove the cover on xenon bulbs. Do not change xenon headlamps yourself,
but have them replaced at a qualified spe-
cialist workshop which has the necessary
specialist knowledge and tools to carry out
the work required.
Mercedes-Benz recommends that you use
a Mercedes-Benz Service Centre for this
purpose. In particular, work relevant to
safety or on safety-related systems must be
carried out at a qualified specialist work-
shop.
1
Protective cap
X Turn cap 1anti-clockwise and remove it. Operation
211_AKB; 2; 5, en-GB
mkalafa,
Version: 2.9.4 2008-02-29T16:57:07+01:00 - Seite 238Dateiname: 6515_3416_02_buchblock.pdf; preflight
Page 244 of 401
Trailer towing
241
Driving tips In Germany, the maximum permitted speed
for vehicle/trailer combinations is 80 km/h.
!
A maximum speed of 80 km/h should not
be exceeded, even in countries where
higher speeds are permitted for vehicle/
trailer combinations.
When towing a trailer, your vehicle's handling
characteristics will be different in comparison
to when driving without a trailer.
The vehicle/trailer combination:
R is heavier
R is restricted in its acceleration and gradi-
ent-climbing capability
R has an increased braking distance
R is affected more by strong crosswinds
R demands more sensitive steering
R consumes more fuel
On long and steep downhill gradients you
must select a lower gear in good time, or in
vehicles with automatic transmission*, select
shift range 1,2or 3.
i This also applies if you have activated
cruise control, Distronic* or Speedtronic. This uses the braking effect of the engine and
you will not have to brake to such an extent
to maintain the same speed. This relieves the
load on the brake system and prevents the
brakes from overheating and wearing too
quickly. If you need additional braking,
depress the brake pedal repeatedly rather
than continuously. G
Risk of accident
Never depress the brake pedal continu-
ously while the vehicle is in motion, e.g.
never cause the brakes to rub by applying
constant slight pedal pressure. This causes
the brake system to overheat, increases
the braking distance and can lead to the
brakes failing completely.
Driving tips
R Maintain a greater distance from the vehi-
cle in front than when driving without a
trailer.
R Avoid braking abruptly. If possible, brake
gently at first to allow the trailer to run on.
Then increase the braking force rapidly.
R The values given for gradient-climbing
capabilities from a standstill refer to sea
level. When driving in mountainous areas,
note that the power output of the engine, and consequently the vehicle's gradient-
climbing capability, decrease with increas-
ing altitude.
If the trailer swings from side to side:
X Do not accelerate.
X Do not counter-steer.
X Brake if necessary. G
Risk of accident
On no account should you attempt to draw
the vehicle/trailer combination out by
increasing speed. Folding in the ball coupling
i Fold in the ball coupling when you are not
using the trailer tow hitch. Operation
* optional
211_AKB; 2; 5, en-GB
mkalafa
,V ersion: 2.9.4
2008-02-29T16:57:07+01:00 - Seite 241 ZDateiname: 6515_3416_02_buchblock.pdf; preflight