2008 MERCEDES-BENZ E-CLASS ESTATE fuses
[x] Cancel search: fusesPage 10 of 401
7
Emergency unlocking
Boo t.. . . . . . . . . . . . . . . . . . . . . . .307
Tailgate . . . . . . . . . . . . . . . . . . . . .308
Vehicle . . . . . . . . . . . . . . . . . . . . . .306
Engine
Display message . . . . . . . . . . . . . .278
Running irregularl y.. . . . . . . . . . . .296
Starting problems . . . . . . . . . . . . .295
Starting with KEYLESS GO . . . . . . .111
Starting with the key . . . . . . . . . . .110
Technical data . . . . . . . . . . . . . . . .348
Engine diagnostic warning lamp . ..2 88
Engine electronics . . . . . . . . . . . . . ..345
Malfunction . . . . . . . . . . . . . . . . . .295
Engine number . . . . . . . . . . . . . . . . . .347
Engine oil . . . . . . . . . . . . . . . . . . . . . .385
Capacities . . . . . . . . . . . . . . . . . . .224
Checking the oil level (dipstick) . . .224
Checking the oil level (on-board
computer) . . . . . . . . . . . . . . . . . . .223
Consumption . . . . . . . . . . . . . . . . .223
Display message . . . . . . . . . .224, 277
Filler neck . . . . . . . . . . . . . . . . . . .225
Temperature display (on-board
computer) . . . . . . . . . . . . . . . . . . .126
Topping up . . . . . . . . . . . . . . . . . . .225
ESP ®
(Electronic Stability Program) .60
Activating/deactivating . . . . . . . . . .60
Display message . . . . . . . . . .260, 269
Warning lamp . . . . . . . . . . . . . .60, 285 Exterior lighting
Delayed switch-off (on-board
computer) . . . . . . . . . . . . . . . . . . .136
Exterior mirror parking position
Storing . . . . . . . . . . . . . . . . . . . .92, 94
Exterior mirrors
Adjusting . . . . . . . . . . . . . . . . . . . . .91
Anti-dazzle mode (automatic) . . . . .92
Folding in/out (automatically ).. . . .92
Folding in/out (electrically) . . . . . . .91
Folding in when locking (on-board
computer) . . . . . . . . . . . . . . . . . . .139
Malfunction . . . . . . . . . . . . . . . . . .300
Parking position . . . . . . . . . . . . .92, 94
Resetting . . . . . . . . . . . . . . . . . . . . .92
Storing settings . . . . . . . . . . . . . . . .93
Exterior view
Overview . . . . . . . . . . . . . . . . . . . . .20 F
Fastening seat belts Children . . . . . . . . . . . . . . . . . . . . . .56
Fire extinguisher . . . . . . . . . . . . . . . .253
First-aid kit . . . . . . . . . . . . . . . . . . . . .253
Flat tyre MOExtended run-flat system . . . . .328
Preparing the vehicle . . . . . . . . . . .317
TIREFIT kit . . . . . . . . . . . . . . . . . . .318
Floormat . . . . . . . . . . . . . . . . . . . . . . .216 Foglamps
Display message . . . . . . . . . . . . . .275
Folding bench seat . . . . . . . . . . . . . ..86
Folding out/folding back . . . . . . . . .87
Fording . . . . . . . . . . . . . . . . . . . . . . . .238
Frequencies Garage door opener . . . . . . . . . . . .391
Telephone . . . . . . . . . . . . . . . . . . .346
Front airbag . . . . . . . . . . . . . . . . . . . . .44
Front-passenger airbag . . . . . . . . . . ..44
Fuel . . . . . . . . . . . . . . . . . . . . . . . . . . .377
Diese l.. . . . . . . . . . . . . . . . . . . . . .220
Display message . . . . . . . . . . . . . .270
Loss . . . . . . . . . . . . . . . . . . . . . . . .294
Petrol . . . . . . . . . . . . . . . . . . . . . . .219
Fuel consumption . . . . . . . . . ..379, 380
Fuel filler flap Opening/closing . . . . . . . . . . . . . .218
Fuel line
Malfunction . . . . . . . . . . . . . . . . . .294
Fuel tank
Malfunction . . . . . . . . . . . . . . . . . .294
Range (on-board computer) . . . . . .140
Fuse allocation chart . . . . . . . . . . ..340
Fuse box Boot/luggage compartment . . . . .341
Dashboard . . . . . . . . . . . . . . . . . . .341
Fuses . . . . . . . . . . . . . . . . . . . . . . . . . .340 Index
211_AKB; 2; 5, en-GB
mkalafa,
Version: 2.9.4
2008-02-29T16:57:07+01:00 - Seite 7 Dateiname: 6515_3416_02_buchblock.pdf; preflight
Page 159 of 401
Driving sys
tems 156 R
HOLD is deactivated by depressing the
accelerator pedal or the brake pedal
R there is a malfunction in the system or an
interruption in the power supply, e.g. bat-
tery failure
R the electrical system in the engine com-
partment, the battery or the fuses are
tampered with
R the battery is disconnected G
Risk of accident
If you wish to leave the vehicle or park it,
deactivate HOLD and secure the vehicle
against rolling away.
You will see a warning message in the multi-
function display if HOLD is activated and:
R the driver's door is opened and you release
the seat belt
R the ignition is switched off
R the bonnet is opened
Vehicles with manual transmission:
Brake immediately
X Immediately depress the brake pedal firmly
until the warning message in the multi-
function display goes out. This deactivates
HOLD. Vehicles with automatic transmission*:
Selector lever in park position
X Move the selector lever to Pto prevent the
vehicle from rolling away.
HOLD is deactivated. The warning message
in the multi-function display goes out.
A horn will also sound at regular intervals if
HOLD is activated and you:
R stop the engine and open the driver's door
R open the bonnet
The horn draws your attention to the fact that
the vehicle has been parked while HOLD is
still activated. The sound becomes louder if
you attempt to lock the vehicle. The vehicle
is not locked until HOLD is deactivated.
i If the ignition has been switched off, the
engine cannot be restarted until HOLD is
deactivated.
If there is a fault in the system or power supply
while HOLD is activated, the Brake immedi-
ately message appears in the multi-function
display. Immediately depress the brake firmly
until the warning message disappears from
the multi-function display, or in vehicles with
automatic transmission*, move the selector
lever to P. This deactivates HOLD. AIRMATIC DC*
Vehicle level Your vehicle automatically adjusts its ride
height to reduce petrol consumption and
improve driving safety.
The following vehicle levels are possible:
R
Normal
R Raised
R Lowered
The "Normal" and "Raised" vehicle levels can
be set manually.
The "Lowered" vehicle level is set automati-
cally:
R at speeds above 140 km/h
R if you have selected "Sports tuning I or
II" (Y page 157)
Setting the vehicle level manually
Select the "Normal" setting for normal road
surfaces and "Raised" for driving with snow
chains or on particularly poor road surfaces. G
Risk of injury
Make sure that nobody is in the vicinity of
the wheel housing or under the vehicle Controls
* optional
211_AKB; 2; 5, en-GB
mkalafa
,V ersion: 2.9.4
2008-02-29T16:57:07+01:00 - Seite 156 Dateiname: 6515_3416_02_buchblock.pdf; preflight
Page 254 of 401
251
Where will I find...?
...........................252
Display messages ............................. 257
Troubleshooting ................................ 282
Locking/unlocking in an emer-
gency ................................................. 306
Resetting triggered NECK-PRO
head restraints .................................. 309
Changing the batteries .....................310
Changing the bulbs ...........................311
Replacing the wiper blades ..............315
Flat tyre ............................................. 317
Battery ............................................... 329
Jump-starting .................................... 333
Towing and tow-starting ..................337
Fuses .................................................. 340 Practical advice
211_AKB; 2; 5, en-GB
mkalafa,
Version: 2.9.4 2008-02-29T16:57:07+01:00 - Seite 251Dateiname: 6515_3416_02_buchblock.pdf; preflight
Page 343 of 401
Fuses
340 Transporting the vehicle
The towing eyes can be used to pull the vehi-
cle onto a trailer or transporter for transport-
ing purposes.
! Only lash the vehicle down by the wheels
or wheel rims, not by parts of the vehicle
such as axle or steering components. The
vehicle could otherwise be damaged.
Vehicles with manual transmission X
Shift to neutral.
Vehicles with automatic transmission* X
Turn the key to position 2in the ignition
lock.
X Move the selector lever to N. Fuses
Notes on changing fuses
The fuses in your vehicle serve to close down
faulty circuits. If a fuse blows, all the compo-
nents on the circuit and their functions will
fail.
Blown fuses must be replaced with fuses of
the same rating, which you can recognise by
the colour and value. The fuse ratings are lis-
ted in the fuse allocation chart. A Mercedes-
Benz Service Centre will be happy to advise
you. G
Risk of fire
Only use fuses that have been approved for
Mercedes-Benz vehicles and which have
the correct fuse rating for the systems con-
cerned. Do not attempt to repair or bridge
faulty fuses. Otherwise, a circuit overload
could cause a fire. Have the cause traced
and rectified at a qualified specialist work-
shop, e.g. a Mercedes-Benz Service Centre.
If the newly inserted fuse also blows, have the
cause traced and rectified at a qualified spe-
cialist workshop, e.g. a Mercedes-Benz
Service Centre. !
Only use fuses that have been approved
for Mercedes-Benz vehicles and which
have the correct fuse rating for the system
concerned. Otherwise, components or sys-
tems could be damaged.
The fuses are located in various fuse boxes:
R Main fuse box on the driver's side of the
dashboard
R Fuse box in the boot/luggage compart-
ment on the left-hand side of the vehicle
Fuse allocation chart The fuse allocation chart is in the main fuse
box in the dashboard.
Before changing a fuse
X Park the vehicle.
X Switch off all electrical consumers.
X Remove the key from the ignition lock. Practical advice
* optional
211_AKB; 2; 5, en-GB
mkalafa,
Version: 2.9.4 2008-02-29T16:57:07+01:00 - Seite 340Dateiname: 6515_3416_02_buchblock.pdf; preflight
Page 344 of 401
Fuses
341Main fuse box
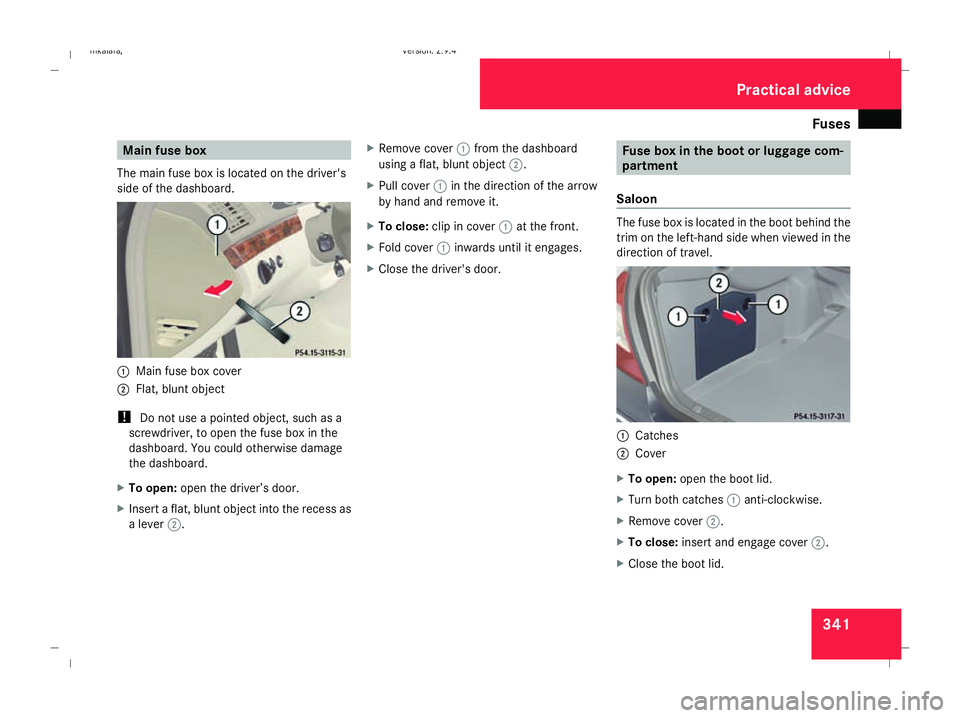
The main fuse box is located on the driver's
side of the dashboard. 1
Main fuse box cover
2 Flat, blunt object
! Do not use a pointed object, such as a
screwdriver, to open the fuse box in the
dashboard. You could otherwise damage
the dashboard.
X To open: open the driver’s door.
X Insert a flat, blunt object into the recess as
a lever 2. X
Remove cover 1from the dashboard
using a flat, blunt object 2.
X Pull cover 1in the direction of the arrow
by hand and remove it.
X To close: clip in cover 1at the front.
X Fold cover 1inwards until it engages.
X Close the driver's door. Fuse box in the boot or luggage com-
partment
Saloon The fuse box is located in the boot behind the
trim on the left-hand side when viewed in the
direction of travel.
1
Catches
2 Cover
X To open: open the boot lid.
X Turn both catches 1anti-clockwise.
X Remove cover 2.
X To close: insert and engage cover 2.
X Close the boot lid. Practical advice
211_AKB; 2; 5, en-GB
mkalafa,
Version: 2.9.4 2008-02-29T16:57:07+01:00 - Seite 341 ZDateiname: 6515_3416_02_buchblock.pdf; preflight
Page 345 of 401
Fuses
342
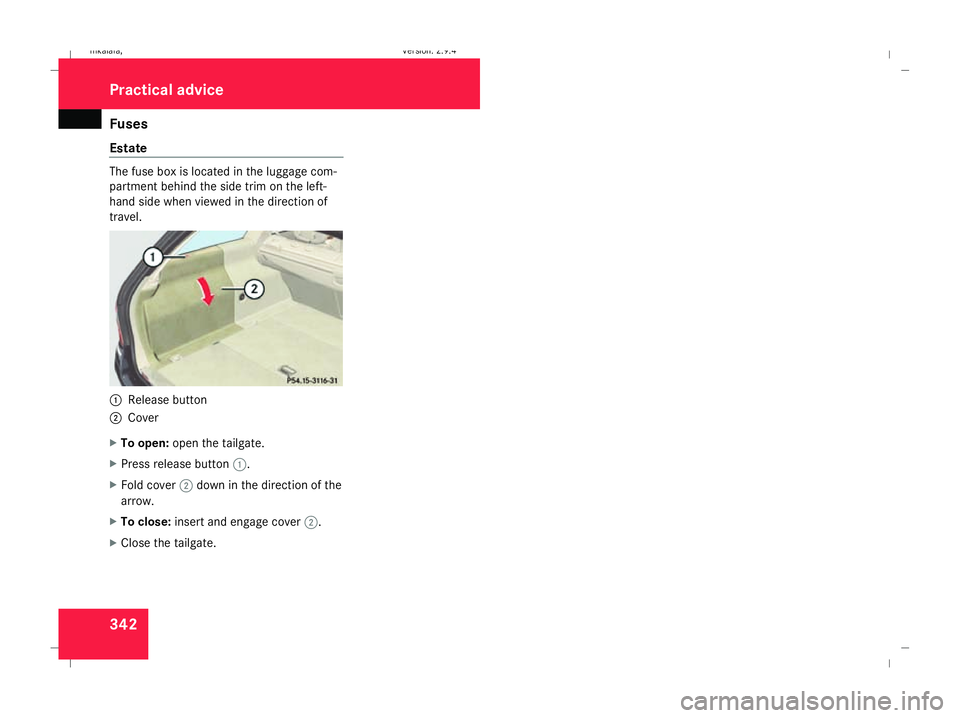
Estate The fuse box is located in the luggage com-
partment behind the side trim on the left-
hand side when viewed in the direction of
travel. 1
Release button
2 Cover
X To open: open the tailgate.
X Press release button 1.
X Fold cover 2down in the direction of the
arrow.
X To close: insert and engage cover 2.
X Close the tailgate. Practical advice
211_AKB; 2; 5, en-GB
mkalafa,
Version: 2.9.4 2008-02-29T16:57:07+01:00 - Seite 342Dateiname: 6515_3416_02_buchblock.pdf; preflight