2008 MERCEDES-BENZ E-CLASS ESTATE transmission
[x] Cancel search: transmissionPage 146 of 401
Driving sys
tems 143Cruise control
Cruise control maintains a constant road
speed for you. It brakes automatically in order
to avoid exceeding the set speed. On long and
steep downhill gradients, especially if the
vehicle is laden or towing a trailer, you must
shift to a lower gear in good time or select
shift range 1,2or 3in vehicles with automatic
transmission*. By doing so you will make use
of the braking effect of the engine, which
relieves the load on the brake system and
prevents the brakes from overheating and
wearing too quickly. G
Risk of accident
Do not change down for additional engine
braking on a slippery road surface. This
could cause the drive wheels to lose their
grip and the vehicle could skid.
Use cruise control only if road and traffic con-
ditions make it appropriate to maintain a
steady speed for a prolonged period. You can
store any road speed above 30 km/h. G
Risk of accident
Cruise control cannot take account of road
and traffic conditions.
Always pay attention to traffic conditions
even when cruise control is activated. Cruise control is only an aid designed to
assist driving. You are responsible for the
vehicle's speed and for braking in good
time. G
Risk of accident
Do not use cruise control:
R in road and traffic conditions which do
not allow you to maintain a constant
speed (e.g. heavy traffic or winding
roads). You could otherwise cause an
accident.
R on slippery roads. Braking or accelerat-
ing could cause the drive wheels to lose
traction and the vehicle could then skid.
R when there is poor visibility, e.g. due to
fog, heavy rain or snow
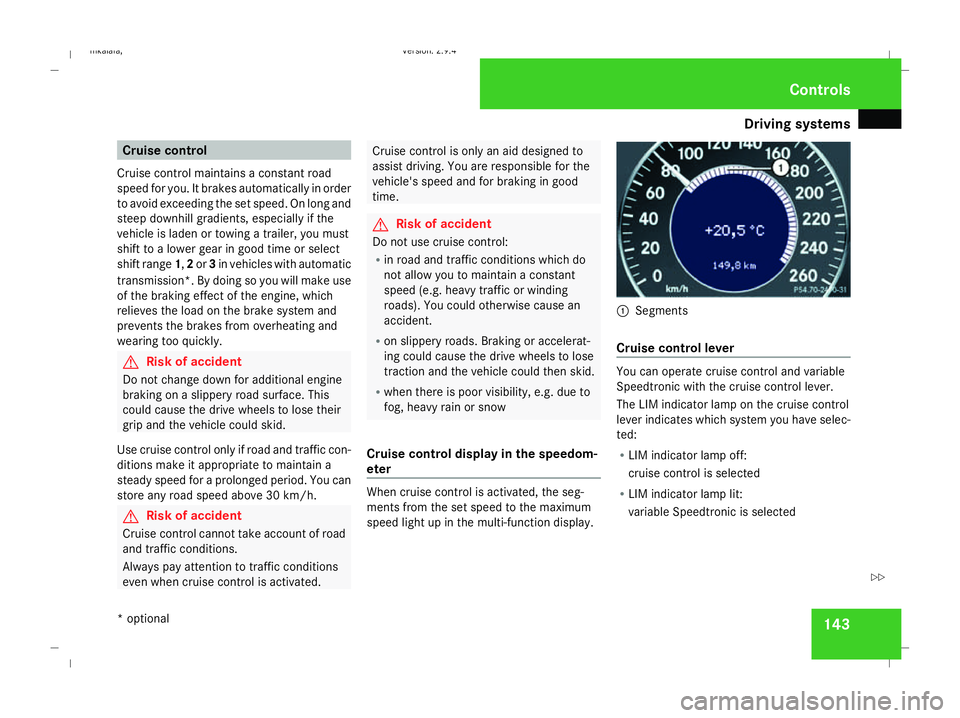
Cruise control display in the speedom-
eter When cruise control is activated, the seg-
ments from the set speed to the maximum
speed light up in the multi-function display. 1
Segments
Cruise control lever You can operate cruise control and variable
Speedtronic with the cruise control lever.
The LIM indicator lamp on the cruise control
lever indicates which system you have selec-
ted:
R
LIM indicator lamp off:
cruise control is selected
R LIM indicator lamp lit:
variable Speedtronic is selected Controls
* optional
211_AKB; 2; 5, en-GB
mkalafa
,V ersion: 2.9.4
2008-02-29T16:57:07+01:00 - Seite 143 ZDateiname: 6515_3416_02_buchblock.pdf; preflight
Page 147 of 401
Driving sys
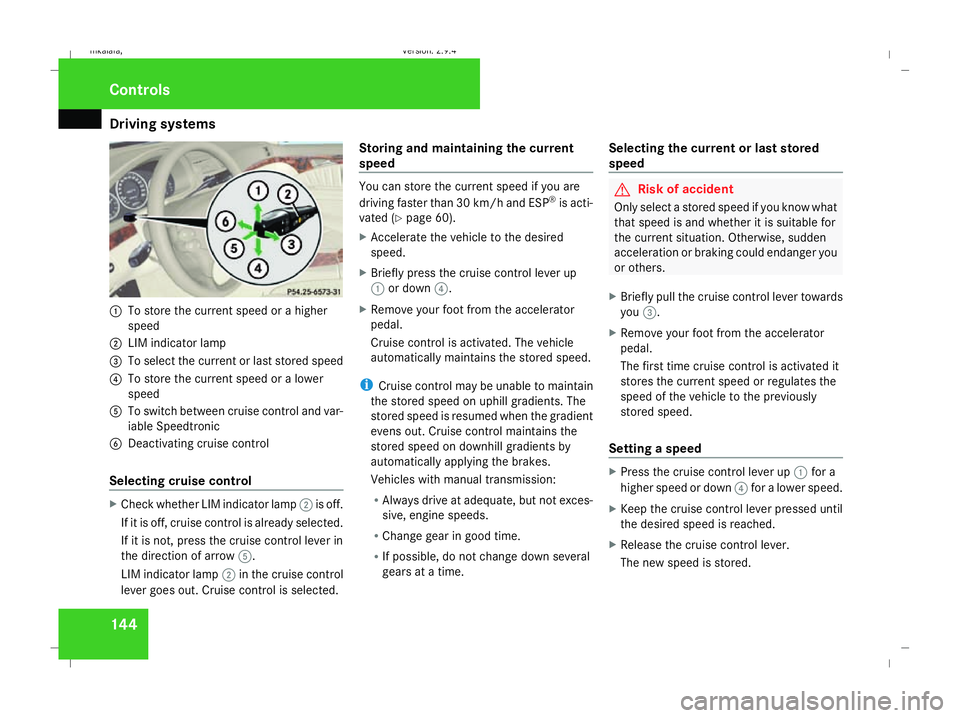
tems 1441
To store the current speed or a higher
speed
2 LIM indicator lamp
3 To select the current or last stored speed
4 To store the current speed or a lower
speed
5 To switch between cruise control and var-
iable Speedtronic
6 Deactivating cruise control
Selecting cruise control X
Check whether LIM indicator lamp 2is off.
If it is off, cruise control is already selected.
If it is not, press the cruise control lever in
the direction of arrow 5.
LIM indicator lamp 2in the cruise control
lever goes out. Cruise control is selected. Storing and maintaining the current
speed You can store the current speed if you are
driving faster than 30 km/h and ESP ®
is acti-
vated (Y page 60).
X Accelerate the vehicle to the desired
speed.
X Briefly press the cruise control lever up
1 or down 4.
X Remove your foot from the accelerator
pedal.
Cruise control is activated. The vehicle
automatically maintains the stored speed.
i Cruise control may be unable to maintain
the stored speed on uphill gradients. The
stored speed is resumed when the gradient
evens out. Cruise control maintains the
stored speed on downhill gradients by
automatically applying the brakes.
Vehicles with manual transmission:
R Always drive at adequate, but not exces-
sive, engine speeds.
R Change gear in good time.
R If possible, do not change down several
gears at a time. Selecting the current or last stored
speed G
Risk of accident
Only select a stored speed if you know what
that speed is and whether it is suitable for
the current situation. Otherwise, sudden
acceleration or braking could endanger you
or others.
X Briefly pull the cruise control lever towards
you 3.
X Remove your foot from the accelerator
pedal.
The first time cruise control is activated it
stores the current speed or regulates the
speed of the vehicle to the previously
stored speed.
Setting a speed X
Press the cruise control lever up 1for a
higher speed or down 4for a lower speed.
X Keep the cruise control lever pressed until
the desired speed is reached.
X Release the cruise control lever.
The new speed is stored. Controls
211_AKB; 2; 5, en-GB
mkalafa
,V ersion: 2.9.4
2008-02-29T16:57:07+01:00 - Seite 144 Dateiname: 6515_3416_02_buchblock.pdf; preflight
Page 148 of 401
Driving sys
tems 145
i
Cruise control is not deactivated if you
depress the accelerator pedal. For exam-
ple, if you accelerate briefly to overtake,
cruise control adjusts the vehicle's speed
to the last speed stored after you have fin-
ished overtaking.
i Deceleration of the vehicle by means of
the cruise control lever is assisted by auto-
matic application of the brakes.
Vehicles with automatic transmission*:
On long downhill gradients, the automatic
transmission shifts down as a further meas-
ure.
Making fine adjustments in 1 km/h
increments X
Briefly press the cruise control lever up
1 for a higher speed or down 4for a
lower speed.
The last speed stored is increased or
reduced.
Deactivating cruise control There are several ways to deactivate cruise
control: X
Briefly press the cruise control lever for-
wards 6.
or
X Brake.
or
X Briefly press the cruise control lever in the
direction of arrow 5.
Variable Speedtronic is selected. LIM indi-
cator lamp 2in the cruise control lever
lights up.
Cruise control is automatically deactivated if,
for example:
R you depress the parking brake
R you are driving at less than 30 km/h
R ESP ®
is intervening or you deactivate
ESP ®
R you move the selector lever to Nin vehicles
with automatic transmission* while driving
If cruise control is deactivated, you will hear
a warning tone. You will see the Cruise con-
trol off message in the multi-function dis-
play for approximately five seconds.
i The last speed stored is cleared when you
switch off the engine. Distronic*
Distronic regulates the speed and automati-
cally maintains the distance to the vehicle in
front. It brakes automatically in order to avoid
exceeding the set speed. On long and steep
downhill gradients, especially if the vehicle is
laden or towing a trailer, you must select shift
range 1,2or 3. By doing so,you will make use
of the braking effect of the engine, which
relieves the load on the brake system and
prevents the brakes from overheating and
wearing too quickly. G
Risk of accident
Do not change down for additional engine
braking on a slippery road surface. This
could cause the drive wheels to lose their
grip and the vehicle could skid. G
Risk of accident
Distronic is only an aid designed to assist
driving. The driver remains fully responsible
for the vehicle's distance from other vehi-
cles, the vehicle's speed and braking in
good time. Controls
* optional
211_AKB; 2; 5, en-GB
mkalafa
,V ersion: 2.9.4
2008-02-29T16:57:07+01:00 - Seite 145 ZDateiname: 6515_3416_02_buchblock.pdf; preflight
Page 155 of 401
Driving sys
tems 152
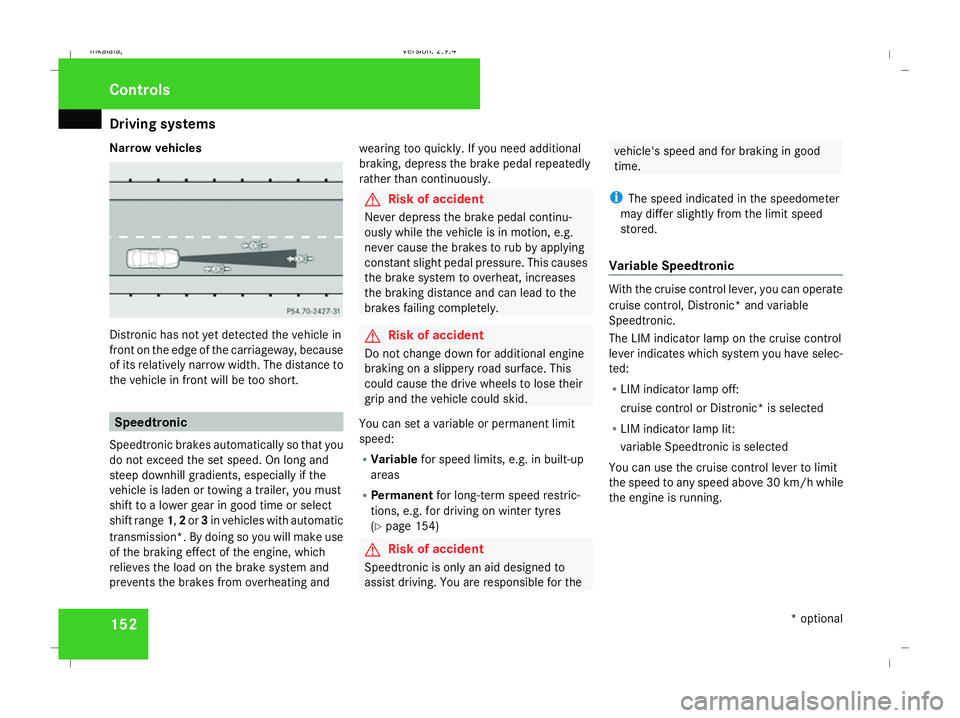
Narrow vehicles
Distronic has not yet detected the vehicle in
front on the edge of the carriageway, because
of its relatively narrow width. The distance to
the vehicle in front will be too short. Speedtronic
Speedtronic brakes automatically so that you
do not exceed the set speed. On long and
steep downhill gradients, especially if the
vehicle is laden or towing a trailer, you must
shift to a lower gear in good time or select
shift range 1,2or 3in vehicles with automatic
transmission*. By doing so you will make use
of the braking effect of the engine, which
relieves the load on the brake system and
prevents the brakes from overheating and wearing too quickly. If you need additional
braking, depress the brake pedal repeatedly
rather than continuously. G
Risk of accident
Never depress the brake pedal continu-
ously while the vehicle is in motion, e.g.
never cause the brakes to rub by applying
constant slight pedal pressure. This causes
the brake system to overheat, increases
the braking distance and can lead to the
brakes failing completely. G
Risk of accident
Do not change down for additional engine
braking on a slippery road surface. This
could cause the drive wheels to lose their
grip and the vehicle could skid.
You can set a variable or permanent limit
speed:
R Variable for speed limits, e.g. in built-up
areas
R Permanent for long-term speed restric-
tions, e.g. for driving on winter tyres
(Y page 154) G
Risk of accident
Speedtronic is only an aid designed to
assist driving. You are responsible for the vehicle's speed and for braking in good
time.
i The speed indicated in the speedometer
may differ slightly from the limit speed
stored.
Variable Speedtronic With the cruise control lever, you can operate
cruise control, Distronic* and variable
Speedtronic.
The LIM indicator lamp on the cruise control
lever indicates which system you have selec-
ted:
R LIM indicator lamp off:
cruise control or Distronic* is selected
R LIM indicator lamp lit:
variable Speedtronic is selected
You can use the cruise control lever to limit
the speed to any speed above 30 km/ hwhile
the engine is running. Controls
* optional
211_AKB; 2; 5, en-GB
mkalafa,
Version: 2.9.4 2008-02-29T16:57:07+01:00 - Seite 152Dateiname: 6515_3416_02_buchblock.pdf; preflight
Page 158 of 401
Driving sys
tems 155
Permanent Speedtronic is deactivated.
R A limit speed between 240 km/hand
160 km/h in increments of 10 km/h.
X To select a different display, press the
j, èorÿ button. HOLD
HOLD relieves the strain on the driver:
R when pulling away, especially on steep
slopes
R when manoeuvring on steep slopes
R when waiting in traffic
The vehicle is kept stationary without the
driver having to depress the brake pedal.
The braking effect is cancelled and HOLD
deactivated when you depress the accelera-
tor pedal to pull away.
Activation conditions You can activate HOLD if:
R
the vehicle is stationary
R the engine is running
R the driver's door is closed
R the parking brake is not applied R
the bonnet is closed
R on vehicles with automatic transmission*,
the selector lever is in position D,Ror N
Activating HOLD X
Make sure that the activation conditions
are met.
X Depress the brake.
X Depress the brake again quickly until
HOLD appears in the display.
HOLD is activated. You can release the
brake pedal.
i If depressing the brake pedal the first
time does not activate HOLD, wait briefly
and then try again. G
Risk of accident
The vehicle's brakes are applied when
HOLD is activated. For this reason, deacti-
vate HOLD if the vehicle is to be set in
motion by other means (e.g. in a car wash
or by towing). Deactivating HOLD HOLD is deactivated if:
R
you accelerate. On vehicles with automatic
transmission*, only if the selector lever is
in position Dor R.
R the selector lever is moved to Pon vehicles
with automatic transmission*
R you release the brakes completely and
apply them again with a certain amount of
pressure until the HOLDmessage in the
multi-function display goes out G
Risk of accident
Never get out of the vehicle when HOLD is
activated.
HOLD must never be operated or deactiva-
ted by a passenger or from outside the
vehicle.
HOLD does not replace the parking brake
and must not be used for parking.
The HOLD braking effect is cancelled and
the vehicle can start moving if: Controls
* optional
211_AKB; 2; 5, en-GB
mkalafa
,V ersion: 2.9.4
2008-02-29T16:57:07+01:00 - Seite 155 ZDateiname: 6515_3416_02_buchblock.pdf; preflight
Page 159 of 401
Driving sys
tems 156 R
HOLD is deactivated by depressing the
accelerator pedal or the brake pedal
R there is a malfunction in the system or an
interruption in the power supply, e.g. bat-
tery failure
R the electrical system in the engine com-
partment, the battery or the fuses are
tampered with
R the battery is disconnected G
Risk of accident
If you wish to leave the vehicle or park it,
deactivate HOLD and secure the vehicle
against rolling away.
You will see a warning message in the multi-
function display if HOLD is activated and:
R the driver's door is opened and you release
the seat belt
R the ignition is switched off
R the bonnet is opened
Vehicles with manual transmission:
Brake immediately
X Immediately depress the brake pedal firmly
until the warning message in the multi-
function display goes out. This deactivates
HOLD. Vehicles with automatic transmission*:
Selector lever in park position
X Move the selector lever to Pto prevent the
vehicle from rolling away.
HOLD is deactivated. The warning message
in the multi-function display goes out.
A horn will also sound at regular intervals if
HOLD is activated and you:
R stop the engine and open the driver's door
R open the bonnet
The horn draws your attention to the fact that
the vehicle has been parked while HOLD is
still activated. The sound becomes louder if
you attempt to lock the vehicle. The vehicle
is not locked until HOLD is deactivated.
i If the ignition has been switched off, the
engine cannot be restarted until HOLD is
deactivated.
If there is a fault in the system or power supply
while HOLD is activated, the Brake immedi-
ately message appears in the multi-function
display. Immediately depress the brake firmly
until the warning message disappears from
the multi-function display, or in vehicles with
automatic transmission*, move the selector
lever to P. This deactivates HOLD. AIRMATIC DC*
Vehicle level Your vehicle automatically adjusts its ride
height to reduce petrol consumption and
improve driving safety.
The following vehicle levels are possible:
R
Normal
R Raised
R Lowered
The "Normal" and "Raised" vehicle levels can
be set manually.
The "Lowered" vehicle level is set automati-
cally:
R at speeds above 140 km/h
R if you have selected "Sports tuning I or
II" (Y page 157)
Setting the vehicle level manually
Select the "Normal" setting for normal road
surfaces and "Raised" for driving with snow
chains or on particularly poor road surfaces. G
Risk of injury
Make sure that nobody is in the vicinity of
the wheel housing or under the vehicle Controls
* optional
211_AKB; 2; 5, en-GB
mkalafa
,V ersion: 2.9.4
2008-02-29T16:57:07+01:00 - Seite 156 Dateiname: 6515_3416_02_buchblock.pdf; preflight
Page 163 of 401
Driving sys
tems 160
If there is an obstacle within this range, all
warning displays light up and a tone sounds.
If the distance falls below the minimum clear-
ance, it may no longer be shown.
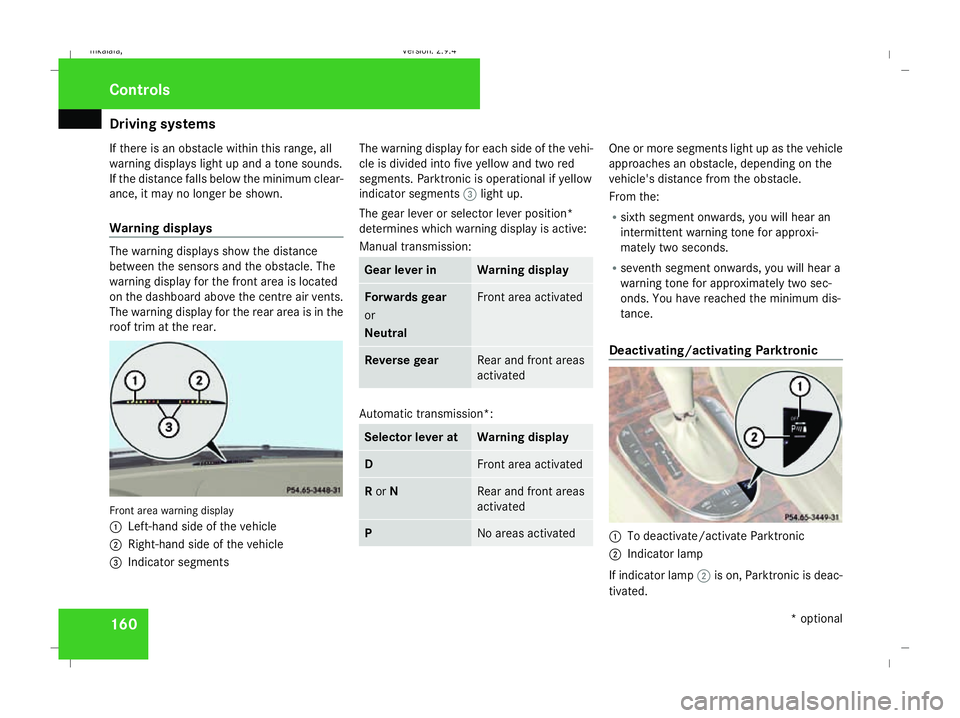
Warning displays The warning displays show the distance
between the sensors and the obstacle. The
warning display for the front area is located
on the dashboard above the centre air vents.
The warning display for the rear area is in the
roof trim at the rear. Front area warning display
1
Left-hand side of the vehicle
2 Right-hand side of the vehicle
3 Indicator segments The warning display for each side of the vehi-
cle is divided into five yellow and two red
segments. Parktronic is operational if yellow
indicator segments
3light up.
The gear lever or selector lever position*
determines which warning display is active:
Manual transmission: Gear lever in Warning display
Forwards gear
or
Neutral Front area activated
Reverse gear Rear and front areas
activated
Automatic transmission*:
Selector lever at Warning display
D Front area activated
R
or N Rear and front areas
activated
P No areas activated One or more segments light up as the vehicle
approaches an obstacle, depending on the
vehicle's distance from the obstacle.
From the:
R
sixth segment onwards, you will hear an
intermittent warning tone for approxi-
mately two seconds.
R seventh segment onwards, you will hear a
warning tone for approximately two sec-
onds. You have reached the minimum dis-
tance.
Deactivating/activating Parktronic 1
To deactivate/activate Parktronic
2 Indicator lamp
If indicator lamp 2is on, Parktronic is deac-
tivated. Controls
* optional
211_AKB; 2; 5, en-GB
mkalafa
,V ersion: 2.9.4
2008-02-29T16:57:07+01:00 - Seite 160 Dateiname: 6515_3416_02_buchblock.pdf; preflight
Page 181 of 401
Air conditioning
178
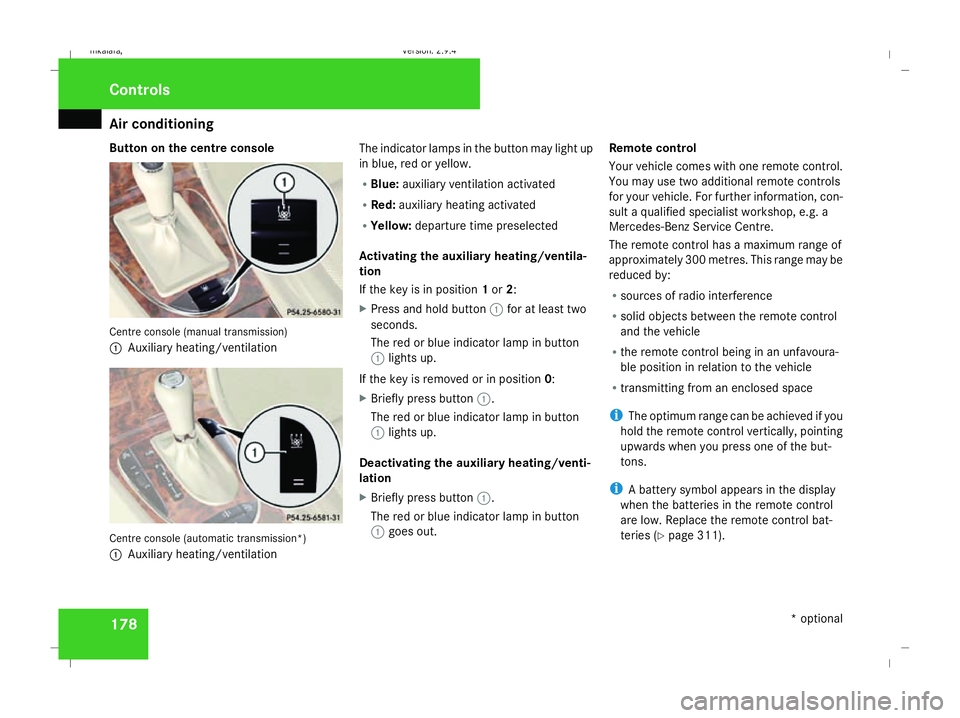
Button on the centre console
Centre console (manual transmission)
1
Auxiliary heating/ventilation Centre console (automatic transmission*)
1 Auxiliary heating/ventilation The indicator lamps in the button may light up
in blue, red or yellow.
R
Blue: auxiliary ventilation activated
R Red: auxiliary heating activated
R Yellow: departure time preselected
Activating the auxiliary heating/ventila-
tion
If the key is in position 1or 2:
X Press and hold button 1for at least two
seconds.
The red or blue indicator lamp in button
1 lights up.
If the key is removed or in position 0:
X Briefly press button 1.
The red or blue indicator lamp in button
1 lights up.
Deactivating the auxiliary heating/venti-
lation
X Briefly press button 1.
The red or blue indicator lamp in button
1 goes out. Remote control
Your vehicle comes with one remote control.
You may use two additional remote controls
for your vehicle. For further information, con-
sult a qualified specialist workshop, e.g. a
Mercedes-Benz Service Centre.
The remote control has a maximum range of
approximately 300 metres. This range may be
reduced by:
R sources of radio interference
R solid objects between the remote control
and the vehicle
R the remote control being in an unfavoura-
ble position in relation to the vehicle
R transmitting from an enclosed space
i The optimum range can be achieved if you
hold the remote control vertically, pointing
upwards when you press one of the but-
tons.
i A battery symbol appears in the display
when the batteries in the remote control
are low. Replace the remote control bat-
teries (Y page 311). Controls
* optional
211_AKB; 2; 5, en-GB
mkalafa
, Version: 2.9.4 2008-02-29T16:57:07+01:00 - Seite 178Dateiname: 6515_3416_02_buchblock.pdf; preflight