2008 MERCEDES-BENZ E-CLASS ESTATE mirror controls
[x] Cancel search: mirror controlsPage 68 of 401
65
Opening and closing
...........................66
Key positions ....................................... 76
Seats .................................................... 77
Steering wheel .................................... 89
Mirrors ................................................. 91
Memory functions* .............................93
Seat belts ............................................. 95
Lights ................................................... 99
Windscreen wipers ...........................105
Side windows .................................... 107Driving and parking
..........................110
Transmission ..................................... 114
Instrument cluster ............................120
On-board computer ..........................121
Driving systems ................................ 142
Air conditioning ................................. 162
Sliding sunroof .................................. 180
Loading and stowing ........................186
Features ............................................. 207 Controls
211_AKB; 2; 5, en-GB
mkalafa,
Version: 2.9.4
2008-02-29T16:57:07+01:00 - Seite 65 Dateiname: 6515_3416_02_buchblock.pdf; preflight
Page 94 of 401
Mirrors
91Mirrors
Rear-view mirror
X Adjust the rear-view mirror by hand so you
have a good overview of the traffic condi-
tions.
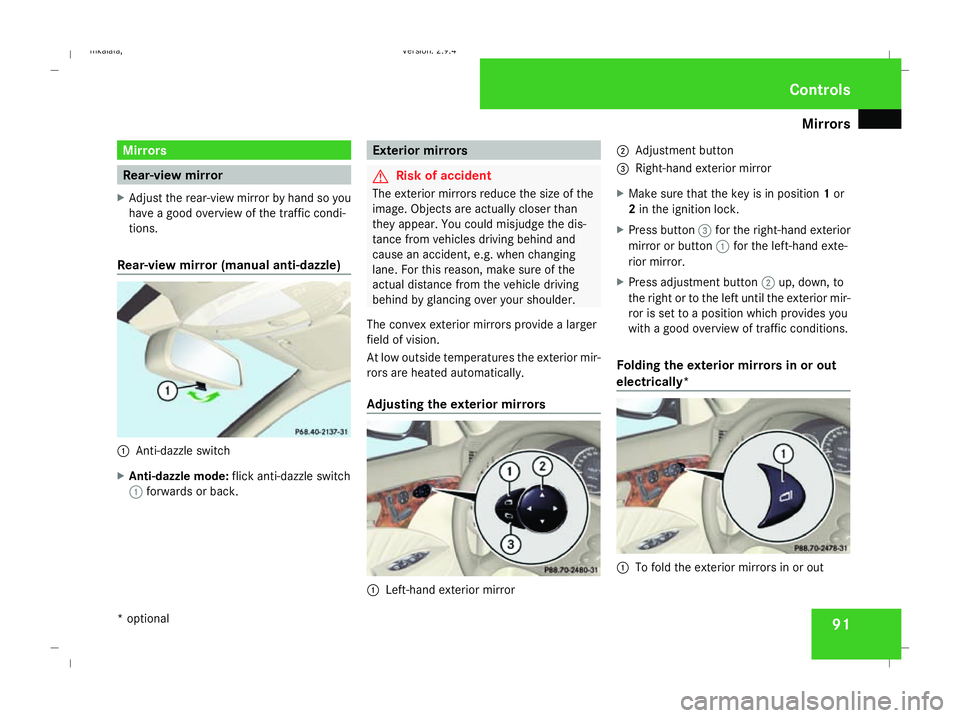
Rear-view mirror (manual anti-dazzle) 1
Anti-dazzle switch
X Anti-dazzle mode: flick anti-dazzle switch
1 forwards or back. Exterior mirrors
G
Risk of accident
The exterior mirrors reduce the size of the
image. Objects are actually closer than
they appear. You could misjudge the dis-
tance from vehicles driving behind and
cause an accident, e.g. when changing
lane. For this reason, make sure of the
actual distance from the vehicle driving
behind by glancing over your shoulder.
The convex exterior mirrors provide a larger
field of vision.
At low outside temperatures the exterior mir-
rors are heated automatically.
Adjusting the exterior mirrors 1
Left-hand exterior mirror 2
Adjustment button
3 Right-hand exterior mirror
X Make sure that the key is in position 1or
2 in the ignition lock.
X Press button 3for the right-hand exterior
mirror or button 1for the left-hand exte-
rior mirror.
X Press adjustment button 2up, down, to
the right or to the left until the exterior mir-
ror is set to a position which provides you
with a good overview of traffic conditions.
Folding the exterior mirrors in or out
electrically* 1
To fold the exterior mirrors in or out Controls
* optional
211_AKB; 2; 5, en-GB
mkalafa,
Version: 2.9.4 2008-02-29T16:57:07+01:00 - Seite 91 ZDateiname: 6515_3416_02_buchblock.pdf; preflight
Page 95 of 401
Mirrors
92
X
Make sure that the key is in position 1or
2 in the ignition lock.
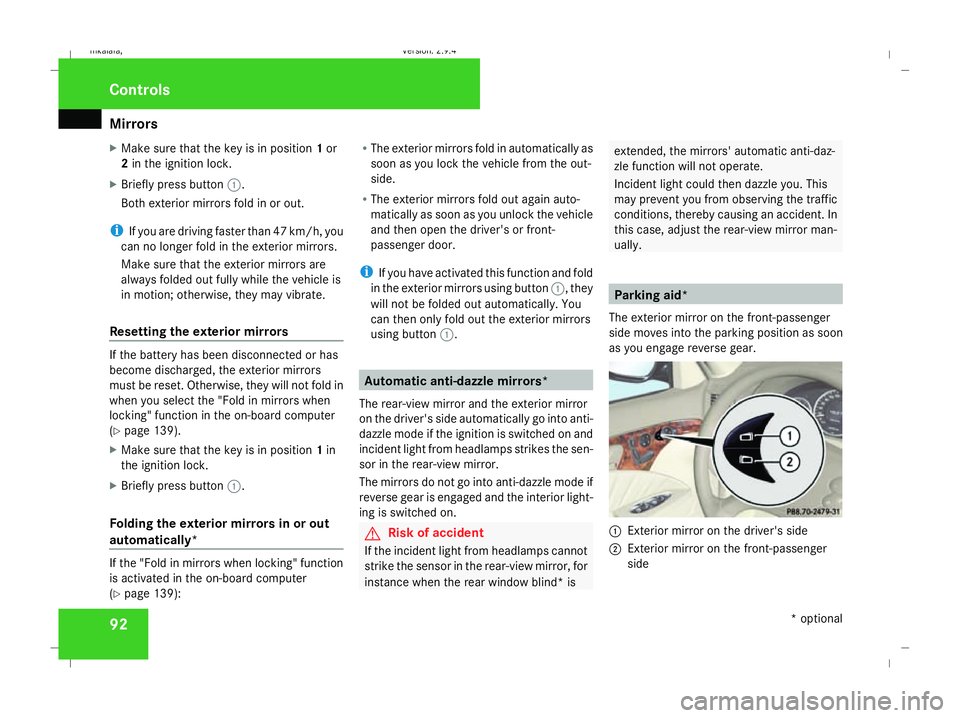
X Briefly press button 1.
Both exterior mirrors fold in or out.
i If you are driving faster than 47 km/h, you
can no longer fold in the exterior mirrors.
Make sure that the exterior mirrors are
always folded out fully while the vehicle is
in motion; otherwise, they may vibrate.
Resetting the exterior mirrors If the battery has been disconnected or has
become discharged, the exterior mirrors
must be reset. Otherwise, they will not fold in
when you select the "Fold in mirrors when
locking" function in the on-board computer
(Y page 139).
X Make sure that the key is in position 1in
the ignition lock.
X Briefly press button 1.
Folding the exterior mirrors in or out
automatically* If the "Fold in mirrors when locking" function
is activated in the on-board computer
(Y page 139): R
The exterior mirrors fold in automatically as
soon as you lock the vehicle from the out-
side.
R The exterior mirrors fold out again auto-
matically as soon as you unlock the vehicle
and then open the driver's or front-
passenger door.
i If you have activated this function and fold
in the exterior mirrors using button 1, they
will not be folded out automatically. You
can then only fold out the exterior mirrors
using button 1. Automatic anti-dazzle mirrors*
The rear-view mirror and the exterior mirror
on the driver's side automatically go into anti-
dazzle mode if the ignition is switched on and
incident light from headlamps strikes the sen-
sor in the rear-view mirror.
The mirrors do not go into anti-dazzle mode if
reverse gear is engaged and the interior light-
ing is switched on. G
Risk of accident
If the incident light from headlamps cannot
strike the sensor in the rear-view mirror, for
instance when the rear window blind* is extended, the mirrors' automatic anti-daz-
zle function will not operate.
Incident light could then dazzle you. This
may prevent you from observing the traffic
conditions, thereby causing an accident. In
this case, adjust the rear-view mirror man-
ually. Parking aid*
The exterior mirror on the front-passenger
side moves into the parking position as soon
as you engage reverse gear. 1
Exterior mirror on the driver's side
2 Exterior mirror on the front-passenger
side Controls
* optional
211_AKB; 2; 5, en-GB
mkalafa,
Version: 2.9.4
2008-02-29T16:57:07+01:00 - Seite 92 Dateiname: 6515_3416_02_buchblock.pdf; preflight
Page 96 of 401
Memory functions*
93
X
Make sure that parking position for the
exterior mirror on the front-passenger side
is stored with the memory function
(Y page 94).
X Make sure that the key is in position 2in
the ignition lock.
X Make sure that button 2for the exterior
mirror on the front-passenger side is
pressed in.
X Engage reverse gear.
The exterior mirror on the front-passenger
side moves to the stored parking position.
The exterior mirror on the front-passenger
side moves back to its original position:
R as soon as you exceed a speed of
10 km/h
R about ten seconds after you have disen-
gaged reverse gear
R if you press button 1for the exterior mir-
ror on the driver's side Memory functions*
Storing settings
You can store up to three different settings
using the memory button.
The following settings are stored as a single
memory preset:
R Position of the seat, backrest and head
restraint
R Dynamic driving seat*: activated/deacti-
vated
R Driver's side: steering-wheel position
R Driver's side: position of the exterior mir-
rors on the driver's and front-passenger
sides G
Risk of injury
The memory function can be used when the
key has been removed. For this reason,
children should never be left unsupervised
in the vehicle. They could otherwise
become trapped when moving the seat or
the steering wheel. G
Risk of accident
Only use the memory function on the
driver’s side when the vehicle is stationary.
You could otherwise be distracted from the traffic conditions by the steering wheel and
seat moving of their own accord, and cause
an accident.
1
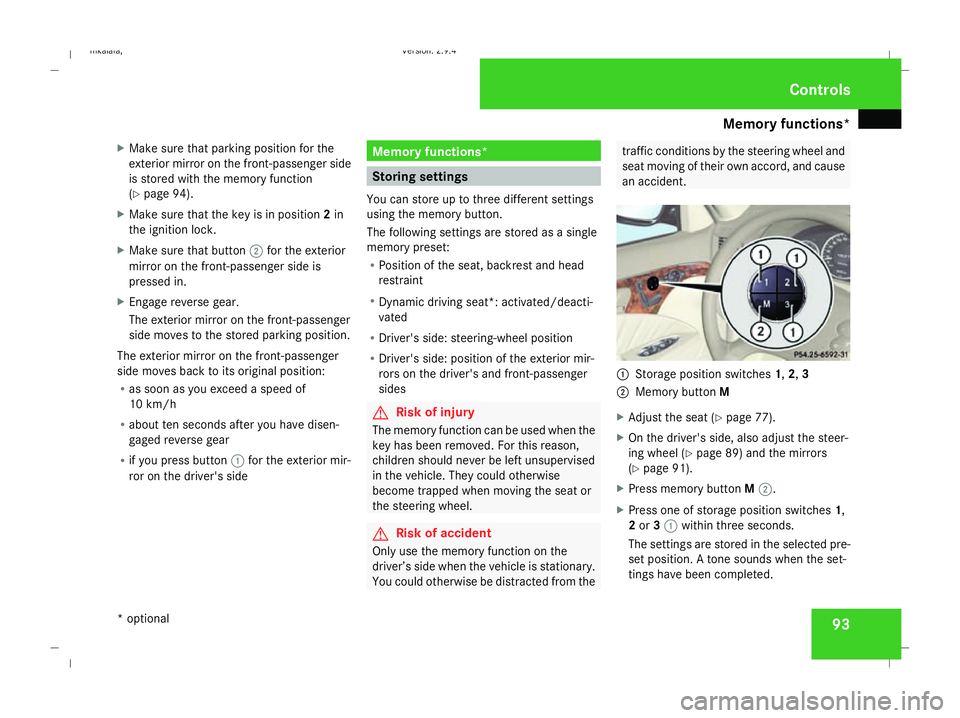
Storage position switches 1,2,3
2 Memory button M
X Adjust the seat ( Ypage 77).
X On the driver's side, also adjust the steer-
ing wheel (Y page 89) and the mirrors
(Y page 91).
X Press memory button M2.
X Press one of storage position switches 1,
2 or 31 within three seconds.
The settings are stored in the selected pre-
set position. A tone sounds when the set-
tings have been completed. Controls
* optional
211_AKB; 2; 5, en-GB
mkalafa
, Version: 2.9.4 2008-02-29T16:57:07+01:00 - Seite 93 ZDateiname: 6515_3416_02_buchblock.pdf; preflight
Page 97 of 401
Memory functions*
94 Calling up a stored setting
G
Risk of accident
Only use the memory function on the
driver’s side when the vehicle is stationary.
You could otherwise be distracted from the
traffic conditions by the steering wheel and
seat moving of their own accord, and cause
an accident.
X Press and hold the relevant storage posi-
tion switch 1,2or 3until the seat, steering
wheel and mirrors are in the stored posi-
tion.
i The setting procedure is interrupted as
soon as you release the storage position
switch. Storing a parking position
To make it easier to park, you can store the
front-passenger side exterior mirror position
in such a way that you can see the rear wheel
on that side as soon as you engage reverse
gear.
You can store a parking position for the exte-
rior mirror on the front-passenger side using
the memory button.
You will find information about using the exte-
rior mirror's parking position in the "Parking
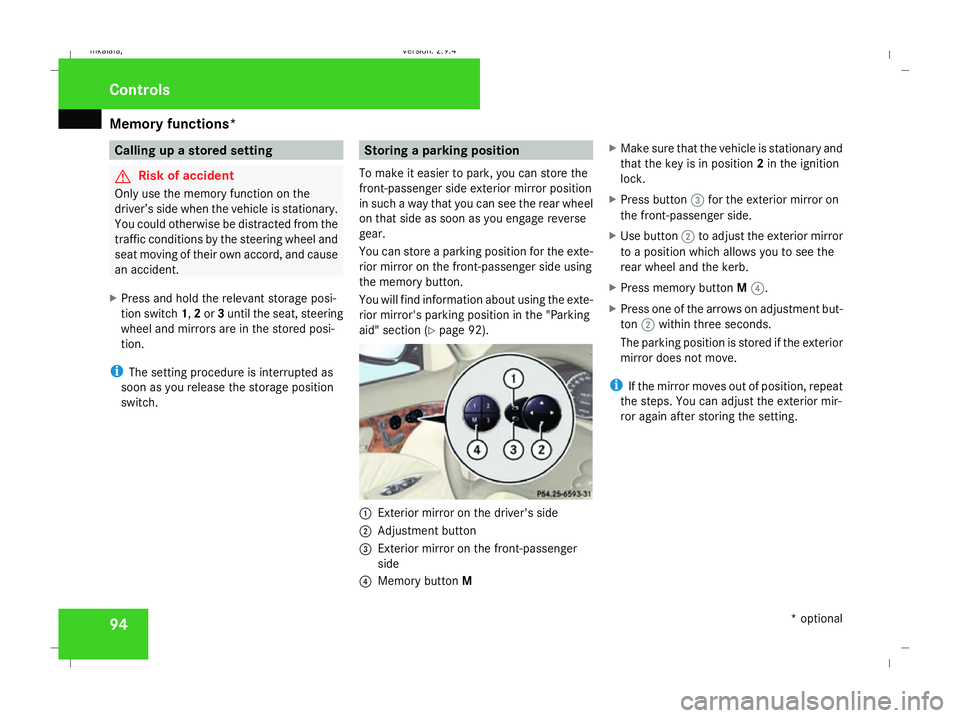
aid" section (Y page 92). 1
Exterior mirror on the driver's side
2 Adjustment button
3 Exterior mirror on the front-passenger
side
4 Memory button M X
Make sure that the vehicle is stationary and
that the key is in position 2in the ignition
lock.
X Press button 3for the exterior mirror on
the front-passenger side.
X Use button 2to adjust the exterior mirror
to a position which allows you to see the
rear wheel and the kerb.
X Press memory button M4.
X Press one of the arrows on adjustment but-
ton 2within three seconds.
The parking position is stored if the exterior
mirror does not move.
i If the mirror moves out of position, repeat
the steps. You can adjust the exterior mir-
ror again after storing the setting. Controls
* optional
211_AKB; 2; 5, en-GB
mkalafa
, Version: 2.9.4 2008-02-29T16:57:07+01:00 - Seite 94Dateiname: 6515_3416_02_buchblock.pdf; preflight
Page 136 of 401
On-board computer
133Lighting submenu
R
Constant headlamp mode (Y page 135)
R Surround lighting (Y page 135)
R Ambient lighting* (Y page 136)
R Exterior lighting delayed switch-off
(Y page 136)
R Interior lighting delayed switch-off
(Y page 136)
R Intelligent Light System* (Y page 137)Vehicle submenu
R
Permanent Speedtronic (Y page 154)
R Automatic locking feature (Y page 137)Heater* submenu
R
Selecting the switch-on time for the aux-
iliary heating * (Ypage 137)
R Changing the switch-on time for the aux-
iliary heating* (Y page 138) Convenience submenu*
R
Easy-entry/exit feature* (Y page 138)
R Fold in mirrors when locking the vehi-
cle* (Y page 139) Dynamic driving seat* submenu
R
Settings for the driver's and front-
passenger seat (Y page 139) Selecting the unit of measurement for
distance
The selected unit of measurement for dis-
tance applies to:
R the total distance recorder and the trip
meter
R the trip computer
R the digital speedometer 23
R cruise control
R Speedtronic
R Distronic* X
Press the èor· button to select the
Settings... menu.
X Press the jbutton to call up the selec-
tion of submenus.
X Press the æorç button to select the
Instr. cluster submenu.
X Press the jbutton to select Display
unit Speed-/odometer.
X Press the æorç button to select
km (kilometres) or milesas the unit of
measurement for distance.
X Press the j,èorÿ button to
select a different display.
Selecting the language X
Press the èor· button to select the
Settings... menu.
X Press the jbutton to call up the selec-
tion of submenus.
X Press the æorç button to select the
Instr. cluster submenu.
X Press the jbutton to select Lan-
guage.
23 Vehicles for the United Kingdom: the digital speedometer always displays km/h. Controls
* optional
211_AKB; 2; 5, en-GB
mkalafa,
Version: 2.9.4
2008-02-29T16:57:07+01:00 - Seite 133 ZDateiname: 6515_3416_02_buchblock.pdf; preflight
Page 142 of 401
On-board computer
139ally activate the easy-entry/exit feature
and become trapped.
X Press the èor· button to select the
Settings... menu.
X Press the jbutton to call up the selec-
tion of submenus.
X Press the æorç button to select the
Convenience submenu.
X Press the jbutton to select the EASY-
ENTRY system.
X Press the æorç button to activate
or deactivate the EASY-ENTRY system.
X Press the j,èorÿ button to
select a different display.
Activating/deactivating the Fold in mir-
rors when locking* function The
Fold in mirrors when locking func-
tion allows you to determine whether the
exterior mirrors should fold in when you lock
the vehicle. When you switch on the ignition,
the exterior mirrors fold out again.
If you have switched the function on and you
fold in the exterior mirrors using the button
on the door (Y page 92), they will not fold out automatically. The exterior mirrors can then
only be folded out using the button on the
door.
X
Press the èor· button to select the
Settings... menu.
X Press the jbutton to call up the selec-
tion of submenus.
X Press the æorç button to select the
Convenience submenu.
X Press the jbutton to select Fold in
mirrors when locking .
X Press the æorç button to activate
or deactivate the Fold in mirrors when
locking feature.
X Press the j,èorÿ button to
select a different display.
Selecting a setting for the dynamic driv-
ing seat* i
For more information on the dynamic driv-
ing seat, see (Y page 84).
X Press the èor· button to select the
Settings... menu.
X Press the jbutton to call up the selec-
tion of submenus. X
Press the æorç button to select the
Driving dynamics seat adjustment
submenu.
X Press the jbutton to select Driving
dyn. seat adjust., driver orDriving
dyn. seat adjust., front-pass..
X Press the æorç button to select the
desired seat setting: Gentlefor a soft seat
setting or Vigorous for a hard seat setting.
X Press the j,èorÿ button to
select a different display. Trip computer menu
You can use the Trip computermenu to call
up or reset statistical data for your vehicle.
i You can select kmormiles as the unit of
measurement for distance (Y page 133).
i Menu overview: see (Y page 124).
Use the buttons on the multi-function steer-
ing wheel.
Consumption statistics from start The values refer to the start of the journey. Controls
* optional
211_AKB; 2; 5, en-GB
mkalafa,
Version: 2.9.4
2008-02-29T16:57:07+01:00 - Seite 139 ZDateiname: 6515_3416_02_buchblock.pdf; preflight
Page 217 of 401
Features
214 Infrared reflecting windscreen*
The infrared reflecting glass prevents the
vehicle interior from becoming too hot. It also
blocks radio waves up into the gigahertz
range. 1
Areas transparent to radio waves
In order to operate radio-controlled equip-
ment (e.g. toll recording systems), areas 1
on the windscreen are transparent to radio
waves. You can install radio-controlled sys-
tems here. These areas can best be seen from
outside the vehicle by observing the light
reflected off the windscreen. Garage door opener*
The remote control integrated in the rear-view
mirror allows you to operate up to three dif-
ferent door and gate systems.
i The garage door opener is only available
for certain countries. Observe the legal
requirements in all countries concerned.
The HomeLink ®
garage door opener is
compatible with most European garage and
gate opener drives. More information on
HomeLink ®
and/or compatible products is
available from:
R any Mercedes-Benz Service Centre
R the HomeLink ®
hotline
(0) 08000 466 354 65 (free of charge) or
+49 (0) 6839 907-27 7(at a charge)
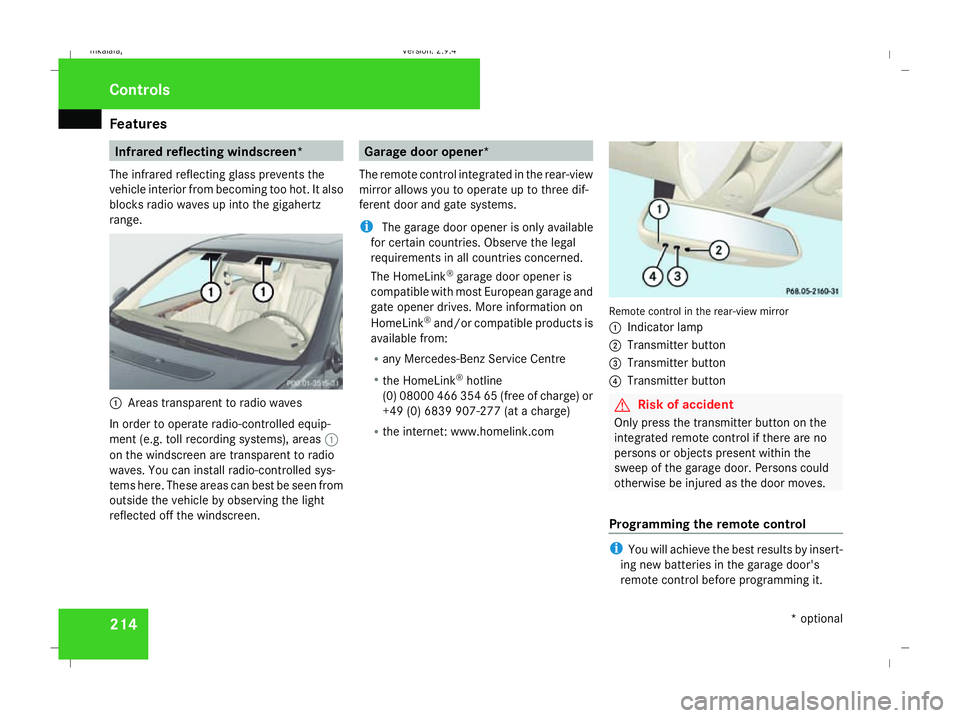
R the internet: www.homelink.com Remote control in the rear-view mirror
1
Indicator lamp
2 Transmitter button
3 Transmitter button
4 Transmitter button G
Risk of accident
Only press the transmitter button on the
integrated remote control if there are no
persons or objects present within the
sweep of the garage door. Persons could
otherwise be injured as the door moves.
Programming the remote control i
You will achieve the best results by insert-
ing new batteries in the garage door's
remote control before programming it. Controls
* optional
211_AKB; 2; 5, en-GB
mkalafa,
Version: 2.9.4 2008-02-29T16:57:07+01:00 - Seite 214Dateiname: 6515_3416_02_buchblock.pdf; preflight