2008 MERCEDES-BENZ E-CLASS ESTATE dashboard
[x] Cancel search: dashboardPage 8 of 401
5
Tail pipes (AMG vehicles) . . . . . . .
.247
Trailer tow hitch . . . . . . . . . . . . . . .248
CD player/CD changer
Operating (on-board computer) . . .129
Central locking
Automatic locking (on-board com-
puter) . . . . . . . . . . . . . . . . . . . . . . .137
From the luggage compartment
(outside ).. . . . . . . . . . . . . . . . . . . . .69
Key . . . . . . . . . . . . . . . . . . . . . . . . . .66
KEYLESS GO . . . . . . . . . . . . . . .68, 69
Central locking/unlocking button . ..70
Central unlocking Key . . . . . . . . . . . . . . . . . . . . . . . . . .66
KEYLESS GO . . . . . . . . . . . . . . .68, 69
Centre console
Lower section . . . . . . . . . . . . . . . . . .31
Upper section . . . . . . . . . . . . . . . . . .32
Changing a wheel
see Flat tyre
Child-proof locks
Rear door s.. . . . . . . . . . . . . . . . . . .56
Side windows (rear) . . . . . . . . . . . . .57
Tailgate . . . . . . . . . . . . . . . . . . . . . .57
Children
Fastening seat belt s.. . . . . . . . . . ..56
in the vehicle . . . . . . . . . . . . . . . . . .47
Restraint systems . . . . . . . . . . . . . .48Child seat
Automatic recognition . . . . . . . . . . .49
Automatic recognition (malfunc-
tion) . . . . . . . . . . . . . . . . . . . . . . . .284
Integrated . . . . . . . . . . . . . . . . . . . .55
ISOFIX . . . . . . . . . . . . . . . . . . . . . . .54
Recommendation s.. . . . . . . . . . . . .53
Suitable positions . . . . . . . . . . . . . .51
Cigarette lighter . . . . . . . . . . . . . . . .209
Cockpit Overview . . . . . . . . . . . . . . . . . . . . .22
Collapsible wheel
Pumping up . . . . . . . . . . . . . . . . . .326
Storage location . . . . . . . . . . . . . . .255
Technical data . . . . . . . . . . . . . . . .365
COMAND . . . . . . . . . . . . . . . . . . . . . . .124
On-board computer . . . . . . . . . . . .124
see separate operating instructions
Constant headlamp mode
Setting (on-board computer) . . . . .135
Consumption statistics (on-board
computer) . . . . . . . . . . . . . . . . . . . . . .140
Convenience closing . . . . . . . . . . . ..109
Coolant . . . . . . . . . . . . . . . . . . . . . . . .225
Checking the level . . . . . . . . . . . . .226
Display message . . . . . . . . . .267, 271
Mixture ratio . . . . . . . . . . . . . . . . .388
Temperature gauge . . . . . . . . . . . .120
Warning lamp . . . . . . . . . . . . . . . . .287 Cornering light
Display message . . . . . . . . . . . . . .272
Cruise control . . . . . . . . . . . . . . . . . .143
Display message . . . . . . . . . . . . . .265
Cup holder . . . . . . . . . . . . . . . . . . . . .186 D
Dashboard see Cockpit
see Instrument cluster
Date
Setting (on-board computer) . . . . .134
Daytime driving lights
see Constant headlamp mode
Delayed switch-off
Exterior lighting (on-board com-
puter) . . . . . . . . . . . . . . . . . . . . . . .136
Interior lighting (on-board com-
puter) . . . . . . . . . . . . . . . . . . . . . . .136
Diesel
Low outside temperatures . . . . . . .221
Diesel engine
Winter driving . . . . . . . . . . . . . . . . .221
Digital speedometer . . . . . . . . . . . ..126
Dipped-beam headlamps Display message . . . . . . . . . . . . . .272
Symmetrical . . . . . . . . . . . . . . . . . .238
Display message . . . . . . . . . . . . . . ..257
Displaying . . . . . . . . . . . . . . . . . . .131 Index
211_AKB; 2; 5, en-GB
mkalafa,
Version: 2.9.4
2008-02-29T16:57:07+01:00 - Seite 5 Dateiname: 6515_3416_02_buchblock.pdf; preflight
Page 10 of 401
7
Emergency unlocking
Boo t.. . . . . . . . . . . . . . . . . . . . . . .307
Tailgate . . . . . . . . . . . . . . . . . . . . .308
Vehicle . . . . . . . . . . . . . . . . . . . . . .306
Engine
Display message . . . . . . . . . . . . . .278
Running irregularl y.. . . . . . . . . . . .296
Starting problems . . . . . . . . . . . . .295
Starting with KEYLESS GO . . . . . . .111
Starting with the key . . . . . . . . . . .110
Technical data . . . . . . . . . . . . . . . .348
Engine diagnostic warning lamp . ..2 88
Engine electronics . . . . . . . . . . . . . ..345
Malfunction . . . . . . . . . . . . . . . . . .295
Engine number . . . . . . . . . . . . . . . . . .347
Engine oil . . . . . . . . . . . . . . . . . . . . . .385
Capacities . . . . . . . . . . . . . . . . . . .224
Checking the oil level (dipstick) . . .224
Checking the oil level (on-board
computer) . . . . . . . . . . . . . . . . . . .223
Consumption . . . . . . . . . . . . . . . . .223
Display message . . . . . . . . . .224, 277
Filler neck . . . . . . . . . . . . . . . . . . .225
Temperature display (on-board
computer) . . . . . . . . . . . . . . . . . . .126
Topping up . . . . . . . . . . . . . . . . . . .225
ESP ®
(Electronic Stability Program) .60
Activating/deactivating . . . . . . . . . .60
Display message . . . . . . . . . .260, 269
Warning lamp . . . . . . . . . . . . . .60, 285 Exterior lighting
Delayed switch-off (on-board
computer) . . . . . . . . . . . . . . . . . . .136
Exterior mirror parking position
Storing . . . . . . . . . . . . . . . . . . . .92, 94
Exterior mirrors
Adjusting . . . . . . . . . . . . . . . . . . . . .91
Anti-dazzle mode (automatic) . . . . .92
Folding in/out (automatically ).. . . .92
Folding in/out (electrically) . . . . . . .91
Folding in when locking (on-board
computer) . . . . . . . . . . . . . . . . . . .139
Malfunction . . . . . . . . . . . . . . . . . .300
Parking position . . . . . . . . . . . . .92, 94
Resetting . . . . . . . . . . . . . . . . . . . . .92
Storing settings . . . . . . . . . . . . . . . .93
Exterior view
Overview . . . . . . . . . . . . . . . . . . . . .20 F
Fastening seat belts Children . . . . . . . . . . . . . . . . . . . . . .56
Fire extinguisher . . . . . . . . . . . . . . . .253
First-aid kit . . . . . . . . . . . . . . . . . . . . .253
Flat tyre MOExtended run-flat system . . . . .328
Preparing the vehicle . . . . . . . . . . .317
TIREFIT kit . . . . . . . . . . . . . . . . . . .318
Floormat . . . . . . . . . . . . . . . . . . . . . . .216 Foglamps
Display message . . . . . . . . . . . . . .275
Folding bench seat . . . . . . . . . . . . . ..86
Folding out/folding back . . . . . . . . .87
Fording . . . . . . . . . . . . . . . . . . . . . . . .238
Frequencies Garage door opener . . . . . . . . . . . .391
Telephone . . . . . . . . . . . . . . . . . . .346
Front airbag . . . . . . . . . . . . . . . . . . . . .44
Front-passenger airbag . . . . . . . . . . ..44
Fuel . . . . . . . . . . . . . . . . . . . . . . . . . . .377
Diese l.. . . . . . . . . . . . . . . . . . . . . .220
Display message . . . . . . . . . . . . . .270
Loss . . . . . . . . . . . . . . . . . . . . . . . .294
Petrol . . . . . . . . . . . . . . . . . . . . . . .219
Fuel consumption . . . . . . . . . ..379, 380
Fuel filler flap Opening/closing . . . . . . . . . . . . . .218
Fuel line
Malfunction . . . . . . . . . . . . . . . . . .294
Fuel tank
Malfunction . . . . . . . . . . . . . . . . . .294
Range (on-board computer) . . . . . .140
Fuse allocation chart . . . . . . . . . . ..340
Fuse box Boot/luggage compartment . . . . .341
Dashboard . . . . . . . . . . . . . . . . . . .341
Fuses . . . . . . . . . . . . . . . . . . . . . . . . . .340 Index
211_AKB; 2; 5, en-GB
mkalafa,
Version: 2.9.4
2008-02-29T16:57:07+01:00 - Seite 7 Dateiname: 6515_3416_02_buchblock.pdf; preflight
Page 47 of 401
Occupant safety
44 secure a forward-facing child restraint
system to the front-passenger seat, you
must move the front-passenger seat as
far back as possible.
R Make sure there are no heavy or sharp-
edged objects in pockets of clothing.
R Do not lean forwards, e.g. over the cover
of the driver's front airbag, particularly
when the vehicle is in motion.
R Do not put your feet on the dashboard.
R Only hold the steering wheel by the rim.
This allows the airbag to inflate fully. You
could be injured if the airbag is deployed
and you are holding the inside of the
steering wheel.
R Do not lean on the doors from inside the
vehicle.
R Make sure that there are no people, ani-
mals or objects between the vehicle
occupants and the area of deployment of
the airbag.
R Do not place any objects between the
seat backrest and the door. R
Do not hang any hard objects, for exam-
ple coat hangers, on the grab handles or
coat hooks.
R Do not attach accessories, e.g. cup hold-
ers, to the doors.
It is not possible to rule out a risk of injuries
caused by an airbag due to the high speed
at which the airbag is required to deploy. G
Risk of injury
The airbag's functionality can only be guar-
anteed if the following parts are not cov-
ered and no badges or stickers are
attached to them:
R Padded steering wheel boss
R Front-passenger front airbag cover
R Outer side of front seats
R Rear door trims G
Risk of injury
When an airbag deploys, a small amount of
powder is released. The powder may cause
short-term breathing difficulties to persons
suffering from asthma or other pulmonary
conditions. In order to prevent potential breathing dif-
ficulties you should leave the vehicle as
soon as it is safe to do so. You can also open
the window to allow fresh air to enter the
interior. The powder does not constitute a
health hazard and does not indicate that
there is a fire in the vehicle. G
Risk of injury
The airbag parts are hot after the airbag has
been deployed. Do not touch them, other-
wise you may burn yourself.
Have the airbags checked at a qualified
specialist workshop. Otherwise, occupants
are not protected by the airbags in the
event of another accident.
Front airbags
The front airbags are designed to increase
protection for the driver's and front-
passenger head and chest. Safety
211_AKB; 2; 5, en-GB
mkalafa,
Version: 2.9.4 2008-02-29T16:57:07+01:00 - Seite 44Dateiname: 6515_3416_02_buchblock.pdf; preflight
Page 52 of 401
Occupant safety
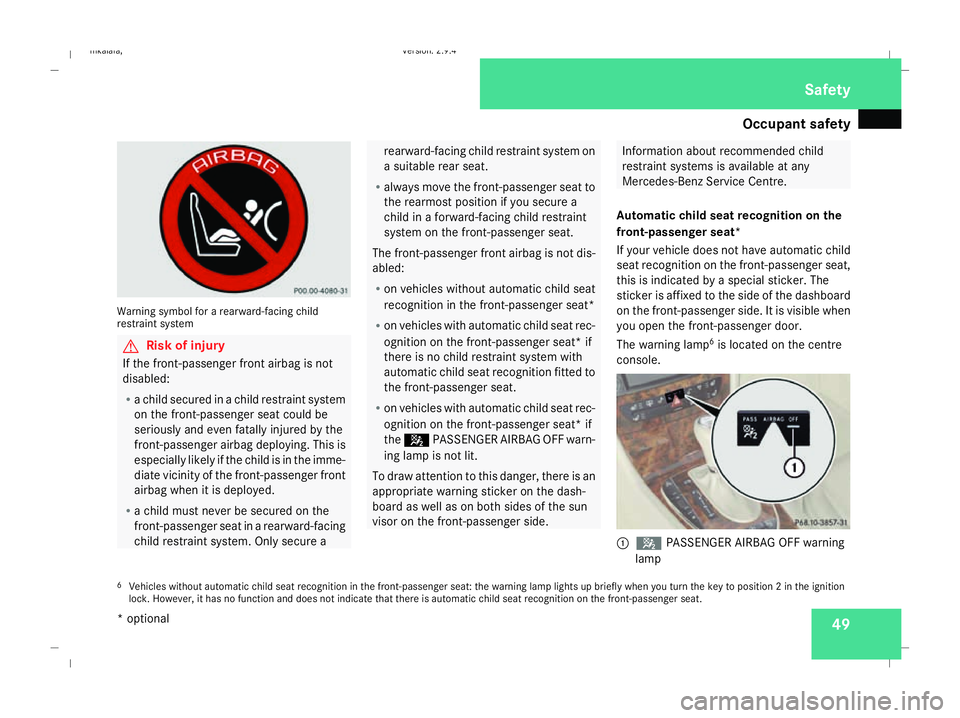
49Warning symbol for a rearward-facing child
restraint system G
Risk of injury
If the front-passenger front airbag is not
disabled:
R a child secured in a child restraint system
on the front-passenger seat could be
seriously and even fatally injured by the
front-passenger airbag deploying. This is
especially likely if the child is in the imme-
diate vicinity of the front-passenger front
airbag when it is deployed.
R a child must never be secured on the
front-passenger seat in a rearward-facing
child restraint system. Only secure a rearward-facing child restraint system on
a suitable rear seat.
R always move the front-passenger seat to
the rearmost position if you secure a
child in a forward-facing child restraint
system on the front-passenger seat.
The front-passenger front airbag is not dis-
abled:
R on vehicles without automatic child seat
recognition in the front-passenger seat*
R on vehicles with automatic child seat rec-
ognition on the front-passenger seat* if
there is no child restraint system with
automatic child seat recognition fitted to
the front-passenger seat.
R on vehicles with automatic child seat rec-
ognition on the front-passenger seat* if
the 5 PASSENGER AIRBAG OFF warn-
ing lamp is not lit.
To draw attention to this danger, there is an
appropriate warning sticker on the dash-
board as well as on both sides of the sun
visor on the front-passenger side. Information about recommended child
restraint systems is available at any
Mercedes-Benz Service Centre.
Automatic child seat recognition on the
front-passenger seat*
If your vehicle does not have automatic child
seat recognition on the front-passenger seat,
this is indicated by a special sticker. The
sticker is affixed to the side of the dashboard
on the front-passenger side. It is visible when
you open the front-passenger door.
The warning lamp 6
is located on the centre
console. 1
5 PASSENGER AIRBAG OFF warning
lamp
6 Vehicles without automatic child seat recognition in the front-passenger seat: the warning lamp lights up briefly when you turn the key to position 2 in the ignition
lock. However, it has no function and does not indicate that there is automatic child seat recognition on the front-passenger seat. Safety
* optional
211_AKB; 2; 5, en-GB
mkalafa,
Version: 2.9.4 2008-02-29T16:57:07+01:00 - Seite 49 ZDateiname: 6515_3416_02_buchblock.pdf; preflight
Page 163 of 401
Driving sys
tems 160
If there is an obstacle within this range, all
warning displays light up and a tone sounds.
If the distance falls below the minimum clear-
ance, it may no longer be shown.
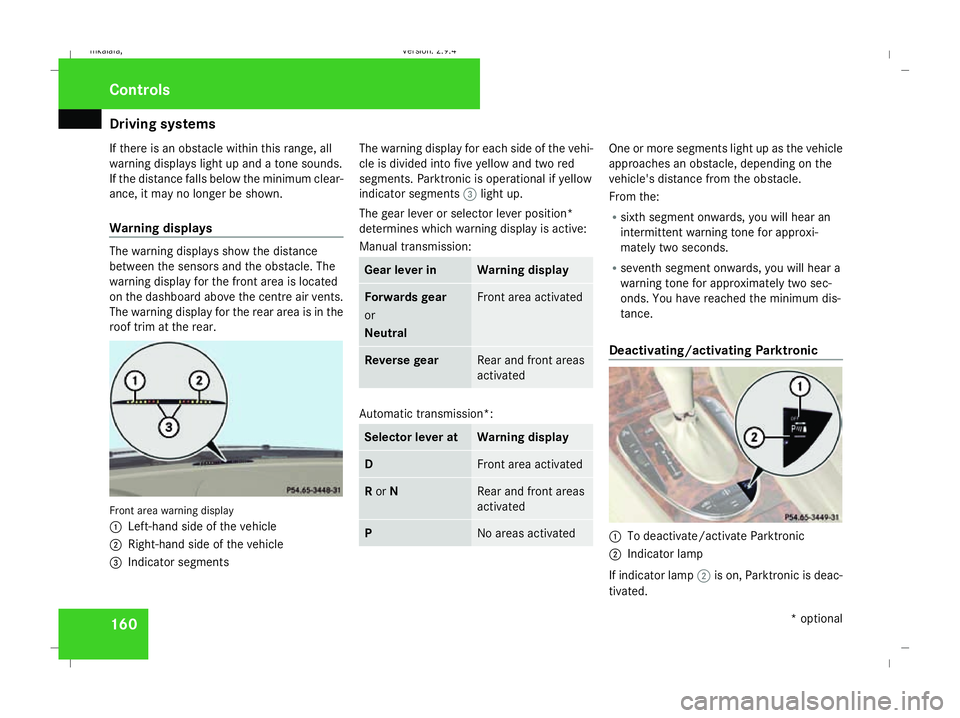
Warning displays The warning displays show the distance
between the sensors and the obstacle. The
warning display for the front area is located
on the dashboard above the centre air vents.
The warning display for the rear area is in the
roof trim at the rear. Front area warning display
1
Left-hand side of the vehicle
2 Right-hand side of the vehicle
3 Indicator segments The warning display for each side of the vehi-
cle is divided into five yellow and two red
segments. Parktronic is operational if yellow
indicator segments
3light up.
The gear lever or selector lever position*
determines which warning display is active:
Manual transmission: Gear lever in Warning display
Forwards gear
or
Neutral Front area activated
Reverse gear Rear and front areas
activated
Automatic transmission*:
Selector lever at Warning display
D Front area activated
R
or N Rear and front areas
activated
P No areas activated One or more segments light up as the vehicle
approaches an obstacle, depending on the
vehicle's distance from the obstacle.
From the:
R
sixth segment onwards, you will hear an
intermittent warning tone for approxi-
mately two seconds.
R seventh segment onwards, you will hear a
warning tone for approximately two sec-
onds. You have reached the minimum dis-
tance.
Deactivating/activating Parktronic 1
To deactivate/activate Parktronic
2 Indicator lamp
If indicator lamp 2is on, Parktronic is deac-
tivated. Controls
* optional
211_AKB; 2; 5, en-GB
mkalafa
,V ersion: 2.9.4
2008-02-29T16:57:07+01:00 - Seite 160 Dateiname: 6515_3416_02_buchblock.pdf; preflight
Page 250 of 401
Care
247
Plastic trim !
Do not use dry, coarse or hard cloths and
do not scrub. Doing so will scratch or dam-
age the surfaces.
X Wipe plastic parts with a damp, lint-free
cloth (e.g. a microfibre cloth).
X Light soiling: use a low-foaming soap (e.g.
a light liquid hand soap) diluted in water.
X Heavy soiling: use a cleaning agent that is
solvent-free and non-corrosive. Mercedes-
Benz recommends that you use a
Mercedes-Benz cleaning product for this
purpose.
Cleaning the steering wheel boss and
dashboard X
Moisten a clean lint-free cloth with water.
X Clean the plastic parts and the dashboard.
X If particularly dirty, use a mild detergent. G
Risk of injury
Do not use cleaners and cockpit care
sprays containing solvents to clean the
cockpit and steering wheel boss. Cleaners
containing solvents cause the surface to
become porous and in the event of an air- bag being triggered, plastic parts that have
become loose could cause considerable
injuries.
Leather upholstery* !
Cleaning
R Clean genuine leather covers using a
damp cloth, then wipe the covers down
using a dry cloth. When doing this, make
sure that the leather does not become
soaked. For leather care, you should use
leather care foam A 001 986 59 71 10.
You can purchase this from any
Mercedes-Benz Service Centre.
R Clean artificial leather covers with a cloth
moistened with a solution containing 1%
detergent (e. g. washing up liquid).
R Clean fabric covers with a microfibre
cloth moistened with a solution contain-
ing 1% detergent (e. g. washing up liquid).
When cleaning, take care not to rub too
vigorously and always wipe entire seat
sections to avoid leaving visible lines.
Leave the seat to dry afterwards. Clean- ing results depend on the type of dirt and
how long it has been there.
R Clean Alcantara covers with a damp
cloth. Make sure you wipe entire seat
sections to avoid leaving visible lines.
i Note that leather covers are a natural
product and as such are subject to a natural
ageing process and may react differently
(e.g. increased formation of wrinkles) to
certain environmental influences (such as
high humidity, intense heat).
Note that regular care is essential to ensure
that the quality (both appearance and com-
fort) of the covers is retained over time.
Care of exhaust tail pipes (AMG vehi-
cles) Impurities combined with the effects of road
grit and corrosive environmental factors may
cause flash rust to form on the surface.
Regular care of the exhaust tail pipes will
ensure that their original shine is restored.
!
Do not clean exhaust tail pipes with alka-
line-based cleaning agents such as wheel
cleaner. Operation
* optional
211_AKB; 2; 5, en-GB
mkalafa,
Version: 2.9.4
2008-02-29T16:57:07+01:00 - Seite 247 ZDateiname: 6515_3416_02_buchblock.pdf; preflight
Page 343 of 401
Fuses
340 Transporting the vehicle
The towing eyes can be used to pull the vehi-
cle onto a trailer or transporter for transport-
ing purposes.
! Only lash the vehicle down by the wheels
or wheel rims, not by parts of the vehicle
such as axle or steering components. The
vehicle could otherwise be damaged.
Vehicles with manual transmission X
Shift to neutral.
Vehicles with automatic transmission* X
Turn the key to position 2in the ignition
lock.
X Move the selector lever to N. Fuses
Notes on changing fuses
The fuses in your vehicle serve to close down
faulty circuits. If a fuse blows, all the compo-
nents on the circuit and their functions will
fail.
Blown fuses must be replaced with fuses of
the same rating, which you can recognise by
the colour and value. The fuse ratings are lis-
ted in the fuse allocation chart. A Mercedes-
Benz Service Centre will be happy to advise
you. G
Risk of fire
Only use fuses that have been approved for
Mercedes-Benz vehicles and which have
the correct fuse rating for the systems con-
cerned. Do not attempt to repair or bridge
faulty fuses. Otherwise, a circuit overload
could cause a fire. Have the cause traced
and rectified at a qualified specialist work-
shop, e.g. a Mercedes-Benz Service Centre.
If the newly inserted fuse also blows, have the
cause traced and rectified at a qualified spe-
cialist workshop, e.g. a Mercedes-Benz
Service Centre. !
Only use fuses that have been approved
for Mercedes-Benz vehicles and which
have the correct fuse rating for the system
concerned. Otherwise, components or sys-
tems could be damaged.
The fuses are located in various fuse boxes:
R Main fuse box on the driver's side of the
dashboard
R Fuse box in the boot/luggage compart-
ment on the left-hand side of the vehicle
Fuse allocation chart The fuse allocation chart is in the main fuse
box in the dashboard.
Before changing a fuse
X Park the vehicle.
X Switch off all electrical consumers.
X Remove the key from the ignition lock. Practical advice
* optional
211_AKB; 2; 5, en-GB
mkalafa,
Version: 2.9.4 2008-02-29T16:57:07+01:00 - Seite 340Dateiname: 6515_3416_02_buchblock.pdf; preflight
Page 344 of 401
Fuses
341Main fuse box
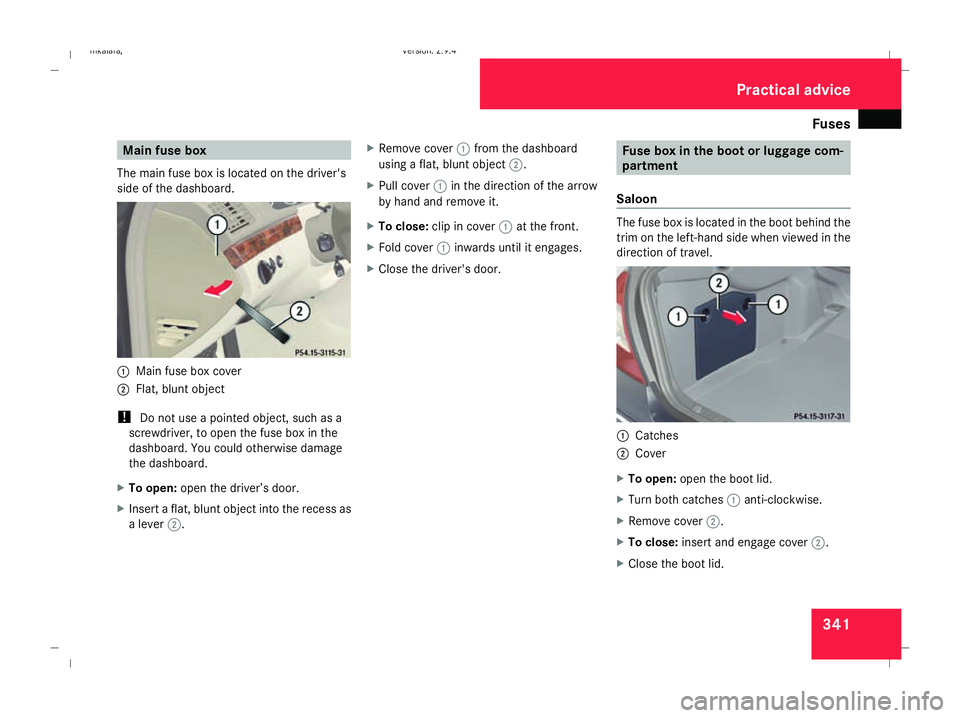
The main fuse box is located on the driver's
side of the dashboard. 1
Main fuse box cover
2 Flat, blunt object
! Do not use a pointed object, such as a
screwdriver, to open the fuse box in the
dashboard. You could otherwise damage
the dashboard.
X To open: open the driver’s door.
X Insert a flat, blunt object into the recess as
a lever 2. X
Remove cover 1from the dashboard
using a flat, blunt object 2.
X Pull cover 1in the direction of the arrow
by hand and remove it.
X To close: clip in cover 1at the front.
X Fold cover 1inwards until it engages.
X Close the driver's door. Fuse box in the boot or luggage com-
partment
Saloon The fuse box is located in the boot behind the
trim on the left-hand side when viewed in the
direction of travel.
1
Catches
2 Cover
X To open: open the boot lid.
X Turn both catches 1anti-clockwise.
X Remove cover 2.
X To close: insert and engage cover 2.
X Close the boot lid. Practical advice
211_AKB; 2; 5, en-GB
mkalafa,
Version: 2.9.4 2008-02-29T16:57:07+01:00 - Seite 341 ZDateiname: 6515_3416_02_buchblock.pdf; preflight