2008 MERCEDES-BENZ E-CLASS ESTATE load capacity
[x] Cancel search: load capacityPage 17 of 401
14
Switching off the alarm
ATA . . . . . . . . . . . . . . . . . . . . . . . . . .62T
Tailgate Display message . . . . . . . . . . . . . .266
Emergency unlocking . . . . . . . . . . .308
Limiting the opening angl e.. . . . . ..76
Opening/closing (manually) . . . . . . .70
Tail lamps
Display message . . . . . . . . . . . . . .276
Tank capacity . . . . . . . . . . . . . . . . . . .377
Technical data Acceleration . . . . . . . . . . . . . . . . . .354
Engine . . . . . . . . . . . . . . . . . . . . . .348
Speed . . . . . . . . . . . . . . . . . . . . . . .352
Trailer loads . . . . . . . . . . . . . . . . . .376
Tyres . . . . . . . . . . . . . . . . . . . . . . .357
Vehicle dimensions . . . . . . . . . . . .366
Vehicle weights . . . . . . . . . . . . . . .369
Wheels . . . . . . . . . . . . . . . . . . . . . .357
Telephone
see Mobile phone
Telescopic lever . . . . . . . . . . . . . . . . .239
Telescopic rod (Easy-Pack fix kit) ..2 04
Temperature Engine oil (on-board computer) . . .126
Outside temperature . . . . . . . . . . .121 Thermatic
Malfunction indicator lamp . . . . . .283
Thermotronic
Malfunction indicator lamp . . . . . .283
Third brake lamp
Display message . . . . . . . . . . . . . .274
Through-loading feature . . . . . . . . ..195
Tightening torque . . . . . . . . . . . . . ..327
Time Lap time (on-board computer) . . . .127
Setting (on-board computer) . . . . .134
Setting the time (on-board com-
puter) . . . . . . . . . . . . . . . . . . . . . . .134
Timer (on-board computer) . . . . . ..127
TIREFIT kit Storage location . . . . . . . . . . . . . . .255
Using . . . . . . . . . . . . . . . . . . . . . . .318
Total distance recorder
. . . . . . . . . . . . . . . . . . . . . . . . . . . . .27, 29
Resetting the trip meter . . . . . . . . .121
Tow-away protection . . . . . . . . . . . . ..63
Towing . . . . . . . . . . . . . . . . . . . . . . . .339
Towing eye Fitting . . . . . . . . . . . . . . . . . . . . . . .338
Removing . . . . . . . . . . . . . . . . . . . .339
Tow-starting . . . . . . . . . . . . . . . . . . . .339
Trailer 7-pin connector . . . . . . . . . . . . . . .242
Display message . . . . . .268, 272, 273
Power supply . . . . . . . . . . . . . . . . .242 Trailer loads
Technical data . . . . . . . . . . . . . . . .376
Trailer tow hitch . . . . . . . . . . . . . . . .239
Notes on care . . . . . . . . . . . . . . . .248
Trailer towing
Driving tips . . . . . . . . . . . . . . . . . . .240
Mounting dimensions . . . . . . . . . . .375
Parktroni c.. . . . . . . . . . . . . . . . . .161
Transmission output (maximum)
Telephone/two-way radio . . . . . . .345
Transport (vehicle) . . . . . . . . . . . . ..340
Trip computer Menu (on-board computer) . . . . . .139
Trip meter . . . . . . . . . . . . . . . . . . . . . .125
Resetting . . . . . . . . . . . . . . . . . . . .121
Turn signal lamps
Display message . . . . . . . . . .273, 274
TV
Operating (on-board computer) . . .130
Two-way radio
Installatio n.. . . . . . . . . . . . . . . . . .345
Tyre grip . . . . . . . . . . . . . . . . . . . . . . .237
Tyre pressure . . . . . . . . . . . . . . . . . . .229
Calling up (on-board computer) . .232
Display message . . . . . . . . . .262, 278
Table (see Fuel filler flap) . . . . . . . .219
see Tyre pressure
Tyre pressure loss warning system 230
Tyre pressure monitor Warning lamp . . . . . . . . . . . . . . . . .289 Index
211_AKB; 2; 5, en-GB
mkalafa,
Version: 2.9.4 2008-02-29T16:57:07+01:00 - Seite 14Dateiname: 6515_3416_02_buchblock.pdf; preflight
Page 198 of 401
Loading and stowing
195
ers
6on front luggage compartment floor
1.
i You must release both retainers 6to
remove transverse brace 4. To do this,
press the tabs under retainer 6forwards.
i You can insert loading tray 2under
either the rear or the front luggage com-
partment floor.
Vehicles with a folding bench seat* TIREFIT, the vehicle tool kit, etc. are located
in the stowage well.
Opening the luggage compartment floor
1
Handle
2 Luggage compartment floor X
Remove the seat cushion from the folding
bench seat (Y page 87).
X Pull handle 1and fold up luggage com-
partment floor 2.
Closing the luggage compartment floor
X Fold down luggage compartment floor 2
and press it down until it locks in place. Retaining hooks in the boot (Saloon)
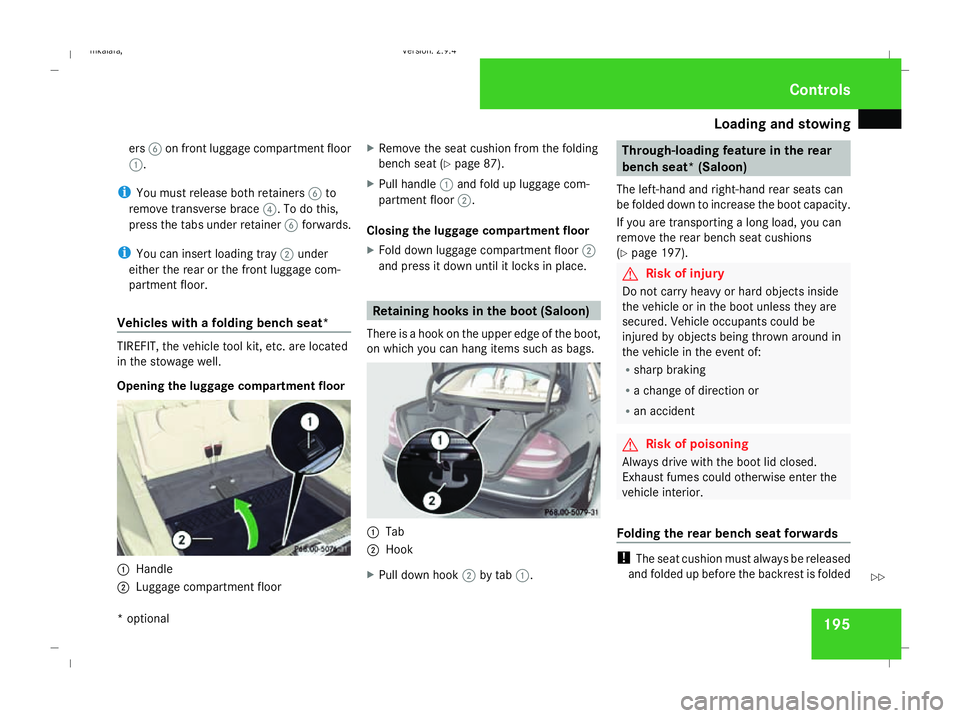
There is a hook on the upper edge of the boot,
on which you can hang items such as bags. 1
Tab
2 Hook
X Pull down hook 2by tab 1. Through-loading feature in the rear
bench seat* (Saloon)
The left-hand and right-hand rear seats can
be folded down to increase the boot capacity.
If you are transporting a long load, you can
remove the rear bench seat cushions
(Y page 197). G
Risk of injury
Do not carry heavy or hard objects inside
the vehicle or in the boot unless they are
secured. Vehicle occupants could be
injured by objects being thrown around in
the vehicle in the event of:
R sharp braking
R a change of direction or
R an accident G
Risk of poisoning
Always drive with the boot lid closed.
Exhaust fumes could otherwise enter the
vehicle interior.
Folding the rear bench seat forwards !
The seat cushion must always be released
and folded up before the backrest is folded Controls
* optional
211_AKB; 2; 5, en-GB
mkalafa,
Version: 2.9.4 2008-02-29T16:57:07+01:00 - Seite 195 ZDateiname: 6515_3416_02_buchblock.pdf; preflight
Page 201 of 401
Loading and stowing
198seat heating connector
2from the seat
cushion.
i Join the connections for the seat heating,
making sure the connector clicks into
place, when replacing the cushion.
X Pull seat cushion release catch 1and
remove the seat cushion upwards.
! Leave the seat cushion hinge in this posi-
tion. If you fold it back, you could damage
the upholstery. X
Fold the backrest forward. Enlarging the luggage compartment
(Estate)
The left-hand and right-hand rear seats can
be folded down to increase the luggage com-
partment capacity.
If the combined luggage cover and net is fit-
ted with the luggage compartment cover and
safety net, you can only fold the right-hand
backrest forwards on its own or both backr-
ests if you first fold the right-hand backrest
forwards. G
Risk of injury
Do not carry heavy or hard objects inside
the vehicle or in the luggage compartment
unless they are secured.
Otherwise, you and other vehicle occu-
pants could be injured by objects being
thrown around the vehicle in the event of
sharp braking, a sudden change in direction
or an accident.
You must always fold the seat cushions
forward and attach the safety net when
using the luggage compartment enlarge-
ment. G
Risk of poisoning
Always drive with the tailgate closed.
Exhaust fumes could otherwise enter the
vehicle interior.
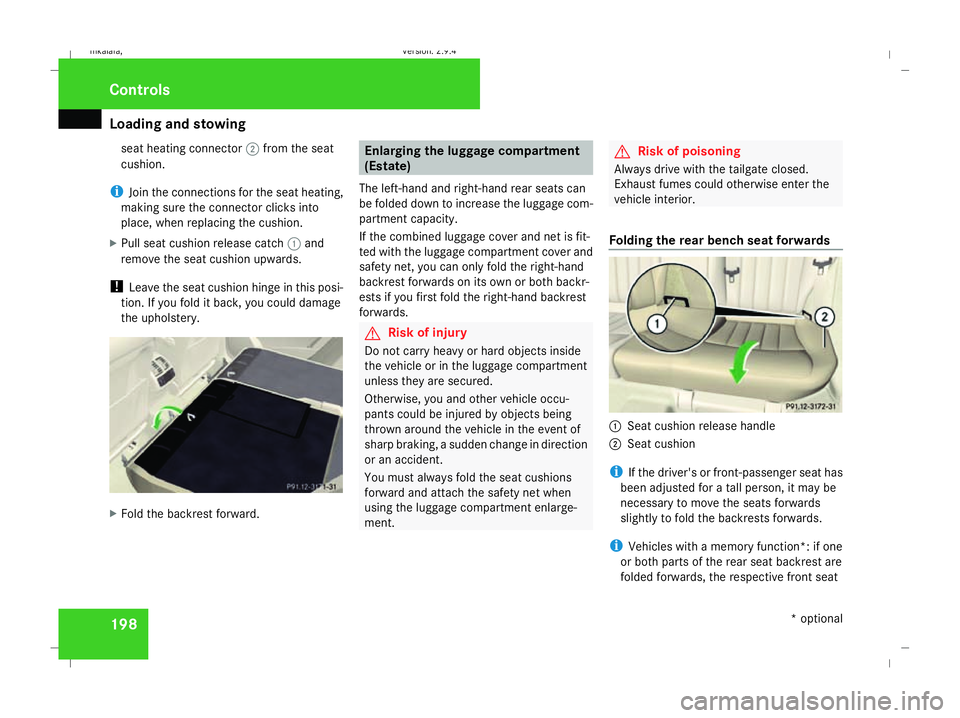
Folding the rear bench seat forwards 1
Seat cushion release handle
2 Seat cushion
i If the driver's or front-passenger seat has
been adjusted for a tall person, it may be
necessary to move the seats forwards
slightly to fold the backrests forwards.
i Vehicles with a memory function*: if one
or both parts of the rear seat backrest are
folded forwards, the respective front seat Controls
* optional
211_AKB; 2; 5, en-GB
mkalafa,
Version: 2.9.4 2008-02-29T16:57:07+01:00 - Seite 198Dateiname: 6515_3416_02_buchblock.pdf; preflight
Page 204 of 401
Loading and stowing
201
Adjusting the backrest position
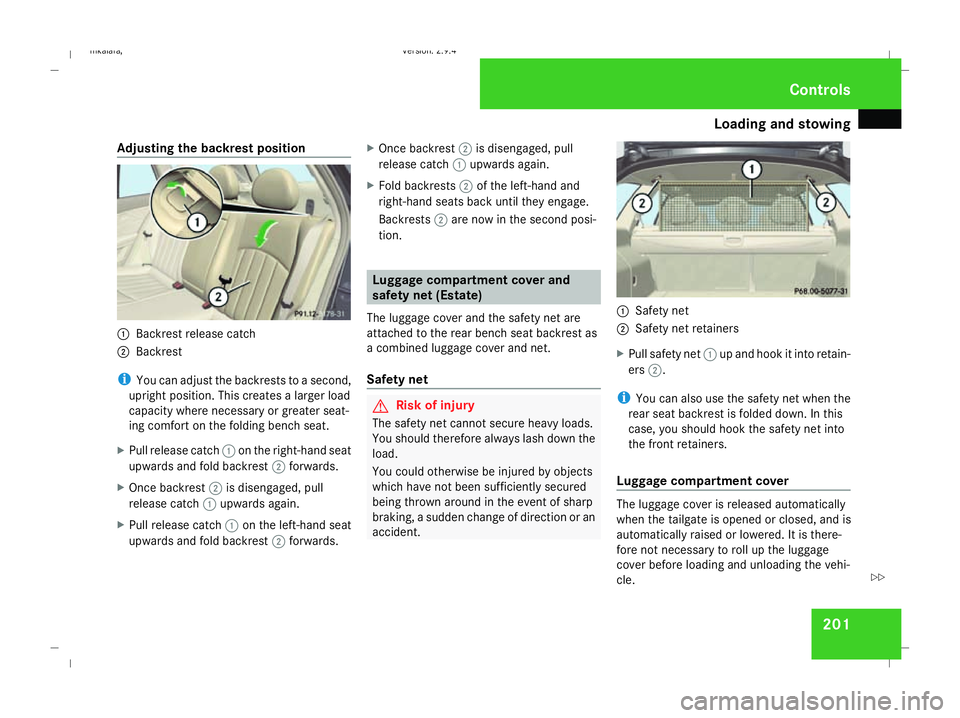
1
Backrest release catch
2 Backrest
i You can adjust the backrests to a second,
upright position. This creates a larger load
capacity where necessary or greater seat-
ing comfort on the folding bench seat.
X Pull release catch 1on the right-hand seat
upwards and fold backrest 2forwards.
X Once backrest 2is disengaged, pull
release catch 1upwards again.
X Pull release catch 1on the left-hand seat
upwards and fold backrest 2forwards. X
Once backrest 2is disengaged, pull
release catch 1upwards again.
X Fold backrests 2of the left-hand and
right-hand seats back until they engage.
Backrests 2are now in the second posi-
tion. Luggage compartment cover and
safety net (Estate)
The luggage cover and the safety net are
attached to the rear bench seat backrest as
a combined luggage cover and net.
Safety net G
Risk of injury
The safety net cannot secure heavy loads.
You should therefore always lash down the
load.
You could otherwise be injured by objects
which have not been sufficiently secured
being thrown around in the event of sharp
braking, a sudden change of direction or an
accident. 1
Safety net
2 Safety net retainers
X Pull safety net 1up and hook it into retain-
ers 2.
i You can also use the safety net when the
rear seat backrest is folded down. In this
case, you should hook the safety net into
the front retainers.
Luggage compartment cover The luggage cover is released automatically
when the tailgate is opened or closed, and is
automatically raised or lowered. It is there-
fore not necessary to roll up the luggage
cover before loading and unloading the vehi-
cle. Controls
211_AKB; 2; 5, en-GB
mkalafa,
Version: 2.9.4
2008-02-29T16:57:07+01:00 - Seite 201 ZDateiname: 6515_3416_02_buchblock.pdf; preflight
Page 257 of 401
Where will I find...?
254 Vehicle tool kit, jack and spare
wheel*
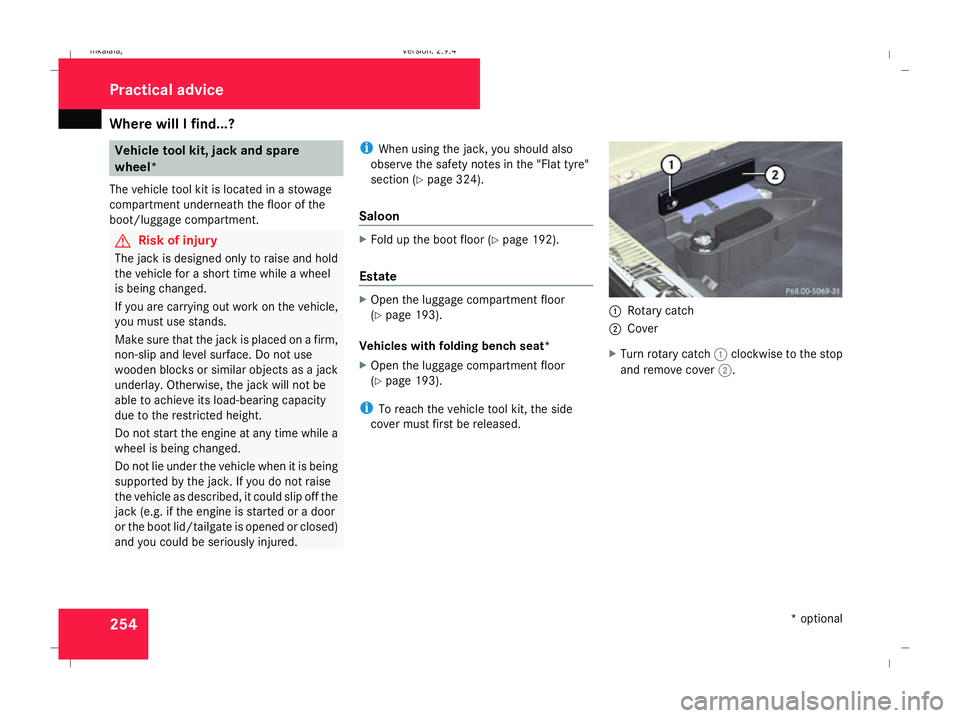
The vehicle tool kit is located in a stowage
compartment underneath the floor of the
boot/luggage compartment. G
Risk of injury
The jack is designed only to raise and hold
the vehicle for a short time while a wheel
is being changed.
If you are carrying out work on the vehicle,
you must use stands.
Make sure that the jack is placed on a firm,
non-slip and level surface. Do not use
wooden blocks or similar objects as a jack
underlay. Otherwise, the jack will not be
able to achieve its load-bearing capacity
due to the restricted height.
Do not start the engine at any time while a
wheel is being changed.
Do not lie under the vehicle when it is being
supported by the jack. If you do not raise
the vehicle as described, it could slip off the
jack (e.g. if the engine is started or a door
or the boot lid/tailgate is opened or closed)
and you could be seriously injured. i
When using the jack, you should also
observe the safety notes in the "Flat tyre"
section (Y page 324).
Saloon X
Fold up the boot floor (Y page 192).
Estate X
Open the luggage compartment floor
(Y page 193).
Vehicles with folding bench seat*
X Open the luggage compartment floor
(Y page 193).
i To reach the vehicle tool kit, the side
cover must first be released. 1
Rotary catch
2 Cover
X Turn rotary catch 1clockwise to the stop
and remove cover 2. Practical advice
* optional
211_AKB; 2; 5, en-GB
mkalafa,
Version: 2.9.4 2008-02-29T16:57:07+01:00 - Seite 254Dateiname: 6515_3416_02_buchblock.pdf; preflight
Page 321 of 401
Flat tyre
318 Make sure that the jack is placed on a firm,
non-slip, level surface. Do not use wooden
blocks or similar as jacking supports. Oth-
erwise, the jack will not be able to achieve
its load-bearing capacity due to the restric-
ted height.
Do not start the engine at any time while
the wheel is being changed.
Do not lie under the vehicle when it is being
supported by the jack. If you do not raise
the vehicle as described, it could slip off the
jack (e.g. if the engine is started or a door
or the boot lid/tailgate is opened or closed)
and you could sustain serious injuries. Using the TIREFIT kit
You can use the TIREFIT kit to seal small
punctures, particularly those in the tyre tread.
You can use TIREFIT in outdoor temperatures
down to -20 °C. G
Risk of accident
In the following situations, your safety is at
particular risk and TIREFIT is unable to pro-
vide breakdown assistance: R
if there are cuts or punctures in the tyre
greater than 4 mm
R if the wheel rim is damaged
R if you have driven at very low tyre pres-
sures or on a flat tyre
Do not drive any further. Consult a qualified
specialist workshop which has the neces-
sary specialist knowledge and tools to carry
out the work required.
Mercedes-Benz recommends that you use
a Mercedes-Benz Service Centre for this
purpose. In particular, work relevant to
safety or on safety-related systems must be
carried out at a qualified specialist work-
shop.
X Do not remove any foreign objects which
have penetrated the tyre, e.g. screws or
nails.
X Remove TIREFIT, the accompanying "max.
80 km/h "sticker and the electric air pump
from the stowage well underneath the
boot/luggage compartment floor
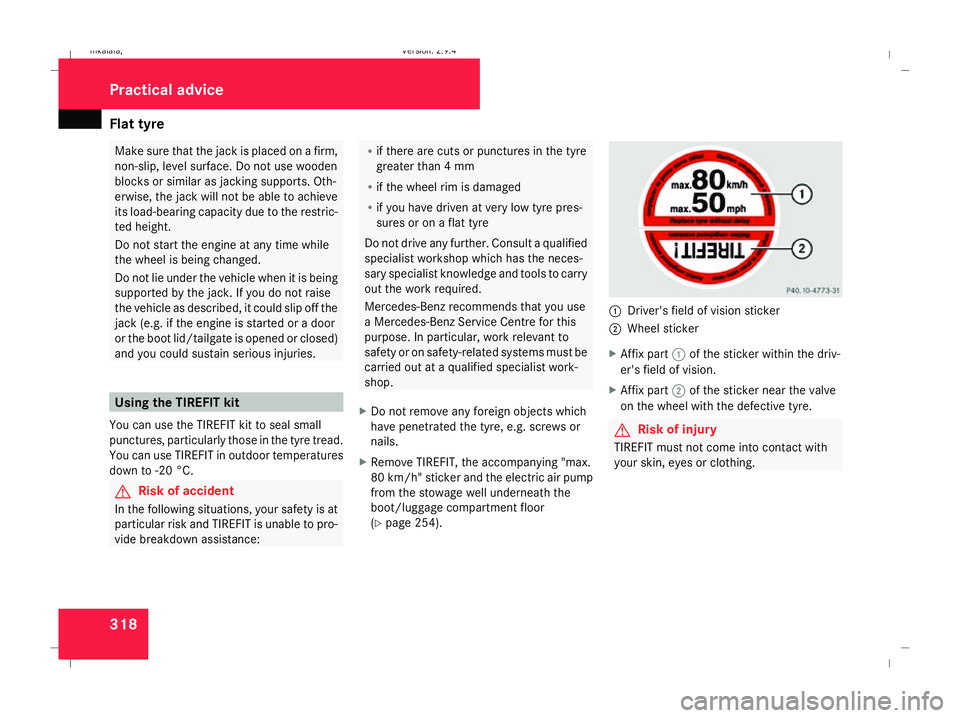
(Y page 254). 1
Driver's field of vision sticker
2 Wheel sticker
X Affix part 1of the sticker within the driv-
er's field of vision.
X Affix part 2of the sticker near the valve
on the wheel with the defective tyre. G
Risk of injury
TIREFIT must not come into contact with
your skin, eyes or clothing. Practical advice
211_AKB; 2; 5, en-GB
mkalafa
, Version: 2.9.4 2008-02-29T16:57:07+01:00 - Seite 318Dateiname: 6515_3416_02_buchblock.pdf; preflight