2008 MERCEDES-BENZ E-CLASS ESTATE change time
[x] Cancel search: change timePage 236 of 401
Tyres and wheels
233
Restarting the tyre pressure monitor In most cases, the tyre pressure monitor will
automatically detect the new reference val-
ues, e.g. if you have:
R
changed the tyre pressure
R changed the wheels or tyres
R fitted new wheels or tyres
If you wish to define the new reference values
manually:
X Use the table on the inside of the fuel filler
flap to ensure that the tyre pressure is set
correctly in all four tyres for the current
operating conditions.
Also observe the notes in the section on
tyre pressures (Y page 229).
X Make sure that the key is in position 2in
the ignition lock.
The standard display appears in the multi-
function display (Y page 125).
X Press the jork button to select the
Tyre pressure function or wait until the
following message appears:
Tyre pressure displayed only after
driving for a few minutes X
Press the reset button on the left of the
instrument cluster (Y page 243).
The following message appears in the
multi-function display: Check current
tyre pressure?
X Press the æbutton.
The following message appears in the
multi-function display:
Tyre pressure monitor restarted
The tyre pressure monitor has stored the
pressure of the tyres as a new reference
value.
If you wish to cancel the restart:
X Press the çbutton. Interchanging the wheels
G
Risk of accident
Interchange the front and rear wheels only
if they have the same dimensions: for exam-
ple size, offset, etc.
After every wheel interchange/change,
have the tightening torque checked at a
qualified specialist workshop that has the
necessary specialist knowledge and tools
to carry out the work required. Mercedes- Benz recommends that you use a
Mercedes-Benz Service Centre for this pur-
pose. In particular, work relevant to safety
or on safety-related systems must be car-
ried out at a qualified specialist workshop.
The wheels could work loose if they are not
tightened to a torque of 130 Nm.
For safety reasons, Mercedes-Benz recom-
mends that you only use wheel bolts of the
correct size which have been approved for
Mercedes-Benz vehicles.
The wheels may be interchanged every
5,000 km to 10,000 km depending on the
degree of tyre wear, provided that the vehicle
has the same size front and rear tyres. Do not
reverse the direction of tyre rotation.
The wear patterns on the front and rear tyres
differ depending on the operating conditions.
Interchange the wheels before a clear wear
pattern has formed on the tyres. The front
tyres typically wear more on the shoulders
and the rear tyres in the centre.
Clean the contact surfaces of the wheel and
the brake disc thoroughly every time a wheel
is interchanged. Check the tyre pressure and,
if necessary, restart the tyre pressure loss
warning system or the tyre pressure moni-
tor*. Operation
* optional
211_AKB; 2; 5, en-GB
mkalafa
,V ersion: 2.9.4
2008-02-29T16:57:07+01:00 - Seite 233 ZDateiname: 6515_3416_02_buchblock.pdf; preflight
Page 239 of 401
Driving
tips 236 Driving tips
Rolling with the engine switched off
G
Risk of accident
Do not switch off the engine while the vehi-
cle is in motion.
There is no power assistance for the steer-
ing or the service brake when the engine is
not running.
Steering and braking require significantly
more effort and you could lose control of
the vehicle and cause an accident as a
result. Braking
G
Risk of accident
Do not change down for additional engine
braking on a slippery road surface. This
could cause the drive wheels to lose their
grip and the vehicle could skid. G
Risk of accident
Make sure that other road users are not
endangered by your braking. Downhill gradients On long and steep downhill stretches, espe-
cially if the vehicle is laden or towing a trailer,
you must shift to a lower gear in good time or,
on vehicles with automatic transmission*,
select shift range
1,2or 3.
i This also applies if you have activated
cruise control, Speedtronic or Distronic*.
This uses the braking effect of the engine and
you will not have to brake to such an extent
to maintain the same speed. This relieves the
load on the brake system and prevents the
brakes from overheating and wearing too
quickly. If you need additional braking,
depress the brake pedal repeatedly rather
than continuously.
Heavy and light loads If the brakes have been subjected to a heavy
load, do not stop the vehicle immediately, but
drive on for a short while. This allows the air-
flow to cool the brakes more quickly.
G
Risk of accident
Never depress the brake pedal continu-
ously while the vehicle is in motion, e.g.
never cause the brakes to rub by applying constant slight pedal pressure. This causes
the brake system to overheat, increases
the braking distance and can lead to the
brakes failing completely.
If the brakes have been used only moderately,
you should occasionally test their effective-
ness. To do this, brake more firmly from a
higher speed. This improves the grip of the
brakes.
Wet roads If driving in heavy rain for a prolonged period
of time without braking, there may be a
delayed reaction from the brakes, when brak-
ing for the first time. You must brake harder.
You must therefore maintain a greater dis-
tance from the vehicle in front.
Brake firmly after driving on a wet road. This
way the brake discs will become warm, drying
more quickly, which will protect them against
corrosion. Operation
* optional
211_AKB; 2; 5, en-GB
mkalafa
,V ersion: 2.9.4
2008-02-29T16:57:07+01:00 - Seite 236 Dateiname: 6515_3416_02_buchblock.pdf; preflight
Page 257 of 401
Where will I find...?
254 Vehicle tool kit, jack and spare
wheel*
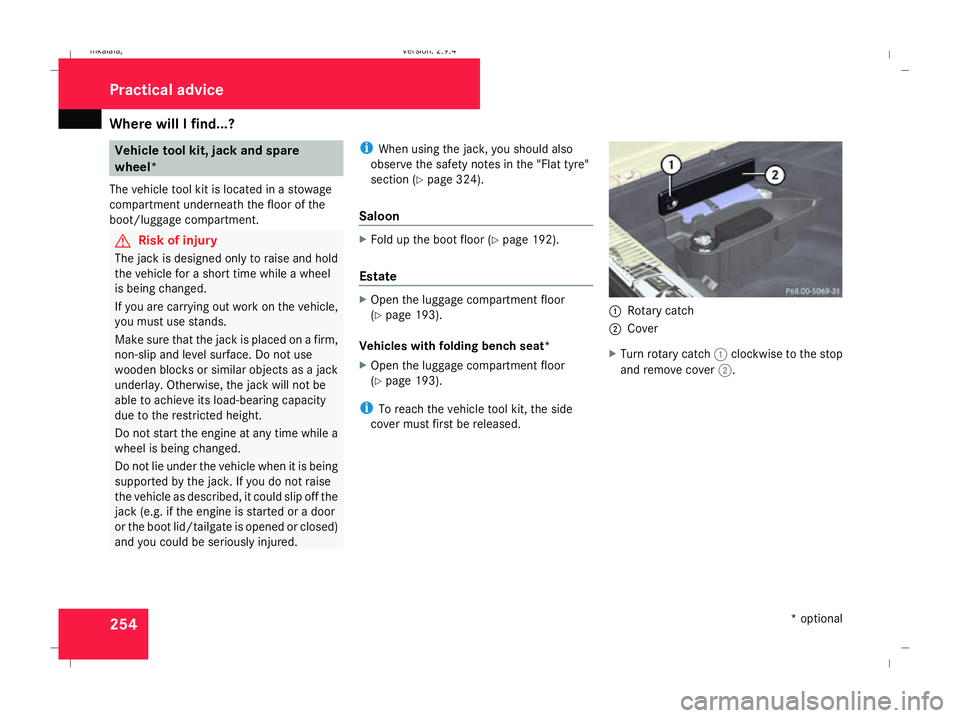
The vehicle tool kit is located in a stowage
compartment underneath the floor of the
boot/luggage compartment. G
Risk of injury
The jack is designed only to raise and hold
the vehicle for a short time while a wheel
is being changed.
If you are carrying out work on the vehicle,
you must use stands.
Make sure that the jack is placed on a firm,
non-slip and level surface. Do not use
wooden blocks or similar objects as a jack
underlay. Otherwise, the jack will not be
able to achieve its load-bearing capacity
due to the restricted height.
Do not start the engine at any time while a
wheel is being changed.
Do not lie under the vehicle when it is being
supported by the jack. If you do not raise
the vehicle as described, it could slip off the
jack (e.g. if the engine is started or a door
or the boot lid/tailgate is opened or closed)
and you could be seriously injured. i
When using the jack, you should also
observe the safety notes in the "Flat tyre"
section (Y page 324).
Saloon X
Fold up the boot floor (Y page 192).
Estate X
Open the luggage compartment floor
(Y page 193).
Vehicles with folding bench seat*
X Open the luggage compartment floor
(Y page 193).
i To reach the vehicle tool kit, the side
cover must first be released. 1
Rotary catch
2 Cover
X Turn rotary catch 1clockwise to the stop
and remove cover 2. Practical advice
* optional
211_AKB; 2; 5, en-GB
mkalafa,
Version: 2.9.4 2008-02-29T16:57:07+01:00 - Seite 254Dateiname: 6515_3416_02_buchblock.pdf; preflight
Page 283 of 401
Display
messages 280 Display messages Possible cause/consequence Possible solution
I Key not detected
The KEYLESS GO key* cannot be detected
at present. X
Change the location of the KEYLESS GO key*
within the vehicle.
X Operate the vehicle using the key in the ignition
lock if necessary. I Key still in vehi-
cle
The KEYLESS GO key* was detected
inside the vehicle during locking. X
Remove the KEYLESS GO key* from the vehi-
cle. I Please replace key The key no longer functions. X
Visit a qualified specialist workshop. X inoperative Bat-
tery weak The battery voltage is insufficient. The
auxiliary heating/ventilation* has
switched off or cannot be switched on. X
Drive for a longer distance.
The battery is being charged. The auxiliary
heating/ventilation* is reactivated as soon as
there is sufficient battery voltage. X inoperative Refuel There is insufficient fuel in the fuel tank.
The auxiliary heating* cannot be switched
on. X
Refuel at the nearest filling station. X inoperative See
Owner's Manual
The auxiliary heating* has a temporary
malfunction or is faulty. X
When the vehicle is on a level surface and the
engine has cooled down: try to switch on the
auxiliary heating* four times, waiting for sev-
eral minutes between each attempt.
X If the auxiliary heating* does not switch on:
visit a qualified specialist workshop. Practical advi
ce
* optional
211_AKB; 2; 5, en-GB
mkalafa,
Version: 2.9.4 2008-02-29T16:57:07+01:00 - Seite 280Dateiname: 6515_3416_02_buchblock.pdf; preflight
Page 314 of 401
Changing the bulbs
311
X
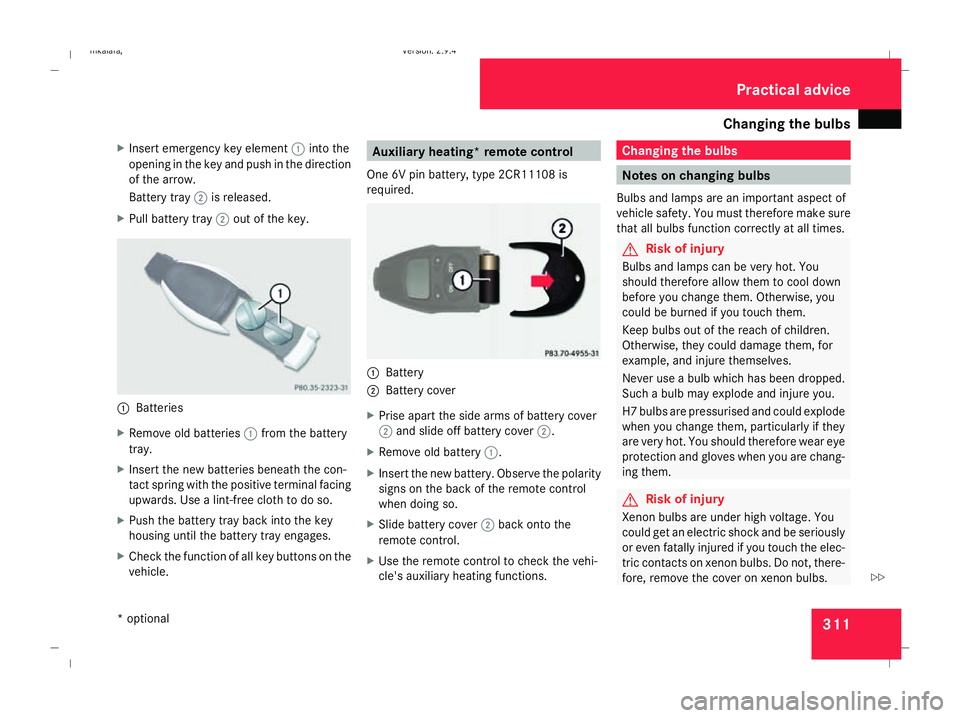
Insert emergency key element 1into the
opening in the key and push in the direction
of the arrow.
Battery tray 2is released.
X Pull battery tray 2out of the key. 1
Batteries
X Remove old batteries 1from the battery
tray.
X Insert the new batteries beneath the con-
tact spring with the positive terminal facing
upwards. Use a lint-free cloth to do so.
X Push the battery tray back into the key
housing until the battery tray engages.
X Check the function of all key buttons on the
vehicle. Auxiliary heating* remote control
One 6V pin battery, type 2CR11108 is
required. 1
Battery
2 Battery cover
X Prise apart the side arms of battery cover
2 and slide off battery cover 2.
X Remove old battery 1.
X Insert the new battery. Observe the polarity
signs on the back of the remote control
when doing so.
X Slide battery cover 2back onto the
remote control.
X Use the remote control to check the vehi-
cle's auxiliary heating functions. Changing the bulbs
Notes on changing bulbs
Bulbs and lamps are an important aspect of
vehicle safety. You must therefore make sure
that all bulbs function correctly at all times. G
Risk of injury
Bulbs and lamps can be very hot. You
should therefore allow them to cool down
before you change them. Otherwise, you
could be burned if you touch them.
Keep bulbs out of the reach of children.
Otherwise, they could damage them, for
example, and injure themselves.
Never use a bulb which has been dropped.
Such a bulb may explode and injure you.
H7 bulbs are pressurised and could explode
when you change them, particularly if they
are very hot. You should therefore wear eye
protection and gloves when you are chang-
ing them. G
Risk of injury
Xenon bulbs are under high voltage. You
could get an electric shock and be seriously
or even fatally injured if you touch the elec-
tric contacts on xenon bulbs. Do not, there-
fore, remove the cover on xenon bulbs. Practical advice
* optional
211_AKB; 2; 5, en-GB
mkalafa,
Version: 2.9.4 2008-02-29T16:57:07+01:00 - Seite 311 ZDateiname: 6515_3416_02_buchblock.pdf; preflight
Page 320 of 401
Flat tyre
317
X
Remove the key from the ignition lock.
X Fold the wiper arm away from the rear win-
dow until it engages.
X Turn wiper blade 1at a right angle to wiper
arm.
X Press tab 2and push wiper blade 1off
the retainer in the direction of arrow 4.
X Remove wiper blade 1.
Fitting X
Insert the new wiper blade into retainer
3 in the opposite direction to arrow 4
until tab 2engages.
X Make sure that wiper blade 1is seated
correctly.
X Turn wiper blade 1parallel to the wiper
arm.
X Fold the wiper arm back onto the rear win-
dow. Flat tyre
Your vehicle may be equipped with:
R a TIREFIT kit (Y page 255)
R a "Minispare" emergency spare
wheel* (Y page 255)
R a collapsible emergency spare
wheel* (Y page 255)
R a spare wheel* (Y page 255)
R the MOExtended run-flat sys-
tem* (Y page 328) Preparing the vehicle
i Vehicle preparation is not necessary on
vehicles with MOE tyres*.
X Stop your vehicle as far away from traffic
as possible on solid, non-slippery, level
ground.
X Switch on the hazard warning lamps.
X Firmly depress the parking brake.
Vehicles with manual transmission X
Shift to either first or reverse gear. Vehicles with automatic transmission* X
Move the selector lever to P.
For all vehicles X
All occupants must get out of the vehicle.
Make sure that they are not endangered as
they do so.
X Make sure that no one is near the danger
area whilst a wheel is being changed. Any-
one who is not directly assisting in the
wheel change should, for example, stand
behind the barrier.
X Switch off the engine.
X Remove the key from the ignition lock.
X Place the warning triangle ( Ypage 252) or
warning lamps at a suitable distance.
Observe legal requirements. G
Risk of injury
The jack is designed only to raise the vehi-
cle for a short time while a wheel is being
changed.
If you intend to work under the vehicle, it
must be placed on stands. Practical advice
* optional
211_AKB; 2; 5, en-GB
mkalafa,
Version: 2.9.4
2008-02-29T16:57:07+01:00 - Seite 317 ZDateiname: 6515_3416_02_buchblock.pdf; preflight
Page 321 of 401
Flat tyre
318 Make sure that the jack is placed on a firm,
non-slip, level surface. Do not use wooden
blocks or similar as jacking supports. Oth-
erwise, the jack will not be able to achieve
its load-bearing capacity due to the restric-
ted height.
Do not start the engine at any time while
the wheel is being changed.
Do not lie under the vehicle when it is being
supported by the jack. If you do not raise
the vehicle as described, it could slip off the
jack (e.g. if the engine is started or a door
or the boot lid/tailgate is opened or closed)
and you could sustain serious injuries. Using the TIREFIT kit
You can use the TIREFIT kit to seal small
punctures, particularly those in the tyre tread.
You can use TIREFIT in outdoor temperatures
down to -20 °C. G
Risk of accident
In the following situations, your safety is at
particular risk and TIREFIT is unable to pro-
vide breakdown assistance: R
if there are cuts or punctures in the tyre
greater than 4 mm
R if the wheel rim is damaged
R if you have driven at very low tyre pres-
sures or on a flat tyre
Do not drive any further. Consult a qualified
specialist workshop which has the neces-
sary specialist knowledge and tools to carry
out the work required.
Mercedes-Benz recommends that you use
a Mercedes-Benz Service Centre for this
purpose. In particular, work relevant to
safety or on safety-related systems must be
carried out at a qualified specialist work-
shop.
X Do not remove any foreign objects which
have penetrated the tyre, e.g. screws or
nails.
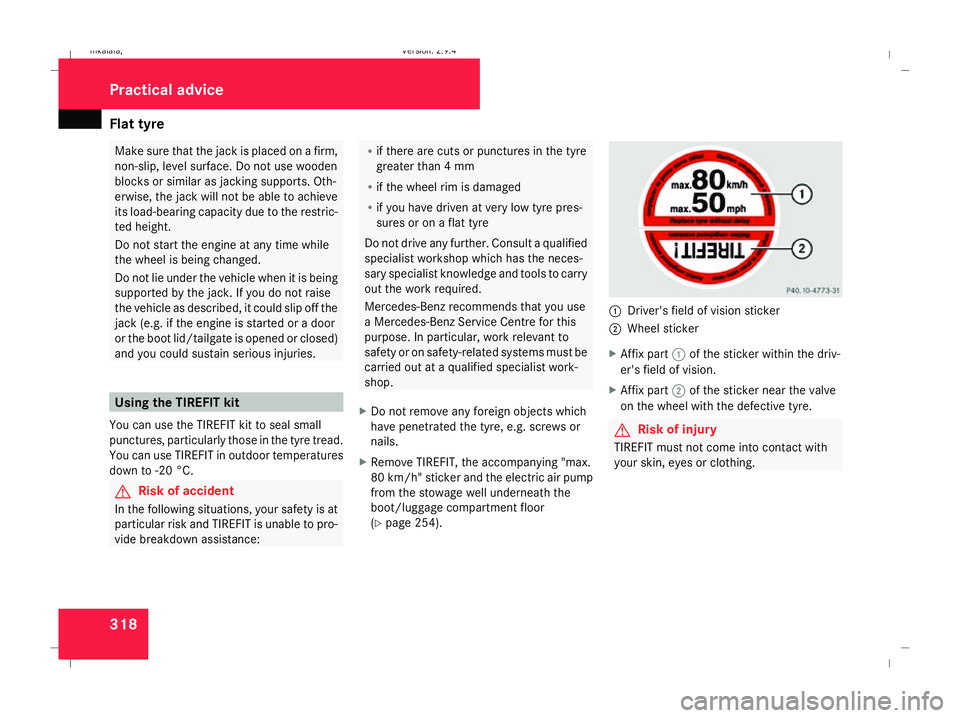
X Remove TIREFIT, the accompanying "max.
80 km/h "sticker and the electric air pump
from the stowage well underneath the
boot/luggage compartment floor
(Y page 254). 1
Driver's field of vision sticker
2 Wheel sticker
X Affix part 1of the sticker within the driv-
er's field of vision.
X Affix part 2of the sticker near the valve
on the wheel with the defective tyre. G
Risk of injury
TIREFIT must not come into contact with
your skin, eyes or clothing. Practical advice
211_AKB; 2; 5, en-GB
mkalafa
, Version: 2.9.4 2008-02-29T16:57:07+01:00 - Seite 318Dateiname: 6515_3416_02_buchblock.pdf; preflight
Page 393 of 401
Service products and capacities
390 E 200 CDI E 220 CDI E 280 CDI
E 280 CDI
4MATIC
E 300 Bluetec E 320 CDI
E 320 CDI
4MATIC E 420 CDI
Coolant 10.2 l 10.2 l 13.0 l 13.0 l 15.3 l
Amount of antifreeze/corrosion inhibitor required for antifreeze protection
Down to –37 °C
(approx. 50%) 5.1 l 5.1 l 6.5 l 6.5 l 7.7 l
Down to –45 °C
(approx. 55%) 5.6 l 5.6 l 7.2 l 7.2 l 8.4 l
Brake fluid
Over a period of time, the brake fluid absorbs
moisture from the air; this lowers its boiling
point. G
Risk of accident
If the boiling point of the brake fluid is too
low, vapour pockets may form in the brake
system when the brakes are applied hard
(e.g. when driving downhill). This would
impair braking efficiency. Have the brake fluid renewed every two
years with a brake fluid that has been
approved by Mercedes-Benz and have this
confirmed in the Service Booklet.
i There is usually a notice in the engine
compartment to remind you when the next
brake fluid change is due. Windscreen washer system
The washer fluid reservoir holds approxi-
mately 4.5 litres; on vehicles with the head-
lamp cleaning system* it holds 7 litres.
The headlamp cleaning system* and the
windscreen washer system are both supplied
from the washer fluid reservoir.
X At temperatures above freezing point:
Top up the washer fluid reservoir with a
mixture of water and windscreen washer
concentrate (Y page 226).
X At temperatures below freezing point: Technical data
* optional
211_AKB; 2; 5, en-GB
mkalafa,
Version: 2.9.4 2008-02-29T16:57:07+01:00 - Seite 390Dateiname: 6515_3416_02_buchblock.pdf; preflight