2008 MERCEDES-BENZ E-CLASS ESTATE change time
[x] Cancel search: change timePage 98 of 401
Seat belts
95Seat belts
Wearing seat belts
Seat belts are the most effective means of
restraining the movement of vehicle occu-
pants in the event of an accident. This
reduces the risk of vehicle occupants coming
into contact with the vehicle interior. G
Risk of injury
A seat belt which is not worn correctly, or
which has not been engaged in the seat belt
buckle correctly, cannot perform its inten-
ded protective function. Under certain cir-
cumstances this could cause severe or
even fatal injuries.
Make sure that all occupants – in particular,
pregnant women – wear their seat belt cor-
rectly at all times.
R The seat belt must pass closely over your
body and must not be twisted. You
should therefore avoid wearing bulky
clothing (e.g. a winter coat). The shoulder
belt section must be routed across the
middle of your shoulder – on no account
across your neck or under your arm – and
pulled tight against your upper body. The
lap belt must always pass across your lap
as low down as possible, i.e. over your hip joints – not across your abdomen. If
necessary, push down the belt strap
slightly and then retighten it in the roll-up
direction.
R Do not route the belt strap across sharp
or fragile objects, especially if these are
located on or in your clothing, e.g. spec-
tacles, pencils, keys, etc. The seat belt
strap could be damaged and tear in an
accident and you or other vehicle occu-
pants could be injured.
R Only one person should use each seat
belt at any one time. Children must never
travel sitting on the lap of other occu-
pants. It would not be possible to restrain
the child in the event of a sudden change
in direction, braking or an accident. This
could result in severe or even fatal inju-
ries to the child and other occupants.
R Persons less than 1.50 m tall cannot
wear the seat belts correctly. For this
reason, secure persons less than 1.50 m
tall in specially designed, suitable
restraint systems.
R Children less than 1.50 m tall or under
12 years of age cannot wear the seat
belts properly. Therefore, always secure
these children in suitable child restraint systems on suitable vehicle seats. You
can find more information under "Chil-
dren in the vehicle" in the "Safety" sec-
tion of the Owner's Manual. Follow the
manufacturer's installation instructions
when fitting the child restraint system.
R Do not secure any objects with a seat belt
if the seat belt is also being used by one
of the vehicle's occupants. G
Risk of injury
The seat belt does not offer the intended
level of protection unless the backrest is
almost vertical. Under certain circumstan-
ces this could cause severe or even fatal
injuries.
Before starting a journey, make sure that
the seat is properly adjusted and that the
backrest is almost vertical. G
Risk of injury
A dirty or damaged seat belt or a seat belt
that has been subjected to a load in an
accident or modified no longer offers the
intended level of protection. Under certain
circumstances this could cause severe or
even fatal injuries. Controls
211_AKB; 2; 5, en-GB
mkalafa,
Version: 2.9.4
2008-02-29T16:57:07+01:00 - Seite 95 ZDateiname: 6515_3416_02_buchblock.pdf; preflight
Page 102 of 401
Lights
99Lights
Light switch
For reasons of safety, Mercedes-Benz recom-
mends that you drive with the lights switched
on even during the daytime. In some coun-
tries, daytime operation of headlamps varies
due to legal requirements and self-imposed
obligations. In these countries, the dipped-
beam headlamps are automatically switched
on when the engine is started.
i If you drive in countries in which traffic
drives on the opposite side of the road to
the country where the vehicle is registered,
oncoming traffic may be dazzled by the
asymmetrical dipped-beam headlamps.
Have the headlamps changed to symmet-
rical dipped beam when driving in these
countries. You can obtain information
about this from any Mercedes-Benz Service
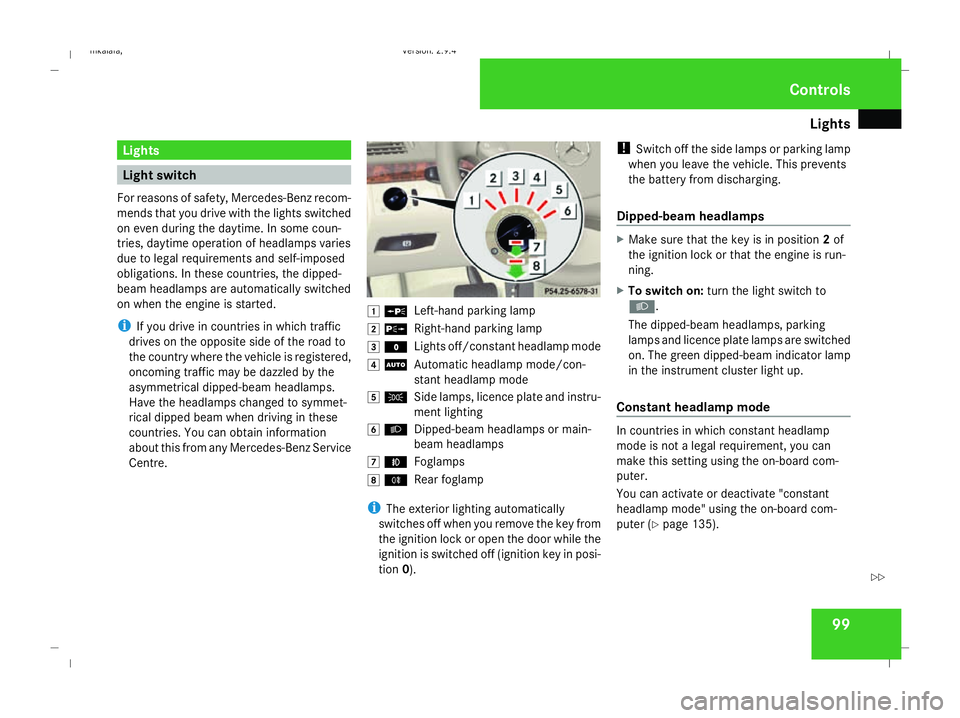
Centre. $
a
Left-hand parking lamp
% g
Right-hand parking lamp
& M
Lights off/constant headlamp mode
( U
Automatic headlamp mode/con-
stant headlamp mode
) C
Side lamps, licence plate and instru-
ment lighting
* B
Dipped-beam headlamps or main-
beam headlamps
, ¥
Foglamps
. †
Rear foglamp
i The exterior lighting automatically
switches off when you remove the key from
the ignition lock or open the door while the
ignition is switched off (ignition key in posi-
tion 0). !
Switch off the side lamps or parking lamp
when you leave the vehicle. This prevents
the battery from discharging.
Dipped-beam headlamps X
Make sure that the key is in position 2of
the ignition lock or that the engine is run-
ning.
X To switch on: turn the light switch to
B.
The dipped-beam headlamps, parking
lamps and licence plate lamps are switched
on. The green dipped-beam indicator lamp
in the instrument cluster light up.
Constant headlamp mode In countries in which constant headlamp
mode is not a legal requirement, you can
make this setting using the on-board com-
puter.
You can activate or deactivate "constant
headlamp mode" using the on-board com-
puter (Y page 135). Controls
211_AKB; 2; 5, en-GB
mkalafa,
Version: 2.9.4 2008-02-29T16:57:07+01:00 - Seite 99 ZDateiname: 6515_3416_02_buchblock.pdf; preflight
Page 104 of 401
Lights
101Combination switch (turn signals,
main-beam headlamps and headlamp
flasher)
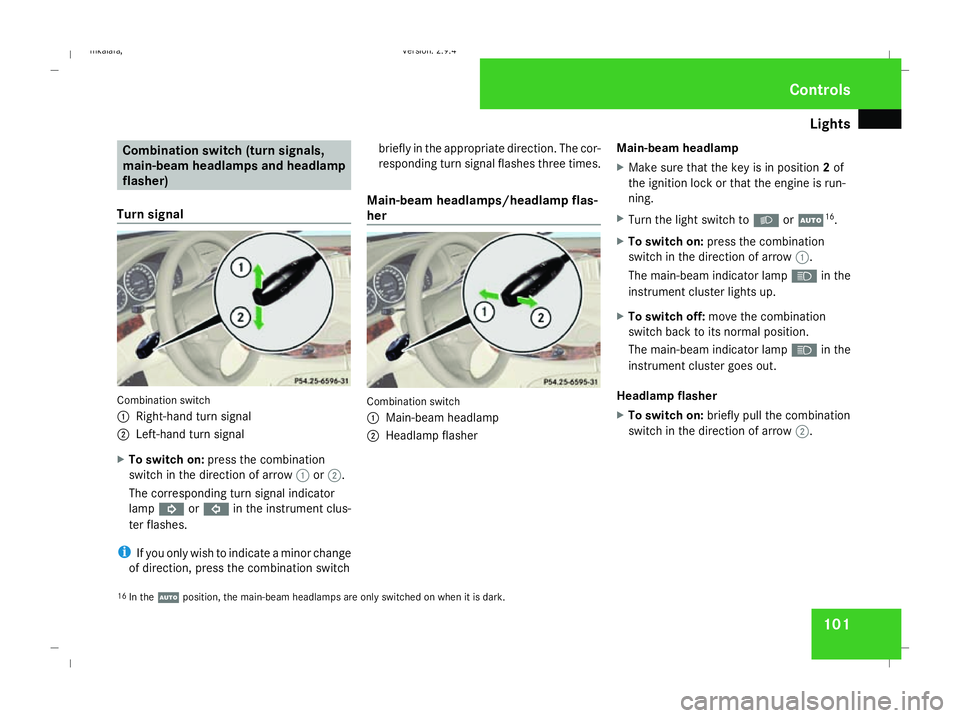
Turn signal Combination switch
1
Right-hand turn signal
2 Left-hand turn signal
X To switch on: press the combination
switch in the direction of arrow 1or2.
The corresponding turn signal indicator
lamp K orL in the instrument clus-
ter flashes.
i If you only wish to indicate a minor change
of direction, press the combination switch briefly in the appropriate direction. The cor-
responding turn signal flashes three times.
Main-beam headlamps/headlamp flas-
her Combination switch
1
Main-beam headlamp
2 Headlamp flasher Main-beam headlamp
X
Make sure that the key is in position 2of
the ignition lock or that the engine is run-
ning.
X Turn the light switch to BorU 16
.
X To switch on: press the combination
switch in the direction of arrow 1.
The main-beam indicator lamp Ain the
instrument cluster lights up.
X To switch off: move the combination
switch back to its normal position.
The main-beam indicator lamp Ain the
instrument cluster goes out.
Headlamp flasher
X To switch on: briefly pull the combination
switch in the direction of arrow 2.
16 In the Uposition, the main-beam headlamps are only switched on when it is dark. Controls
211_AKB; 2; 5, en-GB
mkalafa,
Version: 2.9.4 2008-02-29T16:57:07+01:00 - Seite 101 ZDateiname: 6515_3416_02_buchblock.pdf; preflight
Page 106 of 401
Lights
103Position Load
-1 Front and rear seats occupied
or
Front and rear seats occu-
pied, luggage compartment
laden
0 Front seats occupied
1 Driver's seat occupied, lug-
gage compartment laden
X
Turn thumbwheel for headlamp range 1to
the position which corresponds to the load
in your vehicle. Headlamp cleaning system*
The headlamps are cleaned automatically if
the "Wipe with windscreen washer fluid" func-
tion is operated five times while the lights are
on and the engine is running. When you
switch off the ignition, the automatic head-
lamp cleaning system is reset and counting is
resumed from 0. Intelligent Light System* (vehicles
with bi-xenon headlamps*)
The Intelligent Light System adapts the light-
ing of the front headlamps to the prevailing
driving conditions so that the road is illumi-
nated better.
i The Intelligent Light System is only active
when it is dark.
The Intelligent Light System comprises:
R Active light function
R Cornering light function
R Motorway mode
R Extended range foglamps Active light function For the active light function, the dipped-beam
headlamps swivel horizontally. The swivel
angle changes according to the respective
driving situation. The active light function is
not active when the vehicle is stationary.
Cornering light function
Specially designed headlamps light up the
area into which you are driving when turning
corners.
If you are driving at speeds below 40 km/h,
the cornering light function is activated either
by the turn signals or when the steering wheel
is turned. If you are driving at speeds above
40 km/h the cornering light function is deac-
tivated.
Switching on
X
Make sure that the engine is running.
X Switch on the dipped-beam headlamps.
X Switch off the fog lights.
X Switch on the turn signal.
The cornering light on the same side as the
turn signal comes on, even if you turn the
steering wheel in the opposite direction
after indicating. Controls
* optional
211_AKB; 2; 5, en-GB
mkalafa,
Version: 2.9.4
2008-02-29T16:57:07+01:00 - Seite 103 ZDateiname: 6515_3416_02_buchblock.pdf; preflight
Page 115 of 401
Driving and pa
rking 112 even if you are only leaving it for a short
time.
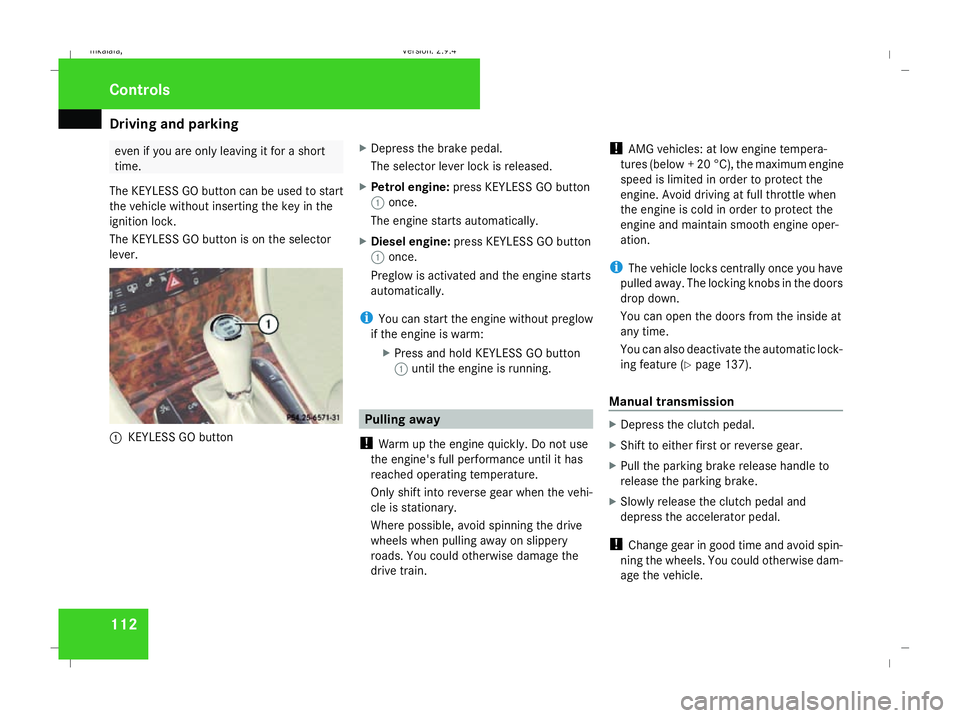
The KEYLESS GO button can be used to start
the vehicle without inserting the key in the
ignition lock.
The KEYLESS GO button is on the selector
lever. 1
KEYLESS GO button X
Depress the brake pedal.
The selector lever lock is released.
X Petrol engine: press KEYLESS GO button
1 once.
The engine starts automatically.
X Diesel engine: press KEYLESS GO button
1 once.
Preglow is activated and the engine starts
automatically.
i You can start the engine without preglow
if the engine is warm:
XPress and hold KEYLESS GO button
1 until the engine is running. Pulling away
! Warm up the engine quickly. Do not use
the engine's full performance until it has
reached operating temperature.
Only shift into reverse gear when the vehi-
cle is stationary.
Where possible, avoid spinning the drive
wheels when pulling away on slippery
roads. You could otherwise damage the
drive train. !
AMG vehicles: at low engine tempera-
tures (below + 20 °C), the maximum engine
speed is limited in order to protect the
engine. Avoid driving at full throttle when
the engine is cold in order to protect the
engine and maintain smooth engine oper-
ation.
i The vehicle locks centrally once you have
pulled away. The locking knobs in the doors
drop down.
You can open the doors from the inside at
any time.
You can also deactivate the automatic lock-
ing feature (Y page 137).
Manual transmission X
Depress the clutch pedal.
X Shift to either first or reverse gear.
X Pull the parking brake release handle to
release the parking brake.
X Slowly release the clutch pedal and
depress the accelerator pedal.
! Change gear in good time and avoid spin-
ning the wheels. You could otherwise dam-
age the vehicle. Controls
211_AKB; 2; 5, en-GB
mkalafa
, Version: 2.9.4 2008-02-29T16:57:07+01:00 - Seite 112Dateiname: 6515_3416_02_buchblock.pdf; preflight
Page 135 of 401
On-board computer
132
Resetting to factory settings For safety reasons, not all functions are reset:
permanent Speedtronic can only be set in the
Vehicle menu. The Headlamp mode function
in the Lighting submenu is only reset if the
vehicle is stationary.
X Press the èor· button to select the
Settings... menu.
X Press and hold the reset button on the left-
hand side of the instrument cluster for
approximately three seconds.
A prompt appears in the multi-function dis-
play asking you to press the reset button
again to confirm.
X Press the reset button again.
The functions of most submenus are
restored to the factory settings.
or
X If you want to retain the settings, do not
press the reset button a second time.
After approximately 5 seconds, the Set-
tings... menu appears again. Submenus in the Settings menu X
Press èor· to select the Set-
tings... menu.
X Press the jbutton to call up the selec-
tion of submenus.
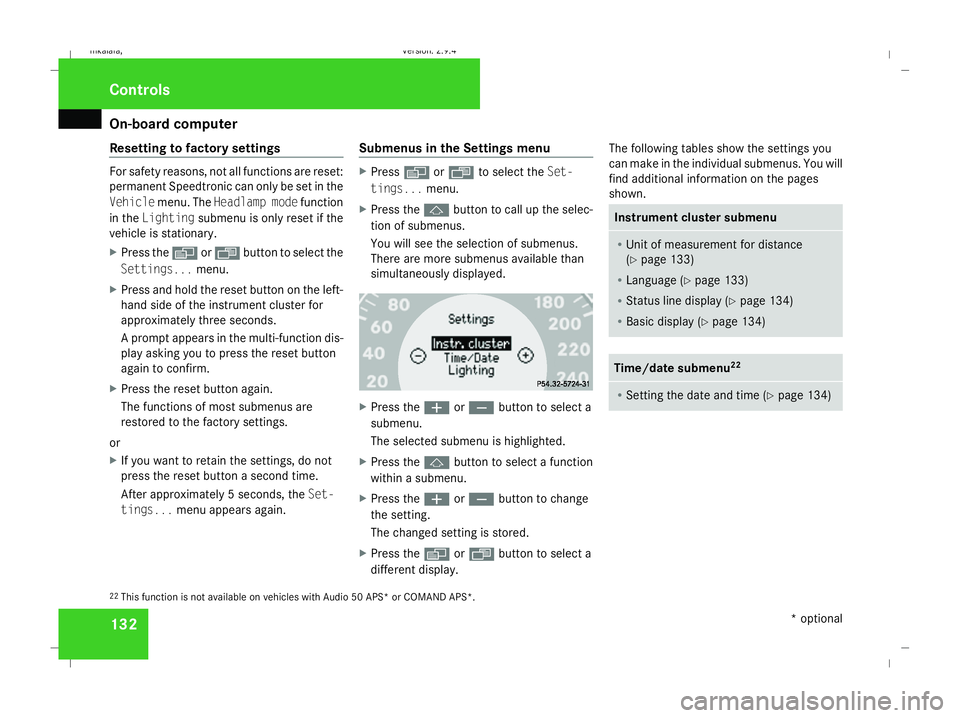
You will see the selection of submenus.
There are more submenus available than
simultaneously displayed. X
Press the æorç button to select a
submenu.
The selected submenu is highlighted.
X Press the jbutton to select a function
within a submenu.
X Press the æorç button to change
the setting.
The changed setting is stored.
X Press the èorÿ button to select a
different display. The following tables show the settings you
can make in the individual submenus. You will
find additional information on the pages
shown. Instrument cluster submenu
R
Unit of measurement for distance
(Y page 133)
R Language (Y page 133)
R Status line display (Y page 134)
R Basic display ( Ypage 134) Time/date submenu
22 R
Setting the date and time (Y page 134)22
This function is not available on vehicles with Audio 50 APS* or COMAND APS*. Controls
* optional
211_AKB; 2; 5, en-GB
mkalafa,
Version: 2.9.4 2008-02-29T16:57:07+01:00 - Seite 132Dateiname: 6515_3416_02_buchblock.pdf; preflight
Page 140 of 401
On-board computer
137
X
Press the æorç button to select the
Lighting submenu.
X Press the jbutton to select Interior
lighting delayed switch-off.
X Press the æorç button to activate
or deactivate the Interior lighting
delayed switch-off feature.
X Press the j,èorÿ button to
select a different display.
Switching the Intelligent Light Sys-
tem* on/off You can set whether motorway mode, the
active light system and the extended range
foglamps are to be activated using the
Intelligent Light System
function.
X Press the èor· button to select the
Settings... menu.
X Press the jbutton to call up the selec-
tion of submenus.
X Press the æorç button to select the
Lighting submenu.
X Press the jbutton to select Intelli-
gent Light System. X
Press the æorç button to switch
the Intelligent Light System on/off.
X Press the j,èorÿ button to
select a different display.
Activating/deactivating the automatic
door locking feature The
Automatic door locking feature
allows you to set whether your vehicle will
lock centrally from a speed of about
15 km/h upwards.
i For more information on the automatic
locking feature, see (Y page 70).
X Press the èor· button to select the
Settings... menu.
X Press the jbutton to call up the selec-
tion of submenus.
X Press the æorç button to select the
Vehicle submenu.
X Press the jbutton to select Automatic
door locking . X
Press the æorç button to activate
or deactivate the Automatic door lock-
ing feature.
X Press the j,èorÿ button to
select a different display.
Selecting the switch-on time for the
auxiliary heating* This function is only available if the vehicle
has an auxiliary heating system.
The
Auxiliary heat. function allows you to
select three switch-on times. You can set the
exact switch-on time using the other func-
tions in the Heatersubmenu.
The auxiliary heating adopts the Thermatic or
4-zone Thermotronic *temperature setting.
The minimum and maximum temperature set-
tings for the auxiliary heating are 20 † and
24 † respectively.
You can switch off the auxiliary heating by
using the remote control or the auxiliary heat-
ing button on the centre console.
The auxiliary heating is switched off automat-
ically after 50 minutes. This time can be
changed. To do this, visit a qualified specialist
workshop, e.g. a Mercedes-Benz Service
Centre. Controls
* optional
211_AKB; 2; 5, en-GB
mkalafa
,V ersion: 2.9.4
2008-02-29T16:57:07+01:00 - Seite 137 ZDateiname: 6515_3416_02_buchblock.pdf; preflight
Page 146 of 401
Driving sys
tems 143Cruise control
Cruise control maintains a constant road
speed for you. It brakes automatically in order
to avoid exceeding the set speed. On long and
steep downhill gradients, especially if the
vehicle is laden or towing a trailer, you must
shift to a lower gear in good time or select
shift range 1,2or 3in vehicles with automatic
transmission*. By doing so you will make use
of the braking effect of the engine, which
relieves the load on the brake system and
prevents the brakes from overheating and
wearing too quickly. G
Risk of accident
Do not change down for additional engine
braking on a slippery road surface. This
could cause the drive wheels to lose their
grip and the vehicle could skid.
Use cruise control only if road and traffic con-
ditions make it appropriate to maintain a
steady speed for a prolonged period. You can
store any road speed above 30 km/h. G
Risk of accident
Cruise control cannot take account of road
and traffic conditions.
Always pay attention to traffic conditions
even when cruise control is activated. Cruise control is only an aid designed to
assist driving. You are responsible for the
vehicle's speed and for braking in good
time. G
Risk of accident
Do not use cruise control:
R in road and traffic conditions which do
not allow you to maintain a constant
speed (e.g. heavy traffic or winding
roads). You could otherwise cause an
accident.
R on slippery roads. Braking or accelerat-
ing could cause the drive wheels to lose
traction and the vehicle could then skid.
R when there is poor visibility, e.g. due to
fog, heavy rain or snow
Cruise control display in the speedom-
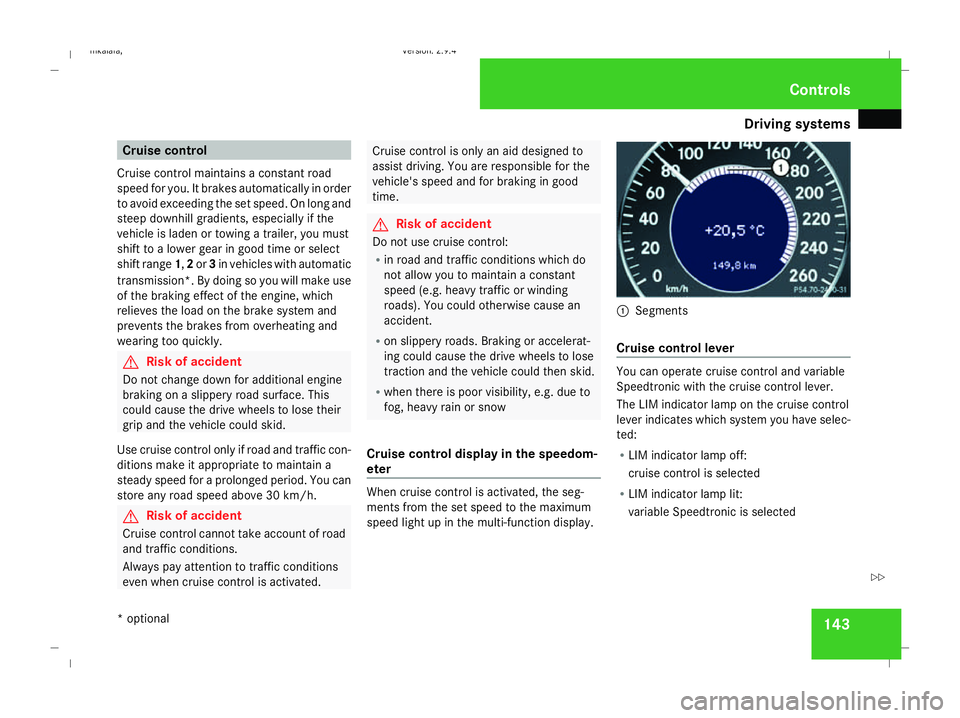
eter When cruise control is activated, the seg-
ments from the set speed to the maximum
speed light up in the multi-function display. 1
Segments
Cruise control lever You can operate cruise control and variable
Speedtronic with the cruise control lever.
The LIM indicator lamp on the cruise control
lever indicates which system you have selec-
ted:
R
LIM indicator lamp off:
cruise control is selected
R LIM indicator lamp lit:
variable Speedtronic is selected Controls
* optional
211_AKB; 2; 5, en-GB
mkalafa
,V ersion: 2.9.4
2008-02-29T16:57:07+01:00 - Seite 143 ZDateiname: 6515_3416_02_buchblock.pdf; preflight