2008 MERCEDES-BENZ E-CLASS ESTATE park assist
[x] Cancel search: park assistPage 7 of 401
4
Automatic transmission Display
message
. . . . . . . . . . . . . . . . . . . . . . .261
Auxiliary heating . . . . . . . . . . ..177, 304
Display message . . . . . . . . . . . . . .280
Remote control . . . . . . . . . . . . . . .178
Setting (on-board computer) . . . . .133
Auxiliary ventilation . . . . . . . . . . . ..177
Axle load, maximum permissible
. . . . . . . . . . . . . .370, 371, 372, 373, 374 B
Ball coupling Folding in . . . . . . . . . . . . . . . . . . . .241
Folding out . . . . . . . . . . . . . . . . . . .239
BAS (Brake Assist) . . . . . . . . . . . . . . ..59
Battery Changing (auxiliary heating
remote control) . . . . . . . . . . . . . . .311
Changing (key ).. . . . . . . . . . . . . . .310
Changing (KEYLESS GO key) . . . . .310
Charging . . . . . . . . . . . . . . . . . . . . .332
Checking (key ).. . . . . . . . . . . . . . .310
Checking (KEYLESS GO key) . . . . .310
Check lamp (key ).. . . . . . . . . . . . .310
Check lamp (KEYLESS GO key) . . . . . . . . . . . . . . . . . . . . . . . . .69, 310
Disconnecting . . . . . . . . . . . . . . . .331
Display message . . . . . . . . . . . . . .266
Maintenance (vehicle ).. . . . . . . ..329
Reconnecting . . . . . . . . . . . . . . . . .333 Removing/fitting . . . . . . . . . . . . .
.332
Vehicle battery . . . . . . . . . . . . . . . .329
Voltage (on-board computer) . . . . .127
Belt force limiters
Activatio n.. . . . . . . . . . . . . . . . . . . .41
Belt height adjustment . . . . . . . . . . ..97
Belt reel (Easy-Pack fix kit) . . . . . . ..203
Belt tensioners Activatio n.. . . . . . . . . . . . . . . . . . . .41
Belt warning . . . . . . . . . . . . . . . . . . . . .97
Bonnet Bonnet catch . . . . . . . . . . . . . . . . .223
Display message . . . . . . . . . . . . . .267
Opening/closing . . . . . . . . . . . . . .222
Bonnet release lever
Release lever . . . . . . . . . . . . . . . . .222
Boot
Emergency release . . . . . . . . . . . . .307
Locking separatel y.. . . . . . . . . . . . .72
Opening/closing (manually) . . . . . . .70
Boot/luggage compartment
Opening/closing (automatically )...73
Boot lid
Display message . . . . . . . . . . . . . .266
Brake
Warning lamp . . . . . . . . . . . . . . . . .286
Brake Assist
see BAS
Brake fluid . . . . . . . . . . . . . . . . . . . . .390
Display message . . . . . . . . . . . . . .270 Brake lamps
Adaptive . . . . . . . . . . . . . . . . . . . . . .59
Display message . . . . . . . . . . . . . .274
Brake system
Display message . . . . . . . . . .268, 269
Parking brake . . . . . . . . . . . . . . . . .113
Bulb
Changing . . . . . . . . . . . . . . . .314, 315
Dipped-beam headlamps . . . . . . . .314
Licence plate lamp . . . . . . . . . . . . .315
Main-beam headlamps . . . . . . . . . .314
Parking lamp . . . . . . . . . . . . . . . . .314
Side lamp . . . . . . . . . . . . . . . . . . . .314
Turn signal lamp . . . . . . . . . . . . . . .314
see Lamp
Bulbs
Overview . . . . . . . . . . . . . . . . . . . .312 C
Calling up a malfunction see Message memory menu
Care . . . . . . . . . . . . . . . . . . . . . . . . . . .244
Automatic car wash . . . . . . . . . . . .245
Distronic . . . . . . . . . . . . . . . . . . . .248
Headlamps . . . . . . . . . . . . . . . . . . .246
High-pressure cleaners . . . . . . . . .245
Parktroni c.. . . . . . . . . . . . . . . . . .248
Plastic trim . . . . . . . . . . . . . . . . . . .247
Rear window . . . . . . . . . . . . . . . . .246
Side windows . . . . . . . . . . . . . . . . .246 Index
211_AKB; 2; 5, en-GB
mkalafa,
Version: 2.9.4 2008-02-29T16:57:07+01:00 - Seite 4Dateiname: 6515_3416_02_buchblock.pdf; preflight
Page 145 of 401
Driving sys
tems 142
X
Press the èor· button to select the
Telephone menu.
X Press the jork button to call up
the phone book.
X Press the jork button to select the
desired name. To scroll through the tele-
phone book faster, press and hold the
j ork button for longer than 1 sec-
ond.
X Press the sbutton to start dialling.
The multi-function display shows the Con-
necting call...message.
The number dialled is stored in the redial
memory.
When there is a connection, the name of
the person called – if stored in the phone
book – or the number dialled appears in the
multi-function display.
or
X If you do not wish to make a call, press the
t button.
Redialling The on-board computer stores the last phone
numbers which were dialled. X
Press the èor· button to select the
Telephone menu.
X Press the sbutton to call up the most
recently dialled number in the redial mem-
ory.
X Press the jork button to select the
desired name or number.
X Press the sbutton to start dialling. Driving systems
Overview of driving systems
The vehicle's driving systems are described
on the following pages:
R Cruise control, Distronic* and Speedtronic,
which are used to control the speed of the
vehicle
R HOLD, which makes pulling away easier,
particularly on steep uphill gradients
R Vehicle level setting and AIRMATIC DC*,
which are used to adjust the vehicle's sus-
pension system
R 4*MATIC (permanent four-wheel drive), for
optimum traction
R Parktronic*, which assists you in parking
and manoeuvring
The ABS, BAS, adaptive brake lights, ESP ®
,
EBV (electronic brake-power distribution) and
ADAPTIVE BRAKE driving safety systems are
described in the "Driving safety systems" sec-
tion (Y page 58). Controls
* optional
211_AKB; 2; 5, en-GB
mkalafa
,V ersion: 2.9.4
2008-02-29T16:57:07+01:00 - Seite 142 Dateiname: 6515_3416_02_buchblock.pdf; preflight
Page 148 of 401
Driving sys
tems 145
i
Cruise control is not deactivated if you
depress the accelerator pedal. For exam-
ple, if you accelerate briefly to overtake,
cruise control adjusts the vehicle's speed
to the last speed stored after you have fin-
ished overtaking.
i Deceleration of the vehicle by means of
the cruise control lever is assisted by auto-
matic application of the brakes.
Vehicles with automatic transmission*:
On long downhill gradients, the automatic
transmission shifts down as a further meas-
ure.
Making fine adjustments in 1 km/h
increments X
Briefly press the cruise control lever up
1 for a higher speed or down 4for a
lower speed.
The last speed stored is increased or
reduced.
Deactivating cruise control There are several ways to deactivate cruise
control: X
Briefly press the cruise control lever for-
wards 6.
or
X Brake.
or
X Briefly press the cruise control lever in the
direction of arrow 5.
Variable Speedtronic is selected. LIM indi-
cator lamp 2in the cruise control lever
lights up.
Cruise control is automatically deactivated if,
for example:
R you depress the parking brake
R you are driving at less than 30 km/h
R ESP ®
is intervening or you deactivate
ESP ®
R you move the selector lever to Nin vehicles
with automatic transmission* while driving
If cruise control is deactivated, you will hear
a warning tone. You will see the Cruise con-
trol off message in the multi-function dis-
play for approximately five seconds.
i The last speed stored is cleared when you
switch off the engine. Distronic*
Distronic regulates the speed and automati-
cally maintains the distance to the vehicle in
front. It brakes automatically in order to avoid
exceeding the set speed. On long and steep
downhill gradients, especially if the vehicle is
laden or towing a trailer, you must select shift
range 1,2or 3. By doing so,you will make use
of the braking effect of the engine, which
relieves the load on the brake system and
prevents the brakes from overheating and
wearing too quickly. G
Risk of accident
Do not change down for additional engine
braking on a slippery road surface. This
could cause the drive wheels to lose their
grip and the vehicle could skid. G
Risk of accident
Distronic is only an aid designed to assist
driving. The driver remains fully responsible
for the vehicle's distance from other vehi-
cles, the vehicle's speed and braking in
good time. Controls
* optional
211_AKB; 2; 5, en-GB
mkalafa
,V ersion: 2.9.4
2008-02-29T16:57:07+01:00 - Seite 145 ZDateiname: 6515_3416_02_buchblock.pdf; preflight
Page 150 of 401
Driving sys
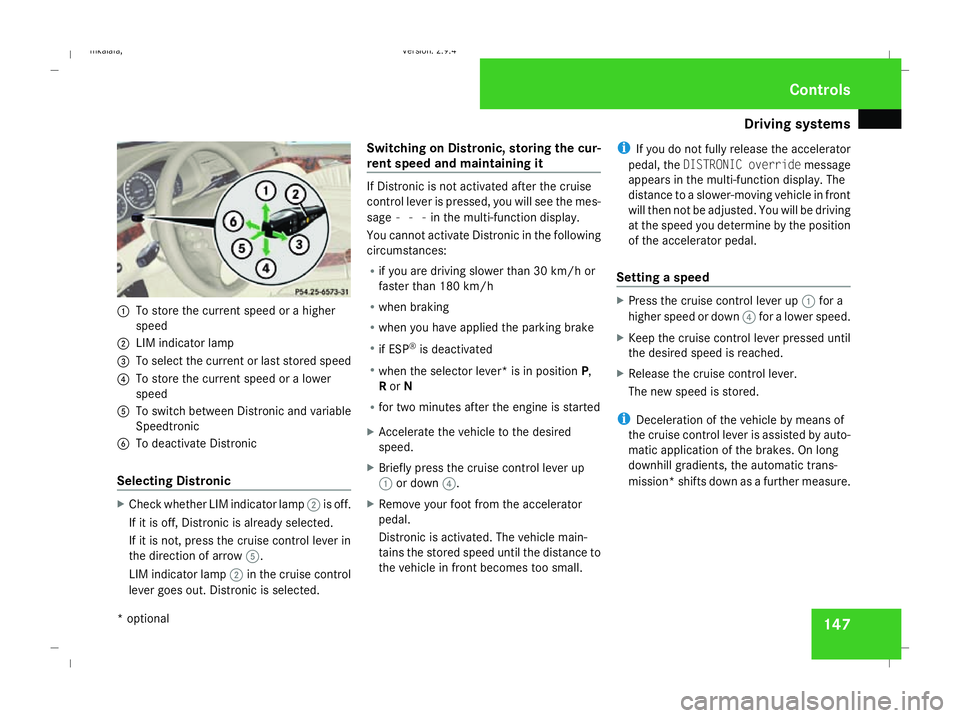
tems 1471
To store the current speed or a higher
speed
2 LIM indicator lamp
3 To select the current or last stored speed
4 To store the current speed or a lower
speed
5 To switch between Distronic and variable
Speedtronic
6 To deactivate Distronic
Selecting Distronic X
Check whether LIM indicator lamp 2is off.
If it is off, Distronic is already selected.
If it is not, press the cruise control lever in
the direction of arrow 5.
LIM indicator lamp 2in the cruise control
lever goes out. Distronic is selected. Switching on Distronic, storing the cur-
rent speed and maintaining it If Distronic is not activated after the cruise
control lever is pressed, you will see the mes-
sage - - - in the multi-function display.
You cannot activate Distronic in the following
circumstances:
R if you are driving slower than 30 km/h or
faster than 180 km/h
R when braking
R when you have applied the parking brake
R if ESP ®
is deactivated
R when the selector lever* is in position P,
R or N
R for two minutes after the engine is started
X Accelerate the vehicle to the desired
speed.
X Briefly press the cruise control lever up
1 or down 4.
X Remove your foot from the accelerator
pedal.
Distronic is activated. The vehicle main-
tains the stored speed until the distance to
the vehicle in front becomes too small. i
If you do not fully release the accelerator
pedal, the DISTRONIC override message
appears in the multi-function display. The
distance to a slower-moving vehicle in front
will then not be adjusted. You will be driving
at the speed you determine by the position
of the accelerator pedal.
Setting a speed X
Press the cruise control lever up 1for a
higher speed or down 4for a lower speed.
X Keep the cruise control lever pressed until
the desired speed is reached.
X Release the cruise control lever.
The new speed is stored.
i Deceleration of the vehicle by means of
the cruise control lever is assisted by auto-
matic application of the brakes. On long
downhill gradients, the automatic trans-
mission* shifts down as a further measure. Controls
* optional
211_AKB; 2; 5, en-GB
mkalafa
,V ersion: 2.9.4
2008-02-29T16:57:07+01:00 - Seite 147 ZDateiname: 6515_3416_02_buchblock.pdf; preflight
Page 320 of 401
Flat tyre
317
X
Remove the key from the ignition lock.
X Fold the wiper arm away from the rear win-
dow until it engages.
X Turn wiper blade 1at a right angle to wiper
arm.
X Press tab 2and push wiper blade 1off
the retainer in the direction of arrow 4.
X Remove wiper blade 1.
Fitting X
Insert the new wiper blade into retainer
3 in the opposite direction to arrow 4
until tab 2engages.
X Make sure that wiper blade 1is seated
correctly.
X Turn wiper blade 1parallel to the wiper
arm.
X Fold the wiper arm back onto the rear win-
dow. Flat tyre
Your vehicle may be equipped with:
R a TIREFIT kit (Y page 255)
R a "Minispare" emergency spare
wheel* (Y page 255)
R a collapsible emergency spare
wheel* (Y page 255)
R a spare wheel* (Y page 255)
R the MOExtended run-flat sys-
tem* (Y page 328) Preparing the vehicle
i Vehicle preparation is not necessary on
vehicles with MOE tyres*.
X Stop your vehicle as far away from traffic
as possible on solid, non-slippery, level
ground.
X Switch on the hazard warning lamps.
X Firmly depress the parking brake.
Vehicles with manual transmission X
Shift to either first or reverse gear. Vehicles with automatic transmission* X
Move the selector lever to P.
For all vehicles X
All occupants must get out of the vehicle.
Make sure that they are not endangered as
they do so.
X Make sure that no one is near the danger
area whilst a wheel is being changed. Any-
one who is not directly assisting in the
wheel change should, for example, stand
behind the barrier.
X Switch off the engine.
X Remove the key from the ignition lock.
X Place the warning triangle ( Ypage 252) or
warning lamps at a suitable distance.
Observe legal requirements. G
Risk of injury
The jack is designed only to raise the vehi-
cle for a short time while a wheel is being
changed.
If you intend to work under the vehicle, it
must be placed on stands. Practical advice
* optional
211_AKB; 2; 5, en-GB
mkalafa,
Version: 2.9.4
2008-02-29T16:57:07+01:00 - Seite 317 ZDateiname: 6515_3416_02_buchblock.pdf; preflight