2008 MERCEDES-BENZ CLS COUPE brake
[x] Cancel search: brakePage 249 of 329

Troubleshooting
246 Problem Possible cause/consequence Suggested solutions
l
The red distance warning
lamp* lights up while the
vehicle is in motion. You
will also hear a warning
tone. G
Risk of accident
You are approaching a vehicle in
front at too great a speed or Dis-
tronic*
has detected a stationary
obstacle in your line of travel. X
Be prepared to brake immediately.
X Pay careful attention to the traffic situation. You may have to brake
or take evasive action. D
The red coolant warning
lamp comes on while the
engine is running. There is insufficient coolant in the
expansion tank.
The coolant is too hot and the
engine is no longer being cooled
sufficiently. X
Stop the vehicle as soon as possible. Pay attention to the traffic
conditions as you do so.
X Allow the engine and coolant to cool.
X Check the coolant level. Observe the warning notes
(Y page 196). Top up the coolant if necessary.
X Have the coolant system checked at a qualified specialist work-
shop if the coolant needs topping up more often than usual. D
The red coolant warning
lamp comes on while the
engine is running. If the coolant level is correct, the
radiator fan may be faulty.
The coolant is too hot and the
engine is no longer being cooled
sufficiently. X
If the coolant temperature is less than 120†, you can continue
driving to the nearest qualified specialist workshop.
X In doing so, avoid heavy loads on the engine (e.g. driving in moun-
tainous terrain) and stop-and-go driving. Practical advice
* optional
219_AKB; 2; 4, en-GB
mkalafa,
2007-11-13T09:28:36+01:00 - Seite 246
Page 254 of 329
Troubleshooting
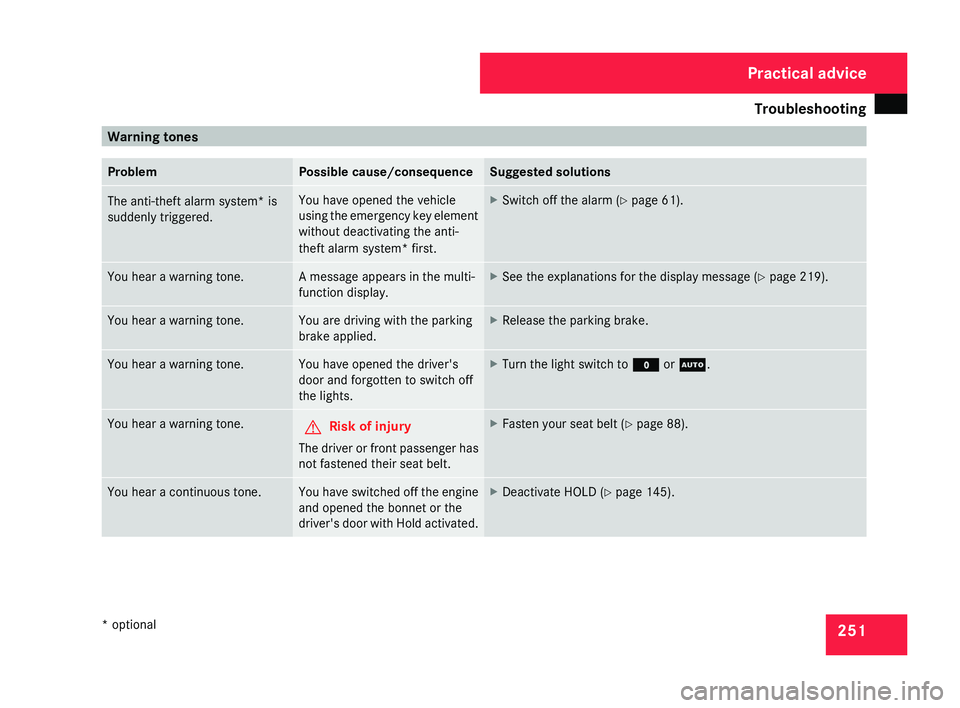
251Warning tones
Problem Possible cause/consequence Suggested solutions
The anti-theft alarm system* is
suddenly triggered. You have opened the vehicle
using
the emergency key element
without deactivating the anti-
theft alarm system* first. X
Switch off the alarm (Y page 61). You hear a warning tone. A message appears in the multi-
function display. X
See the explanations for the display message ( Y page 219).You hear a warning tone. You are driving with the parking
brake applied. X
Release the parking brake. You hear a warning tone. You have opened the driver's
door and forgotten to switch off
the lights. X
Turn the light switch to M or U.You hear a warning tone.
G
Risk of injury
The driver or front passenger has
not fastened their seat belt. X
Fasten your seat belt ( Y page 88).You hear a continuous tone. You have switched off the engine
and opened the bonnet or the
driver's
door with Hold activated. X
Deactivate HOLD (Y page 145). Practical advice
* optional
219_AKB; 2; 4, en-GB
mkalafa,
2007-11-13T09:28:36+01:00 - Seite 251
Page 267 of 329
Troubleshooting
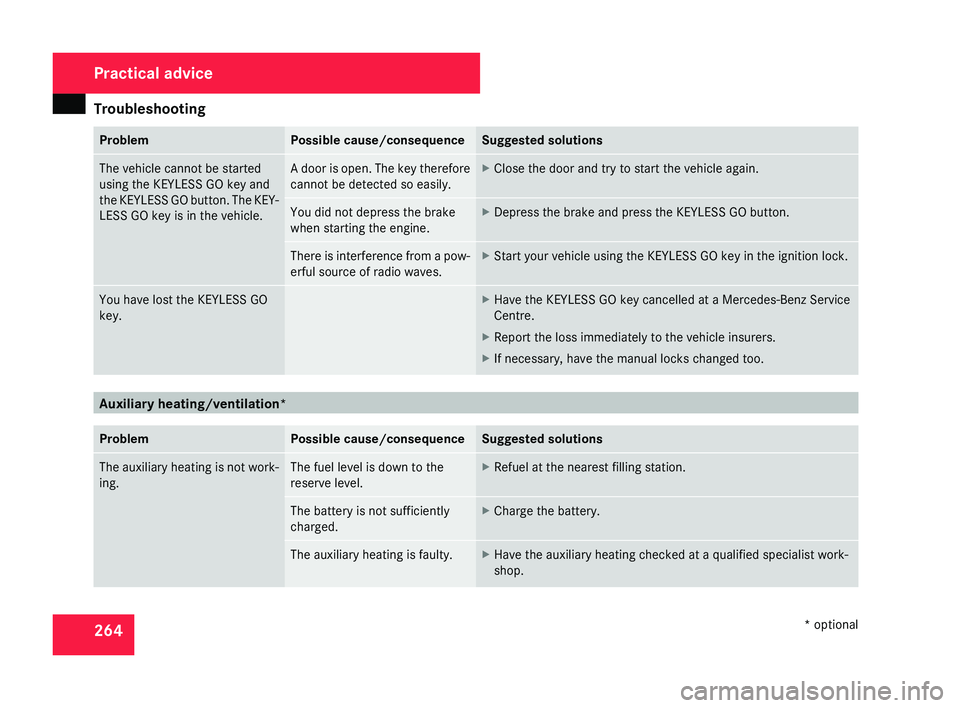
264 Problem Possible cause/consequence Suggested solutions
The vehicle cannot be started
using the KEYLESS GO key and
the
KEYLESS GO button. The KEY-
LESS GO key is in the vehicle. A door is open. The key therefore
cannot be detected so easily. X
Close the door and try to start the vehicle again. You did not depress the brake
when starting the engine. X
Depress the brake and press the KEYLESS GO button. There is interference from a pow-
erful source of radio waves. X
Start your vehicle using the KEYLESS GO key in the ignition lock. You have lost the KEYLESS GO
key. X
Have the KEYLESS GO key cancelled at a Mercedes-Benz Service
Centre.
X Report the loss immediately to the vehicle insurers.
X If necessary, have the manual locks changed too. Auxiliary heating/ventilation*
Problem Possible cause/consequence Suggested solutions
The auxiliary heating is not work-
ing. The fuel level is down to the
reserve level. X
Refuel at the nearest filling station. The battery is not sufficiently
charged. X
Charge the battery. The auxiliary heating is faulty. X
Have the auxiliary heating checked at a qualified specialist work-
shop. Practical advice
* optional
219_AKB; 2; 4, en-GB
mkalafa,
2007-11-13T09:28:36+01:00 - Seite 264
Page 271 of 329
Locking/unlocking in an emergency
268
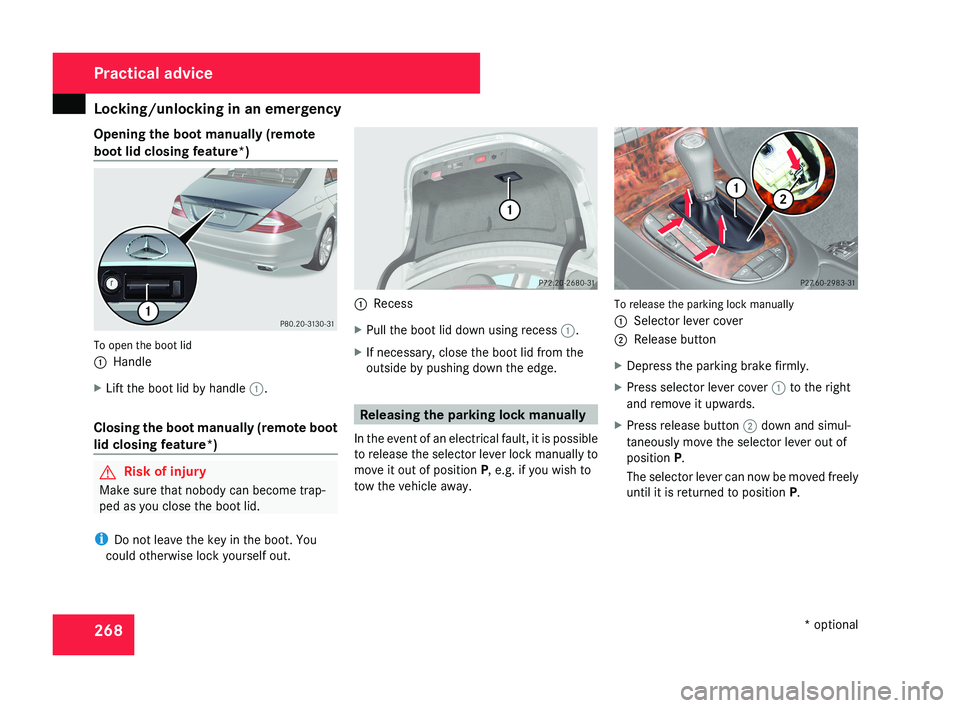
Opening the boot manually (remote
boot lid closing feature*)
To open the boot lid
1
Handle
X Lift the boot lid by handle 1.
Closing the boot manually (remote boot
lid closing feature*) G
Risk of injury
Make sure that nobody can become trap-
ped as you close the boot lid.
i Do not leave the key in the boot. You
could otherwise lock yourself out. 1
Recess
X Pull the boot lid down using recess 1.
X If necessary, close the boot lid from the
outside by pushing down the edge. Releasing the parking lock manually
In the event of an electrical fault, it is possible
to release the selector lever lock manually to
move it out of position P, e.g. if you wish to
tow the vehicle away. To release the parking lock manually
1
Selector lever cover
2 Release button
X Depress the parking brake firmly.
X Press selector lever cover 1 to the right
and remove it upwards.
X Press release button 2 down and simul-
taneously move the selector lever out of
position P.
The selector lever can now be moved freely
until it is returned to position P. Practical advice
* optional
219_AKB; 2; 4, en-GB
mkalafa,
2007-11-13T09:28:36+01:00 - Seite 268
Page 275 of 329
Changing the bulbs
272
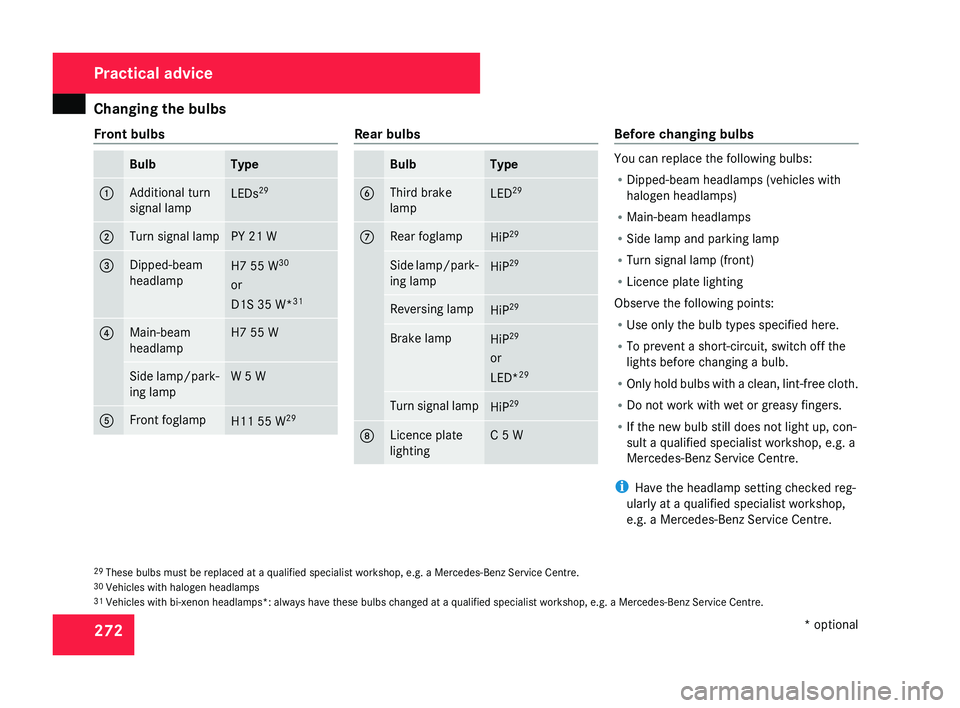
Front bulbs Bulb Type
1 Additional turn
signal lamp
LEDs
29 2 Turn signal lamp PY 21 W
3 Dipped-beam
headlamp
H7 55 W
30
or
D1S 35 W* 31 4 Main-beam
headlamp H7 55 W
Side lamp/park-
ing lamp W 5 W
5 Front foglamp
H11 55 W
29 Rear bulbs
Bulb Type
6 Third brake
lamp
LED
29 7 Rear foglamp
HiP
29 Side lamp/park-
ing lamp
HiP
29 Reversing lamp
HiP
29 Brake lamp
HiP
29
or
LED* 29 Turn signal lamp
HiP
29 8 Licence plate
lighting C 5 W Before changing bulbs
You can replace the following bulbs:
R
Dipped-beam headlamps (vehicles with
halogen headlamps)
R Main-beam headlamps
R Side lamp and parking lamp
R Turn signal lamp (front)
R Licence plate lighting
Observe the following points:
R Use only the bulb types specified here.
R To prevent a short-circuit, switch off the
lights before changing a bulb.
R Only
hold bulbs with a clean, lint-free cloth.
R Do not work with wet or greasy fingers.
R If the new bulb still does not light up, con-
sult a qualified specialist workshop, e.g. a
Mercedes-Benz Service Centre.
i Have the headlamp setting checked reg-
ularly at a qualified specialist workshop,
e.g. a Mercedes-Benz Service Centre.
29 These bulbs must be replaced at a qualified specialist workshop, e.g. a Mercedes-Benz Service Centre.
30 Vehicles with halogen headlamps
31 Vehicles with bi-xenon headlamps*: always have these bulbs changed at a qualified specialist workshop, e.g. a Mercedes-Benz Service Centre. Practical advice
* optional
219_AKB; 2; 4, en-GB
mkalafa,
2007-11-13T09:28:36+01:00 - Seite 272
Page 278 of 329
Replacing the wiper blades
275Replacing the wiper blades
G
Risk of accident
The windscreen will no longer be properly
wiped if the wiper blades are worn. This
may prevent you from observing the traffic
conditions, thereby causing an accident.
Replace the wiper blades twice a year, ide-
ally in spring and autumn. G
Risk of accident
The wiper arms could start moving and
cause an injury if you leave the windscreen
wipers switched on.
Remove the key from the ignition lock
before replacing the wiper blades.
! Make sure that you touch only the wiper
arm of the windscreen wiper to avoid dam-
aging the windscreen wiper blades. Removing
Vehicles without KEYLESS GO* X
Make sure that the key is in position 1 or
2 in the ignition lock.
X Set the windscreen wipers to posi-
tion u (Y page 98) on the combination
switch.
X When the wiper arms have reached a ver-
tical position, turn the key to position 0 and
remove it from the ignition lock.
X Fold the wiper arm away from the wind-
screen until it engages.
X Set the wiper blade at right angles to the
wiper arm.
Vehicles with KEYLESS GO* X
Switch off the engine.
X Take your foot off the brake pedal.
X Set the windscreen wipers to posi-
tion u (Y page 98) on the combination
switch.
X Press the KEYLESS GO button repeatedly
until the windscreen wipers start. X
When the wiper arms have reached a ver-
tical position, press the KEYLESS GO but-
ton again.
X Fold the wiper arm away from the wind-
screen until it engages.
X Set the wiper blade at right angles to the
wiper arm. X
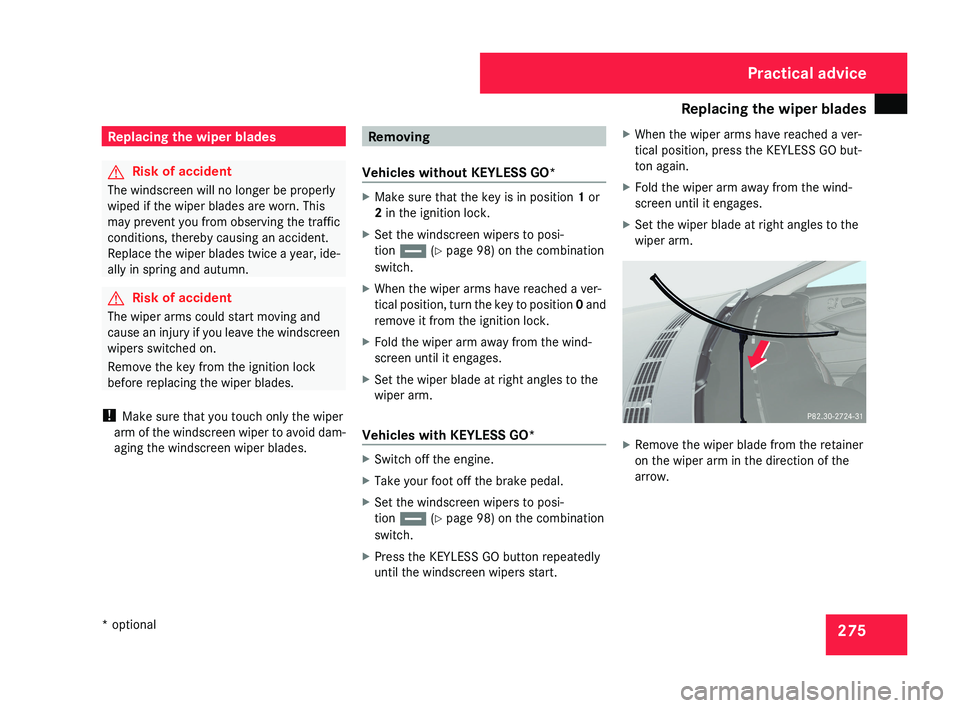
Remove the wiper blade from the retainer
on the wiper arm in the direction of the
arrow. Practical advice
* optional
219_AKB; 2; 4, en-GB
mkalafa,
2007-11-13T09:28:36+01:00 - Seite 275
Page 279 of 329
Flat tyre
276 Fitting
X Slide the new wiper blade into the retainer
on the wiper arm in the opposite direction
to the arrow.
X Turn the wiper blade parallel to the wiper
arm.
X Fold the wiper arm back onto the wind-
screen. Flat tyre
Your vehicle may be equipped with:
R a TIREFIT kit (Y page 217)
R a "Minispare" emergency spare
wheel*
(Y page 218)
R a collapsible emergency spare
wheel* (Y page 218)
R a spare wheel* (Y page 218)
R the MOExtended run-flat sys-
tem* (Y page 287) Preparing the vehicle
i Vehicle preparation is not necessary on
vehicles with MOE tyres*.
X Stop your vehicle as far away from traffic
as possible on solid, non-slippery, level
ground.
X Switch on the hazard warning lamps.
X Firmly depress the parking brake.
X Move the selector lever to P. X
All occupants must get out of the vehicle.
Make
sure that they are not endangered as
they do so.
X Make sure that no one is near the danger
area whilst a wheel is being changed. Any-
one who is not directly assisting in the
wheel change should, for example, stand
behind the barrier.
X Switch off the engine.
X Remove the key from the ignition lock.
X Place the warning triangle ( Y page 216) or
warning lamps at a suitable distance.
Observe legal requirements. G
Risk of injury
The jack is designed only to raise the vehi-
cle for a short time while a wheel is being
changed.
If you intend to work under the vehicle, it
must be placed on stands.
Make
sure that the jack is placed on a firm,
non-slip, level surface. Do not use wooden
blocks or similar as jacking supports. Oth-
erwise, the jack will not be able to achieve
its load-bearing capacity due to the restric-
ted height. Practical advice
* optional
219_AKB; 2; 4, en-GB
mkalafa,
2007-11-13T09:28:36+01:00 - Seite 276
Page 293 of 329
Battery
290 Disconnecting the battery
G
Risk of accident
If the battery is disconnected:
R there
is no brake boosting effect and you
will need to apply more pressure to brake
and the brake pedal travel will be longer;
you may have to depress the brake pedal
with full force
R you can no longer turn the key in the igni-
tion and, on vehicles with KEYLESS
GO*, pressing the KEYLESS GO button*
on the selector lever will have no effect
R the selector lever is locked in position P
! Always disconnect the battery in the
sequence described below. Never swap the
terminal clamps. You may otherwise dam-
age the vehicle electronics.
X Firmly depress the parking brake and move
the selector lever to P.
X Switch off all electrical consumers.
X Turn the key to position 0 in the ignition
lock and remove it.
X Open the boot/luggage compartment.
X Remove the luggage well (Y page 218). X
Remove the battery cover.
X Remove the negative terminal clamp from
the battery.
X Remove the cover from the positive termi-
nal clamp.
X Remove the positive terminal clamp from
the battery.
X Disconnect the breather hose. Removing the battery
X Disconnect the battery ( Y page 290).
X Loosen the bolt which holds the battery in
place.
X Release the strap and remove the battery. Charging and fitting the battery
G
Risk of injury
Only charge the installed battery with a bat-
tery charger which has been tested and
approved
by Mercedes-Benz. These battery
chargers allow the battery to be charged
while it is still installed. Otherwise, the vehi-
cle's electronic system may be damaged.
Only charge the battery in a well-ventilated
area. As the battery is being charged, gases
can escape and generate minor explosions.
This may injure you and other persons or
cause damage to the paintwork or acid cor-
rosion on the vehicle.
You can obtain information about battery
chargers which allow the battery to be
charged when still installed from a qualified
specialist workshop, e.g. a Mercedes-Benz
Service Centre. G
Risk of injury
There is a risk of acid burns during the
charging process due to the gases which
escape from the battery. Do not lean over
the battery during the charging process.
! Only use battery chargers with a maxi-
mum charging voltage of 14.8 V. Practical advice
* optional
219_AKB; 2; 4, en-GB
mkalafa,
2007-11-13T09:28:36+01:00 - Seite 290