2008 MERCEDES-BENZ CLS COUPE lights
[x] Cancel search: lightsPage 162 of 329
Air conditioning
159
X
To switch on: press the œ button.
The indicator lamp in the œ button
comes on.
X To deactivate: press the œ button.
The indicator lamp in the œ button goes
out. The cooling with air dehumidification
function has a delayed switch-off feature.
i The cooling with air dehumidification
function in the rear compartment is only
operative if the 4-zone Thermotronic cool-
ing with air dehumidification function* is
switched on. Controlling the air conditioning auto-
matically
In automatic mode, the set temperature is
maintained at a constant level fully automat-
ically. To do so, the system automatically
regulates the temperature of the dispensed
air, the airflow and the air distribution.
The automatic air conditioning will achieve
optimal operation if "cooling with air dehu-
midification" is also activated. If necessary,
cooling
with air dehumidification can be deac-
tivated. X
Make sure that the key is in position 2 in
the ignition lock.
X Set the desired temperature.
X To activate: press the U button.
The AUTO
display for the air distribution and
airflow comes on. The indicator lamp 22
on
the U button lights up. Airflow and air
distribution are set to automatic mode.
X To deactivate: press the Q or ·
button.
The AUTO display for the airflow goes out.
The automatic control is deactivated and
the airflow is controlled according to the
selected
setting. Automatic air distribution
remains activated.
or
X 2-zone Thermatic only: press
the © or
ª air distribution button.
The AUTO display for the air distribution
goes out. The automatic control is deacti-
vated and the air distribution is controlled
according to the selected setting. Auto-
matic airflow remains activated. or
X
4-zone Thermotronic only*: turn air dis-
tribution thumbwheel 1 or 7 to the
desired symbol
(Y page 155).
The indicator lamp in the U button goes
out. The automatic control is deactivated
and the air distribution is controlled
according to the selected setting. Auto-
matic airflow remains activated. Setting the temperature
2-zone Thermatic Different temperatures can be set for the
driver's and front-passenger sides.
X
To increase/reduce: turn thumbwheels
1 and 7 clockwise or anti-clockwise
(Y
page 153). Only change the temperature
setting in small increments. Start at 22 †.
4-zone Thermotronic* The interior temperature for each of the four
air-conditioning zones can be adjusted sepa-
rately.
22 Only for vehicles with 4-zone Thermotronic*. Controls
* optional
219_AKB; 2; 4, en-GB
mkalafa,
2007-11-13T09:28:36+01:00 - Seite 159 Z
Page 167 of 329
Air conditioning
164 Windows misted up
Windows misted up on the inside X
Activate the "cooling function with air-
dehumidification" function.
X Activate the automatic mode.
X If the windows continue to mist up, activate
the "demisting" function.
Windows misted up on the outside X
Activate the windscreen wipers.
X 2-zone Thermatic: press and hold the
© or ª button until the a, Ú
or Y symbol is shown in the display.
X 4-zone Thermotronic*: turn the thumb-
wheel for air distribution to the Y or
a symbol.
i You should only select this setting until
the windscreen is clear again. Switching the rear window heating
on/off
G
Risk of accident
Clear all windows of ice or snow before set-
ting off. Impaired visibility could otherwise
endanger yourself and others.
i At very low temperatures, the rear win-
dow heating is only switched on once the
vehicle interior has warmed up.
i The rear window heating has a high cur-
rent draw. You should therefore switch it
off
as soon as the window is clear, as it only
switches itself off automatically after
between six and twenty minutes.
i If the battery voltage is too low, the rear
window heating may switch off.
X Make sure that the key is in position 2 in
the ignition lock.
X Press the ¯ button.
The
indicator lamp in the ¯ switch lights
up or goes out. Activating/deactivating air-recircula-
tion mode
You can deactivate the flow of fresh air if
unpleasant odours are entering the vehicle
from outside. The air already inside the vehi-
cle will then be recirculated. G
Risk of accident
Only switch over to air-recirculation mode
briefly
at low outside temperatures. Other-
wise, the windows could mist up, thus
impairing visibility and endangering your-
self and others. This may prevent you from
observing the traffic conditions, thereby
causing an accident.
X To activate: press the , button.
The indicator lamp in the , button
comes on.
i Air-recirculation mode is activated auto-
matically at high outside temperatures.
When air-recirculation mode is activated
automatically, the indicator lamp in
the , button is not lit.
Outside air is added after about 30
minutes. Controls
* optional
219_AKB; 2; 4, en-GB
mkalafa,
2007-11-13T09:28:36+01:00 - Seite 164
Page 170 of 329
Air conditioning
167
Activating the auxiliary heating/ventila-
tion
If the key is in position 1 or 2:
X
Press and hold button 1 for at least two
seconds.
The red or blue indicator lamp in the button
lights up.
If the key is removed or in position 0:
X Briefly press button 1.
The red or blue indicator lamp in the button
lights up.
Deactivating the auxiliary heating/venti-
lation
X Briefly press button 1.
The red or blue indicator lamp in the button
goes out.
Remote control
Your vehicle comes with one remote control.
You may use two additional remote controls
for your vehicle. For further information, con-
sult a qualified specialist workshop, e.g. a
Mercedes-Benz Service Centre. The remote control has a maximum range of
approximately 300 metres. This range may be
reduced by:
R
sources of radio interference
R solid objects between the remote control
and the vehicle
R the remote control being in an unfavoura-
ble position in relation to the vehicle
R transmitting from an enclosed space
i The optimum range can be achieved if you
hold the remote control vertically, pointing
upwards when you press one of the but-
tons.
i A battery symbol appears in the display
when the batteries in the remote control
are low. Replace the remote control bat-
teries (Y page 270).
i More information about the auxiliary
heating can be found in the "Practical
advice" section ( Y page 264).1
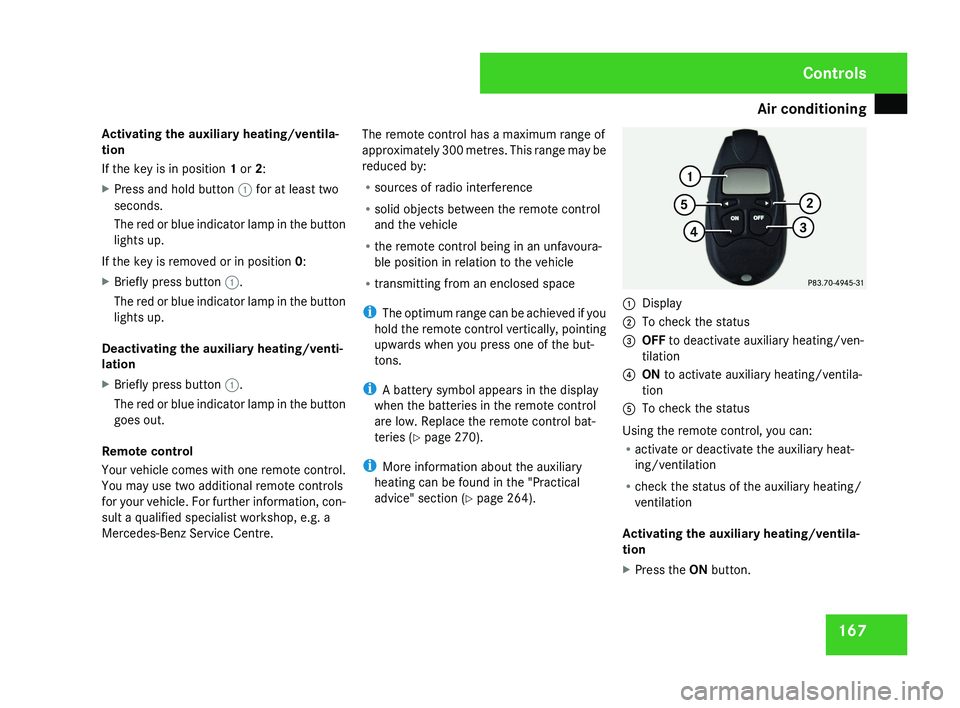
Display
2 To check the status
3 OFF to deactivate auxiliary heating/ven-
tilation
4 ON to activate auxiliary heating/ventila-
tion
5 To check the status
Using the remote control, you can:
R activate or deactivate the auxiliary heat-
ing/ventilation
R check the status of the auxiliary heating/
ventilation
Activating the auxiliary heating/ventila-
tion
X Press the ON button.
Controls
219_AKB; 2; 4, en-GB
mkalafa,
2007-11-13T09:28:36+01:00 - Seite 167
Page 183 of 329
Features
180 Features
Sun visors
G
Risk of accident
Keep the mirrors in the sun visors covered
while driving. You could otherwise be daz-
zled by bright lights, impairing your view of
traffic conditions. As a result you could
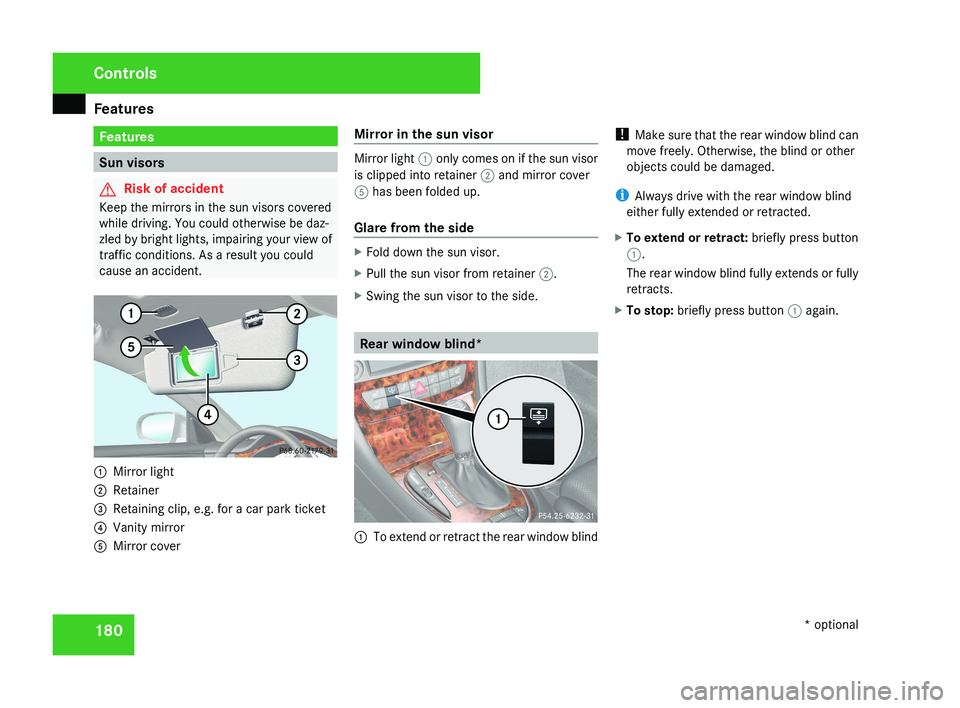
cause an accident.1 Mirror light
2 Retainer
3 Retaining clip, e.g. for a car park ticket
4 Vanity mirror
5 Mirror cover Mirror in the sun visor
Mirror light
1 only comes on if the sun visor
is clipped into retainer 2 and mirror cover
5 has been folded up.
Glare from the side
X Fold down the sun visor.
X Pull the sun visor from retainer 2.
X Swing the sun visor to the side.
Rear window blind*
1 To extend or retract the rear window blind !
Make sure that the rear window blind can
move freely. Otherwise, the blind or other
objects could be damaged.
i Always drive with the rear window blind
either fully extended or retracted.
X To extend or retract: briefly press button
1.
The rear window blind fully extends or fully
retracts.
X To stop: briefly press button 1 again.
Controls
* optional
219_AKB; 2; 4, en-GB
mkalafa,
2007-11-13T09:28:36+01:00 - Seite 180
Page 190 of 329
Features
187
tion for at least 20 seconds before trying
another position.
X Keep the transmitter button on the garage
door's
remote control depressed until indi-
cator lamp 1 starts to flash rapidly.
The programming was successful if indica-
tor lamp 1 flashes rapidly.
X Release the transmitter buttons on the
garage
door's remote control and the inte-
grated remote control.
If indicator lamp 1 goes out after approxi-
mately 20 seconds and did not flash rapidly
before this:
X Release the transmitter buttons on the
integrated and portable remote controls.
X Repeat the programming procedure. At the
same time change the distance between
the garage door's remote control and the
transmitter
buttons in the rear-view mirror.
i If the garage door system works with a
rolling code, after programming you must
synchronise the remote control integrated
in
the rear-view mirror with the garage door
system receiver.
You will find further information in the
garage door opening system's operating instructions, e.g. the sections on “Synchro-
nising the transmitter” or “Registering a
new
transmitter”. You can also call the hot-
line mentioned above.
Opening or closing the garage door Once programmed, the integrated remote
control
will assume the function of the garage
door system's remote control. Please read
the operating instructions for the garage door
system.
X Turn the key to position 2 in the ignition
lock.
X Press the transmitter button on the rear-
view mirror that you have programmed to
operate the garage door.
Garage door system with fixed code: indi-
cator lamp 1 lights up continuously.
Garage
door system with rolling code: indi-
cator lamp 1 flashes briefly and then lights
up for approximately two seconds. This is
repeated for up to 20 seconds.
i The transmitter will transmit a signal for
as long as the transmitter button is being
pressed. The transmission will be halted
after a maximum of 20 seconds and indi- cator lamp 1 will flash. Press the trans-
mitter button again if necessary.
Clearing the remote control memory X
Turn the key to position 2 in the ignition
lock.
X Press and hold transmitter buttons 2 and
4
for approximately 20 seconds until indi-
cator lamp 1 flashes rapidly.
The memory is cleared.
i You
should clear the remote control mem-
ory before selling the vehicle. Floormat* on the driver's side
G
Risk of accident
Make sure that there is sufficient clearance
around the pedals when floormats are
used, and that the floormats are properly
secured.
The
floormats must be secured at all times
using retainers and studs.
Before you drive off, make sure that the
floormats are secure and rectify if neces-
sary. A floormat which is not properly Controls
* optional
219_AKB; 2; 4, en-GB
mkalafa,
2007-11-13T09:28:36+01:00 - Seite 187 Z
Page 225 of 329

Display messages
222 Display messages Possible cause/consequence Possible solution
DISTRONIC currently unavail-
able See Owner's
Manual
Distronic* is deactivated and is tempora-
rily inoperative, if:
R
the Distronic*
cover in the radiator
grille is dirty
R its function is impaired due to heavy
rain, snow or fog.
R the radar sensor system is temporarily
unavailable, e.g. because of electro-
magnetic radiation.
R The radar sensor system has not detec-
ted any vehicles or stationary objects,
e.g. traffic signs, for a long time.
R The system has overheated. Distronic* is available again and the display mes-
sage disappears when the dirt (e.g. slush) falls off
while you are driving or if the system detects that
the sensors are fully available again.
If the display message does not disappear:
X
Clean the Distronic* cover in the radiator grille
(Y page 213).
X If necessary, wait until the system has cooled
down.
X Restart the engine. ESP
also lights up:
v inoperative See
Owner's Manual
G
Risk of accident
ESP ®
and therefore also Brake Assist and
PRE-SAFE ®
are unavailable due to a mal-
function.
The brake system is still available with
complete brake boosting effect. X
Drive on carefully.
X Visit a qualified specialist workshop. Practical advice
* optional
219_AKB; 2; 4, en-GB
mkalafa,
2007-11-13T09:28:36+01:00 - Seite 222
Page 236 of 329
Display messages
233Display messages Possible cause/consequence Possible solution
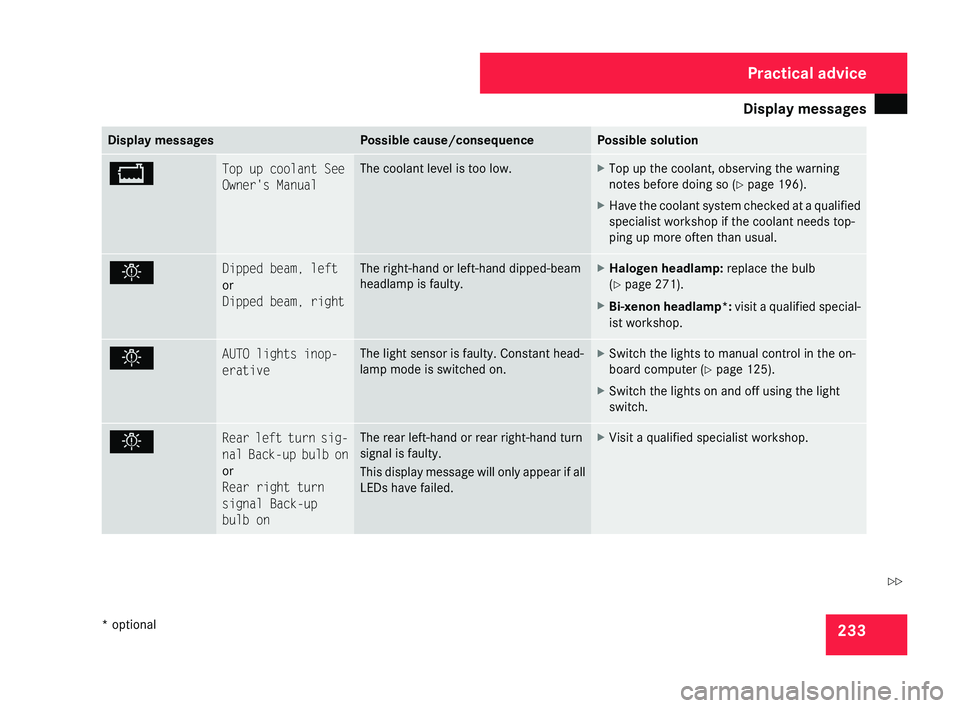
B Top up coolant See
Owner's Manual The coolant level is too low. X
Top up the coolant, observing the warning
notes before doing so (Y page 196).
X Have the coolant system checked at a qualified
specialist workshop if the coolant needs top-
ping up more often than usual. . Dipped beam, left
or
Dipped beam, right The right-hand or left-hand dipped-beam
headlamp is faulty. X
Halogen headlamp: replace the bulb
(Y page 271).
X Bi-xenon headlamp*: visit a qualified special-
ist workshop. . AUTO lights inop-
erative The light sensor is faulty. Constant head-
lamp mode is switched on. X
Switch the lights to manual control in the on-
board computer ( Y page 125).
X Switch the lights on and off using the light
switch. . Rear left turn sig-
nal
Back-up bulb on
or
Rear right turn
signal Back-up
bulb on The rear left-hand or rear right-hand turn
signal is faulty.
This
display message will only appear if all
LEDs have failed. X
Visit a qualified specialist workshop. Practical advice
* optional
219_AKB; 2; 4, en-GB
mkalafa,
2007-11-13T09:28:36+01:00 - Seite 233 Z
Page 238 of 329
Display messages
235Display messages Possible cause/consequence Possible solution
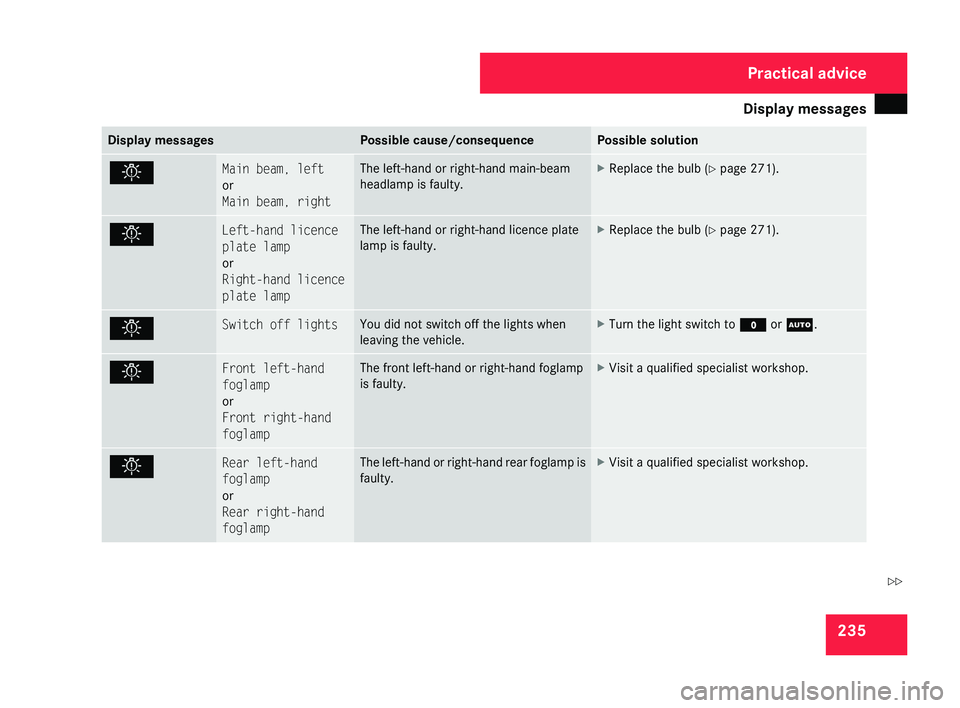
. Main beam, left
or
Main beam, right The left-hand or right-hand main-beam
headlamp is faulty. X
Replace the bulb ( Y page 271). . Left-hand licence
plate lamp
or
Right-hand licence
plate lamp The left-hand or right-hand licence plate
lamp is faulty. X
Replace the bulb ( Y page 271). . Switch off lights You did not switch off the lights when
leaving the vehicle. X
Turn the light switch to M or U.. Front left-hand
foglamp
or
Front right-hand
foglamp The front left-hand or right-hand foglamp
is faulty. X
Visit a qualified specialist workshop. . Rear left-hand
foglamp
or
Rear right-hand
foglamp The left-hand or right-hand rear foglamp is
faulty. X
Visit a qualified specialist workshop. Practical advice
219_AKB; 2; 4, en-GB
mkalafa,
2007-11-13T09:28:36+01:00 - Seite 235 Z