2008 MERCEDES-BENZ CLS COUPE lights
[x] Cancel search: lightsPage 98 of 329
Lights
95Adjusting the headlamp range (vehi-
cles with halogen headlamps)
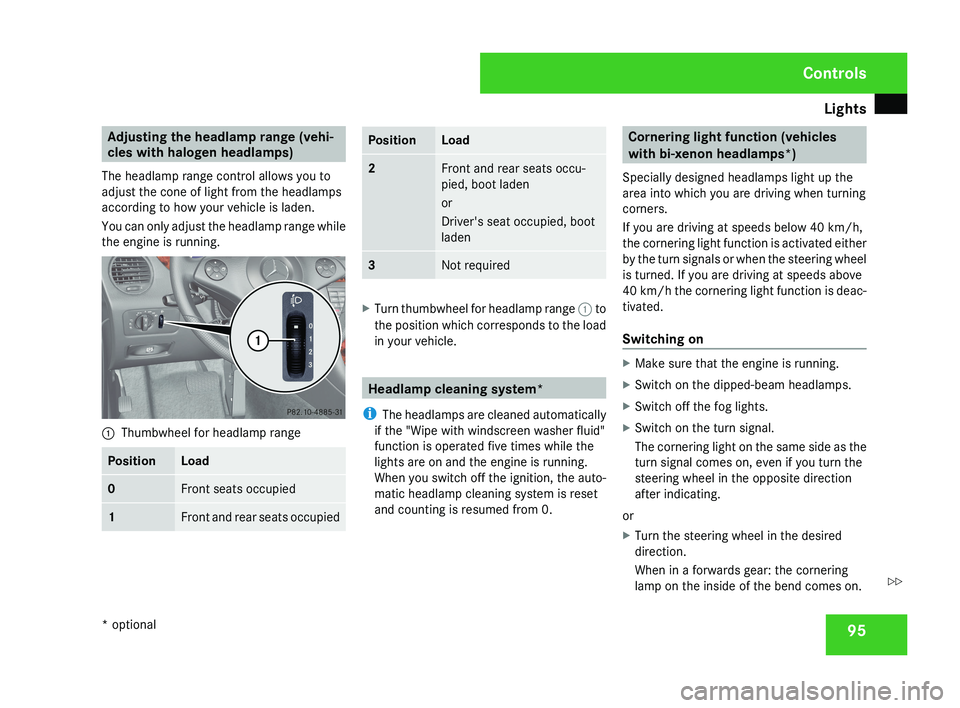
The headlamp range control allows you to
adjust the cone of light from the headlamps
according to how your vehicle is laden.
You can only adjust the headlamp range while
the engine is running.1 Thumbwheel for headlamp range
PositionLoad
0Front seats occupied
1Front and rear seats occupied
PositionLoad
2Front and rear seats occu-
pied, boot laden
or
Driver's seat occupied, boot
laden
3Not required
X
Turn thumbwheel for headlamp range 1 to
the position which corresponds to the load
in your vehicle.
Headlamp cleaning system*
i The headlamps are cleaned automatically
if the "Wipe with windscreen washer fluid"
function is operated five times while the
lights are on and the engine is running.
When you switch off the ignition, the auto-
matic headlamp cleaning system is reset
and counting is resumed from 0.
Cornering light function (vehicles
with bi-xenon headlamps*)
Specially designed headlamps light up the
area into which you are driving when turning
corners.
If you are driving at speeds below 40 km/h,
the cornering light function is activated either
by the turn signals or when the steering wheel
is turned. If you are driving at speeds above
40 km/h the cornering light function is deac-
tivated.
Switching on
X Make sure that the engine is running.
X Switch on the dipped-beam headlamps.
X Switch off the fog lights.
X Switch on the turn signal.
The cornering light on the same side as the
turn signal comes on, even if you turn the
steering wheel in the opposite direction
after indicating.
or
X Turn the steering wheel in the desired
direction.
When in a forwards gear: the cornering
lamp on the inside of the bend comes on.
Controls
* optional
219_AKB; 2; 4, en-GB
mkalafa,
2007-11-13T09:28:36+01:00 - Seite 95
Z
Page 99 of 329
Lights
96When in reverse gear: the cornering light on
the outside of the bend comes on.
Switching off X
Switch off the turn signal.
i The cornering light is activated until you
turn the steering wheel back to the straight-
ahead position and the turn signal switches
off. The cornering light may remain lit for a
short time, but no more than three minutes.
It then goes out, even if the turn signal is
still switched on. Interior lighting
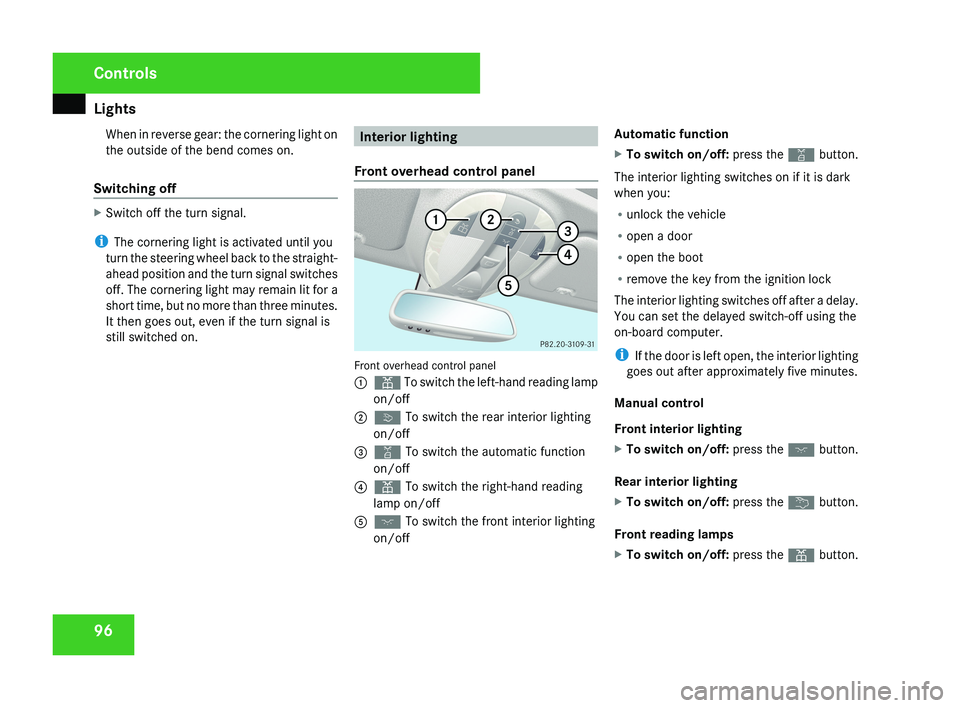
Front overhead control panel Front overhead control panel
1
X To switch the left-hand reading lamp
on/off
2 ò To switch the rear interior lighting
on/off
3 ¡ To switch the automatic function
on/off
4 X To switch the right-hand reading
lamp on/off
5 ð To switch the front interior lighting
on/off Automatic function
X
To switch on/off: press the ¡ button.
The interior lighting switches on if it is dark
when you:
R unlock the vehicle
R open a door
R open the boot
R remove the key from the ignition lock
The interior lighting switches off after a delay.
You can set the delayed switch-off using the
on-board computer.
i If the door is left open, the interior lighting
goes out after approximately five minutes.
Manual control
Front interior lighting
X To switch on/off: press the ð button.
Rear interior lighting
X To switch on/off: press the ¦ button.
Front reading lamps
X To switch on/off: press the X button. Controls
219_AKB; 2; 4, en-GB
mkalafa,
2007-11-13T09:28:36+01:00 - Seite 96
Page 105 of 329
Driving and parking
102
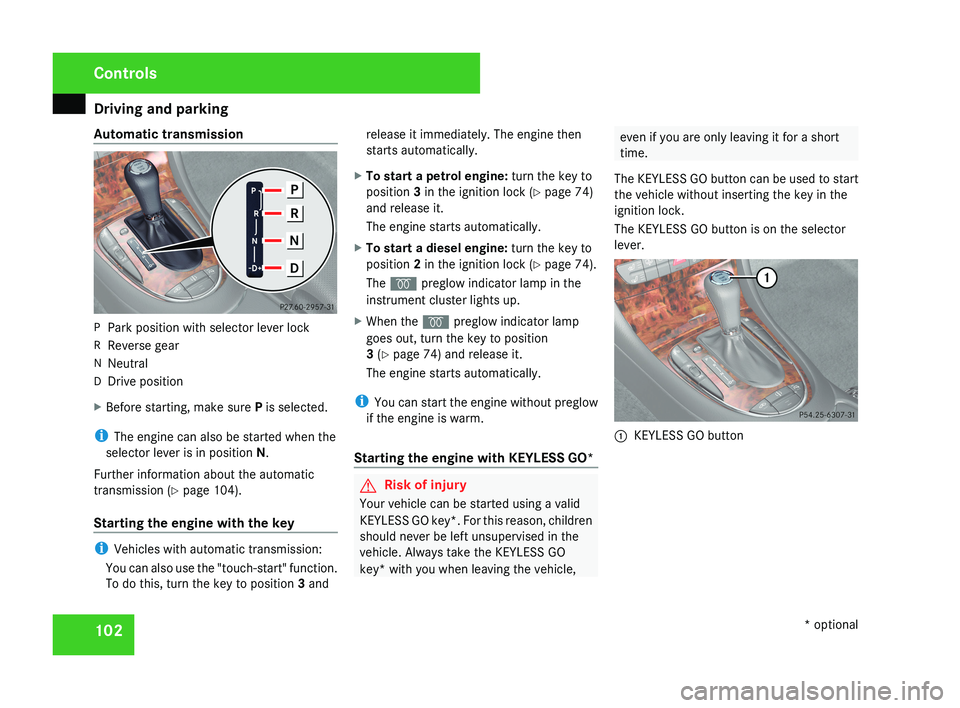
Automatic transmission
P
Park position with selector lever lock
R Reverse gear
N Neutral
D Drive position
X Before starting, make sure P is selected.
i The engine can also be started when the
selector lever is in position N.
Further information about the automatic
transmission (Y page 104).
Starting the engine with the key i
Vehicles with automatic transmission:
You can also use the "touch-start" function.
To do this, turn the key to position 3 and release it immediately. The engine then
starts automatically.
X To start a petrol engine: turn the key to
position 3 in the ignition lock (Y page 74)
and release it.
The engine starts automatically.
X To start a diesel engine: turn the key to
position 2 in the ignition lock (Y page 74).
The q preglow indicator lamp in the
instrument cluster lights up.
X When the q preglow indicator lamp
goes out, turn the key to position
3 (Y page 74) and release it.
The engine starts automatically.
i You can start the engine without preglow
if the engine is warm.
Starting the engine with KEYLESS GO* G
Risk of injury
Your vehicle can be started using a valid
KEYLESS GO key*. For this reason, children
should never be left unsupervised in the
vehicle. Always take the KEYLESS GO
key* with you when leaving the vehicle, even if you are only leaving it for a short
time.
The KEYLESS GO button can be used to start
the vehicle without inserting the key in the
ignition lock.
The KEYLESS GO button is on the selector
lever. 1
KEYLESS GO button Controls
* optional
219_AKB; 2; 4, en-GB
mkalafa,
2007-11-13T09:28:36+01:00 - Seite 102
Page 107 of 329
Transmission
104
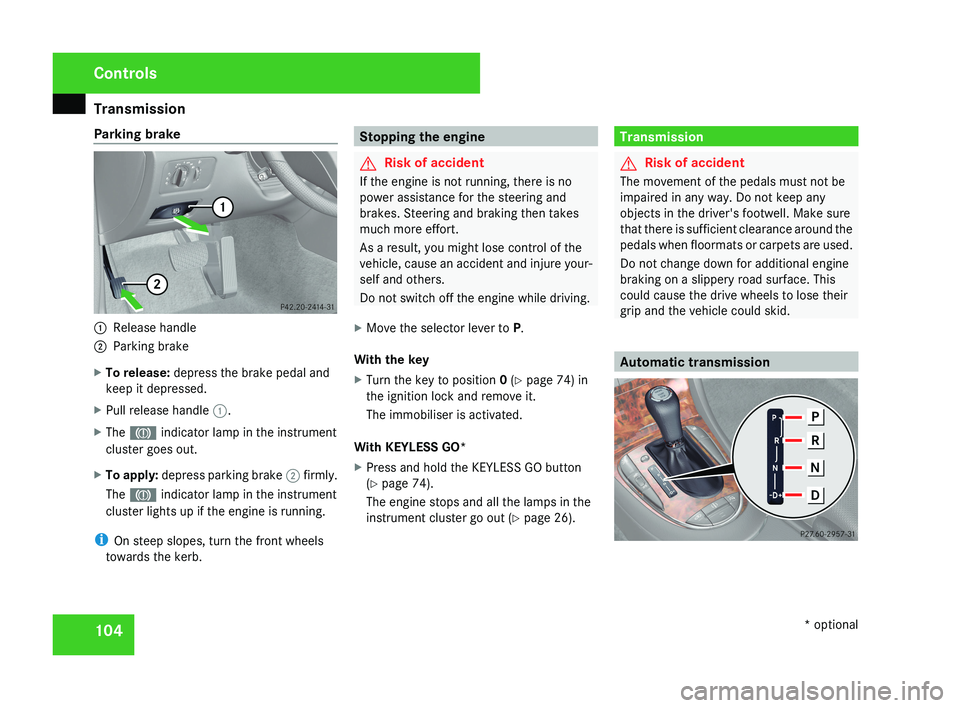
Parking brake
1
Release handle
2 Parking brake
X To release: depress the brake pedal and
keep it depressed.
X Pull release handle 1.
X The 3 indicator lamp in the instrument
cluster goes out.
X To apply: depress parking brake 2 firmly.
The 3 indicator lamp in the instrument
cluster lights up if the engine is running.
i On steep slopes, turn the front wheels
towards the kerb. Stopping the engine
G
Risk of accident
If the engine is not running, there is no
power assistance for the steering and
brakes. Steering and braking then takes
much more effort.
As a result, you might lose control of the
vehicle, cause an accident and injure your-
self and others.
Do not switch off the engine while driving.
X Move the selector lever to P.
With the key
X Turn the key to position 0 (Y page 74) in
the ignition lock and remove it.
The immobiliser is activated.
With KEYLESS GO*
X Press and hold the KEYLESS GO button
(Y page 74).
The engine stops and all the lamps in the
instrument cluster go out ( Y page 26). Transmission
G
Risk of accident
The movement of the pedals must not be
impaired in any way. Do not keep any
objects in the driver's footwell. Make sure
that there is sufficient clearance around the
pedals when floormats or carpets are used.
Do not change down for additional engine
braking on a slippery road surface. This
could cause the drive wheels to lose their
grip and the vehicle could skid. Automatic transmissionControls
* optional
219_AKB; 2; 4, en-GB
mkalafa,
2007-11-13T09:28:36+01:00 - Seite 104
Page 113 of 329
Instrument cluster
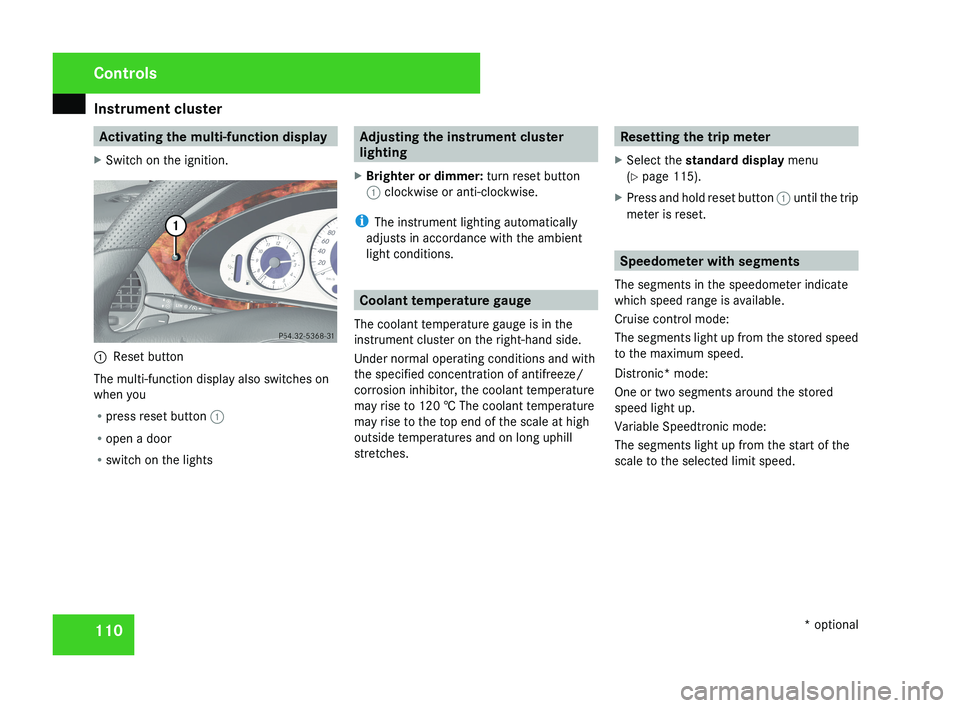
110 Activating the multi-function display
X Switch on the ignition.1 Reset button
The multi-function display also switches on
when you
R press reset button 1
R open a door
R switch on the lights
Adjusting the instrument cluster
lighting
X Brighter or dimmer: turn reset button
1 clockwise or anti-clockwise.
i The instrument lighting automatically
adjusts in accordance with the ambient
light conditions.
Coolant temperature gauge
The coolant temperature gauge is in the
instrument cluster on the right-hand side.
Under normal operating conditions and with
the specified concentration of antifreeze/
corrosion inhibitor, the coolant temperature
may rise to 120 † The coolant temperature
may rise to the top end of the scale at high
outside temperatures and on long uphill
stretches.
Resetting the trip meter
X Select the standard display menu
(Y page 115).
X Press and hold reset button 1 until the trip
meter is reset.
Speedometer with segments
The segments in the speedometer indicate
which speed range is available.
Cruise control mode:
The segments light up from the stored speed
to the maximum speed.
Distronic* mode:
One or two segments around the stored
speed light up.
Variable Speedtronic mode:
The segments light up from the start of the
scale to the selected limit speed.
Controls
* optional
219_AKB; 2; 4, en-GB
mkalafa,
2007-11-13T09:28:36+01:00 - Seite 110
Page 128 of 329
On-board computer
125
X
Press the è or · button to select the
Settings... menu.
X Press the j
button to call up the selec-
tion of submenus.
X Press the æ
or ç button to select the
Time/Date submenu.
Setting the time
X Use j to select Clock, hours Con-
firm by press. R (or Clock, minutes
Confirm by press. R).
X Press the æ or ç button to set a
value.
X Press the reset button on the left of the
instrument cluster.
The set time is stored.
Setting the date
X Press the j
button to select Set date
Day (or Set date Month or Set date
Year).
X Press the æ or ç button to set the
values.
X Press the j, è or ÿ button to
select a different display. Setting constant headlamp mode If you have set constant headlamp mode and
the light switch is in position M orU,
the
side lamps, dipped-beam headlamps and
licence plate lighting are switched on auto-
matically when the engine is running. Turning
the light switch to a different position
switches on the corresponding lights.
For safety reasons, it is only possible to set
this function when the vehicle is stationary.
In countries in which constant headlamp
mode is a legal requirement, Constant is the
factory setting.
X Press the è
or · button to select the
Settings... menu.
X Press the j
button to call up the selec-
tion of submenus.
X Press the æ
or ç button to select the
Lighting submenu.
X Press the j button to select Headlamp
mode.
X Press the æ or ç button to set the
mode
for the headlamps to Manual or Con-
stant (constant headlamp mode).
X Press the j, è or ÿ button to
select a different display. Switching the surround lighting on or
off If the surround lighting is switched on, the
following lights will be switched on automat-
ically
in the dark after you have unlocked the
vehicle using the key:
R the side lamps
R the tail lamps
R the licence plate lighting
R the front foglamps
R the lights* in the exterior mirrors
The surround lighting switches off automati-
cally if you open the driver's door or after 40
seconds.
X Press the è
or · button to select the
Settings... menu.
X Press the j
button to call up the selec-
tion of submenus.
X Press the æ
or ç button to select the
Lighting submenu.
X Press the j button to select the Sur-
round lighting function. Controls
* optional
219_AKB; 2; 4, en-GB
mkalafa,
2007-11-13T09:28:36+01:00 - Seite 125 Z
Page 129 of 329
On-board computer
126
X
Press the æ or ç button to switch
the Surround lighting function on or
off.
X Press the j, è or ÿ button to
select a different display.
Setting the ambient lighting X
Press the è or · button to select the
Settings... menu.
X Press the j
button to call up the selec-
tion of submenus.
X Press the æ
or ç button to select the
Lighting submenu.
X Press the j button to select Ambient
light.
X Press the æ
or ç button to adjust the
brightness to any level from 0 (off) to 5
(bright).
X Press the j, è or ÿ button to
select a different display.
Activating or deactivating the exterior
lighting delayed switch-off You can set whether the exterior lighting
should remain on for 15 seconds after the doors are closed when it is dark using the
Headlamps delayed switch-off function.
If none of the doors are opened after the
engine
is switched off or if an open door is not
closed, the exterior lighting goes out after
60 seconds.
When you have set a delayed switch-off time
and then switch off the engine, the following
remain lit:
R the side lamps
R the tail lamps
R the licence plate lighting
R the front foglamps
R the lights* in the exterior mirrors
X Press the è
or · button to select the
Settings... menu.
X Press the j
button to call up the selec-
tion of submenus.
X Press the æ
or ç button to select the
Lighting submenu.
X Press the j
button to select Headlamps
delayed switch-off. X
Press the æ or ç button to activate
or deactivate the Headlamps delayed
switch-off feature.
X Press the j, è or ÿ button to
select a different display.
To temporarily deactivate the delayed switch-
off:
X Before leaving the vehicle, turn the key to
position 0 in the ignition lock.
X Turn the key to position 2 in the ignition
lock and back to position 0.
Delayed
switch-off is deactivated. It is reac-
tivated as soon as you start the engine
again.
Activating or deactivating the interior
lighting delayed switch-off The
Interior
lighting delayed switch-
off function allows you to set whether the
interior lighting should remain on for 10 sec-
onds after the key is removed from the igni-
tion lock when it is dark.
X Press the è
or · button to select the
Settings... menu.
X Press the j
button to call up the selec-
tion of submenus. Controls
* optional
219_AKB; 2; 4, en-GB
mkalafa,
2007-11-13T09:28:36+01:00 - Seite 126
Page 131 of 329
On-board computer
128
X
Press the j button to select Auxiliary
heat..
X Press the æ or ç button to select
one of the three switch-on times or Timer
off (auxiliary heating switched off).
When
a switch-on time is selected, the yel-
low indicator lamp lights up in the auxiliary
heating button.
X Press the j, è or ÿ button to
select a different display.
Changing the switch-on time for the
auxiliary heating* This function is only displayed if you have
selected
a switch-on time. Here you can enter
the time at which the auxiliary heating is to
be switched on.
X Press the è
or · button to select the
Settings... menu.
X Press the j
button to call up the selec-
tion of submenus.
X Press the æ
or ç button to select the
Heater submenu.
X Press the j
button to select Switch-on
time X Set hours. X
Press the æ or ç button to set the
hour.
X Press the j
button to select Switch-on
time X Set minutes.
X Press the æ or ç button to set the
minutes.
After changing from one menu to another
the new time setting is stored. The yellow
indicator lamp lights up on the button for
the
auxiliary heating on the centre console.
X Press the j, è or ÿ button to
select a different display.
Activating or deactivating the easy-
entry/exit feature* i
For more information on the easy-entry/
exit feature, see ( Y page 83). G
Risk of injury
When the easy-entry/exit feature is active,
the
steering wheel moves. There is a risk of
occupants becoming trapped. Before acti-
vating the easy-entry/exit feature, make
sure that nobody can become trapped.
Do not leave children unsupervised in the
vehicle, even if they are secured in a child restraint system. The children could open
the driver's door and thereby unintention-
ally activate the easy-entry/exit feature
and become trapped.
X Press the è
or · button to select the
Settings... menu.
X Press the j
button to call up the selec-
tion of submenus.
X Press the æ
or ç button to select the
Convenience submenu.
X Press the j button to select the EASY-
ENTRY system.
X Press the æ or ç button to activate
or deactivate the EASY-ENTRY system.
X Press the j, è or ÿ button to
select a different display.
Activating or deactivating the fold-in
mirrors when locking*
function The
Fold
in mirrors when locking func-
tion allows you to determine whether the
exterior mirrors should fold in when you lock
the vehicle. When you switch on the ignition,
the exterior mirrors fold out again. Controls
* optional
219_AKB; 2; 4, en-GB
mkalafa,
2007-11-13T09:28:36+01:00 - Seite 128