2008 MERCEDES-BENZ CLS COUPE lights
[x] Cancel search: lightsPage 135 of 329
Driving systems
132
X
Press the s button to call up the most
recently dialled number in the redial mem-
ory.
X Press the j or k button to select the
desired name or number.
X Press the s button to start dialling. Driving systems
Your vehicle's driving systems are described
on the following pages:
R Cruise
control, Distronic* and Speedtronic,
which you can use to control the speed of
the vehicle
R HOLD, which makes pulling away easier,
particularly on steep uphill gradients
R Vehicle level setting and Airmatic DC*,
which can be used to adjust your vehicle's
chassis
R Parktronic*, which assists you in parking
and manoeuvring
The ABS, BAS, adaptive brake lights, ESP ®
,
EBV (electronic brake-power distribution) and
ADAPTIVE BRAKE driving safety systems are
described in the "Driving safety systems" sec-
tion (Y page 57). Cruise control
Cruise control maintains a constant road
speed
for you. It brakes automatically in order
to avoid exceeding the set speed. On long and
steep downhill gradients, especially if the
vehicle is laden, you must select shift range
1, 2 or 3 in good time. In this way you will
make use of the braking effect of the engine,
which relieves the load on the brake system
and prevents the brakes from overheating
and wearing too quickly. G
Risk of accident
Do not change down for additional engine
braking on a slippery road surface. This
could cause the drive wheels to lose their
grip and the vehicle could skid.
Use
cruise control only if road and traffic con-
ditions make it appropriate to maintain a
steady speed for a prolonged period. You can
store any road speed above 30 km/h. G
Risk of accident
Cruise control
cannot take account of road
and traffic conditions.
Always pay attention to traffic conditions
even when cruise control is activated. Controls
* optional
219_AKB; 2; 4, en-GB
mkalafa,
2007-11-13T09:28:36+01:00 - Seite 132
Page 138 of 329
Driving systems
135
X
Briefly press the cruise control lever in the
direction of arrow 5.
Variable Speedtronic is selected. LIM indi-
cator lamp 2 in the cruise control lever
lights up.
Cruise control is automatically deactivated if,
for example:
R you depress the parking brake
R you are driving at less than
30 km/h
R ESP ®
(Y page 59) is intervening or you
deactivate ESP ®
R you move the selector lever to N while driv-
ing
If cruise control is deactivated, you will hear
a warning tone. You will see the Cruise con-
trol off message in the multi-function dis-
play for approximately five seconds.
i The last speed stored is cleared when you
switch off the engine. Distronic*
Distronic regulates the speed and automati-
cally maintains the distance to the vehicle in
front.
It brakes automatically in order to avoid
exceeding the set speed. On long and steep
downhill gradients, especially if the vehicle is
laden, you must select shift range 1, 2 or 3 in
good time. In this way you will make use of
the braking effect of the engine, which
relieves the load on the brake system and
prevents the brakes from overheating and
wearing too quickly. G
Risk of accident
Do not change down for additional engine
braking on a slippery road surface. This
could cause the drive wheels to lose their
grip and the vehicle could skid. G
Risk of accident
Distronic is only an aid designed to assist
driving.
The driver remains fully responsible
for the vehicle's distance from other vehi-
cles, the vehicle's speed and braking in
good time. Distronic does not react to: R
pedestrians
R stationary
obstacles on the road, e.g. sta-
tionary or parked vehicles
R oncoming and crossing traffic
Distronic may not detect narrow vehicles
driving in front, e.g. motorcycles, or vehi-
cles driving on a different line. Therefore,
always pay attention to traffic conditions
even when Distronic is activated. Other-
wise, you may fail to recognise dangers in
time, could cause an accident and injure
yourself and others.
If a slower-moving vehicle is detected in front,
Distronic causes your vehicle to brake and
maintain a preset distance to the vehicle in
front. G
Risk of accident
Distronic cannot take account of road and
traffic conditions. Deactivate, or do not
activate, Distronic in situations in which
Distronic maintains the speed or acceler-
ates
to the set speed because it has lost the
vehicle in front, in particular:
R before corners
R on filter lanes Controls
* optional
219_AKB; 2; 4, en-GB
mkalafa,
2007-11-13T09:28:36+01:00 - Seite 135 Z
Page 141 of 329
Driving systems
138
X
Briefly pull the cruise control lever towards
you 3.
X Remove your foot from the accelerator
pedal.
Distronic is activated and adjusts the vehi-
cle's speed to the last speed stored.
Setting the specified minimum distance
for Distronic You can set the specified minimum distance
for Distronic by varying the time span
between 1.0 and 2.0 seconds. This time span
determines the distance that Distronic should
maintain from the vehicle in front, depending
on the road speed. You can read this distance
in the multi-function display.
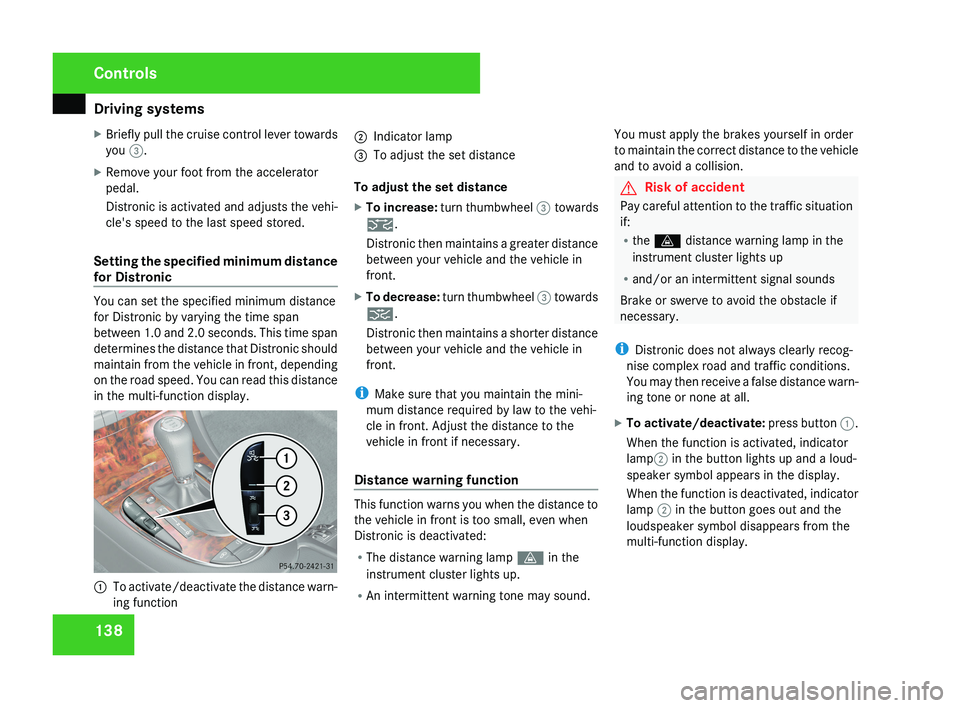
1
To activate/deactivate the distance warn-
ing function 2
Indicator lamp
3 To adjust the set distance
To adjust the set distance
X To increase: turn thumbwheel 3 towards
¯.
Distronic then maintains a greater distance
between your vehicle and the vehicle in
front.
X To decrease: turn thumbwheel 3 towards
®.
Distronic then maintains a shorter distance
between your vehicle and the vehicle in
front.
i Make sure that you maintain the mini-
mum distance required by law to the vehi-
cle in front. Adjust the distance to the
vehicle in front if necessary.
Distance warning function This function warns you when the distance to
the vehicle in front is too small, even when
Distronic is deactivated:
R
The distance warning lamp l in the
instrument cluster lights up.
R An intermittent warning tone may sound. You must apply the brakes yourself in order
to maintain the correct distance to the vehicle
and to avoid a collision. G
Risk of accident
Pay careful attention to the traffic situation
if:
R the l distance warning lamp in the
instrument cluster lights up
R and/or an intermittent signal sounds
Brake or swerve to avoid the obstacle if
necessary.
i Distronic does not always clearly recog-
nise complex road and traffic conditions.
You may then receive a false distance warn-
ing tone or none at all.
X To activate/deactivate: press button 1.
When the function is activated, indicator
lamp 2 in the button lights up and a loud-
speaker symbol appears in the display.
When the function is deactivated, indicator
lamp 2 in the button goes out and the
loudspeaker symbol disappears from the
multi-function display. Controls
219_AKB; 2; 4, en-GB
mkalafa,
2007-11-13T09:28:36+01:00 - Seite 138
Page 142 of 329
Driving systems
139
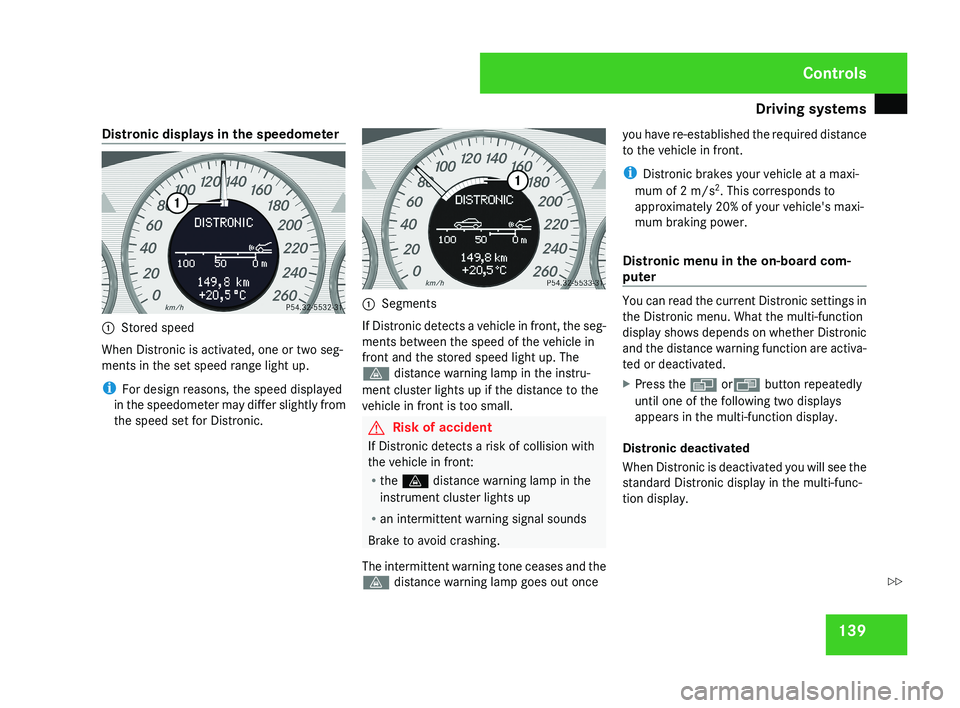
Distronic displays in the speedometer
1
Stored speed
When Distronic is activated, one or two seg-
ments in the set speed range light up.
i For design reasons, the speed displayed
in the speedometer may differ slightly from
the speed set for Distronic. 1
Segments
If Distronic detects a vehicle in front, the seg-
ments between the speed of the vehicle in
front and the stored speed light up. The
l distance warning lamp in the instru-
ment cluster lights up if the distance to the
vehicle in front is too small. G
Risk of accident
If Distronic detects a risk of collision with
the vehicle in front:
R the l distance warning lamp in the
instrument cluster lights up
R an intermittent warning signal sounds
Brake to avoid crashing.
The intermittent warning tone ceases and the
l distance warning lamp goes out once you have re-established the required distance
to the vehicle in front.
i
Distronic brakes your vehicle at a maxi-
mum of 2 m/s 2
. This corresponds to
approximately 20% of your vehicle's maxi-
mum braking power.
Distronic menu in the on-board com-
puter You can read the current Distronic settings in
the Distronic menu. What the multi-function
display shows depends on whether Distronic
and the distance warning function are activa-
ted or deactivated.
X
Press the è orÿ button repeatedly
until one of the following two displays
appears in the multi-function display.
Distronic deactivated
When Distronic is deactivated you will see the
standard Distronic display in the multi-func-
tion display. Controls
219_AKB; 2; 4, en-GB
mkalafa,
2007-11-13T09:28:36+01:00 - Seite 139 Z
Page 143 of 329
Driving systems
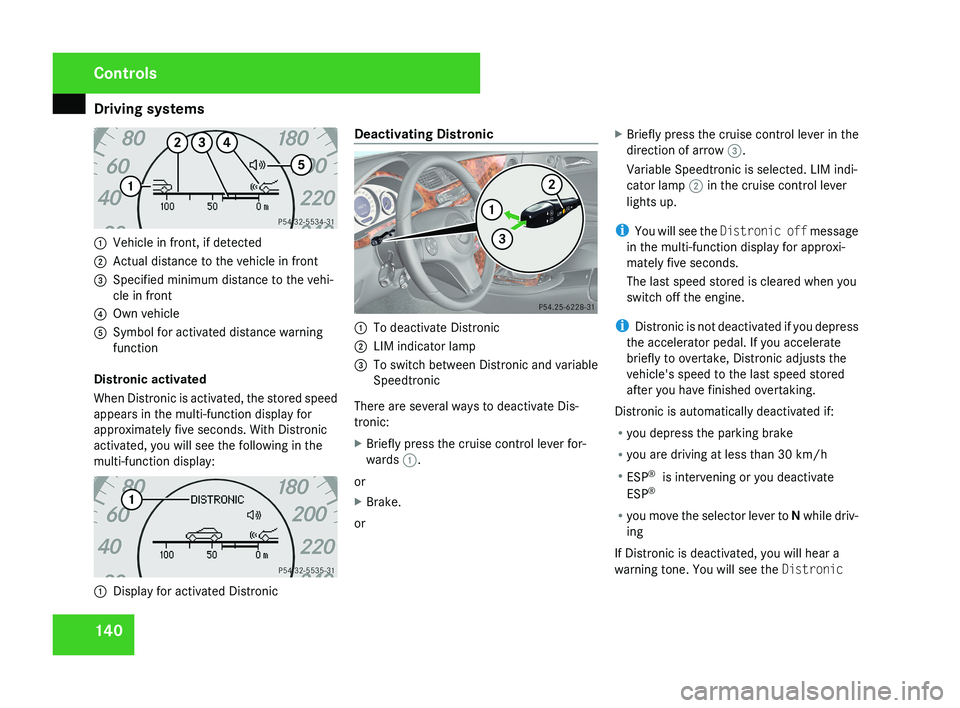
1401
Vehicle in front, if detected
2 Actual distance to the vehicle in front
3 Specified minimum distance to the vehi-
cle in front
4 Own vehicle
5 Symbol for activated distance warning
function
Distronic activated
When Distronic is activated, the stored speed
appears in the multi-function display for
approximately five seconds. With Distronic
activated, you will see the following in the
multi-function display:
1 Display for activated Distronic Deactivating Distronic
1
To deactivate Distronic
2 LIM indicator lamp
3 To switch between Distronic and variable
Speedtronic
There are several ways to deactivate Dis-
tronic:
X Briefly press the cruise control lever for-
wards 1.
or
X Brake.
or X
Briefly press the cruise control lever in the
direction of arrow 3.
Variable Speedtronic is selected. LIM indi-
cator lamp 2 in the cruise control lever
lights up.
i You will see the Distronic off message
in the multi-function display for approxi-
mately five seconds.
The last speed stored is cleared when you
switch off the engine.
i Distronic is not deactivated if you depress
the accelerator pedal. If you accelerate
briefly to overtake, Distronic adjusts the
vehicle's speed to the last speed stored
after you have finished overtaking.
Distronic is automatically deactivated if:
R you depress the parking brake
R you are driving at less than 30 km/h
R ESP ®
is intervening or you deactivate
ESP ®
R you move the selector lever to N while driv-
ing
If Distronic is deactivated, you will hear a
warning tone. You will see the Distronic
Controls
219_AKB; 2; 4, en-GB
mkalafa,
2007-11-13T09:28:36+01:00 - Seite 140
Page 146 of 329

Driving systems
143
Selecting variable Speedtronic X
Check whether LIM indicator lamp 2 is on.
If it is on, variable Speedtronic is already
selected.
If it is not, press the cruise control lever in
the direction of arrow 5.
LIM indicator lamp 2 in the cruise control
lever lights up. Variable Speedtronic is
selected. G
Risk of accident
If there is a change of drivers, advise the
new driver of the limit speed stored.
Only use variable Speedtronic if you are
sure that you will not have to accelerate
suddenly to a speed above that stored as
the
limit speed, otherwise you could cause
an accident.
You can only exceed the limit speed stored
if you deactivate variable Speedtronic:
R using the cruise control lever
R if you depress the accelerator pedal
beyond the pressure point (kickdown)
It is not possible to deactivate variable
Speedtronic by braking. Storing the current speed You can use the cruise control lever to limit
the
speed to any speed above 30 km/h while
the engine is running.
X Briefly press the cruise control lever up
1 or down 4.
The current speed is stored. The stored
speed,
e.g. LIM km/h , appears in the multi-
function display.
The segments in the speedometer from the
start of the scale up to the stored speed
light up.
Selecting the current or last stored
speed X
Briefly pull the cruise control lever towards
you 3.
Adjustment in 10 km/h increments X
Briefly press the cruise control lever up
1 for a higher speed or down 4 for a
lower speed.
or
X Keep the cruise control lever pressed until
the desired speed is set. Press the cruise control lever, up 1 for a higher speed or
down 4 for a lower speed.
Making fine adjustments in 1 km/h
increments X
For a higher speed: briefly pull the cruise
control lever towards you 3.
or
X Keep the cruise control lever pulled
towards you 3 until the desired speed is
set.
Deactivating variable Speedtronic There are several ways to deactivate variable
Speedtronic:
X
Briefly press the cruise control lever for-
wards 6.
or
X Briefly press the cruise control lever in the
direction of arrow 5.
LIM
indicator lamp 2 in the cruise control
lever goes out. Variable Speedtronic is
deactivated.
Cruise control or Distronic* is selected. Controls
* optional
219_AKB; 2; 4, en-GB
mkalafa,
2007-11-13T09:28:36+01:00 - Seite 143
Page 149 of 329
Driving systems
146
display. Immediately depress the brake firmly
until the warning message disappears from
the multi-function display or move the selec-
tor lever to
P. This deactivates HOLD. AIRMATIC DC*
Vehicle level Your vehicle automatically adjusts its ride
height to reduce petrol consumption and
improve driving safety.
The following vehicle levels are possible:
R
Normal
R Raised
R Lowered
The "Normal" and "Raised" vehicle levels can
be set manually.
The "Lowered" vehicle level is set automati-
cally:
R at speeds above 140 km/h
R if you have selected "Sports tuning I or
II" ( Y page 147)
R if you have selected "Comfort tun-
ing" (Y page 147) and then lock the vehicle within 60 seconds of the engine being
switched off G
Risk of injury
If you have selected “Comfort tuning”, the
vehicle will be lowered if you lock it within
60 seconds of the engine being switched
off. Make sure, therefore, that nobody is in
the vicinity of the wheel housing or under
the vehicle when you lock the vehicle. Oth-
erwise, limbs could become trapped.
! If you have selected “Comfort tuning”,
the vehicle will be lowered if you lock it
within 60 seconds of the engine being
switched off. Make sure when parking that
you stop your vehicle so that it does not
make contact with the kerb as it descends.
Your vehicle could otherwise be damaged.
Setting the vehicle level manually
Select the "Normal" setting for normal road
surfaces and "Raised" for driving with snow
chains or on particularly poor road surfaces. G
Risk of injury
Make sure that nobody is in the vicinity of
the wheel housing or under the vehicle
while lowering the vehicle when it is sta- tionary. Otherwise, limbs could become
trapped.
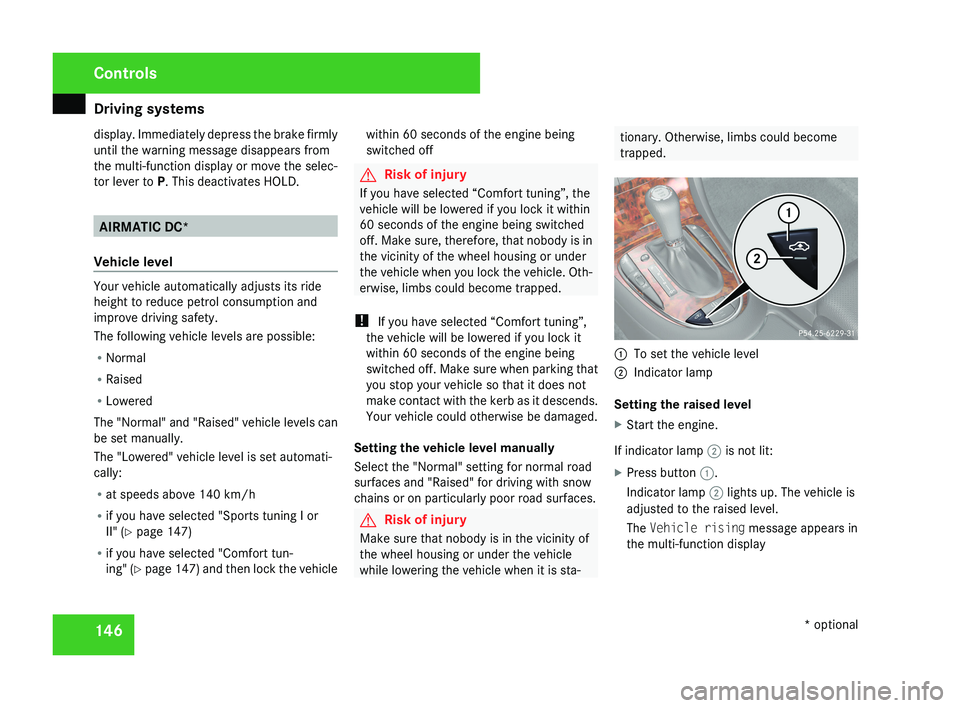
1
To set the vehicle level
2 Indicator lamp
Setting the raised level
X Start the engine.
If indicator lamp 2 is not lit:
X Press button 1.
Indicator lamp 2 lights up. The vehicle is
adjusted to the raised level.
The Vehicle rising message appears in
the multi-function display Controls
* optional
219_AKB; 2; 4, en-GB
mkalafa,
2007-11-13T09:28:36+01:00 - Seite 146
Page 150 of 329
Driving systems
147
Setting the normal level
X
Start the engine.
If indicator lamp 2 is lit:
X Press button 1.
Indicator lamp 2 goes out. The vehicle is
adjusted to the normal level.
i The "Raised level" setting is cancelled at
vehicle speeds above 120 km/h or if the
speed has been between 80 km/h and
120 km/h for more than approximately
5 minutes. If you do not drive within this
speed range, the raised level remains
stored, even when the key is removed from
the ignition lock.
Comfort or sports tuning AIRMATIC DC (dual control) comprises two
components: the Adaptive Damping System
(ADS) and spring stiffness adjustment.
ADS automatically regulates the suspension
as appropriate to particular driving condi-
tions. Parallel to this, the spring stiffness
switches between "comfort" and "sports" lev-
els. The damping/spring stiffness settings are
dependent on:
R
your driving style
R the road surface conditions
R your individual selection
Your selection remains stored even if you
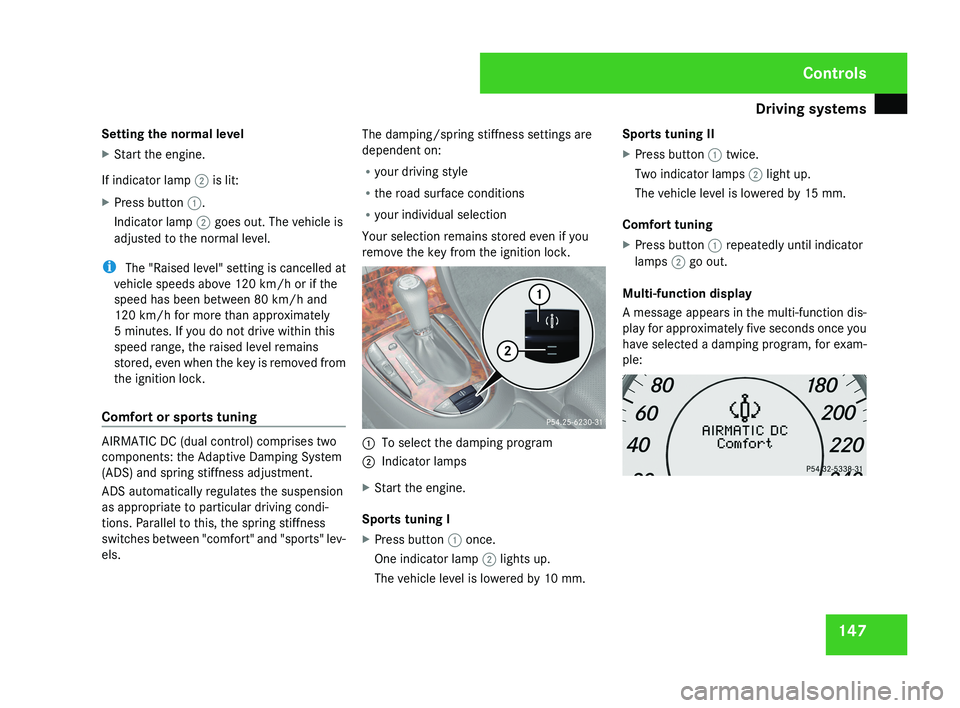
remove the key from the ignition lock. 1
To select the damping program
2 Indicator lamps
X Start the engine.
Sports tuning I
X Press button 1 once.
One indicator lamp 2 lights up.
The vehicle level is lowered by 10 mm. Sports tuning II
X
Press button 1 twice.
Two indicator lamps 2 light up.
The vehicle level is lowered by 15 mm.
Comfort tuning
X Press button 1 repeatedly until indicator
lamps 2 go out.
Multi-function display
A message appears in the multi-function dis-
play for approximately five seconds once you
have selected a damping program, for exam-
ple: Controls
219_AKB; 2; 4, en-GB
mkalafa,
2007-11-13T09:28:36+01:00 - Seite 147