2008 MERCEDES-BENZ CLS COUPE steering wheel
[x] Cancel search: steering wheelPage 112 of 329
Instrument cluster
109
When the AMG display is switched on, the
display
colour changes to red and UP appears
next to the gear indicator, instructing you to
shift up.
Downshifting G
Risk of accident
Do not change down for additional engine
braking on a slippery road surface. This
could cause the drive wheels to lose their
grip and the vehicle could skid.
X Briefly press the selector lever to the left
towards D-
or
X Pull the left-hand paddle on the steering
wheel
(Y page 107).
The automatic transmission shifts down to
the next gear.
i For maximum acceleration, pull the left-
hand gearshift paddle until the transmis-
sion selects the optimum gear depending
on the speed. Kickdown
i
It is not possible to use kickdown in the
manual gearshift program M on vehicles
with AMG engines.
You can also use kickdown for maximum
acceleration in manual gearshift program M.
X Depress the accelerator pedal beyond the
pressure point.
The transmission shifts to a lower gear
depending on the engine speed.
i It is not possible to shift gears using the
steering wheel gearshift paddles during
kickdown. Instrument cluster
Points to remember
You
will find a full overview of the instrument
cluster in the "At a glance" section
(Y page 26). G
Risk of accident
No further messages can be displayed if
there is a malfunction in the instrument
cluster and/or the multi-function display.
This
means that you will not see information
about the driving situation, such as the
speed, outside temperature, warning/indi-
cator lamps, display messages or system
failures. The vehicle's handling character-
istics may be affected. Adjust your driving
style and speed accordingly.
Immediately consult a qualified specialist
workshop which has the necessary special-
ist knowledge and tools to carry out the
work required. Mercedes-Benz recom-
mends that you use a Mercedes-Benz
Service Centre for this purpose. In particu-
lar, work relevant to safety or on safety-
related systems must be carried out at a
qualified specialist workshop. Controls
219_AKB; 2; 4, en-GB
mkalafa,
2007-11-13T09:28:36+01:00 - Seite 109
Page 114 of 329
On-board computer
111Rev counter
The red band in the rev counter indicates the
engine's overrevving range. The fuel supply is
interrupted to protect the engine when the
red band is reached.
! Do not drive in the overrevving range.
Doing so will damage the engine. H
Environmental note
Avoid driving at high engine speeds, as this
increases your vehicle's consumption
unnecessarily and pollutes the environ-
ment through increased emissions. Outside temperature display
G
Risk of accident
The road surface may be icy, especially in
wooded areas or on bridges, even if tem-
peratures are just above freezing point. The
vehicle could skid if you fail to adapt your
driving style. You should therefore always
adapt your driving style and speed to suit
the weather conditions.
There is a short delay before a change in out-
side temperature is displayed. On-board computer
Points to remember
The on-board computer is activated as soon
as the key is turned to position 1 in the igni-
tion lock. You can use the on-board computer
to call up information relating to your vehicle
and to make and adjust settings.
You can call up the next service due date,
select the display language for the instrument
cluster and set other functions. G
Risk of accident
Only use the on-board computer when road
and traffic conditions permit. You would
otherwise be distracted and unable to con-
centrate properly on driving, and could
cause an accident.
The on-board computer shows information in
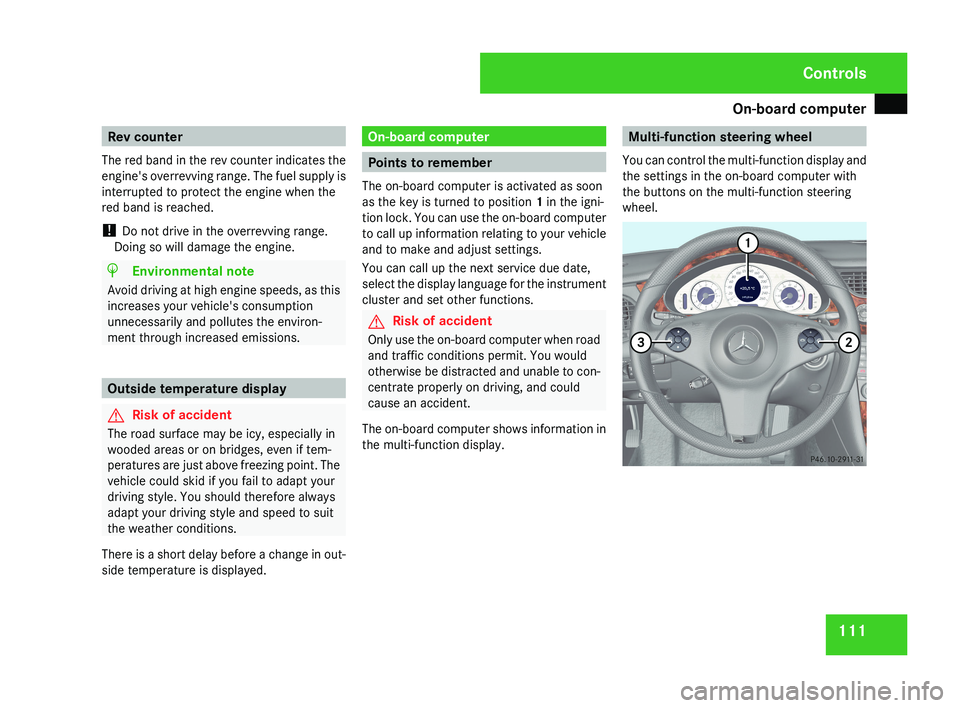
the multi-function display. Multi-function steering wheel
You can control the multi-function display and
the settings in the on-board computer with
the buttons on the multi-function steering
wheel.Controls
219_AKB; 2; 4, en-GB
mkalafa,
2007-11-13T09:28:36+01:00 - Seite 111
Page 131 of 329
On-board computer
128
X
Press the j button to select Auxiliary
heat..
X Press the æ or ç button to select
one of the three switch-on times or Timer
off (auxiliary heating switched off).
When
a switch-on time is selected, the yel-
low indicator lamp lights up in the auxiliary
heating button.
X Press the j, è or ÿ button to
select a different display.
Changing the switch-on time for the
auxiliary heating* This function is only displayed if you have
selected
a switch-on time. Here you can enter
the time at which the auxiliary heating is to
be switched on.
X Press the è
or · button to select the
Settings... menu.
X Press the j
button to call up the selec-
tion of submenus.
X Press the æ
or ç button to select the
Heater submenu.
X Press the j
button to select Switch-on
time X Set hours. X
Press the æ or ç button to set the
hour.
X Press the j
button to select Switch-on
time X Set minutes.
X Press the æ or ç button to set the
minutes.
After changing from one menu to another
the new time setting is stored. The yellow
indicator lamp lights up on the button for
the
auxiliary heating on the centre console.
X Press the j, è or ÿ button to
select a different display.
Activating or deactivating the easy-
entry/exit feature* i
For more information on the easy-entry/
exit feature, see ( Y page 83). G
Risk of injury
When the easy-entry/exit feature is active,
the
steering wheel moves. There is a risk of
occupants becoming trapped. Before acti-
vating the easy-entry/exit feature, make
sure that nobody can become trapped.
Do not leave children unsupervised in the
vehicle, even if they are secured in a child restraint system. The children could open
the driver's door and thereby unintention-
ally activate the easy-entry/exit feature
and become trapped.
X Press the è
or · button to select the
Settings... menu.
X Press the j
button to call up the selec-
tion of submenus.
X Press the æ
or ç button to select the
Convenience submenu.
X Press the j button to select the EASY-
ENTRY system.
X Press the æ or ç button to activate
or deactivate the EASY-ENTRY system.
X Press the j, è or ÿ button to
select a different display.
Activating or deactivating the fold-in
mirrors when locking*
function The
Fold
in mirrors when locking func-
tion allows you to determine whether the
exterior mirrors should fold in when you lock
the vehicle. When you switch on the ignition,
the exterior mirrors fold out again. Controls
* optional
219_AKB; 2; 4, en-GB
mkalafa,
2007-11-13T09:28:36+01:00 - Seite 128
Page 187 of 329
Features
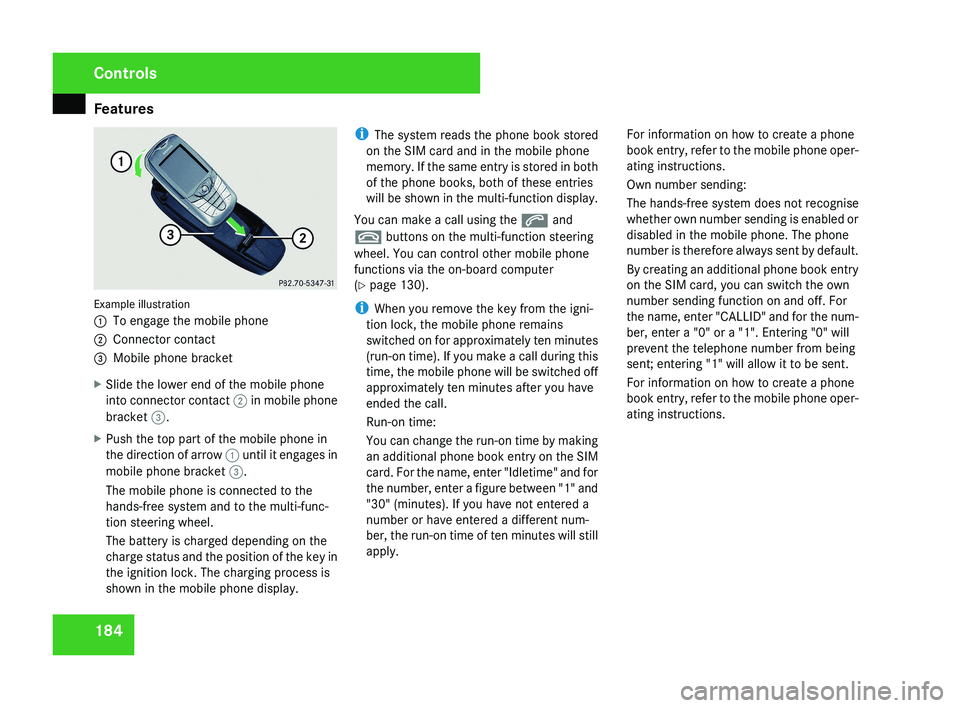
184Example illustration
1
To engage the mobile phone
2 Connector contact
3 Mobile phone bracket
X Slide the lower end of the mobile phone
into connector contact 2 in mobile phone
bracket 3.
X Push the top part of the mobile phone in
the direction of arrow 1 until it engages in
mobile phone bracket 3.
The mobile phone is connected to the
hands-free system and to the multi-func-
tion steering wheel.
The battery is charged depending on the
charge status and the position of the key in
the ignition lock. The charging process is
shown in the mobile phone display. i
The system reads the phone book stored
on the SIM card and in the mobile phone
memory. If the same entry is stored in both
of the phone books, both of these entries
will be shown in the multi-function display.
You can make a call using the s and
t buttons on the multi-function steering
wheel. You can control other mobile phone
functions via the on-board computer
(Y page 130).
i When you remove the key from the igni-
tion lock, the mobile phone remains
switched on for approximately ten minutes
(run-on time). If you make a call during this
time, the mobile phone will be switched off
approximately ten minutes after you have
ended the call.
Run-on time:
You can change the run-on time by making
an additional phone book entry on the SIM
card. For the name, enter "Idletime" and for
the number, enter a figure between "1" and
"30" (minutes). If you have not entered a
number or have entered a different num-
ber, the run-on time of ten minutes will still
apply. For information on how to create a phone
book entry, refer to the mobile phone oper-
ating instructions.
Own number sending:
The hands-free system does not recognise
whether own number sending is enabled or
disabled in the mobile phone. The phone
number is therefore always sent by default.
By creating an additional phone book entry
on the SIM card, you can switch the own
number sending function on and off. For
the name, enter "CALLID" and for the num-
ber, enter a "0" or a "1". Entering "0" will
prevent the telephone number from being
sent; entering "1" will allow it to be sent.
For information on how to create a phone
book entry, refer to the mobile phone oper-
ating instructions.
Controls
219_AKB; 2; 4, en-GB
mkalafa,
2007-11-13T09:28:36+01:00 - Seite 184
Page 203 of 329

Tyres and wheels
200It is therefore recommended to additionally
equip your vehicle with the TIREFIT kit*
when fitting tyres that do not feature run-
flat properties, e.g. winter tyres.
i A TIREFIT kit*
is available from any quali-
fied specialist workshop, e.g. a Mercedes-
Benz Service Centre.
You will find notes on driving with a flat tyre
in the "Practical advice" section
(Y page 287). Tyre tread
G
Risk of accident
Bear in mind that:
R tyre grip decreases rapidly on wet roads
when
the tread depth is less than 3 mm.
You should thus replace tyres that have
insufficient tread.
R winter tyres should be replaced when the
tread depth is 4 mm or less because oth-
erwise they no longer provide adequate
grip.
R the tread on a tyre may not wear evenly.
You should thus regularly check the tread
depth and the condition of the tread across the entire width of all tyres. If nec-
essary, turn the steering wheel so that
you can see the tyre tread more easily.
You could otherwise lose control of the
vehicle and cause an accident due to the
reduced grip of the tyres on the road. Tyre pressures
G
Risk of accident
Tyre pressure that is either too high or too
low has a negative effect on the vehicle’s
active
safety, which could lead you to cause
an accident. You should therefore regularly
check the pressure of all your tyres (includ-
ing the spare tyre*), particularly prior to
long trips, and correct the pressure as nec-
essary.
To test tyre pressure, use a suitable pressure
gauge. The outer appearance of a tyre does
not permit any reliable conclusion about the
tyre pressure. On vehicles fitted with the elec-
tronic tyre pressure monitor*, the tyre pres-
sure can be checked in the on-board com-
puter.
If the vehicle is to be heavily laden or driven
at high speeds, the tyre pressure must be adapted according to the specifications given
in the fuel filler flap
(Y page 190).
Use the highest specified tyre pressure for
the spare wheel*. G
Risk of accident
Should the tyre pressure drop repeatedly:
R Check the tyre for foreign bodies.
R Check whether the wheel is losing air or
the valve is leaking.
Tyre
pressure that is too low has a negative
effect on the vehicle’s active safety, which
could lead to your causing an accident.
Tyre pressure changes by approximately
0.1 bar for every 10 °C change in ambient
temperature.
If you measure the tyre pressure in enclosed
spaces where the temperature differs from
the outside temperature, you will have to cor-
rect the measured value accordingly.
When the vehicle is driven, the tyre tempera-
ture, and with it the tyre pressure, will
increase depending on the road speed and
the load on the tyres.
Therefore, you should only correct tyre pres-
sures when the tyres are cold. Operation
* optional
219_AKB; 2; 4, en-GB
mkalafa,
2007-11-13T09:28:36+01:00 - Seite 200
Page 204 of 329
Tyres and wheels
201
The pressure of warm tyres should only be
corrected
if it is too low for the current oper-
ating conditions.
You will find a table of tyre pressures for var-
ious operating conditions on the inside of
your vehicle's fuel filler flap.
Driving with tyre pressure that is too high or
too low can:
R shorten the service life of the tyres
R cause increased tyre damage
R have a negative effect on handling charac-
teristics (e.g. by causing aquaplaning)
i The tyre pressure values given for low
loads are minimum values which offer you
good ride comfort characteristics.
You can, however, also use the values given
for higher loads. These are permissible and
will not adversely affect the running of the
vehicle.
Also check the tyre pressure of the spare
wheel*. H
Environmental note
Check the tyre pressure regularly, and at
least every 14 days. Tyre pressure loss warning system
G
Risk of accident
The tyre pressure loss warning system does
not
warn you of an incorrectly set tyre pres-
sure. The table on the inside of the fuel filler
flap will help you decide whether the tyre
pressures should be corrected.
The tyre pressure loss warning system does
not replace the need to regularly check
your vehicle's tyre pressures, since an even
loss of pressure on several tyres at the
same time cannot be detected by the tyre
pressure loss warning system.
The tyre pressure loss warning system is
not able to warn you of a sudden loss of
pressure, e.g. if the tyre is penetrated by a
foreign object.
In the event of a sudden loss of pressure,
bring the vehicle to a halt by braking care-
fully. Do not make any sudden steering
movements when doing so.
While the vehicle is in motion, the tyre pres-
sure loss warning system monitors the set
tyre pressure using the rotational speed of
the wheels. This enables the system to detect
significant pressure loss in a tyre. If the speed
of rotation of a wheel changes as a result of
a loss of pressure, a corresponding warning message will appear in the multi-function dis-
play.
The
function of the tyre pressure loss warning
system is limited or delayed if:
R snow chains are fitted to your vehicle's
tyres
R road conditions are wintry
R you are driving on sand or gravel
R you adopt a very sporty driving style (cor-
nering at high speeds or driving with high
rates of acceleration)
R you are driving with a heavy load (in the
vehicle or on the roof)
Restarting the tyre pressure loss warn-
ing system Restart the tyre pressure loss warning system
if you have:
R
changed the tyre pressure
R changed the wheels or tyres
R fitted new wheels or tyres
X Before restarting, consult the table of tyre
pressures
on the inside of the fuel filler flap
to ensure that the tyre pressure in all four Operation
* optional
219_AKB; 2; 4, en-GB
mkalafa,
2007-11-13T09:28:36+01:00 - Seite 201 Z
Page 205 of 329
Tyres and wheels
202tyres is set correctly for the operating con-
ditions concerned.
X Also observe the notes in the section on
tyre pressures ( Y page 200). G
Risk of accident
The tyre pressure loss warning system can
only give reliable warnings if you have set
the correct tyre pressure.
If an incorrect tyre pressure is set, these
incorrect values will be monitored.
A tyre with insufficient pressure results in
an instability of the vehicle when driving,
thus increasing the risk of an accident.
X Make sure that the key is in position 2 in
the ignition lock.
The standard display appears in the multi-
function display ( Y page 115).
X Press k or j to select the tyre pres-
sure function:
Run Flat Indicator active
Menu: R-Button æ
X Press the reset button on the left of the
instrument cluster.
The following message appears in the
multi-function display:
Restart Run Flat Indicator? Yes Cancel
If you wish to confirm the restart:
X Press the æ button.
The following message appears in the
multi-function display:
Run Flat Indicator restarted
After a teach-in period, the tyre pressure
loss warning system will monitor the set
tyre pressures of all four tyres.
If you wish to cancel the restart:
X Press the ç button.
or
X Wait until the message
Restart Run Flat Indicator?
Yes Cancel disappears.
The tyre pressure values stored at the last
restart will continue to be monitored. Checking the tyre pressure electroni-
cally*
The tyre pressure monitor only functions if
the correct wheel electronics are fitted to all
wheels.
These monitor the pressure in all four
tyres, which you have set when restarting the
tyre pressure monitor. The monitor warns you
when the pressure drops in one or more of
the tyres. G
Risk of accident
The tyre pressure monitor does not warn
you
of an incorrectly set tyre pressure. The
table on the inside of the fuel filler flap will
help you decide whether the tyre pressures
should be corrected.
The tyre pressure monitor is not able to
warn you of a sudden loss of pressure, e.g.
if the tyre is penetrated by a foreign object.
In the event of a sudden loss of pressure,
bring the vehicle to a halt by braking care-
fully. Do not make any sudden steering
movements when doing so.
i The operation of the tyre pressure moni-
tor can be affected by interference from
radio transmitting equipment (e.g. radio
headphones, two-way radios) that may be
being operated in or near the vehicle. Operation
* optional
219_AKB; 2; 4, en-GB
mkalafa,
2007-11-13T09:28:36+01:00 - Seite 202
Page 208 of 329
Winter driving
205required. Mercedes-Benz recommends
that you use a Mercedes-Benz Service
Centre
for this purpose. In particular, work
relevant to safety or on safety-related sys-
tems must be carried out at a qualified
specialist workshop. Snow chains
For safety reasons, Mercedes-Benz recom-
mends that you only use snow chains which
have
been specially approved for your vehicle
by Mercedes-Benz or are of a corresponding
standard of quality.
! Information about the use of snow chain-
compatible AMG winter tyres is applicable
for AMG tyres. Use of snow chains is only
permissible with these tyres.
If you intend to fit snow chains, please bear
the following points in mind: R
Snow
chains cannot be fitted to all wheel/
tyre combinations.
R Snow chains must not be fitted to emer-
gency spare wheels, e.g. the "Minispare" or
collapsible emergency spare wheel.
R Fit snow chains to both rear wheels. Com-
ply with the manufacturer's installation
instructions.
! If snow chains are fitted to the front
wheels, they may come into contact with
the bodywork and axle components when
the vehicle is in motion and damage the
tyre or the vehicle.
On vehicles with AIRMATIC DC*, you must
only drive at raised vehicle level if snow
chains have been fitted (Y page 146).
Do not exceed the maximum permissible
speed of 50 km/h.
i You may wish to deactivate ESP ®
when
pulling away with snow chains fitted
(Y page 59). This way you can allow the
wheels to spin in a controlled manner, ach-
ieving an increased driving force (cutting
action). Winter driving
G
Risk of accident
Do not shift down for additional engine
braking on a slippery road surface. This
could cause the drive wheels to lose their
grip and the vehicle could skid.
You
should drive particularly carefully on slip-
pery road surfaces. Avoid sudden accelera-
tion, steering and braking manoeuvres.
If the vehicle threatens to skid or cannot be
stopped when moving at low speed:
X Shift the selector lever to N.
X Try to bring the vehicle under control using
corrective steering. Operation
219_AKB; 2; 4, en-GB
mkalafa,
2007-11-13T09:28:36+01:00 - Seite 205