2008 MERCEDES-BENZ CLS COUPE keyless
[x] Cancel search: keylessPage 267 of 329
Troubleshooting
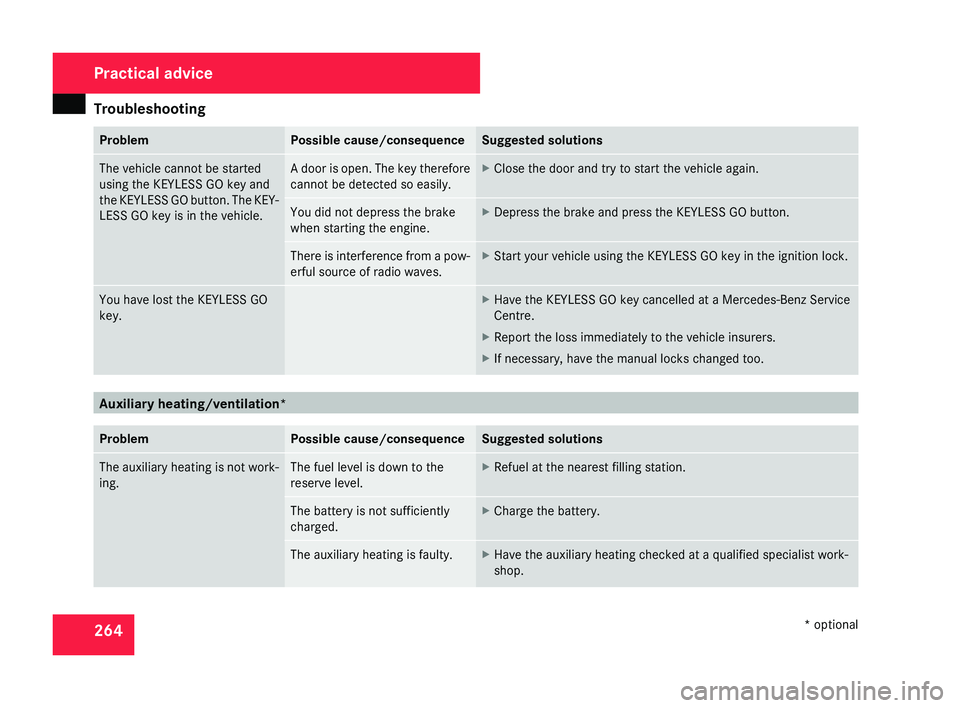
264 Problem Possible cause/consequence Suggested solutions
The vehicle cannot be started
using the KEYLESS GO key and
the
KEYLESS GO button. The KEY-
LESS GO key is in the vehicle. A door is open. The key therefore
cannot be detected so easily. X
Close the door and try to start the vehicle again. You did not depress the brake
when starting the engine. X
Depress the brake and press the KEYLESS GO button. There is interference from a pow-
erful source of radio waves. X
Start your vehicle using the KEYLESS GO key in the ignition lock. You have lost the KEYLESS GO
key. X
Have the KEYLESS GO key cancelled at a Mercedes-Benz Service
Centre.
X Report the loss immediately to the vehicle insurers.
X If necessary, have the manual locks changed too. Auxiliary heating/ventilation*
Problem Possible cause/consequence Suggested solutions
The auxiliary heating is not work-
ing. The fuel level is down to the
reserve level. X
Refuel at the nearest filling station. The battery is not sufficiently
charged. X
Charge the battery. The auxiliary heating is faulty. X
Have the auxiliary heating checked at a qualified specialist work-
shop. Practical advice
* optional
219_AKB; 2; 4, en-GB
mkalafa,
2007-11-13T09:28:36+01:00 - Seite 264
Page 269 of 329
Locking/unlocking in an emergency
266 Locking/unlocking in an emergency
Emergency key
If the vehicle can no longer be unlocked or
locked with the key or the KEYLESS GO
key*, use the emergency key element.
If you use the emergency key element to
unlock and open the driver's door or the boot
lid, the anti-theft alarm system* will be trig-
gered ( Y page 61).
There are several ways to turn off the alarm:
X Press the k or j button on the key.
or
X Insert the key into the ignition lock.
or
X Press the KEYLESS GO but-
ton* ( Y page 74).
or
X Lock or unlock the vehicle using KEYLESS
GO*. Releasing and removing the emergency
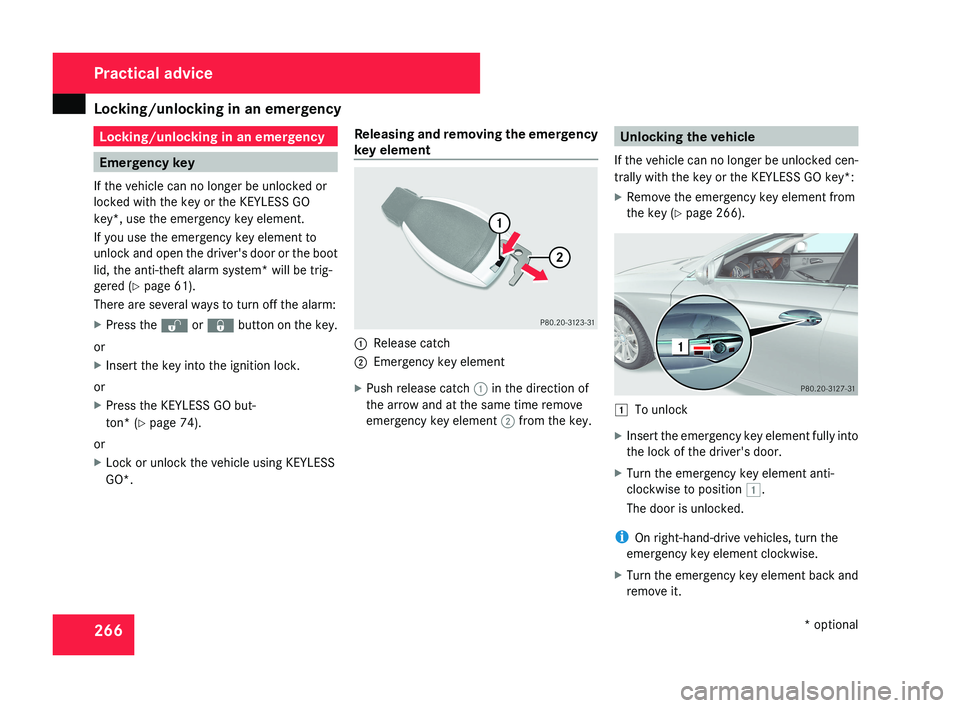
key element 1
Release catch
2 Emergency key element
X Push release catch 1 in the direction of
the arrow and at the same time remove
emergency key element 2 from the key. Unlocking the vehicle
If the vehicle can no longer be unlocked cen-
trally with the key or the KEYLESS GO key*:
X Remove the emergency key element from
the key (Y page 266). $
To unlock
X Insert the emergency key element fully into
the lock of the driver's door.
X Turn the emergency key element anti-
clockwise to position $.
The door is unlocked.
i On right-hand-drive vehicles, turn the
emergency key element clockwise.
X Turn the emergency key element back and
remove it. Practical advice
* optional
219_AKB; 2; 4, en-GB
mkalafa,
2007-11-13T09:28:36+01:00 - Seite 266
Page 270 of 329
Locking/unlocking in an emergency
267Locking the vehicle
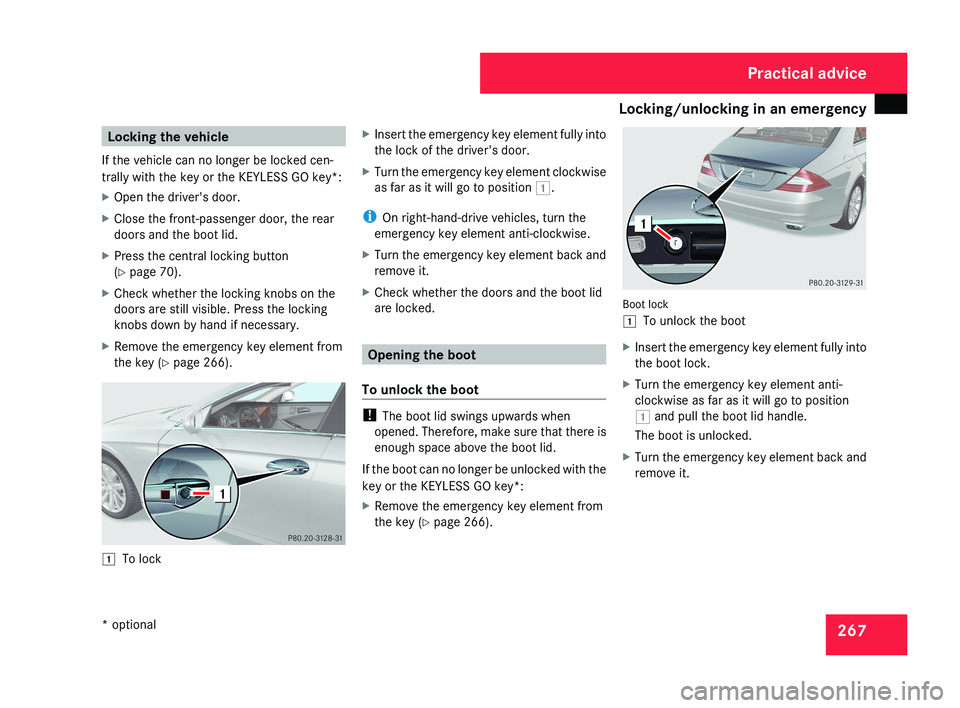
If the vehicle can no longer be locked cen-
trally with the key or the KEYLESS GO key*:
X Open the driver's door.
X Close the front-passenger door, the rear
doors and the boot lid.
X Press the central locking button
(Y page 70).
X Check whether the locking knobs on the
doors are still visible. Press the locking
knobs down by hand if necessary.
X Remove the emergency key element from
the key (Y page 266).$ To lock X
Insert the emergency key element fully into
the lock of the driver's door.
X Turn the emergency key element clockwise
as far as it will go to position $.
i On right-hand-drive vehicles, turn the
emergency key element anti-clockwise.
X Turn the emergency key element back and
remove it.
X Check whether the doors and the boot lid
are locked.
Opening the boot
To unlock the boot
! The boot lid swings upwards when
opened. Therefore, make sure that there is
enough space above the boot lid.
If the boot can no longer be unlocked with the
key or the KEYLESS GO key*:
X Remove the emergency key element from
the key (Y page 266).
Boot lock
$ To unlock the boot
X Insert the emergency key element fully into
the boot lock.
X Turn the emergency key element anti-
clockwise as far as it will go to position
$ and pull the boot lid handle.
The boot is unlocked.
X Turn the emergency key element back and
remove it.
Practical advice
* optional
219_AKB; 2; 4, en-GB
mkalafa,
2007-11-13T09:28:36+01:00 - Seite 267
Page 273 of 329
Changing the batteries
270 Key or KEYLESS GO key*
Checking the batteries X
Press the j or k button.
The batteries are in order if the battery
charge indicator lamp lights up briefly.
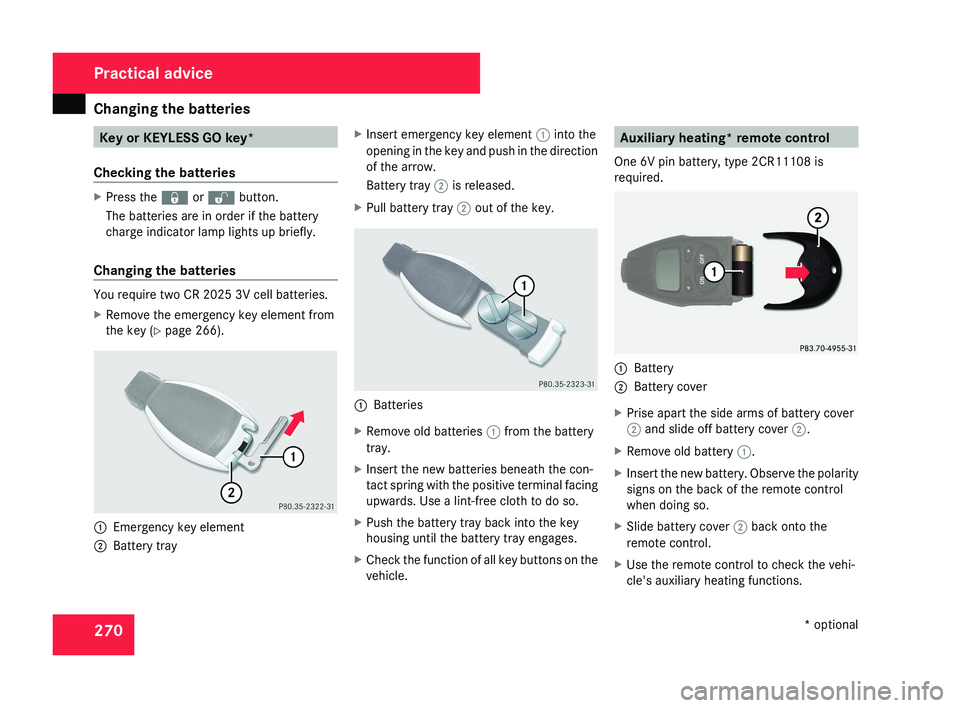
Changing the batteries You require two CR 2025 3V cell batteries.
X
Remove the emergency key element from
the key (Y page 266). 1
Emergency key element
2 Battery tray X
Insert emergency key element 1 into the
opening in the key and push in the direction
of the arrow.
Battery tray 2 is released.
X Pull battery tray 2 out of the key. 1
Batteries
X Remove old batteries 1 from the battery
tray.
X Insert the new batteries beneath the con-
tact spring with the positive terminal facing
upwards. Use a lint-free cloth to do so.
X Push the battery tray back into the key
housing until the battery tray engages.
X Check the function of all key buttons on the
vehicle. Auxiliary heating* remote control
One 6V pin battery, type 2CR11108 is
required. 1
Battery
2 Battery cover
X Prise apart the side arms of battery cover
2 and slide off battery cover 2.
X Remove old battery 1.
X Insert the new battery. Observe the polarity
signs on the back of the remote control
when doing so.
X Slide battery cover 2 back onto the
remote control.
X Use the remote control to check the vehi-
cle's auxiliary heating functions. Practical advice
* optional
219_AKB; 2; 4, en-GB
mkalafa,
2007-11-13T09:28:36+01:00 - Seite 270
Page 278 of 329
Replacing the wiper blades
275Replacing the wiper blades
G
Risk of accident
The windscreen will no longer be properly
wiped if the wiper blades are worn. This
may prevent you from observing the traffic
conditions, thereby causing an accident.
Replace the wiper blades twice a year, ide-
ally in spring and autumn. G
Risk of accident
The wiper arms could start moving and
cause an injury if you leave the windscreen
wipers switched on.
Remove the key from the ignition lock
before replacing the wiper blades.
! Make sure that you touch only the wiper
arm of the windscreen wiper to avoid dam-
aging the windscreen wiper blades. Removing
Vehicles without KEYLESS GO* X
Make sure that the key is in position 1 or
2 in the ignition lock.
X Set the windscreen wipers to posi-
tion u (Y page 98) on the combination
switch.
X When the wiper arms have reached a ver-
tical position, turn the key to position 0 and
remove it from the ignition lock.
X Fold the wiper arm away from the wind-
screen until it engages.
X Set the wiper blade at right angles to the
wiper arm.
Vehicles with KEYLESS GO* X
Switch off the engine.
X Take your foot off the brake pedal.
X Set the windscreen wipers to posi-
tion u (Y page 98) on the combination
switch.
X Press the KEYLESS GO button repeatedly
until the windscreen wipers start. X
When the wiper arms have reached a ver-
tical position, press the KEYLESS GO but-
ton again.
X Fold the wiper arm away from the wind-
screen until it engages.
X Set the wiper blade at right angles to the
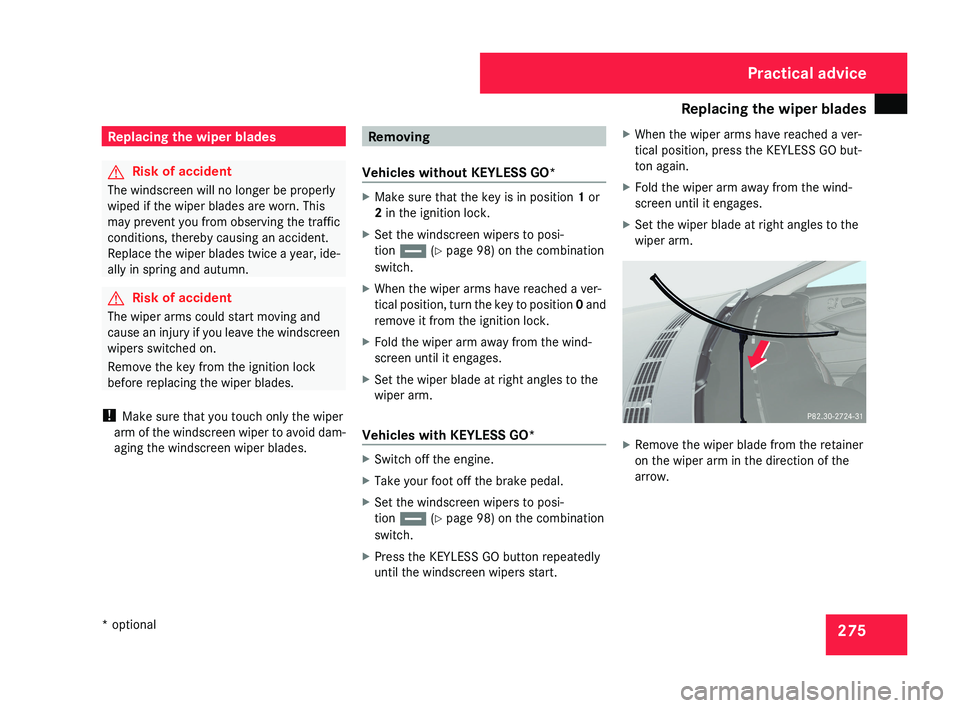
wiper arm. X
Remove the wiper blade from the retainer
on the wiper arm in the direction of the
arrow. Practical advice
* optional
219_AKB; 2; 4, en-GB
mkalafa,
2007-11-13T09:28:36+01:00 - Seite 275
Page 293 of 329
Battery
290 Disconnecting the battery
G
Risk of accident
If the battery is disconnected:
R there
is no brake boosting effect and you
will need to apply more pressure to brake
and the brake pedal travel will be longer;
you may have to depress the brake pedal
with full force
R you can no longer turn the key in the igni-
tion and, on vehicles with KEYLESS
GO*, pressing the KEYLESS GO button*
on the selector lever will have no effect
R the selector lever is locked in position P
! Always disconnect the battery in the
sequence described below. Never swap the
terminal clamps. You may otherwise dam-
age the vehicle electronics.
X Firmly depress the parking brake and move
the selector lever to P.
X Switch off all electrical consumers.
X Turn the key to position 0 in the ignition
lock and remove it.
X Open the boot/luggage compartment.
X Remove the luggage well (Y page 218). X
Remove the battery cover.
X Remove the negative terminal clamp from
the battery.
X Remove the cover from the positive termi-
nal clamp.
X Remove the positive terminal clamp from
the battery.
X Disconnect the breather hose. Removing the battery
X Disconnect the battery ( Y page 290).
X Loosen the bolt which holds the battery in
place.
X Release the strap and remove the battery. Charging and fitting the battery
G
Risk of injury
Only charge the installed battery with a bat-
tery charger which has been tested and
approved
by Mercedes-Benz. These battery
chargers allow the battery to be charged
while it is still installed. Otherwise, the vehi-
cle's electronic system may be damaged.
Only charge the battery in a well-ventilated
area. As the battery is being charged, gases
can escape and generate minor explosions.
This may injure you and other persons or
cause damage to the paintwork or acid cor-
rosion on the vehicle.
You can obtain information about battery
chargers which allow the battery to be
charged when still installed from a qualified
specialist workshop, e.g. a Mercedes-Benz
Service Centre. G
Risk of injury
There is a risk of acid burns during the
charging process due to the gases which
escape from the battery. Do not lean over
the battery during the charging process.
! Only use battery chargers with a maxi-
mum charging voltage of 14.8 V. Practical advice
* optional
219_AKB; 2; 4, en-GB
mkalafa,
2007-11-13T09:28:36+01:00 - Seite 290