2008 MERCEDES-BENZ CLS COUPE instrument cluster
[x] Cancel search: instrument clusterPage 125 of 329
On-board computer
122
X
Press the reset button again.
The functions of most submenus are
restored to the factory settings.
or
X If you want to retain the settings, do not
press the reset button a second time.
After approximately 5 seconds, the Set-
tings... menu appears again.
Submenus in the Settings menu X
Press è or · to select the Set-
tings menu.
X Press the j button to call up the selec-
tion of submenus.
You will see the selection of submenus.
There are more submenus available than
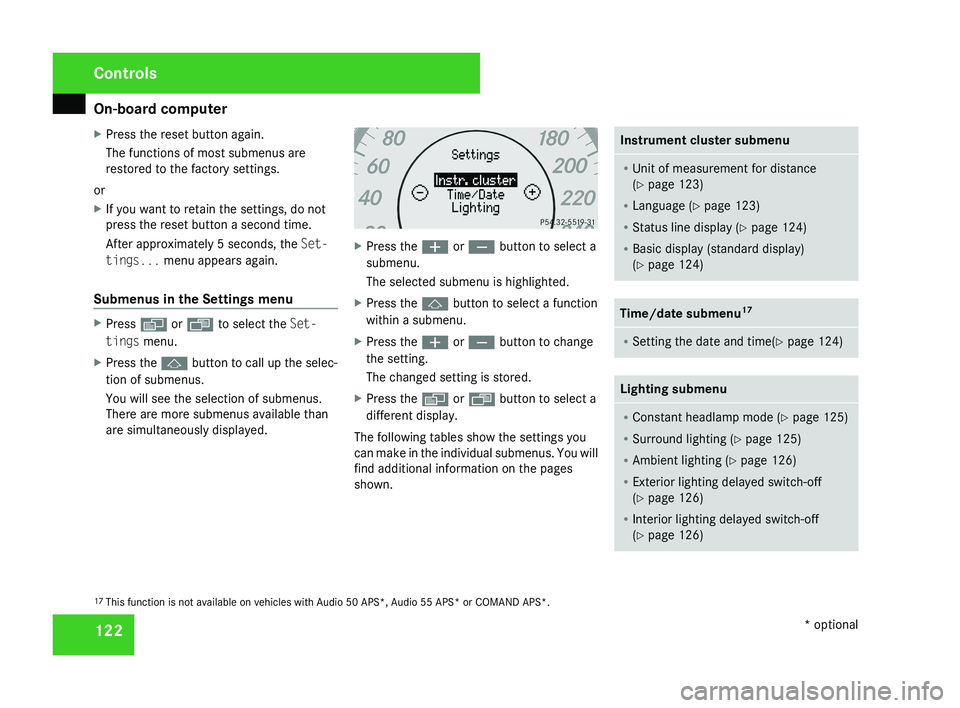
are simultaneously displayed. X
Press the æ or ç button to select a
submenu.
The selected submenu is highlighted.
X Press the j button to select a function
within a submenu.
X Press the æ or ç button to change
the setting.
The changed setting is stored.
X Press the è or ÿ button to select a
different display.
The following tables show the settings you
can make in the individual submenus. You will
find additional information on the pages
shown. Instrument cluster submenu
R
Unit of measurement for distance
(Y page 123)
R Language (Y page 123)
R Status line display ( Y page 124)
R Basic display (standard display)
(Y page 124) Time/date submenu
17 R
Setting the date and time(Y page 124) Lighting submenu
R
Constant headlamp mode (Y page 125)
R Surround lighting ( Y page 125)
R Ambient lighting (Y page 126)
R Exterior lighting delayed switch-off
(Y page 126)
R Interior lighting delayed switch-off
(Y page 126) 17
This function is not available on vehicles with Audio 50 APS*, Audio 55 APS* or COMAND APS*. Controls
* optional
219_AKB; 2; 4, en-GB
mkalafa,
2007-11-13T09:28:36+01:00 - Seite 122
Page 128 of 329
On-board computer
125
X
Press the è or · button to select the
Settings... menu.
X Press the j
button to call up the selec-
tion of submenus.
X Press the æ
or ç button to select the
Time/Date submenu.
Setting the time
X Use j to select Clock, hours Con-
firm by press. R (or Clock, minutes
Confirm by press. R).
X Press the æ or ç button to set a
value.
X Press the reset button on the left of the
instrument cluster.
The set time is stored.
Setting the date
X Press the j
button to select Set date
Day (or Set date Month or Set date
Year).
X Press the æ or ç button to set the
values.
X Press the j, è or ÿ button to
select a different display. Setting constant headlamp mode If you have set constant headlamp mode and
the light switch is in position M orU,
the
side lamps, dipped-beam headlamps and
licence plate lighting are switched on auto-
matically when the engine is running. Turning
the light switch to a different position
switches on the corresponding lights.
For safety reasons, it is only possible to set
this function when the vehicle is stationary.
In countries in which constant headlamp
mode is a legal requirement, Constant is the
factory setting.
X Press the è
or · button to select the
Settings... menu.
X Press the j
button to call up the selec-
tion of submenus.
X Press the æ
or ç button to select the
Lighting submenu.
X Press the j button to select Headlamp
mode.
X Press the æ or ç button to set the
mode
for the headlamps to Manual or Con-
stant (constant headlamp mode).
X Press the j, è or ÿ button to
select a different display. Switching the surround lighting on or
off If the surround lighting is switched on, the
following lights will be switched on automat-
ically
in the dark after you have unlocked the
vehicle using the key:
R the side lamps
R the tail lamps
R the licence plate lighting
R the front foglamps
R the lights* in the exterior mirrors
The surround lighting switches off automati-
cally if you open the driver's door or after 40
seconds.
X Press the è
or · button to select the
Settings... menu.
X Press the j
button to call up the selec-
tion of submenus.
X Press the æ
or ç button to select the
Lighting submenu.
X Press the j button to select the Sur-
round lighting function. Controls
* optional
219_AKB; 2; 4, en-GB
mkalafa,
2007-11-13T09:28:36+01:00 - Seite 125 Z
Page 133 of 329
On-board computer
130
If the vehicle is parked for more than 4 hours,
the From start consumption statistics are
reset (key in position
0 of the ignition lock or
removed).
The values will not be reset if you turn the key
to position 1 or 2 during this time.
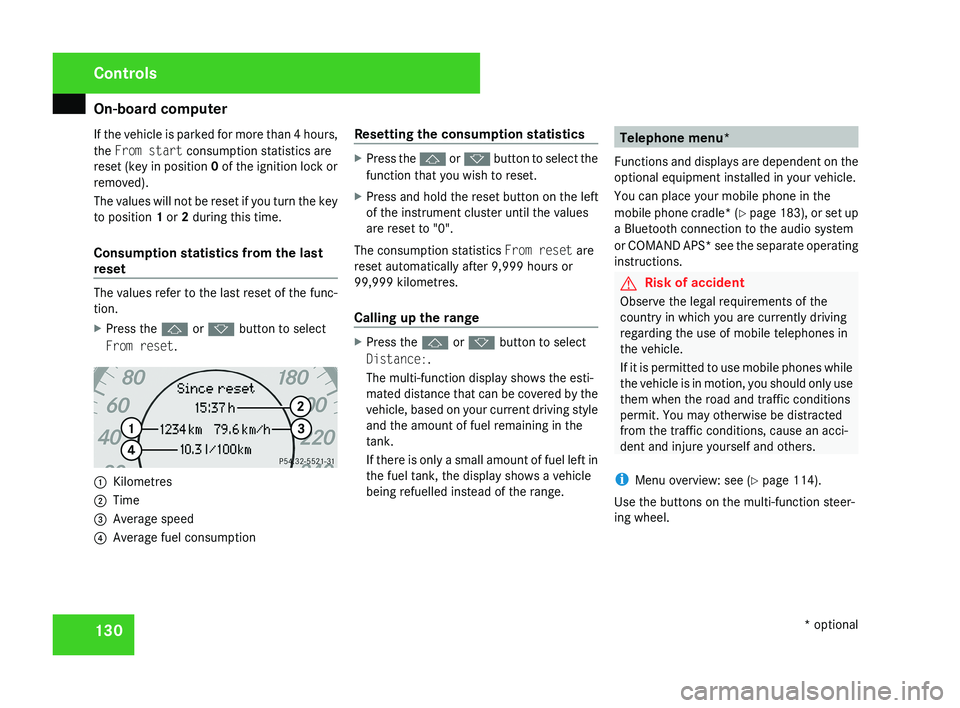
Consumption statistics from the last
reset The values refer to the last reset of the func-
tion.
X
Press the j or k button to select
From reset. 1
Kilometres
2 Time
3 Average speed
4 Average fuel consumption Resetting the consumption statistics X
Press the j or k button to select the
function that you wish to reset.
X Press and hold the reset button on the left
of the instrument cluster until the values
are reset to "0".
The consumption statistics From reset are
reset automatically after 9,999 hours or
99,999 kilometres.
Calling up the range X
Press the j or k button to select
Distance:.
The multi-function display shows the esti-
mated distance that can be covered by the
vehicle, based on your current driving style
and the amount of fuel remaining in the
tank.
If there is only a small amount of fuel left in
the fuel tank, the display shows a vehicle
being refuelled instead of the range. Telephone menu*
Functions and displays are dependent on the
optional equipment installed in your vehicle.
You can place your mobile phone in the
mobile phone cradle* (Y page 183), or set up
a Bluetooth connection to the audio system
or COMAND APS* see the separate operating
instructions. G
Risk of accident
Observe the legal requirements of the
country in which you are currently driving
regarding the use of mobile telephones in
the vehicle.
If it is permitted to use mobile phones while
the vehicle is in motion, you should only use
them when the road and traffic conditions
permit. You may otherwise be distracted
from the traffic conditions, cause an acci-
dent and injure yourself and others.
i Menu overview: see ( Y page 114).
Use the buttons on the multi-function steer-
ing wheel. Controls
* optional
219_AKB; 2; 4, en-GB
mkalafa,
2007-11-13T09:28:36+01:00 - Seite 130
Page 141 of 329
Driving systems
138
X
Briefly pull the cruise control lever towards
you 3.
X Remove your foot from the accelerator
pedal.
Distronic is activated and adjusts the vehi-
cle's speed to the last speed stored.
Setting the specified minimum distance
for Distronic You can set the specified minimum distance
for Distronic by varying the time span
between 1.0 and 2.0 seconds. This time span
determines the distance that Distronic should
maintain from the vehicle in front, depending
on the road speed. You can read this distance
in the multi-function display.
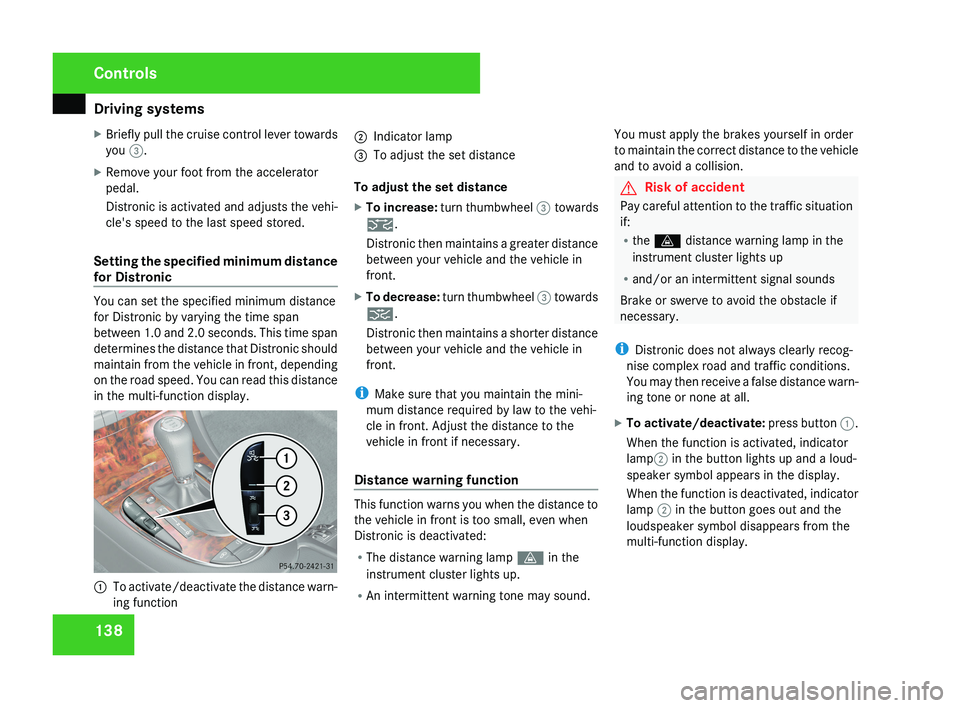
1
To activate/deactivate the distance warn-
ing function 2
Indicator lamp
3 To adjust the set distance
To adjust the set distance
X To increase: turn thumbwheel 3 towards
¯.
Distronic then maintains a greater distance
between your vehicle and the vehicle in
front.
X To decrease: turn thumbwheel 3 towards
®.
Distronic then maintains a shorter distance
between your vehicle and the vehicle in
front.
i Make sure that you maintain the mini-
mum distance required by law to the vehi-
cle in front. Adjust the distance to the
vehicle in front if necessary.
Distance warning function This function warns you when the distance to
the vehicle in front is too small, even when
Distronic is deactivated:
R
The distance warning lamp l in the
instrument cluster lights up.
R An intermittent warning tone may sound. You must apply the brakes yourself in order
to maintain the correct distance to the vehicle
and to avoid a collision. G
Risk of accident
Pay careful attention to the traffic situation
if:
R the l distance warning lamp in the
instrument cluster lights up
R and/or an intermittent signal sounds
Brake or swerve to avoid the obstacle if
necessary.
i Distronic does not always clearly recog-
nise complex road and traffic conditions.
You may then receive a false distance warn-
ing tone or none at all.
X To activate/deactivate: press button 1.
When the function is activated, indicator
lamp 2 in the button lights up and a loud-
speaker symbol appears in the display.
When the function is deactivated, indicator
lamp 2 in the button goes out and the
loudspeaker symbol disappears from the
multi-function display. Controls
219_AKB; 2; 4, en-GB
mkalafa,
2007-11-13T09:28:36+01:00 - Seite 138
Page 142 of 329
Driving systems
139
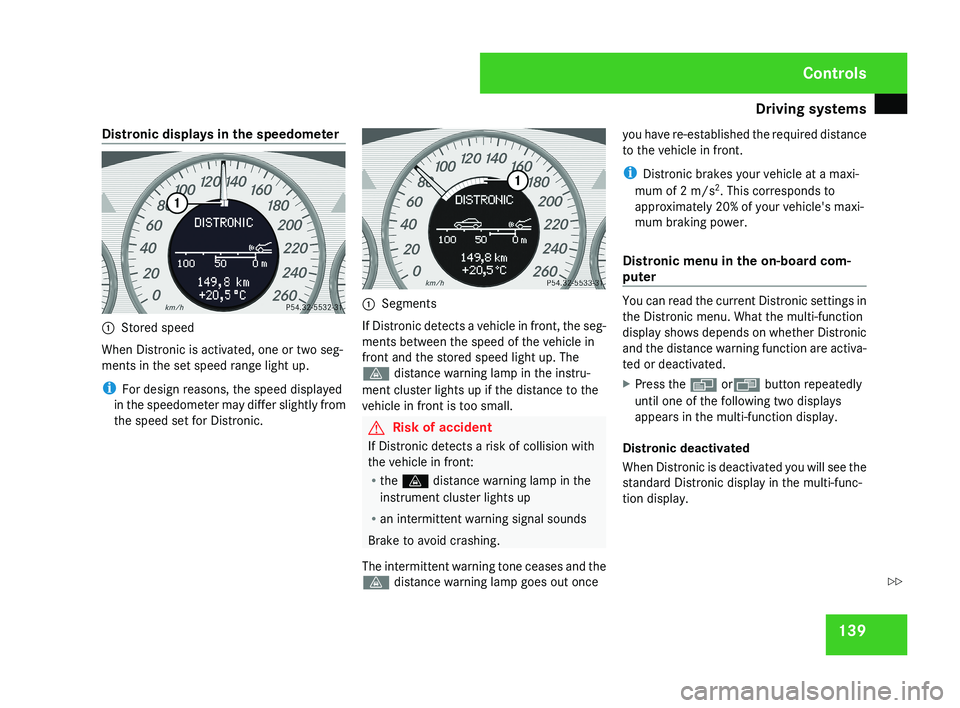
Distronic displays in the speedometer
1
Stored speed
When Distronic is activated, one or two seg-
ments in the set speed range light up.
i For design reasons, the speed displayed
in the speedometer may differ slightly from
the speed set for Distronic. 1
Segments
If Distronic detects a vehicle in front, the seg-
ments between the speed of the vehicle in
front and the stored speed light up. The
l distance warning lamp in the instru-
ment cluster lights up if the distance to the
vehicle in front is too small. G
Risk of accident
If Distronic detects a risk of collision with
the vehicle in front:
R the l distance warning lamp in the
instrument cluster lights up
R an intermittent warning signal sounds
Brake to avoid crashing.
The intermittent warning tone ceases and the
l distance warning lamp goes out once you have re-established the required distance
to the vehicle in front.
i
Distronic brakes your vehicle at a maxi-
mum of 2 m/s 2
. This corresponds to
approximately 20% of your vehicle's maxi-
mum braking power.
Distronic menu in the on-board com-
puter You can read the current Distronic settings in
the Distronic menu. What the multi-function
display shows depends on whether Distronic
and the distance warning function are activa-
ted or deactivated.
X
Press the è orÿ button repeatedly
until one of the following two displays
appears in the multi-function display.
Distronic deactivated
When Distronic is deactivated you will see the
standard Distronic display in the multi-func-
tion display. Controls
219_AKB; 2; 4, en-GB
mkalafa,
2007-11-13T09:28:36+01:00 - Seite 139 Z
Page 205 of 329
Tyres and wheels
202tyres is set correctly for the operating con-
ditions concerned.
X Also observe the notes in the section on
tyre pressures ( Y page 200). G
Risk of accident
The tyre pressure loss warning system can
only give reliable warnings if you have set
the correct tyre pressure.
If an incorrect tyre pressure is set, these
incorrect values will be monitored.
A tyre with insufficient pressure results in
an instability of the vehicle when driving,
thus increasing the risk of an accident.
X Make sure that the key is in position 2 in
the ignition lock.
The standard display appears in the multi-
function display ( Y page 115).
X Press k or j to select the tyre pres-
sure function:
Run Flat Indicator active
Menu: R-Button æ
X Press the reset button on the left of the
instrument cluster.
The following message appears in the
multi-function display:
Restart Run Flat Indicator? Yes Cancel
If you wish to confirm the restart:
X Press the æ button.
The following message appears in the
multi-function display:
Run Flat Indicator restarted
After a teach-in period, the tyre pressure
loss warning system will monitor the set
tyre pressures of all four tyres.
If you wish to cancel the restart:
X Press the ç button.
or
X Wait until the message
Restart Run Flat Indicator?
Yes Cancel disappears.
The tyre pressure values stored at the last
restart will continue to be monitored. Checking the tyre pressure electroni-
cally*
The tyre pressure monitor only functions if
the correct wheel electronics are fitted to all
wheels.
These monitor the pressure in all four
tyres, which you have set when restarting the
tyre pressure monitor. The monitor warns you
when the pressure drops in one or more of
the tyres. G
Risk of accident
The tyre pressure monitor does not warn
you
of an incorrectly set tyre pressure. The
table on the inside of the fuel filler flap will
help you decide whether the tyre pressures
should be corrected.
The tyre pressure monitor is not able to
warn you of a sudden loss of pressure, e.g.
if the tyre is penetrated by a foreign object.
In the event of a sudden loss of pressure,
bring the vehicle to a halt by braking care-
fully. Do not make any sudden steering
movements when doing so.
i The operation of the tyre pressure moni-
tor can be affected by interference from
radio transmitting equipment (e.g. radio
headphones, two-way radios) that may be
being operated in or near the vehicle. Operation
* optional
219_AKB; 2; 4, en-GB
mkalafa,
2007-11-13T09:28:36+01:00 - Seite 202
Page 207 of 329
Winter driving
204
X
Press the reset button on the left of the
instrument cluster
(Y page 209).
The following message appears in the
multi-function display: Check current
tyre pressure?
X Press the æ button.
The following message appears in the
multi-function display:
Tyre pressure monitor restarted
The tyre pressure monitor has stored the
pressure of the tyres as a new reference
value.
If you wish to cancel the restart:
X Press the ç button. Winter driving
Have your vehicle winterproofed at a qualified
specialist workshop, e.g. at a Mercedes-Benz
Service Centre, at the onset of winter.
! Do not use a sharp object to remove snow
or ice from the trim on the B-pillar between
the side windows. Winter tyres
Use
winter tyres at temperatures below +7 °
C and on snow or ice-covered roads. Only
then can the effect of the ABS and ESP ®
driv-
ing systems be ensured in winter too.
Use winter tyres of the same make and tread
on all wheels to maintain safe handling char-
acteristics. G
Risk of accident
You must replace winter tyres with a tread
depth
of less than 4 mm immediately. They
are no longer suitable for winter use, in par-
ticular because they do not provide suffi-
cient grip. This could cause you to lose
control of your vehicle and cause an acci-
dent. Always observe the maximum permitted
speed
specified for the winter tyres you have
fitted. If you fit winter tyres which have a
lower maximum permitted speed than that of
the vehicle, affix an appropriate warning sign
in the driver's field of vision. This can be
obtained at a qualified specialist workshop,
e.g. from a Mercedes-Benz Service Centre.
In such circumstances, you should also
restrict the maximum speed of the vehicle
using permanent Speedtronic 26
to the maxi-
mum permissible speed for winter tyres
(Y page 144).
Once you have fitted the winter tyres:
X Restart the tyre pressure moni-
tor* (Y page 202). G
Risk of accident
If you fit the spare wheel* when driving with
winter tyres, bear in mind that driving sta-
bility will be impaired owing to unstable
cornering
characteristics caused by the dif-
ferent tyres. You should therefore adapt
your driving style and drive carefully.
Have the spare wheel* replaced at the
nearest qualified specialist workshop
which has the necessary specialist knowl-
edge and tools to carry out the work
26 Only available for certain countries. Operation
* optional
219_AKB; 2; 4, en-GB
mkalafa,
2007-11-13T09:28:36+01:00 - Seite 204
Page 222 of 329
Display messages
219Display messages
Notes
The on-board computer shows warnings or
malfunctions in the multi-function display.
Certain display messages are accompanied
by a warning tone or a continuous tone.
The
multi-function display shows high-priority
display messages in red. In the following
tables, these display messages are printed in
red.
Please respond in accordance with the dis-
play messages and follow the additional
notes in this Owner's Manual. G
Risk of accident
No further messages can be displayed if
there is a malfunction in the instrument
cluster and/or the multi-function display.
This
means that you will not see information
about the driving situation, such as the speed, outside temperature, warning/indi-
cator lamps, display messages or system
failures. The vehicle's handling character-
istics may be affected. Adjust your driving
style and speed accordingly.
Immediately consult a qualified specialist
workshop
which has the necessary special-
ist knowledge and tools to carry out the
work required. Mercedes-Benz recom-
mends that you use a Mercedes-Benz
Service Centre for this purpose. In particu-
lar, work relevant to safety or on safety-
related systems must be carried out at a
qualified specialist workshop.
When you stop and park the vehicle, please
observe the instructions provided for HOLD
(Y page 144)and parking ( Y page 103).
The following tables contain all the display
messages. Hiding display messages After a few seconds, the on-board computer
automatically
hides some low priority display
messages. Other messages remain visible in
the multi-function display until you hide them
yourself.
Some high priority display messages cannot
be hidden. The multi-function display shows
these messages continuously until the cau-
ses of the messages have been remedied.
Use the buttons on the multi-function steer-
ing wheel.
X Use the è, ·, j or k button
to select another display.
The on-board computer saves certain dis-
play messages in the message mem-
ory (Y page 121). Practical advice
219_AKB; 2; 4, en-GB
mkalafa,
2007-11-13T09:28:36+01:00 - Seite 219