2008 MERCEDES-BENZ CLS COUPE instrument cluster
[x] Cancel search: instrument clusterPage 97 of 329
Lights
94 Combination switch (turn signals,
main-beam headlamps and headlamp
flasher)
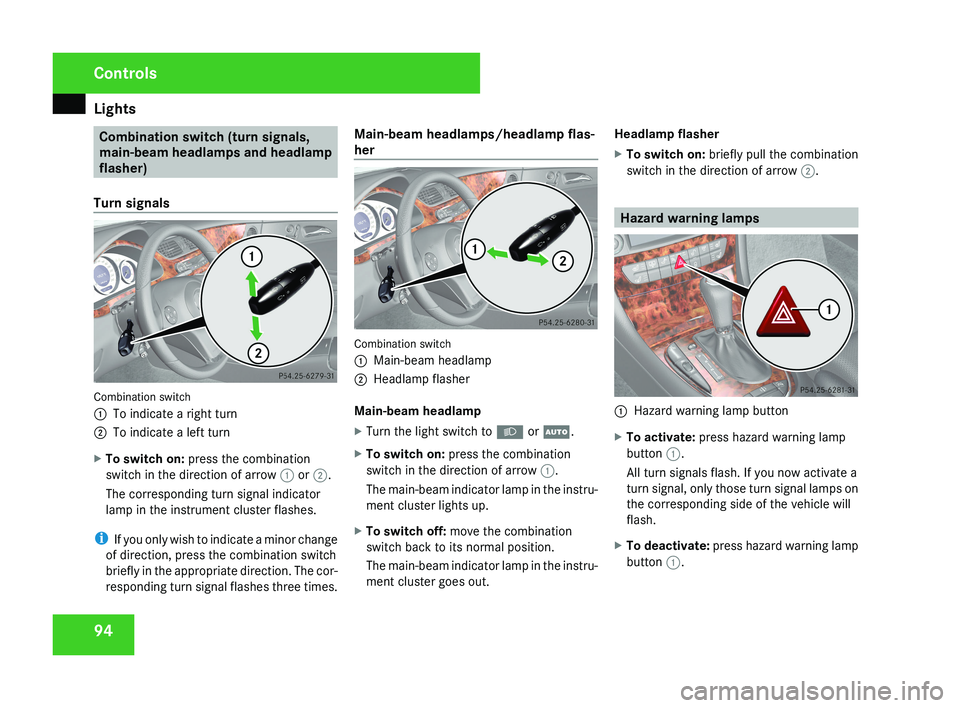
Turn signals Combination switch
1
To indicate a right turn
2 To indicate a left turn
X To switch on: press the combination
switch in the direction of arrow 1 or 2.
The corresponding turn signal indicator
lamp in the instrument cluster flashes.
i If you only wish to indicate a minor change
of direction, press the combination switch
briefly in the appropriate direction. The cor-
responding turn signal flashes three times. Main-beam headlamps/headlamp flas-
her
Combination switch
1
Main-beam headlamp
2 Headlamp flasher
Main-beam headlamp
X Turn the light switch to B or U.
X To switch on: press the combination
switch in the direction of arrow 1.
The main-beam indicator lamp in the instru-
ment cluster lights up.
X To switch off: move the combination
switch back to its normal position.
The main-beam indicator lamp in the instru-
ment cluster goes out. Headlamp flasher
X
To switch on: briefly pull the combination
switch in the direction of arrow 2. Hazard warning lamps
1
Hazard warning lamp button
X To activate: press hazard warning lamp
button 1.
All turn signals flash. If you now activate a
turn signal, only those turn signal lamps on
the corresponding side of the vehicle will
flash.
X To deactivate: press hazard warning lamp
button 1. Controls
219_AKB; 2; 4, en-GB
mkalafa,
2007-11-13T09:28:36+01:00 - Seite 94
Page 105 of 329
Driving and parking
102
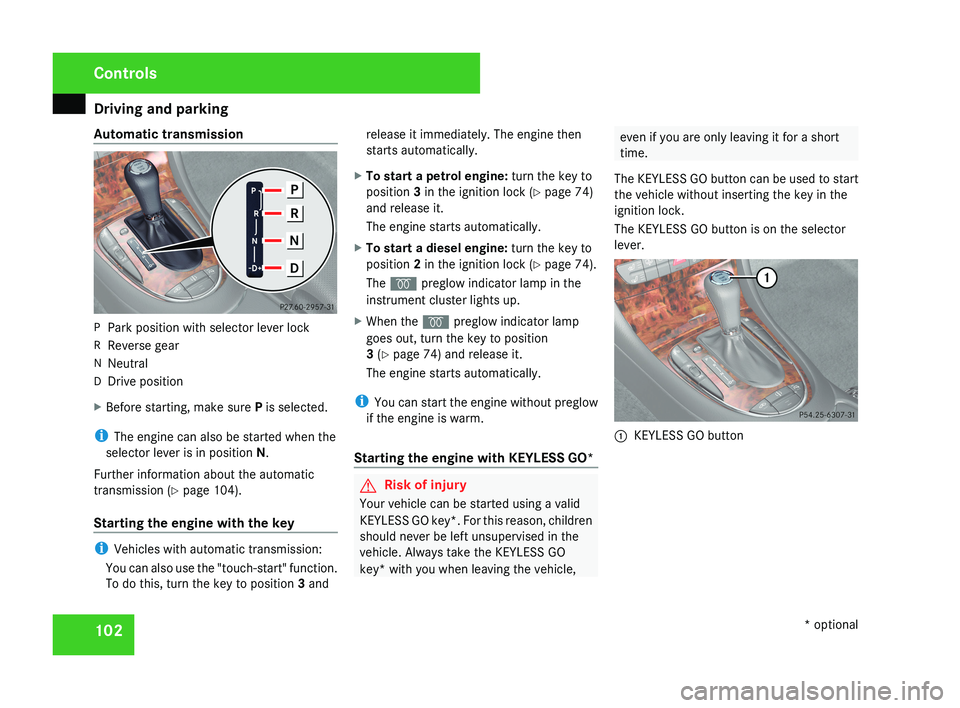
Automatic transmission
P
Park position with selector lever lock
R Reverse gear
N Neutral
D Drive position
X Before starting, make sure P is selected.
i The engine can also be started when the
selector lever is in position N.
Further information about the automatic
transmission (Y page 104).
Starting the engine with the key i
Vehicles with automatic transmission:
You can also use the "touch-start" function.
To do this, turn the key to position 3 and release it immediately. The engine then
starts automatically.
X To start a petrol engine: turn the key to
position 3 in the ignition lock (Y page 74)
and release it.
The engine starts automatically.
X To start a diesel engine: turn the key to
position 2 in the ignition lock (Y page 74).
The q preglow indicator lamp in the
instrument cluster lights up.
X When the q preglow indicator lamp
goes out, turn the key to position
3 (Y page 74) and release it.
The engine starts automatically.
i You can start the engine without preglow
if the engine is warm.
Starting the engine with KEYLESS GO* G
Risk of injury
Your vehicle can be started using a valid
KEYLESS GO key*. For this reason, children
should never be left unsupervised in the
vehicle. Always take the KEYLESS GO
key* with you when leaving the vehicle, even if you are only leaving it for a short
time.
The KEYLESS GO button can be used to start
the vehicle without inserting the key in the
ignition lock.
The KEYLESS GO button is on the selector
lever. 1
KEYLESS GO button Controls
* optional
219_AKB; 2; 4, en-GB
mkalafa,
2007-11-13T09:28:36+01:00 - Seite 102
Page 107 of 329
Transmission
104
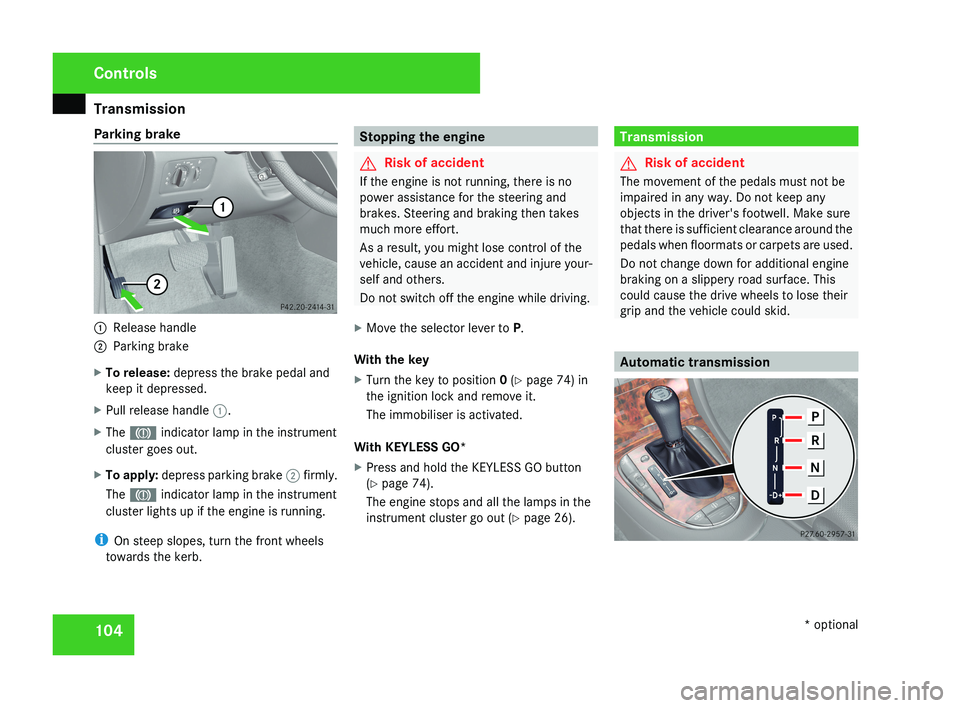
Parking brake
1
Release handle
2 Parking brake
X To release: depress the brake pedal and
keep it depressed.
X Pull release handle 1.
X The 3 indicator lamp in the instrument
cluster goes out.
X To apply: depress parking brake 2 firmly.
The 3 indicator lamp in the instrument
cluster lights up if the engine is running.
i On steep slopes, turn the front wheels
towards the kerb. Stopping the engine
G
Risk of accident
If the engine is not running, there is no
power assistance for the steering and
brakes. Steering and braking then takes
much more effort.
As a result, you might lose control of the
vehicle, cause an accident and injure your-
self and others.
Do not switch off the engine while driving.
X Move the selector lever to P.
With the key
X Turn the key to position 0 (Y page 74) in
the ignition lock and remove it.
The immobiliser is activated.
With KEYLESS GO*
X Press and hold the KEYLESS GO button
(Y page 74).
The engine stops and all the lamps in the
instrument cluster go out ( Y page 26). Transmission
G
Risk of accident
The movement of the pedals must not be
impaired in any way. Do not keep any
objects in the driver's footwell. Make sure
that there is sufficient clearance around the
pedals when floormats or carpets are used.
Do not change down for additional engine
braking on a slippery road surface. This
could cause the drive wheels to lose their
grip and the vehicle could skid. Automatic transmissionControls
* optional
219_AKB; 2; 4, en-GB
mkalafa,
2007-11-13T09:28:36+01:00 - Seite 104
Page 112 of 329
Instrument cluster
109
When the AMG display is switched on, the
display
colour changes to red and UP appears
next to the gear indicator, instructing you to
shift up.
Downshifting G
Risk of accident
Do not change down for additional engine
braking on a slippery road surface. This
could cause the drive wheels to lose their
grip and the vehicle could skid.
X Briefly press the selector lever to the left
towards D-
or
X Pull the left-hand paddle on the steering
wheel
(Y page 107).
The automatic transmission shifts down to
the next gear.
i For maximum acceleration, pull the left-
hand gearshift paddle until the transmis-
sion selects the optimum gear depending
on the speed. Kickdown
i
It is not possible to use kickdown in the
manual gearshift program M on vehicles
with AMG engines.
You can also use kickdown for maximum
acceleration in manual gearshift program M.
X Depress the accelerator pedal beyond the
pressure point.
The transmission shifts to a lower gear
depending on the engine speed.
i It is not possible to shift gears using the
steering wheel gearshift paddles during
kickdown. Instrument cluster
Points to remember
You
will find a full overview of the instrument
cluster in the "At a glance" section
(Y page 26). G
Risk of accident
No further messages can be displayed if
there is a malfunction in the instrument
cluster and/or the multi-function display.
This
means that you will not see information
about the driving situation, such as the
speed, outside temperature, warning/indi-
cator lamps, display messages or system
failures. The vehicle's handling character-
istics may be affected. Adjust your driving
style and speed accordingly.
Immediately consult a qualified specialist
workshop which has the necessary special-
ist knowledge and tools to carry out the
work required. Mercedes-Benz recom-
mends that you use a Mercedes-Benz
Service Centre for this purpose. In particu-
lar, work relevant to safety or on safety-
related systems must be carried out at a
qualified specialist workshop. Controls
219_AKB; 2; 4, en-GB
mkalafa,
2007-11-13T09:28:36+01:00 - Seite 109
Page 113 of 329
Instrument cluster
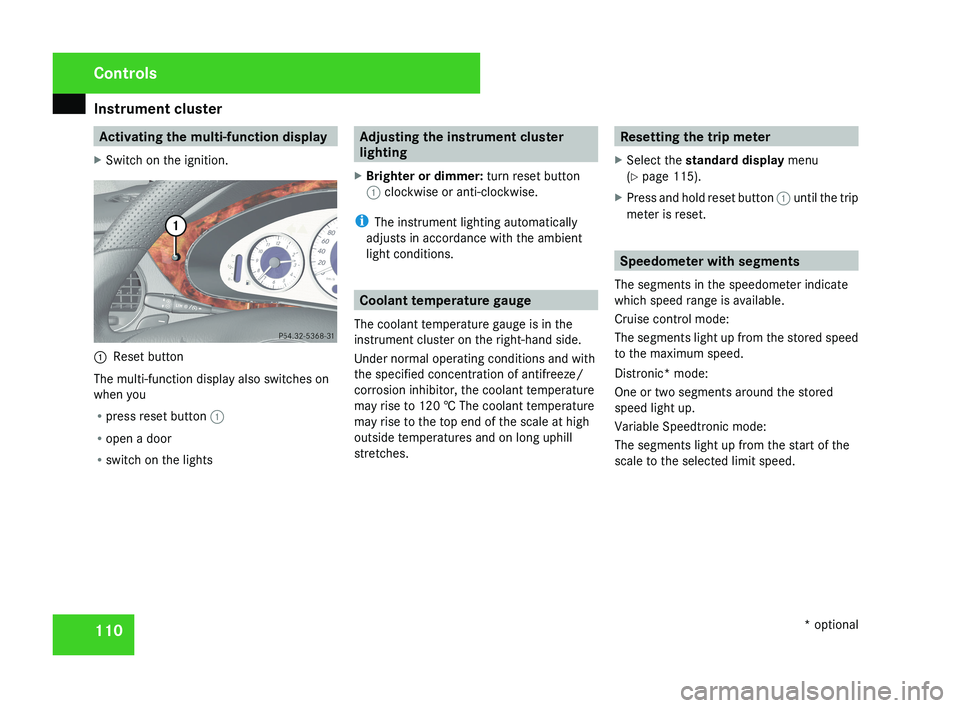
110 Activating the multi-function display
X Switch on the ignition.1 Reset button
The multi-function display also switches on
when you
R press reset button 1
R open a door
R switch on the lights
Adjusting the instrument cluster
lighting
X Brighter or dimmer: turn reset button
1 clockwise or anti-clockwise.
i The instrument lighting automatically
adjusts in accordance with the ambient
light conditions.
Coolant temperature gauge
The coolant temperature gauge is in the
instrument cluster on the right-hand side.
Under normal operating conditions and with
the specified concentration of antifreeze/
corrosion inhibitor, the coolant temperature
may rise to 120 † The coolant temperature
may rise to the top end of the scale at high
outside temperatures and on long uphill
stretches.
Resetting the trip meter
X Select the standard display menu
(Y page 115).
X Press and hold reset button 1 until the trip
meter is reset.
Speedometer with segments
The segments in the speedometer indicate
which speed range is available.
Cruise control mode:
The segments light up from the stored speed
to the maximum speed.
Distronic* mode:
One or two segments around the stored
speed light up.
Variable Speedtronic mode:
The segments light up from the start of the
scale to the selected limit speed.
Controls
* optional
219_AKB; 2; 4, en-GB
mkalafa,
2007-11-13T09:28:36+01:00 - Seite 110
Page 114 of 329
On-board computer
111Rev counter
The red band in the rev counter indicates the
engine's overrevving range. The fuel supply is
interrupted to protect the engine when the
red band is reached.
! Do not drive in the overrevving range.
Doing so will damage the engine. H
Environmental note
Avoid driving at high engine speeds, as this
increases your vehicle's consumption
unnecessarily and pollutes the environ-
ment through increased emissions. Outside temperature display
G
Risk of accident
The road surface may be icy, especially in
wooded areas or on bridges, even if tem-
peratures are just above freezing point. The
vehicle could skid if you fail to adapt your
driving style. You should therefore always
adapt your driving style and speed to suit
the weather conditions.
There is a short delay before a change in out-
side temperature is displayed. On-board computer
Points to remember
The on-board computer is activated as soon
as the key is turned to position 1 in the igni-
tion lock. You can use the on-board computer
to call up information relating to your vehicle
and to make and adjust settings.
You can call up the next service due date,
select the display language for the instrument
cluster and set other functions. G
Risk of accident
Only use the on-board computer when road
and traffic conditions permit. You would
otherwise be distracted and unable to con-
centrate properly on driving, and could
cause an accident.
The on-board computer shows information in
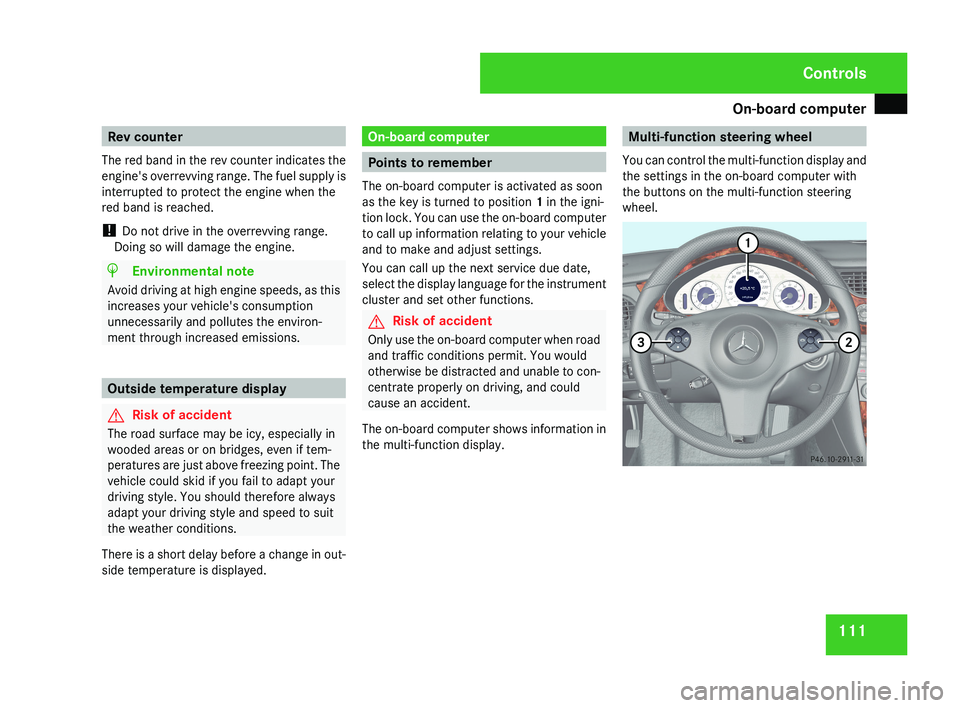
the multi-function display. Multi-function steering wheel
You can control the multi-function display and
the settings in the on-board computer with
the buttons on the multi-function steering
wheel.Controls
219_AKB; 2; 4, en-GB
mkalafa,
2007-11-13T09:28:36+01:00 - Seite 111
Page 121 of 329
On-board computer
118
Resetting the current lap
X
Press the æ button to stop the RACE-
TIMER.
X Press the ç button to reset the lap time
to "0".
Deleting all laps
If you have switched off the engine, the RACE-
TIMER is reset to "0" after 30 seconds. All laps
are deleted.
It is not possible to delete a single stored lap
on its own.
X Press the æ button to stop the RACE-
TIMER.
X Press the reset button on the left of the
instrument cluster twice.
X Press the æ button to start the RACE-
TIMER.
All laps are deleted.
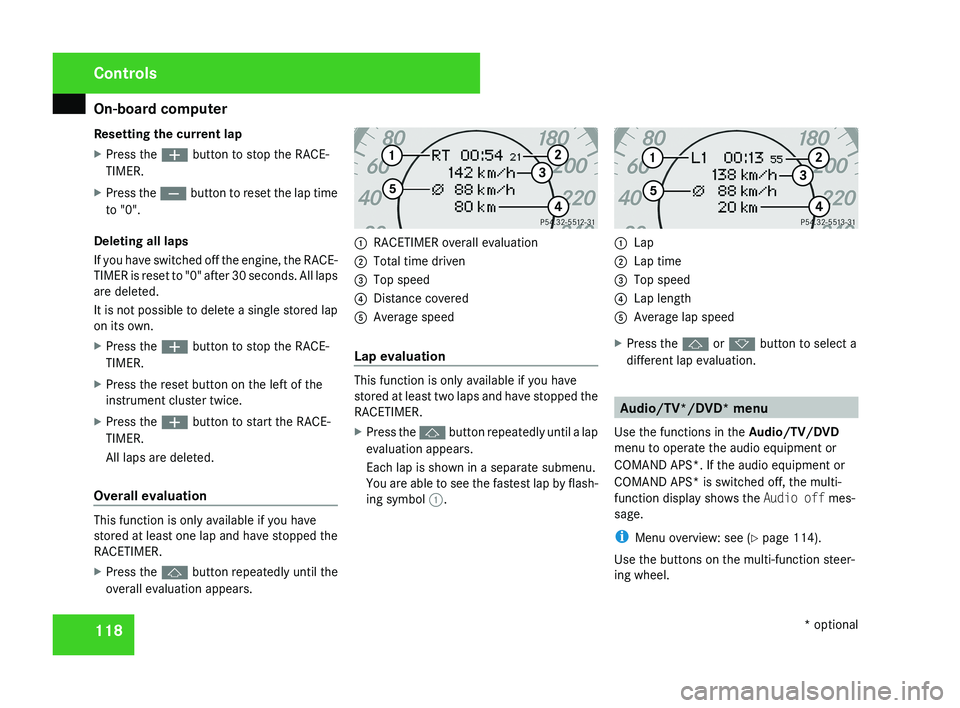
Overall evaluation This function is only available if you have
stored at least one lap and have stopped the
RACETIMER.
X
Press the j button repeatedly until the
overall evaluation appears. 1
RACETIMER overall evaluation
2 Total time driven
3 Top speed
4 Distance covered
5 Average speed
Lap evaluation This function is only available if you have
stored at least two laps and have stopped the
RACETIMER.
X
Press the j button repeatedly until a lap
evaluation appears.
Each lap is shown in a separate submenu.
You are able to see the fastest lap by flash-
ing symbol 1. 1
Lap
2 Lap time
3 Top speed
4 Lap length
5 Average lap speed
X Press the j or k button to select a
different lap evaluation. Audio/TV*/DVD* menu
Use the functions in the Audio/TV/DVD
menu to operate the audio equipment or
COMAND APS*. If the audio equipment or
COMAND APS* is switched off, the multi-
function display shows the Audio off mes-
sage.
i Menu overview: see ( Y page 114).
Use the buttons on the multi-function steer-
ing wheel. Controls
* optional
219_AKB; 2; 4, en-GB
mkalafa,
2007-11-13T09:28:36+01:00 - Seite 118
Page 124 of 329
On-board computer
121Distronic* menu
You can read the current Distronic settings in
the Distronic menu. (Y page 135)
i Menu overview: see ( Y page 114).Message memory menu
Previous display messages can be called up
in
the Message memory menu. You will only
see the Message memory menu if there are
any display messages. G
Risk of accident
The on-board computer only records and
displays messages and warnings from cer-
tain systems. For this reason, you should
always make sure that your vehicle is safe
to
drive. You could otherwise cause an acci-
dent by driving an unsafe vehicle.
Switching off the ignition clears the Message
memory except for the highest priority dis-
play messages. The on-board computer will
delete these display messages only after the
reason for the message has been rectified.
i Menu overview: see ( Y page 114). Displaying messages Use the buttons on the multi-function steer-
ing wheel.
X
Press the è or · button repeatedly
until either the original menu or the Mes-
sage memory menu appears.
If the Message memory menu does not
appear, there are no display messages.
If there are messages, the following mes-
sage may appear in the multi-function dis-
play, for example: 2 messages.
X Press the j or k
button to call up a
display message.
You can scroll through the display mes-
sages in sequence. The possible display
messages are explained in the "Practical
advice" section ( Y page 219). Settings menu
There are two functions in the Settings...
menu:
the To reset: Press reset button
for 3 seconds function, which you can use
to reset most settings to the factory settings.
There are also submenus in which you can
make individual settings for your vehicle.
i Menu overview: see ( Y page 114).
Use the buttons on the multi-function steer-
ing wheel.
Resetting to factory settings For safety reasons, not all functions are reset:
permanent
Speedtronic can only be set in the
Vehicle menu. The Headlamp mode function
in the Lighting submenu is only reset if the
vehicle is stationary.
X Press the è
or · button to select the
Settings... menu.
X Press and hold the reset button on the left-
hand side of the instrument cluster for
approximately three seconds.
A
prompt appears in the multi-function dis-
play asking you to press the reset button
again to confirm. Controls
* optional
219_AKB; 2; 4, en-GB
mkalafa,
2007-11-13T09:28:36+01:00 - Seite 121 Z