2008 MERCEDES-BENZ CLS COUPE warning light
[x] Cancel search: warning lightPage 55 of 329
Occupant safety
52 inflated, the child could be seriously or even
fatally injured.
Proceed as follows:
R
Do not use a rearward-facing child
restraint system on the front-passenger
seat.
R Fit a rearward-facing child restraint sys-
tem on a suitable rear seat.
or
R Only use a forward-facing child seat on
the front-passenger seat and move the
front-passenger seat to its rearmost
position.
R Have the automatic child seat recogni-
tion checked at a qualified specialist
workshop. To ensure that the automatic child seat rec-
ognition on the front-passenger seat func-
tions correctly, never place objects (such
as a cushion) under the child restraint sys-
tem. The entire base of the child restraint
system
must always be resting on the seat
cushion. An incorrectly fitted child restraint
system cannot perform its intended pro-
tective function in the event of an accident,
and could even lead to injuries.
i The windowbag, the sidebag and the belt
tensioner on the front-passenger side are
still active even if the front-passenger front
airbag is disabled. G
Risk of injury
Do not place items of electronic equipment
on the front-passenger seat, e.g.:
R laptops, if switched on
R mobile phones
R cards with transponders, e.g. ski passes
or access passes
Signals from electronic equipment can
cause interference in the automatic child
seat recognition sensor system. This can
lead to a system malfunction. This may
cause the 5 PASSENGER AIRBAG OFF
warning lamp to light up without there
being
a child seat with automatic child seat
recognition fitted. This means the front-
passenger airbag is not deployed during an
accident. It is also possible that the
5 PASSENGER AIRBAG OFF warning
lamp will not light up if you turn the key in
the ignition lock to position 2.Safety
219_AKB; 2; 4, en-GB
mkalafa,
2007-11-13T09:28:36+01:00 - Seite 52
Page 61 of 329
Driving safety systems
58
If ABS intervenes:
X
Continue to depress the brake pedal with
force until the braking situation is over.
For full braking application:
X Depress the brake pedal with maximum
force. G
Risk of accident
If ABS is faulty, the wheels could lock when
braking. This limits the steerability of the
vehicle when braking and the braking dis-
tance may increase.
If ABS is deactivated due to a malfunction,
then
BAS and ESP are also deactivated. The
risk of your vehicle skidding is then
increased in certain situations.
You should therefore always adapt your
driving style to suit the prevailing road and
weather conditions. BAS (Brake Assist)
BAS operates in emergency braking situa-
tions.
If you depress the brake pedal quickly,
BAS automatically boosts the braking force,
thus shortening the stopping distance.
X Keep the brake pedal firmly depressed until
the emergency braking situation is over.
ABS prevents the wheels from locking.
The brakes will function as usual once you
release the brake pedal. BAS is deactivated. G
Risk of accident
If BAS has malfunctioned, the braking sys-
tem
remains available with full brake boost-
ing effect. However, braking force is not
automatically increased in emergency
braking situations and the stopping dis-
tance may increase. Adaptive brake lamps
i Adaptive
brake lamps are only available in
certain countries.
If you brake sharply from a speed of more
than 50 km/h or if braking is assisted by BAS,
the brake lamps flash rapidly. In this way,
traffic travelling behind you is warned in an
even more noticeable manner.
If you brake from a speed of more than
70 km/h and bring the vehicle to a halt, the
hazard warning lamps switch on automati-
cally once the vehicle is stationary and the
brake lamps light up constantly if you depress
the brake pedal again. The hazard warning
lamps switch off automatically if you travel
faster than 10 km/h again. Safety
219_AKB; 2; 4, en-GB
mkalafa,
2007-11-13T09:28:36+01:00 - Seite 58
Page 63 of 329
Driving safety systems
601
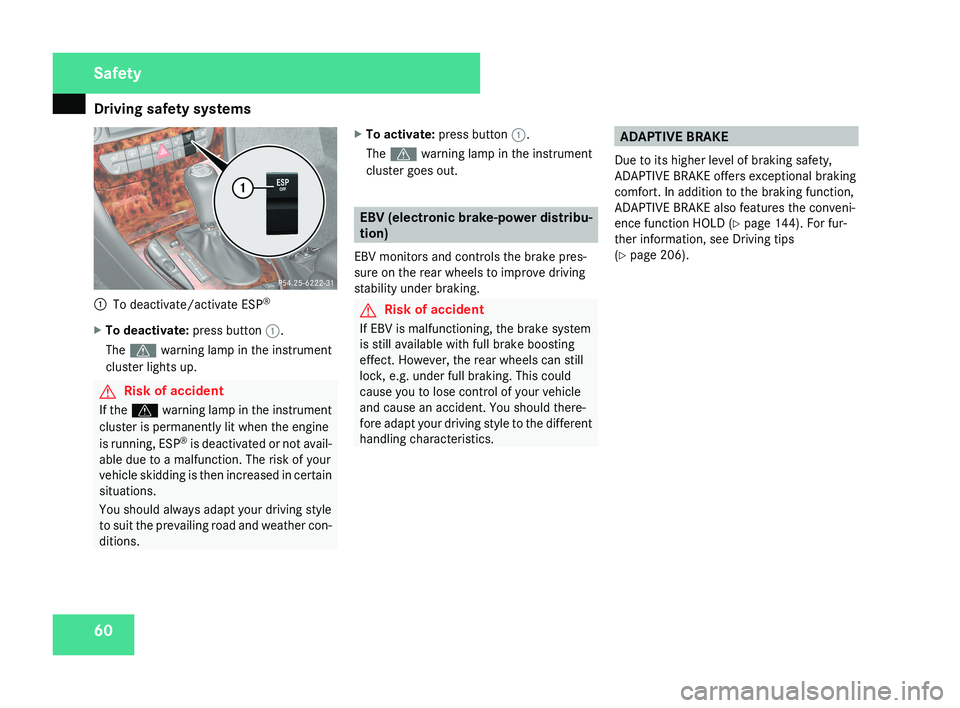
To deactivate/activate ESP ®
X To deactivate: press button 1.
The v warning lamp in the instrument
cluster lights up.
G Risk of accident
If the v warning lamp in the instrument
cluster is permanently lit when the engine
is running, ESP ®
is deactivated or not avail-
able due to a malfunction. The risk of your
vehicle skidding is then increased in certain
situations.
You should always adapt your driving style
to suit the prevailing road and weather con-
ditions. X
To activate: press button 1.
The v warning lamp in the instrument
cluster goes out.
EBV (electronic brake-power distribu-
tion)
EBV monitors and controls the brake pres-
sure on the rear wheels to improve driving
stability under braking.
G Risk of accident
If EBV is malfunctioning, the brake system
is still available with full brake boosting
effect. However, the rear wheels can still
lock, e.g. under full braking. This could
cause you to lose control of your vehicle
and cause an accident. You should there-
fore adapt your driving style to the different
handling characteristics.
ADAPTIVE BRAKE
Due to its higher level of braking safety,
ADAPTIVE BRAKE offers exceptional braking
comfort. In addition to the braking function,
ADAPTIVE BRAKE also features the conveni-
ence function HOLD (Y page 144). For fur-
ther information, see Driving tips
(Y page 206).
Safety
219_AKB; 2; 4, en-GB
mkalafa,
2007-11-13T09:28:36+01:00 - Seite 60
Page 92 of 329
Seat belts
89For this reason, check regularly that the
seat belts are not damaged or dirty.
Always have damaged seat belts or seat
belts that have been subjected to a load in
an accident replaced at a qualified special-
ist workshop. Choose a qualified specialist
workshop which has the necessary special-
ist knowledge and tools for the work
required. Mercedes-Benz recommends
that you use a Mercedes-Benz Service
Centre for this purpose.
For safety reasons, Mercedes-Benz recom-
mends that you only use seat belts which
have been approved by Mercedes-Benz for
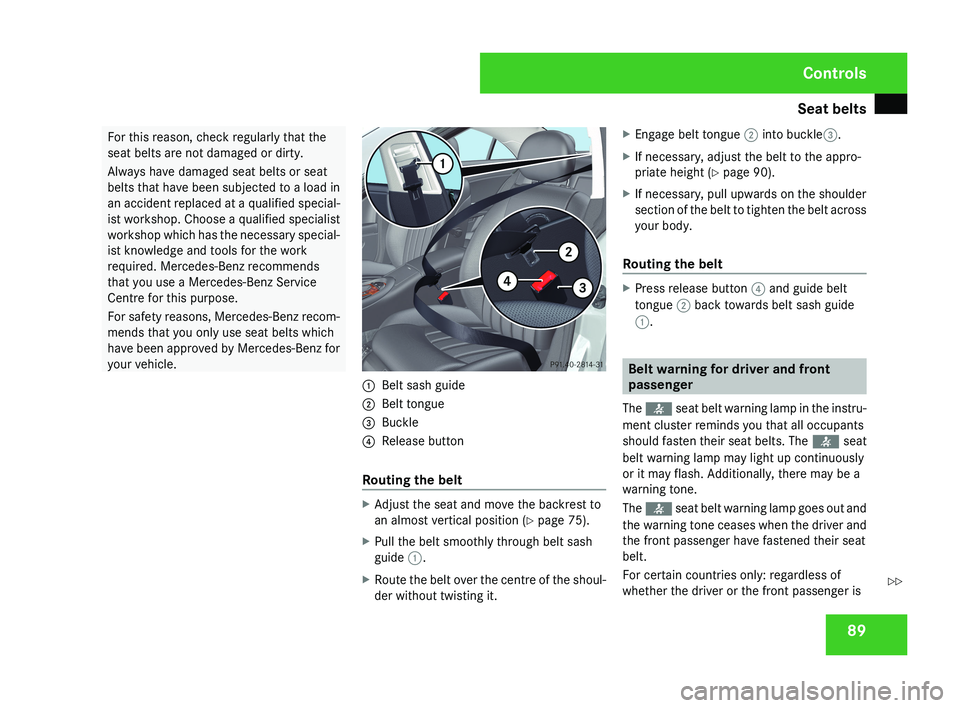
your vehicle.1
Belt sash guide
2 Belt tongue
3 Buckle
4 Release button
Routing the belt
X Adjust the seat and move the backrest to
an almost vertical position ( Y page 75).
X Pull the belt smoothly through belt sash
guide 1.
X Route the belt over the centre of the shoul-
der without twisting it. X
Engage belt tongue 2 into buckle3.
X If necessary, adjust the belt to the appro-
priate height ( Y page 90).
X If necessary, pull upwards on the shoulder
section of the belt to tighten the belt across
your body.
Routing the belt
X Press release button 4 and guide belt
tongue 2 back towards belt sash guide
1.
Belt warning for driver and front
passenger
The < seat belt warning lamp in the instru-
ment cluster reminds you that all occupants
should fasten their seat belts. The < seat
belt warning lamp may light up continuously
or it may flash. Additionally, there may be a
warning tone.
The < seat belt warning lamp goes out and
the warning tone ceases when the driver and
the front passenger have fastened their seat
belt.
For certain countries only: regardless of
whether the driver or the front passenger is
Controls
219_AKB; 2; 4, en-GB
mkalafa,
2007-11-13T09:28:36+01:00 - Seite 89
Z
Page 93 of 329
Seat belts
90
already secured, the
< seat belt warning
lamp lights up for six seconds after the engine
has been started. The < seat belt warning
lamp then goes out if both the driver and the
front passenger have fastened their seat belt.
i Further information about the < seat
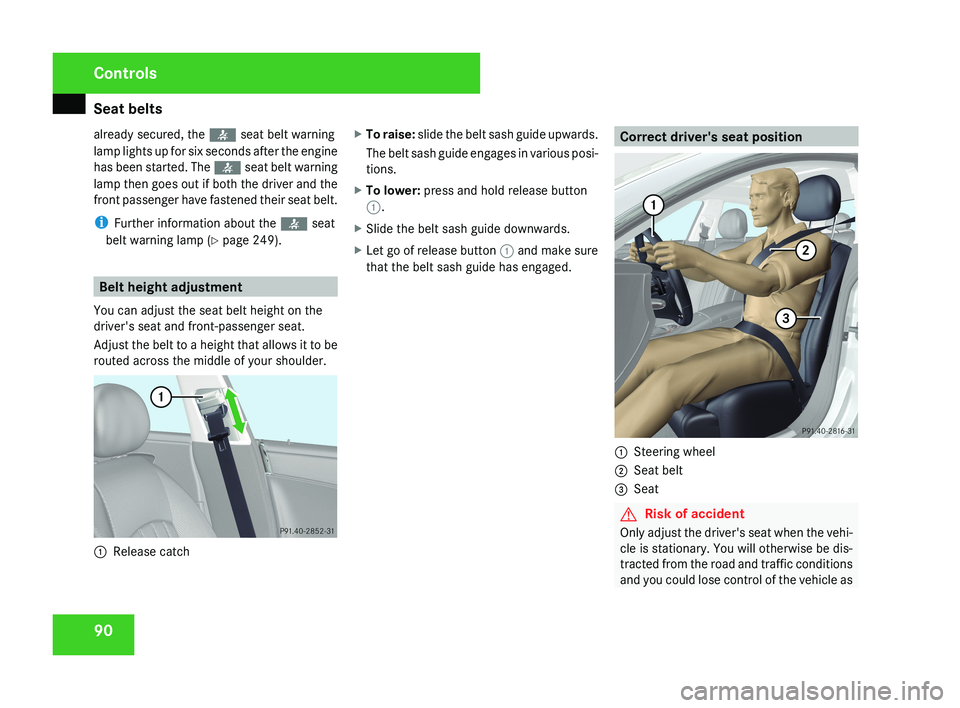
belt warning lamp (Y page 249). Belt height adjustment
You can adjust the seat belt height on the
driver's seat and front-passenger seat.
Adjust the belt to a height that allows it to be
routed across the middle of your shoulder.1 Release catch X
To raise: slide the belt sash guide upwards.
The belt sash guide engages in various posi-
tions.
X To lower: press and hold release button
1.
X Slide the belt sash guide downwards.
X Let go of release button 1 and make sure
that the belt sash guide has engaged.
Correct driver's seat position
1 Steering wheel
2 Seat belt
3 Seat
G Risk of accident
Only adjust the driver's seat when the vehi-
cle is stationary. You will otherwise be dis-
tracted from the road and traffic conditions
and you could lose control of the vehicle as
Controls
219_AKB; 2; 4, en-GB
mkalafa,
2007-11-13T09:28:36+01:00 - Seite 90
Page 97 of 329
Lights
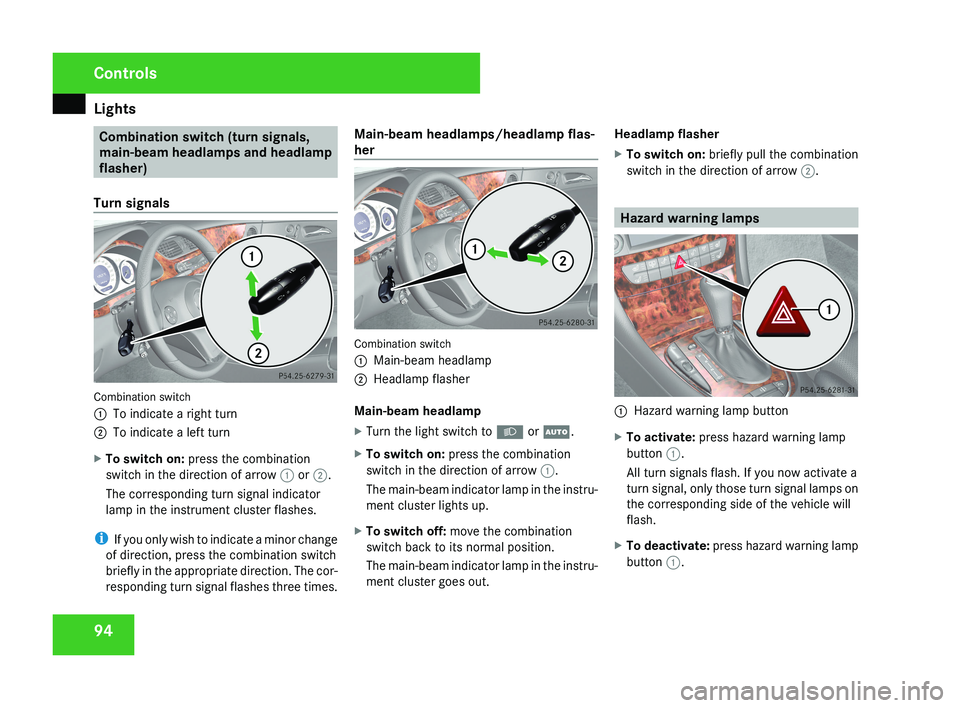
94 Combination switch (turn signals,
main-beam headlamps and headlamp
flasher)
Turn signals Combination switch
1
To indicate a right turn
2 To indicate a left turn
X To switch on: press the combination
switch in the direction of arrow 1 or 2.
The corresponding turn signal indicator
lamp in the instrument cluster flashes.
i If you only wish to indicate a minor change
of direction, press the combination switch
briefly in the appropriate direction. The cor-
responding turn signal flashes three times. Main-beam headlamps/headlamp flas-
her
Combination switch
1
Main-beam headlamp
2 Headlamp flasher
Main-beam headlamp
X Turn the light switch to B or U.
X To switch on: press the combination
switch in the direction of arrow 1.
The main-beam indicator lamp in the instru-
ment cluster lights up.
X To switch off: move the combination
switch back to its normal position.
The main-beam indicator lamp in the instru-
ment cluster goes out. Headlamp flasher
X
To switch on: briefly pull the combination
switch in the direction of arrow 2. Hazard warning lamps
1
Hazard warning lamp button
X To activate: press hazard warning lamp
button 1.
All turn signals flash. If you now activate a
turn signal, only those turn signal lamps on
the corresponding side of the vehicle will
flash.
X To deactivate: press hazard warning lamp
button 1. Controls
219_AKB; 2; 4, en-GB
mkalafa,
2007-11-13T09:28:36+01:00 - Seite 94
Page 118 of 329
On-board computer
115Function
1 Basic display menu (Y page 115)
R
Digital speedometer 12
(Y page 116)
R Outside tempera-
ture 12
(Y page 116)
R ASSYST PLUS service display
(Y page 209)
R Tyre pressure loss warning system
(Y page 201) or tyre pressure mon-
itor* (Y page 202) 2
AMG* menu (Y page 116)
3
Audio/TV*/DVD*
(Y page 118)
menu
R Radio station ( Y page 119)
R Audio drive or media ( Y page 119)
R TV* (Y page 119)
R DVD video* (Y page 120) 4
Navigation* menu (Y page 120) Function
5
Distronic
* menu (distance display)
(Y page 135) 6
Message memory menu
13
(fault and
warning messages) ( Y page 121) 7 Settings menu (Y page 121)
R
Resetting to factory settings
(Y page 121)
R Selecting a submenu ( Y page 122) 8 Trip computer
menu
R Consumption statistics
(Y page 130)
R Range ( Y page 130) 9
Telephone*
menu (Y page 130) This is what the displays look like when you
scroll through the menus.
The generic terms in the table overview are
intended to help you navigate through the
menus. The terms themselves are not always
displayed in the multi-function display.The Audio
, Navi* and Tel* menus are dis-
played slightly differently in vehicles with
audio equipment and vehicles with COMAND
APS*. The examples given in this Owner's
Manual apply to vehicles equipped with
COMAND APS*. Standard display menu
i Menu overview: see ( Y page 114).
Use the buttons on the multi-function steer-
ing wheel.
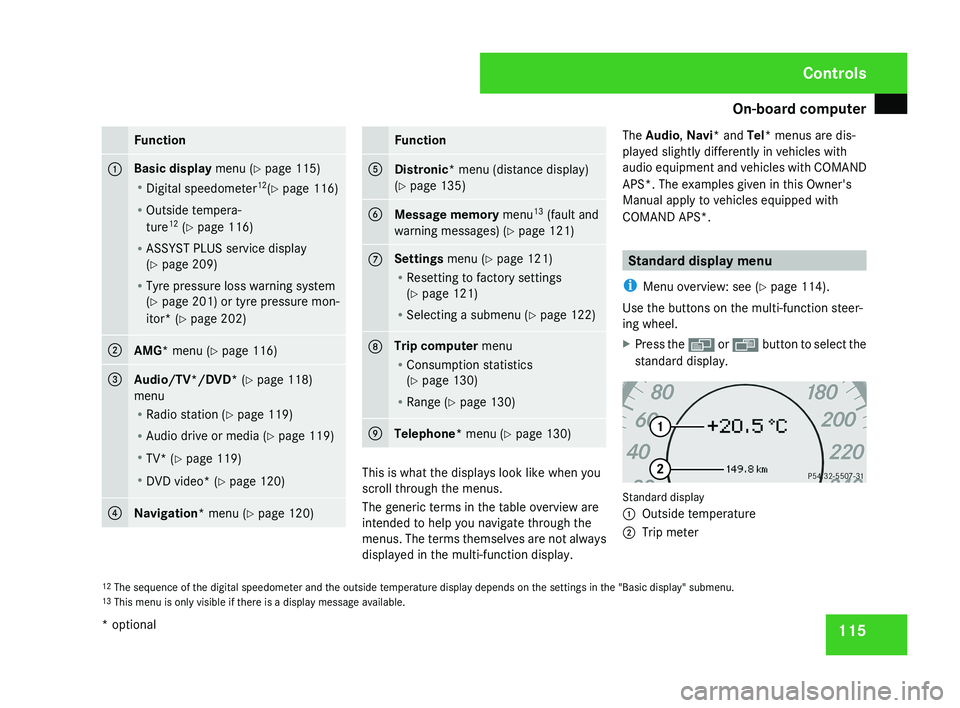
X Press the è or · button to select the
standard display. Standard display
1
Outside temperature
2 Trip meter
12 The sequence of the digital speedometer and the outside temperature display depends on the settings in the "Basic display" submenu.
13 This menu is only visible if there is a display message available. Controls
* optional
219_AKB; 2; 4, en-GB
mkalafa,
2007-11-13T09:28:36+01:00 - Seite 115
Page 124 of 329
On-board computer
121Distronic* menu
You can read the current Distronic settings in
the Distronic menu. (Y page 135)
i Menu overview: see ( Y page 114).Message memory menu
Previous display messages can be called up
in
the Message memory menu. You will only
see the Message memory menu if there are
any display messages. G
Risk of accident
The on-board computer only records and
displays messages and warnings from cer-
tain systems. For this reason, you should
always make sure that your vehicle is safe
to
drive. You could otherwise cause an acci-
dent by driving an unsafe vehicle.
Switching off the ignition clears the Message
memory except for the highest priority dis-
play messages. The on-board computer will
delete these display messages only after the
reason for the message has been rectified.
i Menu overview: see ( Y page 114). Displaying messages Use the buttons on the multi-function steer-
ing wheel.
X
Press the è or · button repeatedly
until either the original menu or the Mes-
sage memory menu appears.
If the Message memory menu does not
appear, there are no display messages.
If there are messages, the following mes-
sage may appear in the multi-function dis-
play, for example: 2 messages.
X Press the j or k
button to call up a
display message.
You can scroll through the display mes-
sages in sequence. The possible display
messages are explained in the "Practical
advice" section ( Y page 219). Settings menu
There are two functions in the Settings...
menu:
the To reset: Press reset button
for 3 seconds function, which you can use
to reset most settings to the factory settings.
There are also submenus in which you can
make individual settings for your vehicle.
i Menu overview: see ( Y page 114).
Use the buttons on the multi-function steer-
ing wheel.
Resetting to factory settings For safety reasons, not all functions are reset:
permanent
Speedtronic can only be set in the
Vehicle menu. The Headlamp mode function
in the Lighting submenu is only reset if the
vehicle is stationary.
X Press the è
or · button to select the
Settings... menu.
X Press and hold the reset button on the left-
hand side of the instrument cluster for
approximately three seconds.
A
prompt appears in the multi-function dis-
play asking you to press the reset button
again to confirm. Controls
* optional
219_AKB; 2; 4, en-GB
mkalafa,
2007-11-13T09:28:36+01:00 - Seite 121 Z