Page 177 of 329
Loading and stowing
174 Skibag*
G
Risk of injury
The skibag is designed to carry up to four
pairs of skis. Do not use the skibag to carry
any other type of load.
The skibag must always be secured when
laden. Otherwise, injuries could be caused
by it in the event of an accident.
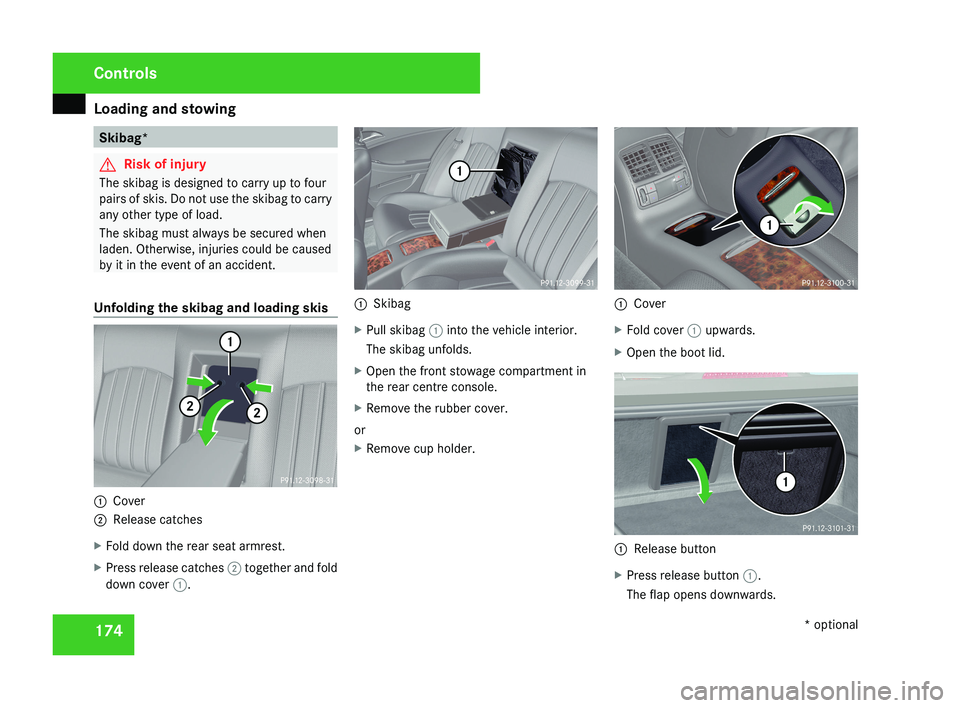
Unfolding the skibag and loading skis 1
Cover
2 Release catches
X Fold down the rear seat armrest.
X Press release catches 2 together and fold
down cover 1. 1
Skibag
X Pull skibag 1 into the vehicle interior.
The skibag unfolds.
X Open the front stowage compartment in
the rear centre console.
X Remove the rubber cover.
or
X Remove cup holder. 1
Cover
X Fold cover 1 upwards.
X Open the boot lid. 1
Release button
X Press release button 1.
The flap opens downwards. Controls
* optional
219_AKB; 2; 4, en-GB
mkalafa,
2007-11-13T09:28:36+01:00 - Seite 174
Page 178 of 329
Loading and stowing
175Skibag
X
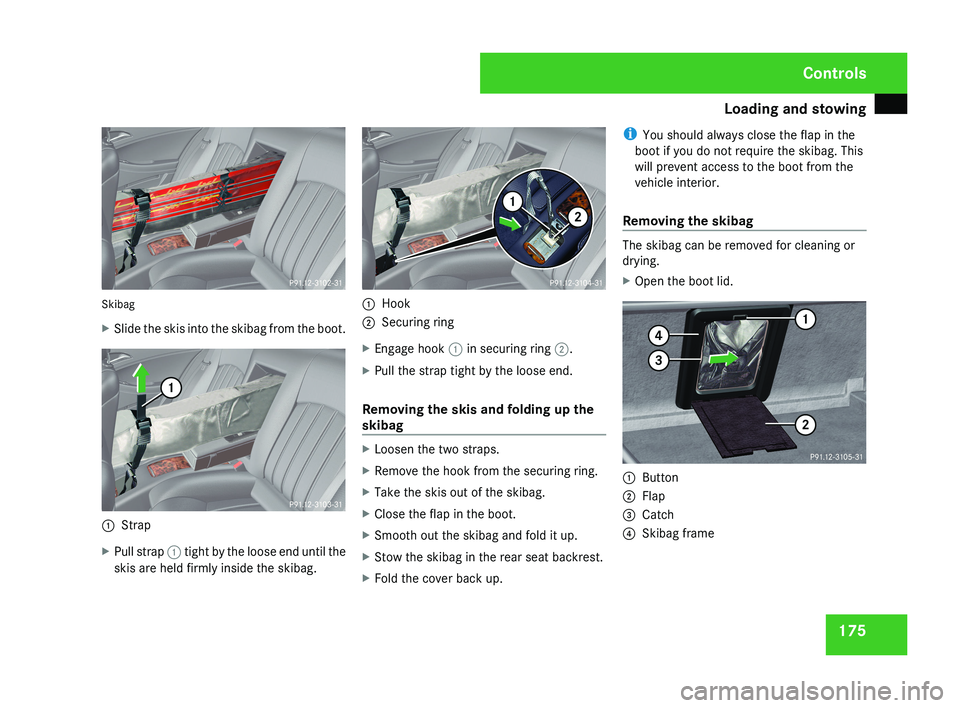
Slide the skis into the skibag from the boot.
1 Strap
X Pull strap 1 tight by the loose end until the
skis are held firmly inside the skibag.
1 Hook
2 Securing ring
X Engage hook 1 in securing ring 2.
X Pull the strap tight by the loose end.
Removing the skis and folding up the
skibag
X Loosen the two straps.
X Remove the hook from the securing ring.
X Take the skis out of the skibag.
X Close the flap in the boot.
X Smooth out the skibag and fold it up.
X Stow the skibag in the rear seat backrest.
X Fold the cover back up. i
You should always close the flap in the
boot if you do not require the skibag. This
will prevent access to the boot from the
vehicle interior.
Removing the skibag
The skibag can be removed for cleaning or
drying.
X Open the boot lid.
1 Button
2 Flap
3 Catch
4 Skibag frame
Controls
219_AKB; 2; 4, en-GB
mkalafa,
2007-11-13T09:28:36+01:00 - Seite 175
Page 179 of 329

Loading and stowing
176
X
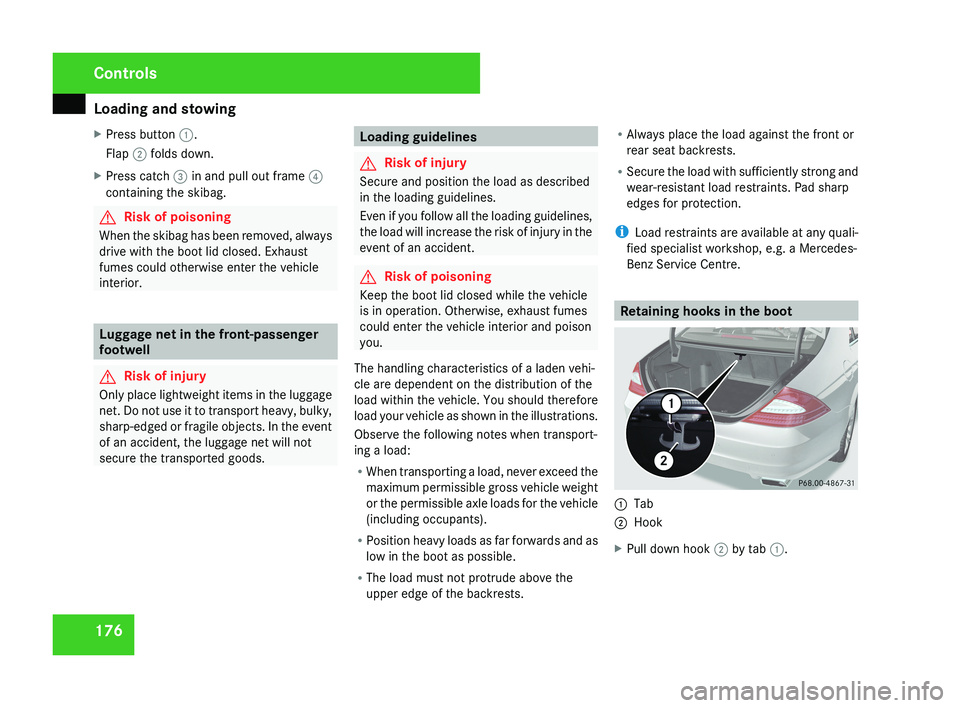
Press button 1.
Flap 2 folds down.
X Press catch 3 in and pull out frame 4
containing the skibag. G
Risk of poisoning
When the skibag has been removed, always
drive with the boot lid closed. Exhaust
fumes could otherwise enter the vehicle
interior. Luggage net in the front-passenger
footwell
G
Risk of injury
Only place lightweight items in the luggage
net. Do not use it to transport heavy, bulky,
sharp-edged or fragile objects. In the event
of an accident, the luggage net will not
secure the transported goods. Loading guidelines
G
Risk of injury
Secure and position the load as described
in the loading guidelines.
Even if you follow all the loading guidelines,
the load will increase the risk of injury in the
event of an accident. G
Risk of poisoning
Keep the boot lid closed while the vehicle
is in operation. Otherwise, exhaust fumes
could enter the vehicle interior and poison
you.
The handling characteristics of a laden vehi-
cle are dependent on the distribution of the
load within the vehicle. You should therefore
load your vehicle as shown in the illustrations.
Observe the following notes when transport-
ing a load:
R When transporting a load, never exceed the
maximum permissible gross vehicle weight
or the permissible axle loads for the vehicle
(including occupants).
R Position heavy loads as far forwards and as
low in the boot as possible.
R The load must not protrude above the
upper edge of the backrests. R
Always place the load against the front or
rear seat backrests.
R Secure the load with sufficiently strong and
wear-resistant load restraints. Pad sharp
edges for protection.
i Load restraints are available at any quali-
fied specialist workshop, e.g. a Mercedes-
Benz Service Centre. Retaining hooks in the boot1
Tab
2 Hook
X Pull down hook 2 by tab 1.
Controls
219_AKB; 2; 4, en-GB
mkalafa,
2007-11-13T09:28:36+01:00 - Seite 176
Page 180 of 329

Loading and stowing
177Stowage compartments
G
Risk of injury
The stowage compartments must be closed
when items are stored in them. Luggage
nets are not designed to secure heavy
items of luggage.
You or other vehicle occupants could be
injured by objects being thrown around if
you:
R brake sharply
R change direction suddenly
R have an accident
Sharp-edged and fragile objects must not
be carried in the luggage net.
Do not carry hard objects in the ruffled
pockets. Objects must not protrude over
the top of the ruffled pockets.
i You will find an overview of the stowage
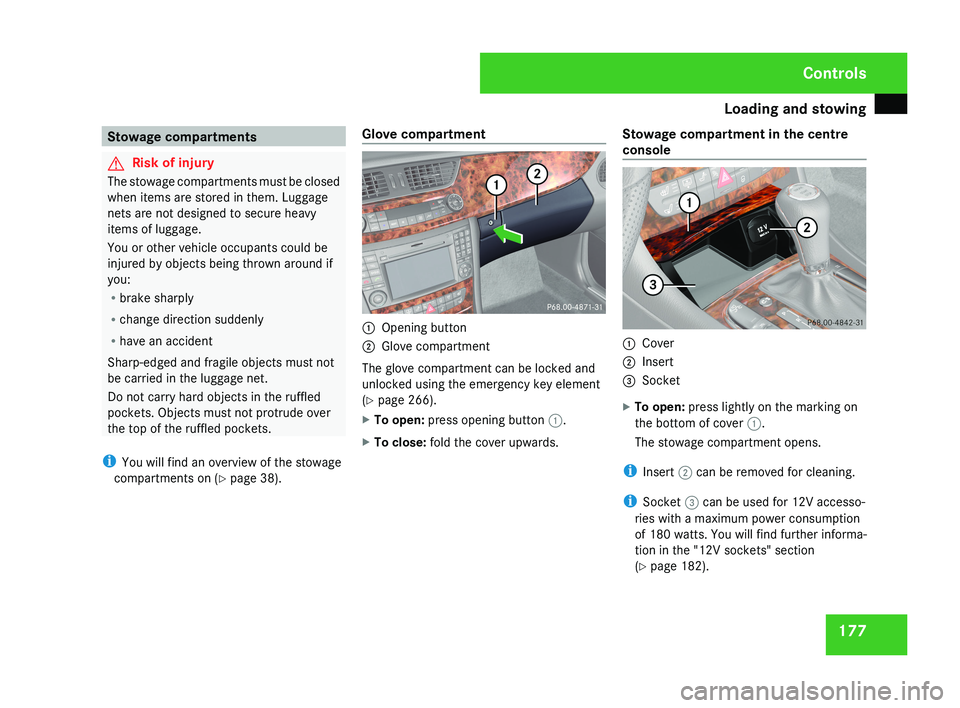
compartments on (Y page 38). Glove compartment 1
Opening button
2 Glove compartment
The glove compartment can be locked and
unlocked using the emergency key element
(Y page 266).
X To open: press opening button 1.
X To close: fold the cover upwards. Stowage compartment in the centre
console 1
Cover
2 Insert
3 Socket
X To open: press lightly on the marking on
the bottom of cover 1.
The stowage compartment opens.
i Insert 2 can be removed for cleaning.
i Socket 3 can be used for 12V accesso-
ries with a maximum power consumption
of 180 watts. You will find further informa-
tion in the "12V sockets" section
(Y page 182). Controls
219_AKB; 2; 4, en-GB
mkalafa,
2007-11-13T09:28:36+01:00 - Seite 177
Page 181 of 329
Loading and stowing
178
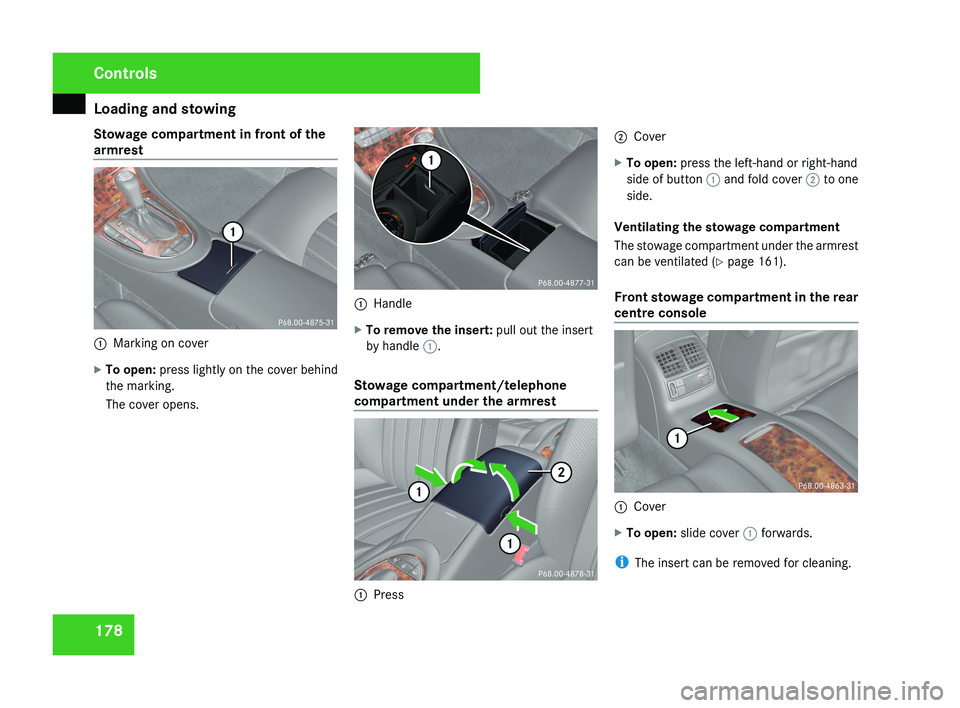
Stowage compartment in front of the
armrest
1
Marking on cover
X To open: press lightly on the cover behind
the marking.
The cover opens. 1
Handle
X To remove the insert: pull out the insert
by handle 1.
Stowage compartment/telephone
compartment under the armrest 1
Press 2
Cover
X To open: press the left-hand or right-hand
side of button 1 and fold cover 2 to one
side.
Ventilating the stowage compartment
The stowage compartment under the armrest
can be ventilated (Y page 161).
Front stowage compartment in the rear
centre console 1
Cover
X To open: slide cover 1 forwards.
i The insert can be removed for cleaning. Controls
219_AKB; 2; 4, en-GB
mkalafa,
2007-11-13T09:28:36+01:00 - Seite 178
Page 182 of 329
Loading and stowing
179
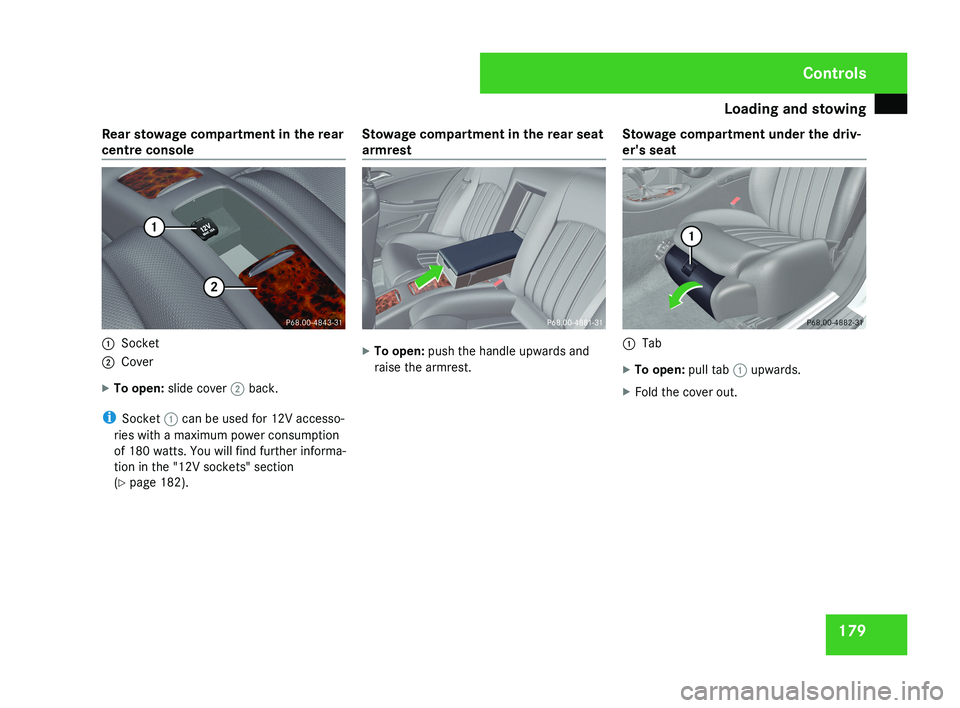
Rear stowage compartment in the rear
centre console
1
Socket
2 Cover
X To open: slide cover 2 back.
i Socket 1 can be used for 12V accesso-
ries with a maximum power consumption
of 180 watts. You will find further informa-
tion in the "12V sockets" section
(Y page 182). Stowage compartment in the rear seat
armrest X
To open: push the handle upwards and
raise the armrest. Stowage compartment under the driv-
er's seat 1
Tab
X To open: pull tab 1 upwards.
X Fold the cover out. Controls
219_AKB; 2; 4, en-GB
mkalafa,
2007-11-13T09:28:36+01:00 - Seite 179
Page 183 of 329

Features
180 Features
Sun visors
G
Risk of accident
Keep the mirrors in the sun visors covered
while driving. You could otherwise be daz-
zled by bright lights, impairing your view of
traffic conditions. As a result you could
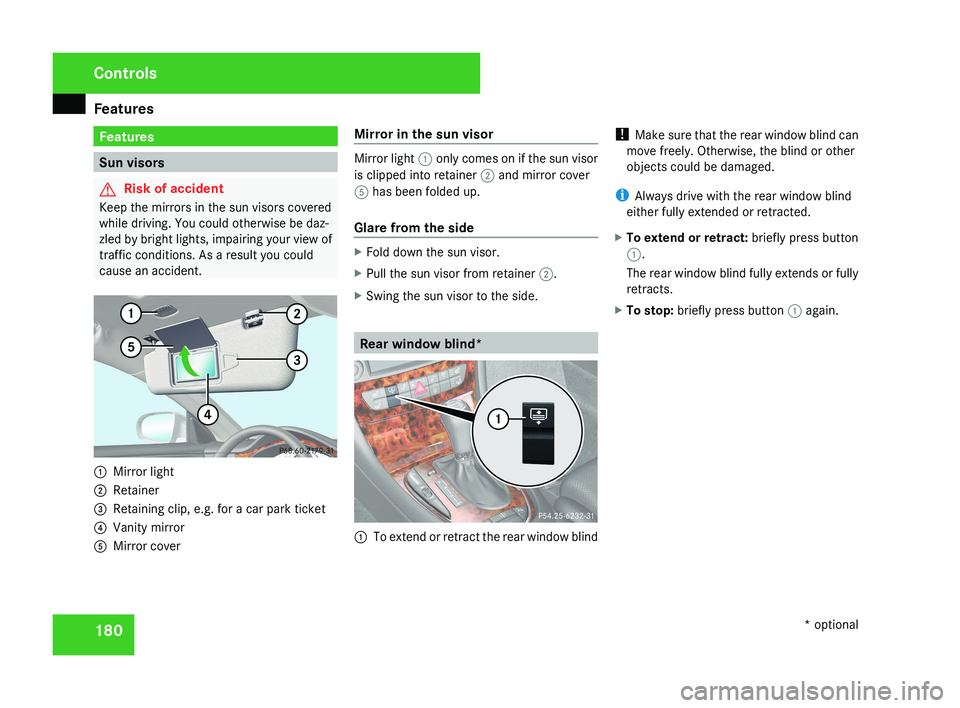
cause an accident.1 Mirror light
2 Retainer
3 Retaining clip, e.g. for a car park ticket
4 Vanity mirror
5 Mirror cover Mirror in the sun visor
Mirror light
1 only comes on if the sun visor
is clipped into retainer 2 and mirror cover
5 has been folded up.
Glare from the side
X Fold down the sun visor.
X Pull the sun visor from retainer 2.
X Swing the sun visor to the side.
Rear window blind*
1 To extend or retract the rear window blind !
Make sure that the rear window blind can
move freely. Otherwise, the blind or other
objects could be damaged.
i Always drive with the rear window blind
either fully extended or retracted.
X To extend or retract: briefly press button
1.
The rear window blind fully extends or fully
retracts.
X To stop: briefly press button 1 again.
Controls
* optional
219_AKB; 2; 4, en-GB
mkalafa,
2007-11-13T09:28:36+01:00 - Seite 180
Page 184 of 329

Features
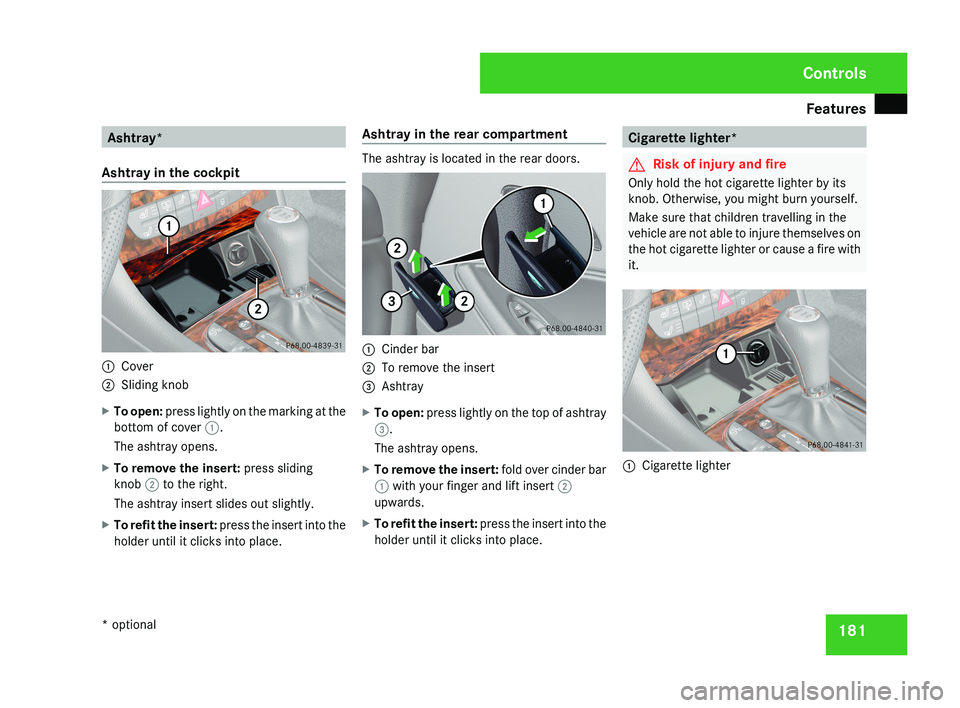
181Ashtray*
Ashtray in the cockpit 1
Cover
2 Sliding knob
X To open: press lightly on the marking at the
bottom of cover 1.
The ashtray opens.
X To remove the insert: press sliding
knob 2 to the right.
The ashtray insert slides out slightly.
X To refit the insert: press the insert into the
holder until it clicks into place. Ashtray in the rear compartment The ashtray is located in the rear doors.
1
Cinder bar
2 To remove the insert
3 Ashtray
X To open: press lightly on the top of ashtray
3.
The ashtray opens.
X To remove the insert: fold over cinder bar
1 with your finger and lift insert 2
upwards.
X To refit the insert: press the insert into the
holder until it clicks into place. Cigarette lighter*
G
Risk of injury and fire
Only hold the hot cigarette lighter by its
knob. Otherwise, you might burn yourself.
Make sure that children travelling in the
vehicle are not able to injure themselves on
the hot cigarette lighter or cause a fire with
it. 1
Cigarette lighter Controls
* optional
219_AKB; 2; 4, en-GB
mkalafa,
2007-11-13T09:28:36+01:00 - Seite 181