2008 MERCEDES-BENZ CLS COUPE stop start
[x] Cancel search: stop startPage 86 of 329
Mirrors
83Easy-entry/exit feature*
The Easy-entry/exit feature makes getting in
and out of your vehicle easier.
The steering wheel swings upwards when
you:
R remove the key from the ignition lock
R open the driver's door when the key is in
the ignition lock or in position 1
The steering wheel is moved automatically to
the position previously set when the key is
inserted into the ignition lock with the driver's
door closed. G
Risk of injury
Make sure that nobody can become trap-
ped when you activate the easy-entry/exit
feature.
If there is a risk of becoming trapped, stop
the adjustment procedure. To halt the pro-
cedure:
R press the steering-column adjustment
switch
R press one of the memory function posi-
tion buttons
The steering column stops moving immedi-
ately. Never leave children unsupervised in the
vehicle. They could open the driver's door
and thereby unintentionally activate the
easy-entry feature and become trapped.
The most recent position of the steering
wheel is stored when you switch off the igni-
tion or when you store a memory position
(Y page 86).
You can activate and deactivate the Easy-
entry/exit feature via the on-board computer
(Y page 128). Mirrors
Before starting off, adjust the mirrors in such
a way that you can get a good overview of
road and traffic conditions. Rear-view mirror
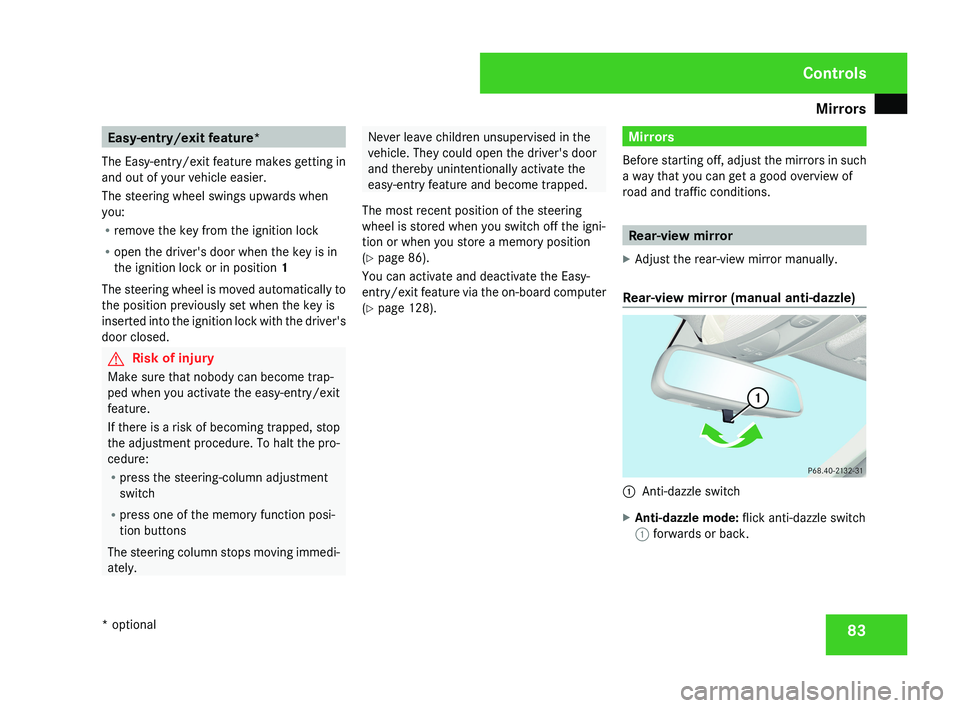
X Adjust the rear-view mirror manually.
Rear-view mirror (manual anti-dazzle) 1
Anti-dazzle switch
X Anti-dazzle mode: flick anti-dazzle switch
1 forwards or back. Controls
* optional
219_AKB; 2; 4, en-GB
mkalafa,
2007-11-13T09:28:36+01:00 - Seite 83
Page 96 of 329
Lights
93The automatic headlamp feature is only an
aid.
The driver is responsible for the vehicle
lighting at all times. G
Risk of accident
When it is dark or foggy, turn the light
switch quickly from U to B. You
could otherwise cause an accident if the
headlamps were to switch off temporarily.
X To switch on: turn the light switch to
U.
The side lamps are switched on and off
automatically when the key is in position
1 in the ignition lock.
The dipped-beam headlamps, side lamps
and licence plate lighting are switched on
automatically when the engine is running.
When the dipped-beam headlamps are
switched
on, the indicator lamp next to the
light switch and the green dipped-beam
indicator lamp in the instrument cluster
light up. Front foglamps/rear foglamp G
Risk of accident
If you suspect that driving conditions will be
foggy, turn the light switch to B before
you start your journey. Otherwise, your
vehicle may not be visible and you could
therefore endanger yourself and others. G
Risk of accident
When it is dark or foggy, turn the light
switch quickly from U to B. You
could otherwise cause an accident if the
headlamps were to switch off temporarily.
i When the light switch is set to U you
cannot switch on the front or rear fog-
lamps.
X Make sure that the key is in position 2 in
the ignition lock.
X To switch on the front foglamps: turn
the
light switch to the B or C position.
X Pull the light switch out to the first stop.
The ¥ green indicator lamp next to the
light switch lights up. X
To switch on the rear foglamp: turn the
light switch to the B position.
X Pull the light switch out to the second stop.
The †
yellow indicator lamp next to the
light switch lights up.
X To switch off the front foglamps/rear
foglamp: push in the light switch to the
stop.
The
corresponding indicator lamp goes out. Controls
219_AKB; 2; 4, en-GB
mkalafa,
2007-11-13T09:28:36+01:00 - Seite 93
Page 120 of 329

On-board computer
1171
Gear indicator
2 On-board voltage
RACETIMER
The RACETIMER allows time measurements
to be saved.
While you have the RACETIMER displayed,
you will not be able to adjust the volume using
the æ and ç buttons.
X Press the j button repeatedly until the
RACETIMER appears.
1 Gear indicator
2 RACETIMER 3
Lap
You can start the RACETIMER when the
engine is running or if the key is in position
2 in the ignition lock.
X To start: press the æ button to start the
RACETIMER.
X To display the intermediate time: press
the ç button to show the intermediate
time.
The intermediate time is displayed for five
seconds.
X To stop: press the æ button to stop the
RACETIMER.
The RACETIMER interrupts timing when you
stop the vehicle and turn the key to position
1 in the ignition lock. When you turn the key
to position 2 or 3 and then press the æ
button, timing is continued.
Storing the lap time and starting a new lap
It is possible to store a maximum of nine laps. X
Press the ç button to show the inter-
mediate time during timing.
The intermediate time is displayed for five
seconds.
X Press the ç button again within 5 sec-
onds.
The displayed intermediate time is stored
as a lap time.
Timing starts for a new lap. The new lap is
timed from when the intermediate time is
called up.
1 Gear indicator
2 RACETIMER
3 Fastest lap time (best lap)
4 Lap
Controls
219_AKB; 2; 4, en-GB
mkalafa,
2007-11-13T09:28:36+01:00 - Seite 117
Page 121 of 329
On-board computer
118
Resetting the current lap
X
Press the æ button to stop the RACE-
TIMER.
X Press the ç button to reset the lap time
to "0".
Deleting all laps
If you have switched off the engine, the RACE-
TIMER is reset to "0" after 30 seconds. All laps
are deleted.
It is not possible to delete a single stored lap
on its own.
X Press the æ button to stop the RACE-
TIMER.
X Press the reset button on the left of the
instrument cluster twice.
X Press the æ button to start the RACE-
TIMER.
All laps are deleted.
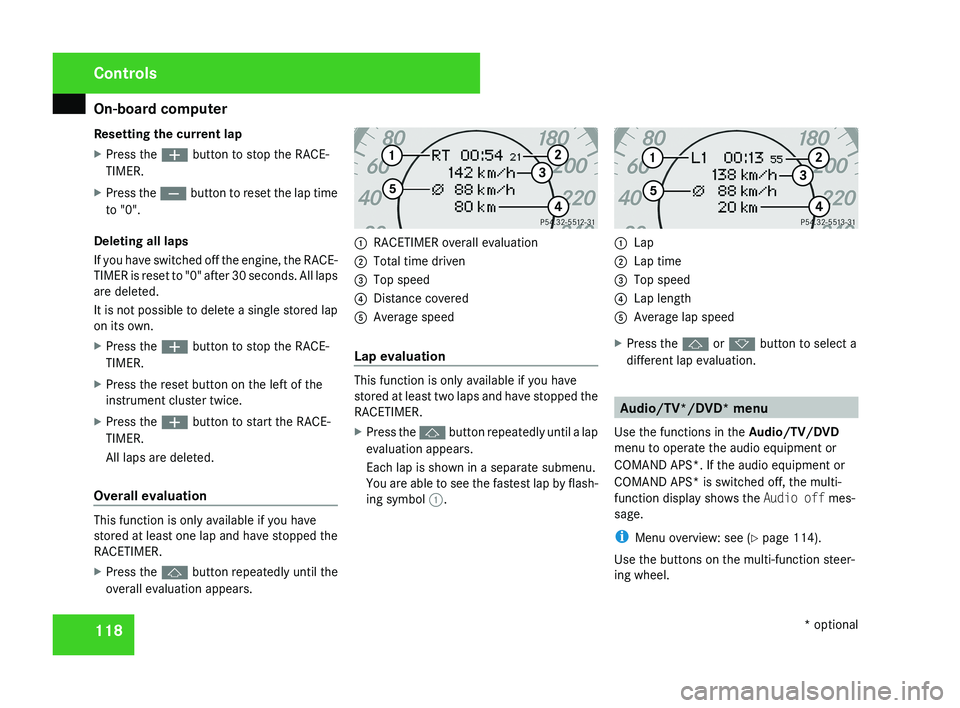
Overall evaluation This function is only available if you have
stored at least one lap and have stopped the
RACETIMER.
X
Press the j button repeatedly until the
overall evaluation appears. 1
RACETIMER overall evaluation
2 Total time driven
3 Top speed
4 Distance covered
5 Average speed
Lap evaluation This function is only available if you have
stored at least two laps and have stopped the
RACETIMER.
X
Press the j button repeatedly until a lap
evaluation appears.
Each lap is shown in a separate submenu.
You are able to see the fastest lap by flash-
ing symbol 1. 1
Lap
2 Lap time
3 Top speed
4 Lap length
5 Average lap speed
X Press the j or k button to select a
different lap evaluation. Audio/TV*/DVD* menu
Use the functions in the Audio/TV/DVD
menu to operate the audio equipment or
COMAND APS*. If the audio equipment or
COMAND APS* is switched off, the multi-
function display shows the Audio off mes-
sage.
i Menu overview: see ( Y page 114).
Use the buttons on the multi-function steer-
ing wheel. Controls
* optional
219_AKB; 2; 4, en-GB
mkalafa,
2007-11-13T09:28:36+01:00 - Seite 118
Page 148 of 329
Driving systems
145
Activating HOLD X
Make sure that the activation conditions
are met.
X Depress the brake.
X Depress the brake again quickly until
HOLD appears in the display.
HOLD is activated. You can release the
brake pedal.
i If depressing the brake pedal the first
time does not activate HOLD, wait briefly
and then try again. G
Risk of accident
The vehicle's brakes are applied when
HOLD is activated. For this reason, deacti-
vate HOLD if the vehicle is to be set in
motion by other means (e.g. in a car wash
or by towing).
Deactivating HOLD HOLD is deactivated if:
R
you
accelerate when the selector lever is in
position D or R
R you move the selector lever to position P
R you release the brakes completely and
apply them again with a certain amount of pressure until the
HOLD message in the
multi-function display goes out G
Risk of accident
Never get out of the vehicle when HOLD is
activated.
HOLD
must never be operated or deactiva-
ted by a passenger or from outside the
vehicle.
HOLD does not replace the parking brake
and must not be used for parking.
The HOLD braking effect is cancelled and
the vehicle can start moving if:
R HOLD is deactivated by depressing the
accelerator pedal or the brake pedal
R there is a malfunction in the system or an
interruption in the power supply, e.g. bat-
tery failure
R the electrical system in the engine com-
partment, the battery or the fuses are
tampered with
R the battery is disconnected G
Risk of accident
If you wish to leave the vehicle or park it,
deactivate HOLD and secure the vehicle
against rolling away. You will see a warning message in the multi-
function display if HOLD is activated and:
R
the
driver's door is opened and you release
the seat belt
R the ignition is switched off
R the bonnet is opened
Selector lever in park position
X Move the selector lever to P
to prevent the
vehicle from rolling away.
HOLD is deactivated. The warning message
in the multi-function display goes out.
A horn will also sound at regular intervals if
HOLD is activated and you:
R stop
the engine and open the driver's door
R open the bonnet
The horn draws your attention to the fact that
the vehicle has been parked while HOLD is
still activated. The sound becomes louder if
you attempt to lock the vehicle. The vehicle
is not locked until HOLD is deactivated.
i If the ignition has been switched off, the
engine cannot be restarted until HOLD is
deactivated.
If there is a fault in the system or power supply
while HOLD is activated, the Brake immedi-
ately message appears in the multi-function Controls
219_AKB; 2; 4, en-GB
mkalafa,
2007-11-13T09:28:36+01:00 - Seite 145 Z
Page 149 of 329
Driving systems
146
display. Immediately depress the brake firmly
until the warning message disappears from
the multi-function display or move the selec-
tor lever to
P. This deactivates HOLD. AIRMATIC DC*
Vehicle level Your vehicle automatically adjusts its ride
height to reduce petrol consumption and
improve driving safety.
The following vehicle levels are possible:
R
Normal
R Raised
R Lowered
The "Normal" and "Raised" vehicle levels can
be set manually.
The "Lowered" vehicle level is set automati-
cally:
R at speeds above 140 km/h
R if you have selected "Sports tuning I or
II" ( Y page 147)
R if you have selected "Comfort tun-
ing" (Y page 147) and then lock the vehicle within 60 seconds of the engine being
switched off G
Risk of injury
If you have selected “Comfort tuning”, the
vehicle will be lowered if you lock it within
60 seconds of the engine being switched
off. Make sure, therefore, that nobody is in
the vicinity of the wheel housing or under
the vehicle when you lock the vehicle. Oth-
erwise, limbs could become trapped.
! If you have selected “Comfort tuning”,
the vehicle will be lowered if you lock it
within 60 seconds of the engine being
switched off. Make sure when parking that
you stop your vehicle so that it does not
make contact with the kerb as it descends.
Your vehicle could otherwise be damaged.
Setting the vehicle level manually
Select the "Normal" setting for normal road
surfaces and "Raised" for driving with snow
chains or on particularly poor road surfaces. G
Risk of injury
Make sure that nobody is in the vicinity of
the wheel housing or under the vehicle
while lowering the vehicle when it is sta- tionary. Otherwise, limbs could become
trapped.
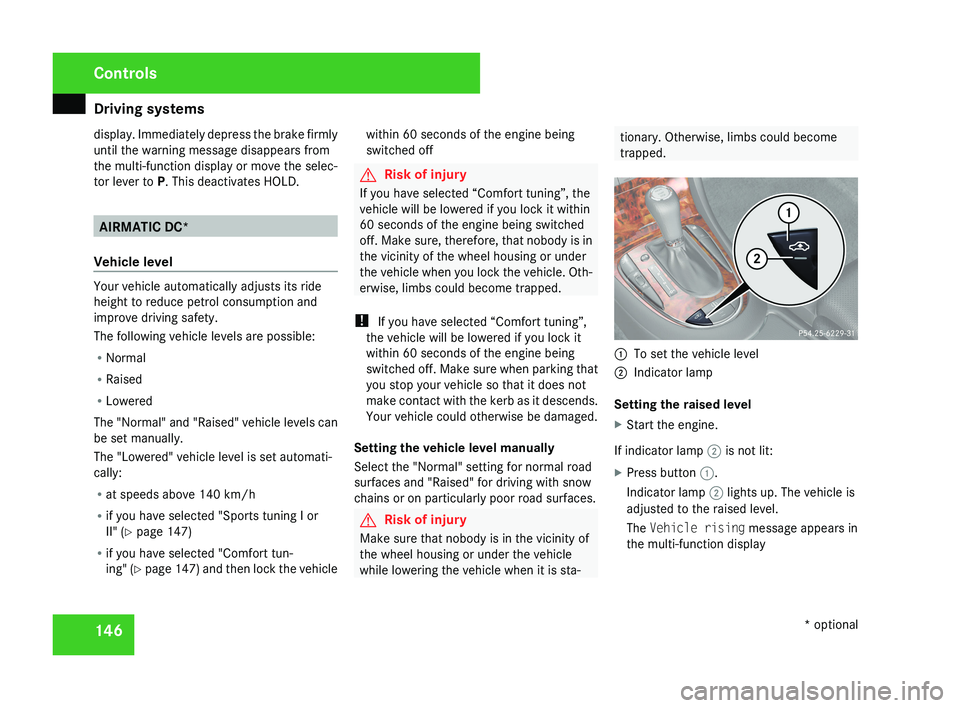
1
To set the vehicle level
2 Indicator lamp
Setting the raised level
X Start the engine.
If indicator lamp 2 is not lit:
X Press button 1.
Indicator lamp 2 lights up. The vehicle is
adjusted to the raised level.
The Vehicle rising message appears in
the multi-function display Controls
* optional
219_AKB; 2; 4, en-GB
mkalafa,
2007-11-13T09:28:36+01:00 - Seite 146
Page 174 of 329

Sliding sunroof
171
Lowering and closing X
To lower manually: pull the switch in the
direction of arrow 2 and hold it until the
sliding/tilting
sunroof is in the desired posi-
tion.
X To lower fully: pull the switch briefly
beyond the pressure point in the direction
of arrow 2 and release it.
X To stop: push or pull the switch in any
direction.
Rain closing feature The sliding/tilting sunroof closes automati-
cally:
R
if it starts to rain
R at extreme outside temperatures
R after 12 hours
R if
there is a malfunction in the power supply
The rear of the sliding/tilting sunroof is then
raised in order to ventilate the interior of the
vehicle.
i The sliding/tilting sunroof is opened
slightly again if it is obstructed while being
closed by the rain closing feature. The rain
closing feature is then deactivated. i
The
sliding/tilting sunroof does not close
if:
R it is raised at the rear
R it is blocked
R no rain is falling on the windscreen (e.g.
because the vehicle is under a bridge or
in a carport)
Opening and closing the cover The cover functions as a sunblind. When you
open the sliding/tilting sunroof, the cover
moves back with it.
When the sliding/tilting sunroof is closed or
raised at the rear, you can open or close the
cover manually.
Resetting the sliding/tilting sunroof
Reset the sliding/tilting sunroof if it does not
move smoothly, or if the battery was discon-
nected or flat:
X
Remove the fuse for the sliding/tilting sun-
roof in the main fuse box (Y page 296).
X Reinsert the fuse.
X Make sure that the key is in position 2 in
the ignition lock. X
Press the switch in the direction of
arrow 3
and hold it until the sliding/tilting
sunroof is fully raised at the rear.
X Keep the switch pressed for an additional
second.
X Make sure that the sliding/tilting sunroof
can be opened or closed fully again
(Y page 170).
X If this is not the case, consult a qualified
specialist workshop. Controls
219_AKB; 2; 4, en-GB
mkalafa,
2007-11-13T09:28:36+01:00 - Seite 171
Page 229 of 329
Display messages
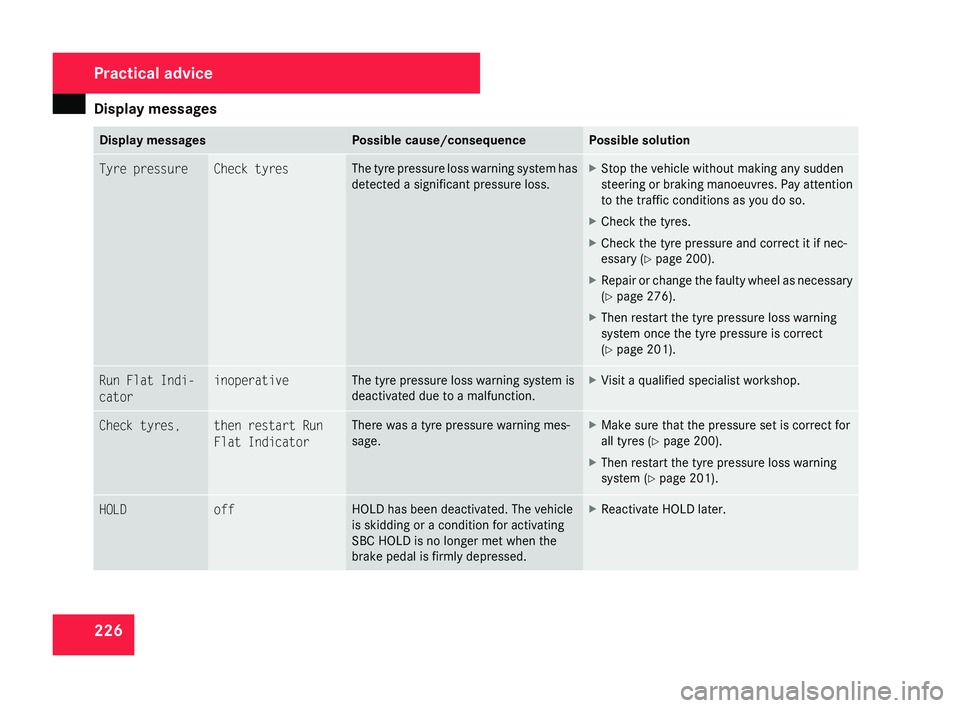
226 Display messages Possible cause/consequence Possible solution
Tyre pressure Check tyres The tyre pressure loss warning system has
detected a significant pressure loss. X
Stop the vehicle without making any sudden
steering
or braking manoeuvres. Pay attention
to the traffic conditions as you do so.
X Check the tyres.
X Check the tyre pressure and correct it if nec-
essary ( Y page 200).
X Repair or change the faulty wheel as necessary
(Y page 276).
X Then restart the tyre pressure loss warning
system once the tyre pressure is correct
(Y page 201). Run Flat Indi-
cator inoperative The tyre pressure loss warning system is
deactivated due to a malfunction. X
Visit a qualified specialist workshop. Check tyres, then restart Run
Flat Indicator There was a tyre pressure warning mes-
sage. X
Make sure that the pressure set is correct for
all tyres
(Y page 200).
X Then restart the tyre pressure loss warning
system (Y page 201). HOLD off HOLD has been deactivated. The vehicle
is skidding or a condition for activating
SBC HOLD is no longer met when the
brake pedal is firmly depressed. X
Reactivate HOLD later. Practical advice
219_AKB; 2; 4, en-GB
mkalafa,
2007-11-13T09:28:36+01:00 - Seite 226