2008 INFINITI QX56 door lock
[x] Cancel search: door lockPage 3290 of 4083
![INFINITI QX56 2008 Factory Service Manual SEC-82
< ECU DIAGNOSIS >[WITH INTELLIGENT KEY SYSTEM]
INTELLIGENT KEY UNIT
13 B/WInside key antenna 3
(front of center con-
sole) (+) signal
LOCK Any door open → all doors closed
14 W/G Inside key INFINITI QX56 2008 Factory Service Manual SEC-82
< ECU DIAGNOSIS >[WITH INTELLIGENT KEY SYSTEM]
INTELLIGENT KEY UNIT
13 B/WInside key antenna 3
(front of center con-
sole) (+) signal
LOCK Any door open → all doors closed
14 W/G Inside key](/manual-img/42/57030/w960_57030-3289.png)
SEC-82
< ECU DIAGNOSIS >[WITH INTELLIGENT KEY SYSTEM]
INTELLIGENT KEY UNIT
13 B/WInside key antenna 3
(front of center con-
sole) (+) signal
LOCK Any door open → all doors closed
14 W/G Inside key antenna 3
(front of center con-
sole) (-) signal
15 G Inside key antenna 1
(rear of center con-
sole) (+) signal
LOCK Any door open → all doors closed
16 L Inside key antenna 1
(rear of center con-
sole) (-) signal
17 P Rear bumper anten-
na (+) signal
LOCK Lift back door handle (close switch).
18 W/R Rear bumper anten-
na (-) signal
19 P Front outside anten-
na LH (+) signal
LOCK Press front door request switch LH.
20 V Front outside anten-
na LH (-) signal
21 B/W Remote keyless en-
try receiver RSSI sig-
nal ——
23 L/W Power back door out-
put —Power liftgate switch ON.
0
Power liftgate switch OFF. Battery voltage
25 P/L Front door request
switch RH —Press front door request switch RH.
0
Other than above Battery voltage
27 R/B Ignition knob switch — Press ignition switch.
Battery voltage
Return ignition switch to LOCK position. 0
28 R Unlock sensor
(driver side) —Door (driver si
de) is locked. 5
Door (driver side ) is unlocked. 0
29 LG/W Back door open
switch input —Back door handle switch ON.
0
Back door handle switch OFF. Battery voltage
Te r m i n a l
Wire
Color Item Condition
Voltage (V)Approx.
Ignition
Switch Po-
sition Operation or Conditions
PIIB7441E
PIIB7441E
SIIA1910J
SIIA1910J
PIIA2344E
Revision: March 2010
2008 QX56
Page 3291 of 4083
![INFINITI QX56 2008 Factory Service Manual INTELLIGENT KEY UNITSEC-83
< ECU DIAGNOSIS > [WITH INTELLIGENT KEY SYSTEM]
C
D
E
F
G H
I
J
L
M A
B
SEC
N
O P
30 G/B Remote keyless en-
try receiver power
supply
—— 5
32 L/O Steering lock sole-
no INFINITI QX56 2008 Factory Service Manual INTELLIGENT KEY UNITSEC-83
< ECU DIAGNOSIS > [WITH INTELLIGENT KEY SYSTEM]
C
D
E
F
G H
I
J
L
M A
B
SEC
N
O P
30 G/B Remote keyless en-
try receiver power
supply
—— 5
32 L/O Steering lock sole-
no](/manual-img/42/57030/w960_57030-3290.png)
INTELLIGENT KEY UNITSEC-83
< ECU DIAGNOSIS > [WITH INTELLIGENT KEY SYSTEM]
C
D
E
F
G H
I
J
L
M A
B
SEC
N
O P
30 G/B Remote keyless en-
try receiver power
supply
—— 5
32 L/O Steering lock sole-
noid communication
signal LOCKWhen Intelligent Key is inside vehicle,
press ignition knob switch.
Other than above
5
33 W Rear parcel shelf an-
tenna (+) signal
LOCKPress ignition knob switch: ON (Ignition
knob switch)
34 BR Rear parcel shelf an-
tenna (-) signal
35 O Inside key antenna 2
(luggage compart-
ment) (+) signal
LOCK Back door open → all doors closed
36 R Inside key antenna 2
(luggage compart-
ment) (-) signal
37 LG Front outside anten-
na (+) signal RH
LOCK Press front door request switch RH.
38 B/Y Front outside anten-
na (-) signal RH
39 L/R P range switch —A/T shift selector lever is in “P” position.
0
Other than above Battery voltage
40 V AS select unlock out-
put
—UNLOCK with rear door locks disabled.
0
Other than above Battery voltage
Te r m i n a l
Wire
Color Item Condition
Voltage (V)Approx.
Ignition
Switch Po-
sition Operation or Conditions
SIIA1911J
PIIB7441E
PIIB7441E
SIIA1910J
Revision: March 2010
2008 QX56
Page 3307 of 4083
![INFINITI QX56 2008 Factory Service Manual IPDM E/R (INTELLIGENT POWER DISTRIBUTION MODULE ENGINE ROOM)
SEC-99
< ECU DIAGNOSIS > [WITH INTELLIGENT KEY SYSTEM]
C
D
E
F
G H
I
J
L
M A
B
SEC
N
O P
THFT HRN REQ Not operated
OFF
• Panic alarm is a INFINITI QX56 2008 Factory Service Manual IPDM E/R (INTELLIGENT POWER DISTRIBUTION MODULE ENGINE ROOM)
SEC-99
< ECU DIAGNOSIS > [WITH INTELLIGENT KEY SYSTEM]
C
D
E
F
G H
I
J
L
M A
B
SEC
N
O P
THFT HRN REQ Not operated
OFF
• Panic alarm is a](/manual-img/42/57030/w960_57030-3306.png)
IPDM E/R (INTELLIGENT POWER DISTRIBUTION MODULE ENGINE ROOM)
SEC-99
< ECU DIAGNOSIS > [WITH INTELLIGENT KEY SYSTEM]
C
D
E
F
G H
I
J
L
M A
B
SEC
N
O P
THFT HRN REQ Not operated
OFF
• Panic alarm is activated
• Horn is activated with VEHICLE SECURITY (THEFT WARNING) SYS-
TEM ON
HORN CHIRP Not operated
OFF
Door locking with Intelligent Key (horn chirp mode) ON
Monitor Item
ConditionValue/Status
Revision: March 2010 2008 QX56
Page 3311 of 4083
![INFINITI QX56 2008 Factory Service Manual IPDM E/R (INTELLIGENT POWER DISTRIBUTION MODULE ENGINE ROOM)
SEC-103
< ECU DIAGNOSIS > [WITH INTELLIGENT KEY SYSTEM]
C
D
E
F
G H
I
J
L
M A
B
SEC
N
O P
41 Y/B Hood switch Input —Hood closed OFF
0V
Ho INFINITI QX56 2008 Factory Service Manual IPDM E/R (INTELLIGENT POWER DISTRIBUTION MODULE ENGINE ROOM)
SEC-103
< ECU DIAGNOSIS > [WITH INTELLIGENT KEY SYSTEM]
C
D
E
F
G H
I
J
L
M A
B
SEC
N
O P
41 Y/B Hood switch Input —Hood closed OFF
0V
Ho](/manual-img/42/57030/w960_57030-3310.png)
IPDM E/R (INTELLIGENT POWER DISTRIBUTION MODULE ENGINE ROOM)
SEC-103
< ECU DIAGNOSIS > [WITH INTELLIGENT KEY SYSTEM]
C
D
E
F
G H
I
J
L
M A
B
SEC
N
O P
41 Y/B Hood switch Input —Hood closed OFF
0V
Hood open ON Battery voltage
42 GR Oil pressure switch Input — Engine running
Battery voltage
Engine stopped 0V
43 L/Y Wiper auto stop signal Input ON or
START Wiper switch OFF, LO, INT Battery voltage
44 BR Daytime light relay
control Input ONDaytime light system active
0V
Daytime light system inactive Battery voltage
45 G/W Horn relay control Input ON When door locks are operated
using keyfob or Intelligent Key
(OFF
→ ON)* Battery voltage
→ 0V
46 GR Fuel pump relay con-
trol
Input —Ignition switch ON or START
0V
Ignition switch OFF or ACC Battery voltage
47 O Throttle control motor
relay control
Input —Ignition switch ON or START
0V
Ignition switch OFF or ACC Battery voltage
48 B/R Starter relay (trans-
mission range switch) Input
ON or
START A/T shift selector lever in "P"
or "N"
0V
A/T shift selector lever any
other position Battery voltage
49 R/L Trailer tow relay Output ON Lighting
switch must
be in the 1st
positionOFF
0V
ON Battery voltage
50 W/R Front fog lamp (LH) Output ON or
START Lighting
switch must
be in the 2nd
position
(LOW beam
is ON) and
the front fog
lamp switch OFF
0V
ON Battery voltage
51 W/R Front fog lamp (RH) Output ON or
START Lighting
switch must
be in the 2nd
position
(LOW beam
is ON) and
the front fog
lamp switch OFF
0V
ON Battery voltage
52 L LH low beam head-
lamp Output — Lighting switch in 2nd position Battery voltage
54 R/Y RH low beam head-
lamp
Output — Lighting switch in 2nd position Battery voltage
55 G LH high beam head-
lamp
Output —Lighting switch in 2nd position
and placed in HIGH or PASS
position
Battery voltage
56 L/W RH high beam head-
lamp Output —Lighting switch in 2nd position
and placed in HIGH or PASS
position Battery voltage
Te r m i n a l
Wire
col or Si
gn
al nameSignal
input/
output Measuring condition
Reference value(Approx.)
Igni-
tion
switch Operation or condition
Revision: March 2010
2008 QX56
Page 3384 of 4083

SR-8
< ON-VEHICLE REPAIR >
SPIRAL CABLE
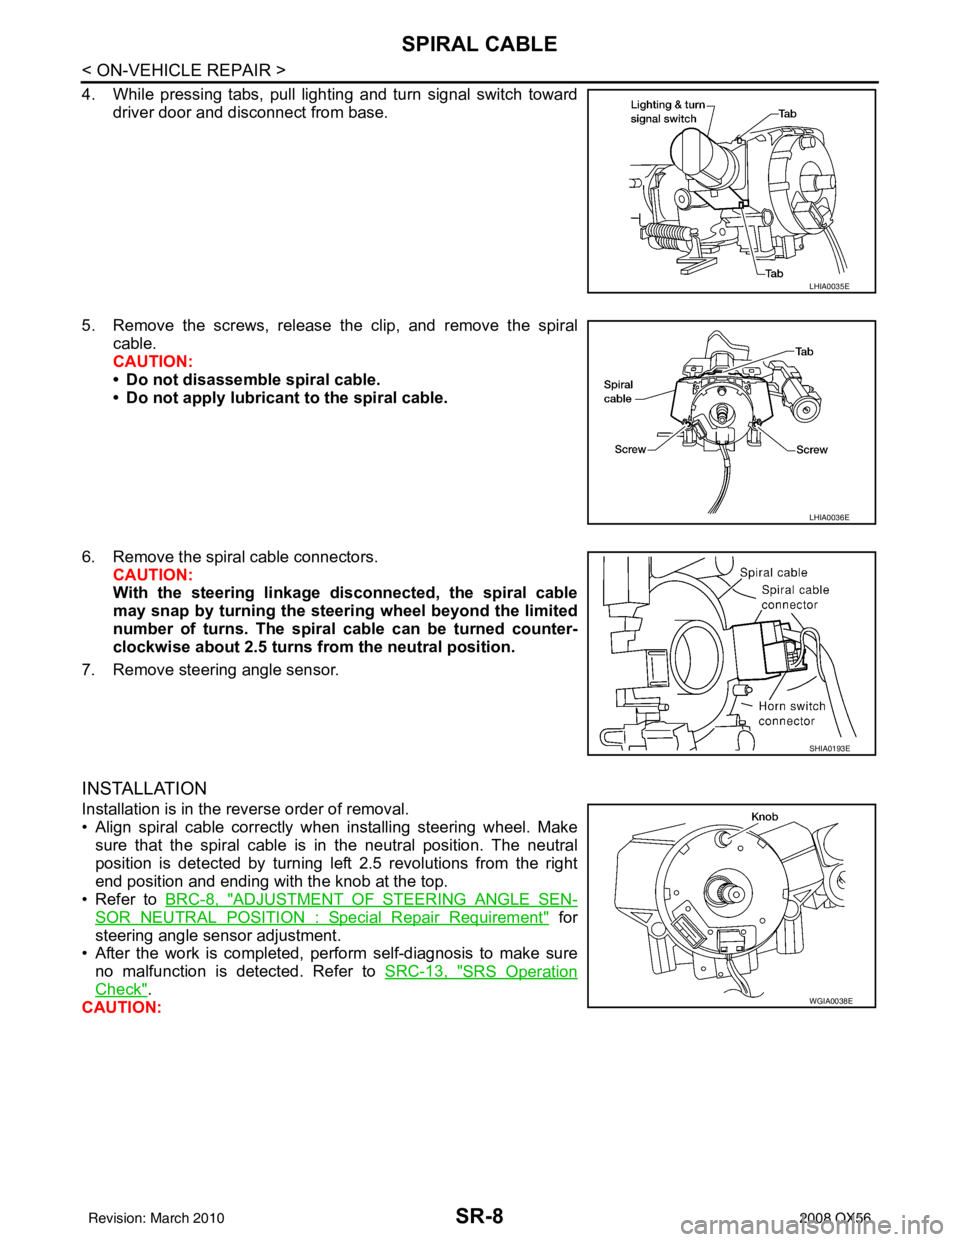
4. While pressing tabs, pull lighting and turn signal switch towarddriver door and disconnect from base.
5. Remove the screws, release the clip, and remove the spiral cable.
CAUTION:
• Do not disassemble spiral cable.
• Do not apply lubricant to the spiral cable.
6. Remove the spiral cable connectors. CAUTION:
With the steering linkage di sconnected, the spiral cable
may snap by turning the steer ing wheel beyond the limited
number of turns. The spiral cable can be turned counter-
clockwise about 2.5 turns fr om the neutral position.
7. Remove steering angle sensor.
INSTALLATION
Installation is in the reverse order of removal.
• Align spiral cable correctly when installing steering wheel. Make sure that the spiral cable is in the neutral position. The neutral
position is detected by turning left 2.5 revolutions from the right
end position and ending with the knob at the top.
• Refer to BRC-8, "
ADJUSTMENT OF STEERING ANGLE SEN-
SOR NEUTRAL POSITION : Special Repair Requirement" for
steering angle sensor adjustment.
• After the work is completed, perform self-diagnosis to make sure no malfunction is detected. Refer to SRC-13, "
SRS Operation
Check".
CAUTION:
LHIA0035E
LHIA0036E
SHIA0193E
WGIA0038E
Revision: March 2010 2008 QX56
Page 3857 of 4083

HEATER & COOLING UNIT ASSEMBLYVTL-17
< ON-VEHICLE REPAIR >
C
DE
F
G H
J
K L
M A
B
VTL
N
O P
1. Move the two front seats to the rear most position on the seat track.
2. Disconnect the battery negative terminal and battery positive terminal.
3. Discharge the refrigerant from the A/C system. Refer to HA-20, "
HFC-134a (R-134a) Service Procedure".
4. Drain the coolant from the engine cooling system. Refer to CO-11, "
Changing Engine Coolant".
5. Disconnect the front heater hoses from the front heater core.
6. Disconnect the high/low pressure pipes from the front expansion valve.
7. Remove the instrument panel and console panel. Refer to IP-12, "
Removal and Installation".
8. Remove the steering column. Refer to ST-20, "
Removal and Installation".
9. Disconnect the instrument panel wire harness at t he RH and LH in-line connector brackets, and the fuse
block (J/B) electrical connectors. Refer to PG-9, "
Wiring Diagram — Battery Power Supply —".
10. Disconnect the steering member from each side of the vehicle body.
11. Remove the front heater and cooling unit assembly with it attached to the steering member, from the vehi- cle.
CAUTION:
Use care not to damage the seats and interior trim panels when removing the front heater and
cooling unit assembly with it at tached to the steering member.
12. Remove the front heater and cooling uni t assembly from the steering member.
Installation
Installation is in the reverse order of removal.
CAUTION:
• Replace the O-ring of the low-pressure pipe and high-pressure pipe with a new one, and apply com-
pressor oil to it when installing it.
• After charging the refrigerant, check for leaks.
NOTE:
• Fill the engine cooling system with the specified coolant mixture. Refer to CO-11, "
Changing Engine Cool-
ant".
• Recharge the A/C system. Refer to HA-20, "
HFC-134a (R-134a) Service Procedure".
REAR HEATER AND COOLING UNIT ASSEMBLY
Removal
1. Discharge the refrigerant from the A/C system. Refer to HA-20, "HFC-134a (R-134a) Service Procedure".
2. Drain the coolant from the engine cooling system. Refer to CO-11, "
Changing Engine Coolant".
3. Remove the luggage side finisher lower RH. Refer to INT-19, "
Removal and Installation".
4. Disconnect the rear heater core hoses from the rear heater core.
5. Disconnect the rear A/C pipes from the rear expansion valve.
6. Disconnect the following electrical connectors: • Rear blower motor
• Rear variable blower control
• Rear air mix door motor
7. Disconnect the ducts from the rear heater and cooling unit assembly.
8. Remove the rear heater and cooling unit assembly.
Installation
Installation is in the reverse order of removal.
CAUTION:
• Replace the O-ring of the low-pressure pipe and high-pressure pipe with a new one, and apply com- pressor oil to it when installing it.
• After charging the refrigerant, check for leaks.
NOTE:
• Fill the engine cooling system with the specified coolant mixture. Refer to CO-11, "
Changing Engine Cool-
ant".
• Recharge the A/C system. Refer to HA-20, "
HFC-134a (R-134a) Service Procedure".
Revision: March 2010 2008 QX56
Page 3887 of 4083

WCS-10
< FUNCTION DIAGNOSIS >
WARNING CHIME SYSTEM
KEY WARNING CHIME
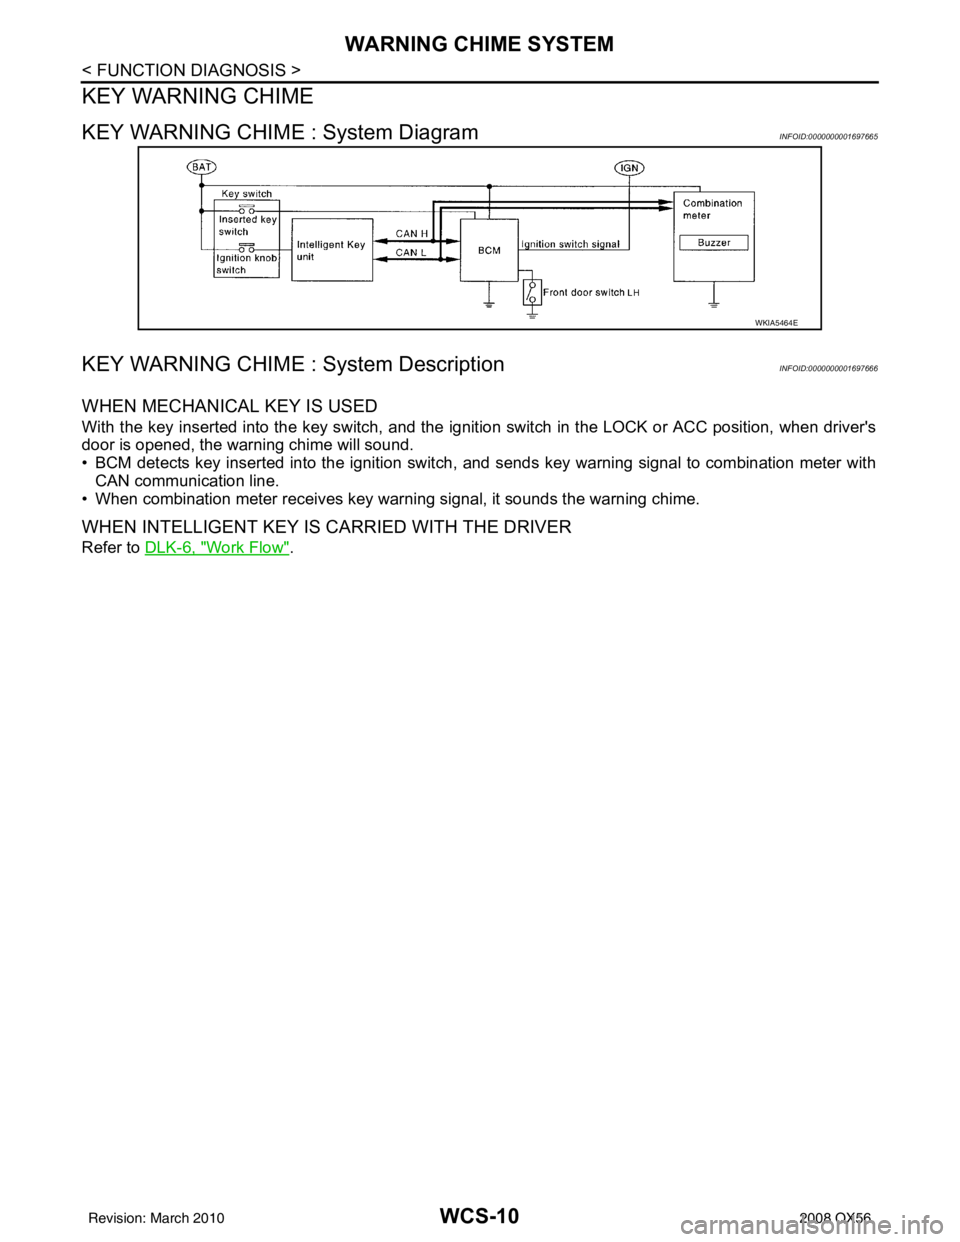
KEY WARNING CHIME : System DiagramINFOID:0000000001697665
KEY WARNING CHIME : System DescriptionINFOID:0000000001697666
WHEN MECHANICAL KEY IS USED
With the key inserted into the key switch, and the ignition switch in the LOCK or ACC position, when driver's
door is opened, the warning chime will sound.
• BCM detects key inserted into the ignition switch, and sends key warning signal to combination meter with CAN communication line.
• When combination meter receives key warning signal, it sounds the warning chime.
WHEN INTELLIGENT KEY IS CARRIED WITH THE DRIVER
Refer to DLK-6, "Work Flow".
WKIA5464E
Revision: March 2010 2008 QX56
Page 3928 of 4083

WCS
BCM (BODY CONTROL MODULE)WCS-51
< ECU DIAGNOSIS >
C
DE
F
G H
I
J
K L
M B A
O P
BCM (BODY CONTROL MODULE)
Reference ValueINFOID:0000000004871172
VALUES ON THE DIAGNOSIS TOOL
Monitor Item Condition Value/Status
AIR COND SW A/C switch OFF
OFF
A/C switch ON ON
AUT LIGHT SYS Outside of the room is dark
OFF
Outside of the room is bright ON
AUTO LIGHT SW Lighting switch OFF
OFF
Lighting switch AUTO ON
BACK DOOR SW Back door closed
OFF
Back door opened ON
CDL LOCK SW Door lock/unlock switch does not operate
OFF
Press door lock/unlock switch to the LOCK side ON
CDL UNLOCK SW Door lock/unlock switch does not operate
OFF
Press door lock/unlock switch to the UNLOCK side ON
DOOR SW-AS Front door RH closed
OFF
Front door RH opened ON
DOOR SW-DR Front door LH closed
OFF
Front door LH opened ON
DOOR SW-RL Rear door LH closed
OFF
Rear door LH opened ON
DOOR SW-RR Rear door RH closed
OFF
Rear door RH opened ON
ENGINE RUN Engine stopped
OFF
Engine running ON
FR FOG SW Front fog lamp switch OFF
OFF
Front fog lamp switch ON ON
FR WASHER SW Front washer switch OFF
OFF
Front washer switch ON ON
FR WIPER LOW Front wiper switch OFF
OFF
Front wiper switch LO ON
FR WIPER HI Front wiper switch OFF
OFF
Front wiper switch HI ON
FR WIPER INT Front wiper switch OFF
OFF
Front wiper switch INT ON
FR WIPER STOP Any position other than front wiper stop position
OFF
Front wiper stop position ON
HAZARD SW When hazard switch is not pressed
OFF
When hazard switch is pressed ON
LIGHT SW 1ST Lighting switch OFF
OFF
Lighting switch 1st ON
Revision: March 2010 2008 QX56