Page 3768 of 4083
OVERHAULTM-221
< DISASSEMBLY AND ASSEMBLY >
CEF
G H
I
J
K L
M A
B
TM
N
O P
: Apply Liquid Gasket (Three Bond 1215) or the equivalent. 1. O-ring
2. Oil pump cover3. O-ring
4. Oil pump housing 5. Self-sealing bolts6. Torque converter
7. Converter housing 8. Oil pump housing oil seal9. Bearing race
10. Needle bearing 11. O-ring 12. Front carrier assembly
13. Needle bearing 14. Snap ring15. Front sun gear
16. 3rd one-way clutch 17. Snap ring18. Bearing race
19. Needle bearing 20. Seal ring 21. Input clutch assembly
22. Needle bearing 23. Rear internal gear24. Brake band
25. Mid carrier assembly 26. Needle bearing 27. Bearing race
28. Rear carrier assembly 29. Needle bearing 30. Mid sun gear
31. Seal ring 32. Rear sun gear33. 1st one-way clutch
34. Snap ring 35. Needle bearing36. High and low reverse clutch hub
37. Snap ring 38. Bearing race39. Needle bearing
Revision: March 2010 2008 QX56
Page 3779 of 4083
TM-232
< DISASSEMBLY AND ASSEMBLY >
DISASSEMBLY
DISASSEMBLY
DisassemblyINFOID:0000000004917895
CAUTION:
Do not disassemble parts behind Drum Support. Refer to TM-8, "
Cross-Sectional View (2WD models)".
1. Drain A/T fluid through drain plug.
2. Remove torque converter by holding it firmly and turing while pulling straight out.
3. Check torque converter one-way clutch using a check tool as shown.
a. Insert a check tool into the groove of bearing support built into one-way clutch outer race.
b. While holding bearing support with a check tool, rotate one-way clutch spline using suitable tool.
c. Make sure that inner race rotates clockwise only. If not, replace torque converter assembly.
4. Remove bolts and converter housing from transmission case. CAUTION:
Do not scratch converter housing.
• Self-sealing bolt (A)
SCIA5010E
SCIA3171E
WCIA0624E
Revision: March 2010 2008 QX56
Page 3799 of 4083
TM-252
< DISASSEMBLY AND ASSEMBLY >
REPAIR FOR COMPONENT PARTS
3. Install new oil pump housing oil seal to the oil pump housinguntil it is flush with the face of oil pump housing using Tool.
CAUTION:
• Do not reuse oil seal.
• Apply ATF to oil seal.
4. Install oil pump housing in oil pump cover. Tighten oil pump housing bolts to the specified torque.
Front Sun Gear, 3rd One-Way ClutchINFOID:0000000004917897
COMPONENTS
DISASSEMBLY
Tool number : ST33400001 (J-26082)
SCIA5313E
SCIA5228E
1. Front sun gear 2. 3rd one-way clutch3. Snap ring
SCIA3114E
Revision: March 2010 2008 QX56
Page 3821 of 4083

TM-274
< DISASSEMBLY AND ASSEMBLY >
ASSEMBLY
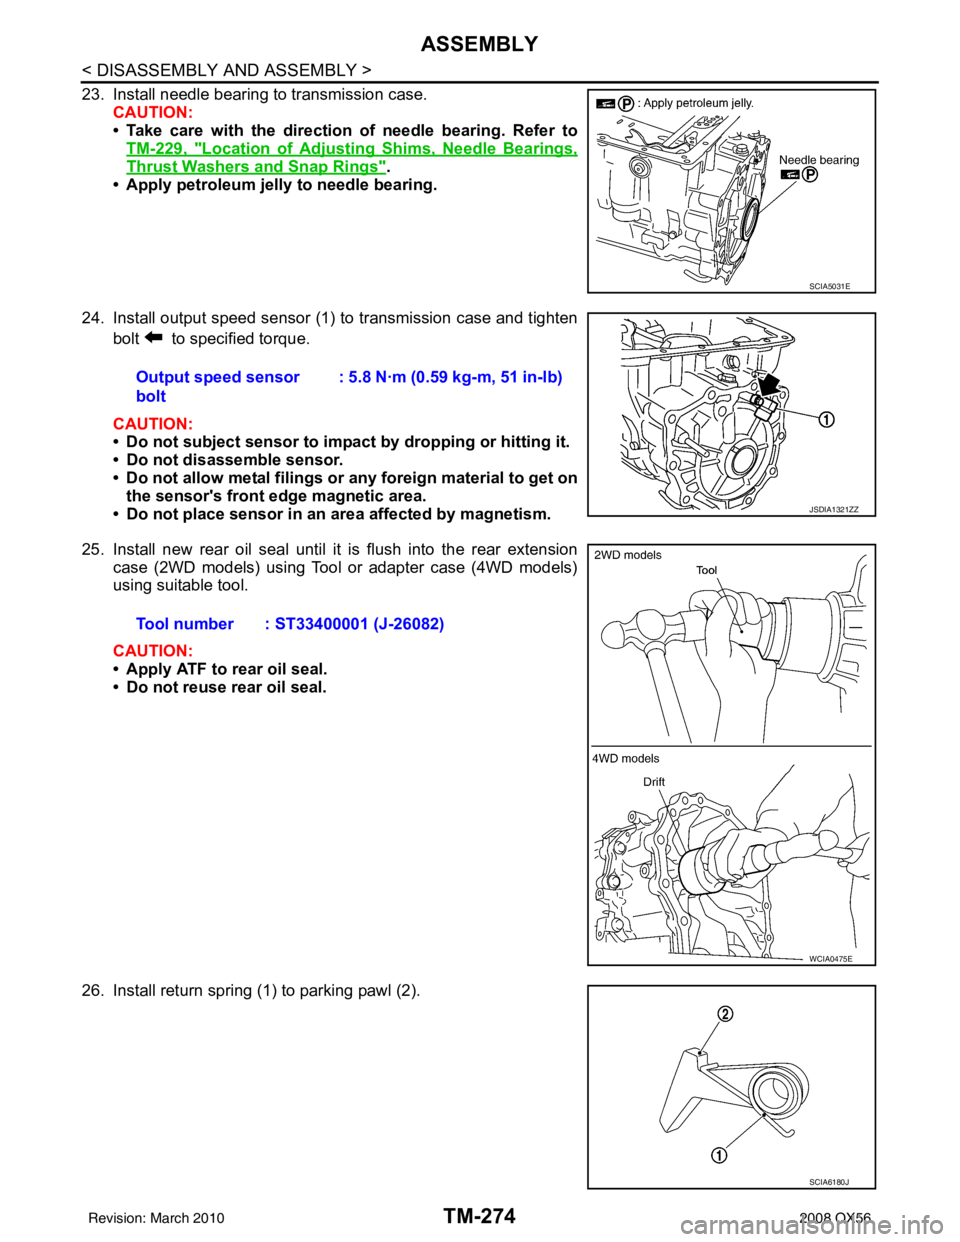
23. Install needle bearing to transmission case.CAUTION:
• Take care with the direction of needle bearing. Refer toTM-229, "
Location of Adjusting Shims, Needle Bearings,
Thrust Washers and Snap Rings".
• Apply petroleum jelly to needle bearing.
24. Install output speed sensor (1) to transmission case and tighten bolt to specified torque.
CAUTION:
• Do not subject sensor to impact by dropping or hitting it.
• Do not disassemble sensor.
• Do not allow metal filings or any foreign material to get on
the sensor's front edge magnetic area.
• Do not place sensor in an area affected by magnetism.
25. Install new rear oil seal until it is flush into the rear extension case (2WD models) using Tool or adapter case (4WD models)
using suitable tool.
CAUTION:
• Apply ATF to rear oil seal.
• Do not reuse rear oil seal.
26. Install return spring (1) to parking pawl (2).
SCIA5031E
Output speed sensor
bolt : 5.8 N·m (0.59 kg-m, 51 in-lb)
JSDIA1321ZZ
Tool number : ST33400001 (J-26082)
WCIA0475E
SCIA6180J
Revision: March 2010
2008 QX56
Page 3824 of 4083

ASSEMBLYTM-277
< DISASSEMBLY AND ASSEMBLY >
CEF
G H
I
J
K L
M A
B
TM
N
O P
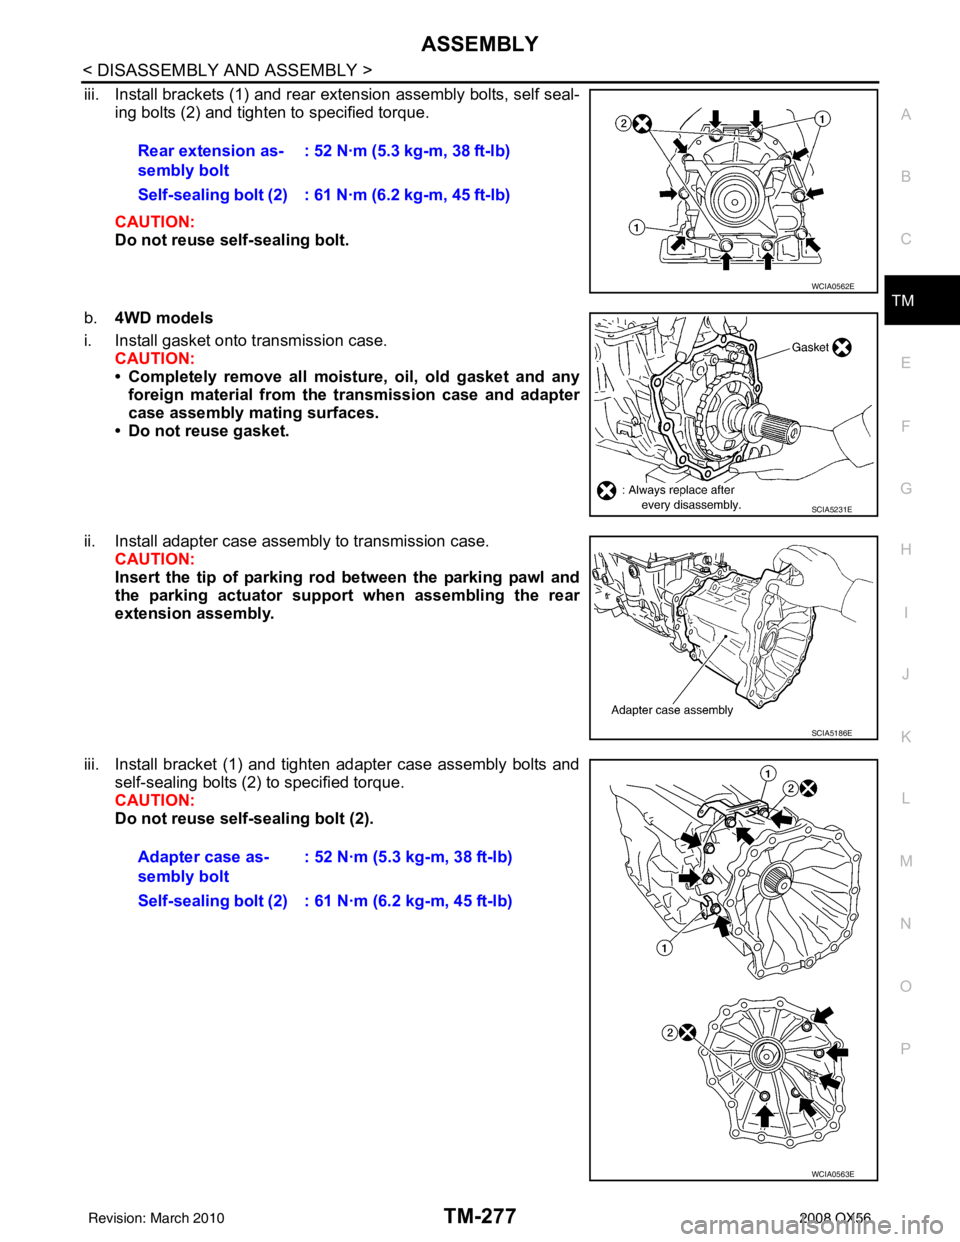
iii. Install brackets (1) and rear extension assembly bolts, self seal- ing bolts (2) and tighten to specified torque.
CAUTION:
Do not reuse self-sealing bolt.
b. 4WD models
i. Install gasket onto transmission case. CAUTION:
• Completely remove all moistu re, oil, old gasket and any
foreign material from the transmission case and adapter
case assembly mating surfaces.
• Do not reuse gasket.
ii. Install adapter case assembly to transmission case. CAUTION:
Insert the tip of parking rod between the parking pawl and
the parking actuator support when assembling the rear
extension assembly.
iii. Install bracket (1) and tighten adapter case assembly bolts and self-sealing bolts (2) to specified torque.
CAUTION:
Do not reuse self-sealing bolt (2).Rear extension as-
sembly bolt
: 52 N·m (5.3 kg-m, 38 ft-lb)
Self-sealing bolt (2) : 61 N·m (6.2 kg-m, 45 ft-lb)
WCIA0562E
SCIA5231E
SCIA5186E
Adapter case as-
sembly bolt : 52 N·m (5.3 kg-m, 38 ft-lb)
Self-sealing bolt (2) : 61 N·m (6.2 kg-m, 45 ft-lb)
WCIA0563E
Revision: March 2010 2008 QX56
Page 3829 of 4083
TM-282
< DISASSEMBLY AND ASSEMBLY >
ASSEMBLY
53. Adjust brake band.
a. Loosen lock nut.
b. Tighten band servo anchor end pin to specified torque.
c. Back off band servo anchor end pin three turns.
d. Holding band servo anchor end pin, tighten lock nut to specifiedtorque.
AdjustmentINFOID:0000000004917903
TOTAL END PLAY
• Measure clearance between front sun gear and bearing race for oilpump cover.
• Select proper thickness of bearing race so that end play is within specifications.
1. Measure dimensions “K” and “L” and then calculate dimension “J”.
a. Measure dimension “K”. Anchor end pin : 5.0 N·m (0.51 kg-m, 44 in-lb)
Lock nut : 46 N·m (4.7 kg-m, 34 ft-lb)
SCIA5498E
SCIA2810E
SCIA5350E
SCIA5351E
Revision: March 2010
2008 QX56
Page 3832 of 4083

ASSEMBLYTM-285
< DISASSEMBLY AND ASSEMBLY >
CEF
G H
I
J
K L
M A
B
TM
N
O P
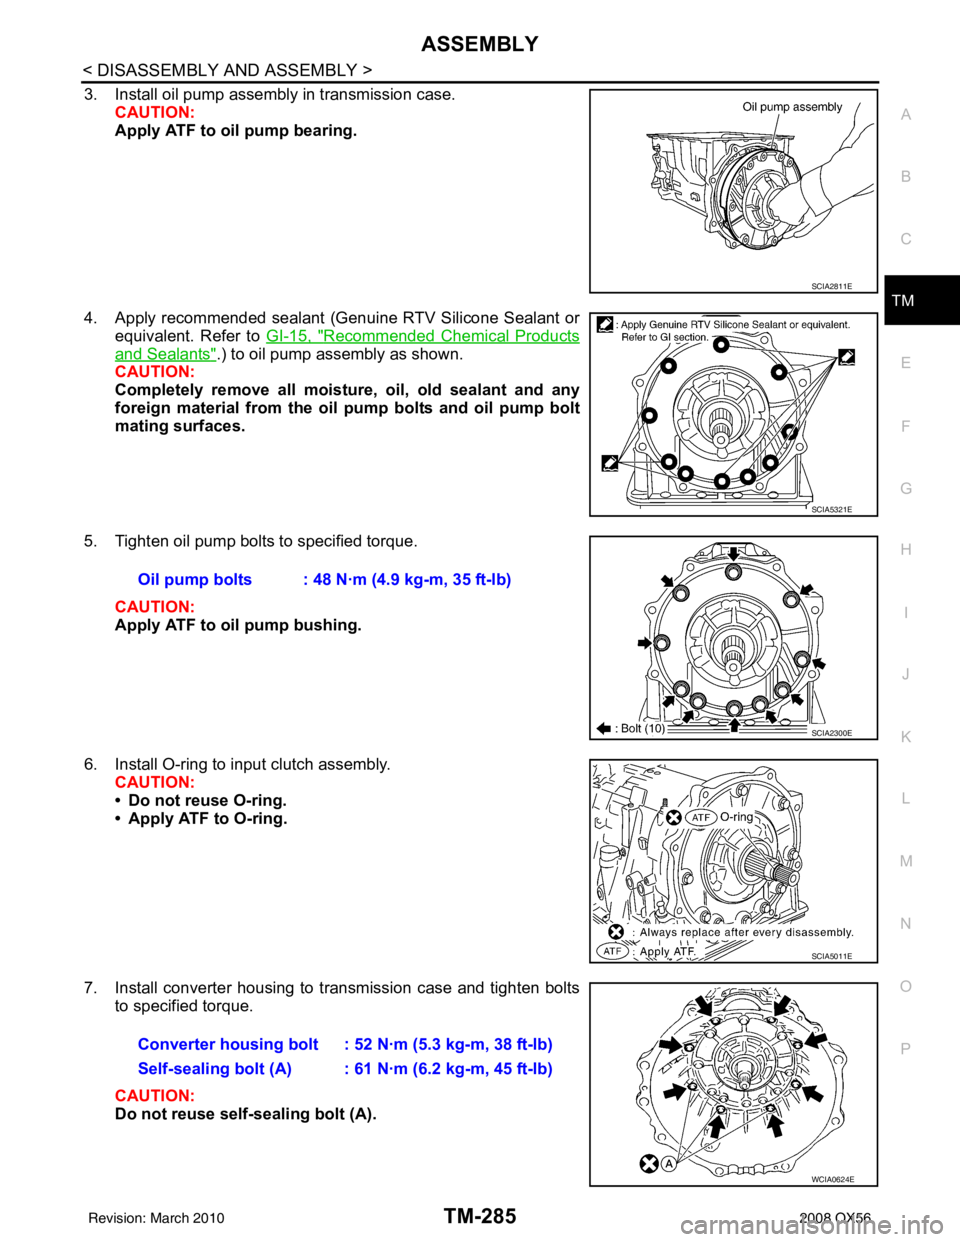
3. Install oil pump assembly in transmission case. CAUTION:
Apply ATF to oil pump bearing.
4. Apply recommended sealant (Genuine RTV Silicone Sealant or equivalent. Refer to GI-15, "
Recommended Chemical Products
and Sealants".) to oil pump assembly as shown.
CAUTION:
Completely remove all moistu re, oil, old sealant and any
foreign material from the oil pump bolts and oil pump bolt
mating surfaces.
5. Tighten oil pump bolts to specified torque. CAUTION:
Apply ATF to oil pump bushing.
6. Install O-ring to input clutch assembly. CAUTION:
• Do not reuse O-ring.
• Apply ATF to O-ring.
7. Install converter housing to transmission case and tighten bolts to specified torque.
CAUTION:
Do not reuse self-sealing bolt (A).
SCIA2811E
SCIA5321E
Oil pump bolts : 48 N·m (4.9 kg-m, 35 ft-lb)
SCIA2300E
SCIA5011E
Converter housing bolt : 52 N·m (5.3 kg-m, 38 ft-lb)
Self-sealing bolt (A) : 61 N·m (6.2 kg-m, 45 ft-lb)
WCIA0624E
Revision: March 2010 2008 QX56
Page 3834 of 4083
ASSEMBLYTM-287
< DISASSEMBLY AND ASSEMBLY >
CEF
G H
I
J
K L
M A
B
TM
N
O P
d. Install O-ring to A/T assembly harness connector. CAUTION:
• Do not reuse O-ring.
• Apply ATF to O-ring.
e. Install A/T fluid temperature sensor 2 to bracket.
f. Install A/T fluid temperature sensor 2 (with bracket) to control valve with TCM and tighten bolt to specified torque.
CAUTION:
Adjust bolt hole of bracket to bolt hole of control valve.
g. Install control valve with TCM in transmission case. CAUTION:
• Make sure that turbine input speed sensor is securelyinstalled into turbine input speed sensor hole (A).
• Hang down output speed sensor harness toward outside
so as not to disturb installati on of control valve with TCM.
• Adjust A/T assembly harness connector of control valve with TCM to terminal hole of transmission case.
SCIA5155E
SCIA5264E
Bracket bolt : 7.9 N·m (0.81 kg-m, 70 in-lb)
SCIA5301E
1 : Brake band
JSDIA1318ZZ
Revision: March 2010 2008 QX56