2008 INFINITI FX35 lights
[x] Cancel search: lightsPage 2350 of 3924
![INFINITI FX35 2008 Service Manual
EC-1110
< SERVICE INFORMATION >[VK45DE]
DTC P2127, P2128 APP SENSOR
DTC P2127, P2128 APP SENSOR
Component DescriptionINFOID:0000000001327008
The accelerator pedal position sensor is installed on the INFINITI FX35 2008 Service Manual
EC-1110
< SERVICE INFORMATION >[VK45DE]
DTC P2127, P2128 APP SENSOR
DTC P2127, P2128 APP SENSOR
Component DescriptionINFOID:0000000001327008
The accelerator pedal position sensor is installed on the](/manual-img/42/57017/w960_57017-2349.png)
EC-1110
< SERVICE INFORMATION >[VK45DE]
DTC P2127, P2128 APP SENSOR
DTC P2127, P2128 APP SENSOR
Component DescriptionINFOID:0000000001327008
The accelerator pedal position sensor is installed on the upper end
of the accelerator pedal assembly. The sensor detects the accelera-
tor position and sends a signal to the ECM.
Accelerator pedal position sensor has two sensors. These sensors
are a kind of potentiometers which transform the accelerator pedal
position into output voltage, and emit the voltage signal to the ECM.
In addition, these sensors detect the opening and closing speed of
the accelerator pedal and feed the voltage signals to the ECM. The
ECM judges the current opening angle of the accelerator pedal from
these signals and controls the throttle control motor based on these
signals.
Idle position of the accelerato
r pedal is determined by the ECM
receiving the signal from the accelerator pedal positi on sensor. The ECM uses this signal for the engine oper-
ation such as fuel cut.
CONSULT-III Reference Value in Data Monitor ModeINFOID:0000000001327009
Specification data are reference values.
*: Accelerator pedal position sensor 2 signal is converted by ECM internally. Thus, it differs from ECM terminal voltage.
On Board Diagn osis LogicINFOID:0000000001327010
These self-diagnoses have the one trip detection logic.
FAIL-SAFE MODE
When the malfunction is detected, ECM enters fail-safe mode and the MIL lights up.
DTC Confirmation ProcedureINFOID:0000000001327011
NOTE:
If DTC Confirmation Procedure has been previously conduc ted, always turn ignition switch OFF and wait at
least 10 seconds before conducting the next test.
PBIB1741E
MONITOR ITEM CONDITION SPECIFICATION
ACCEL SEN 1 Ignition switch: ON
(Engine stopped) Accelerator pedal: Fully released 0.5 - 1.0V
Accelerator pedal: Fully depressed 4.0 - 4.8V
ACCEL SEN 2* Ignition switch: ON
(Engine stopped) Accelerator pedal: Fully released 0.3 - 1.2V
Accelerator pedal: Fully depressed 3.9 - 4.8V
CLSD THL POS Ignition switch: ON
(Engine stopped) Accelerator pedal:
Fully released ON
Accelerator pedal: Slightly depressed OFF
DTC No. Trouble diagnosis name DTC detecting condition Possible cause
P2127
2127 Accelerator pedal posi-
tion sensor 2 circuit low
input An excessively low vo
ltage from the APP sen-
sor 2 is sent to ECM. Harness or connectors
(APP sensor 2 circuit is open or shorted.)
(TP sensor circuit is shorted.)
Accelerator pedal position sensor (APP sensor 2)
Electric throttle control actuator (TP sensor 1 and 2)
P2128
2128
Accelerator pedal posi-
tion sensor 2 circuit high
input An excessively high vo
ltage from the APP sen-
sor 2 is sent to ECM.
Engine operating condition in fail-safe mode
The ECM controls the electric throttle control actuator in regulating the throttle opening in order for the idle position to be within +10
degrees.
The ECM regulates the opening speed of the throttle valve to be slower than the normal condition.
So, the acceleration will be poor.
3AA93ABC3ACD3AC03ACA3AC03AC63AC53A913A773A893A873A873A8E3A773A983AC73AC93AC03AC3
3A893A873A873A8F3A773A9D3AAF3A8A3A8C3A863A9D3AAF3A8B3A8C
Page 2356 of 3924
![INFINITI FX35 2008 Service Manual
EC-1116
< SERVICE INFORMATION >[VK45DE]
DTC P2135 TP SENSOR
DTC P2135 TP SENSOR
Component DescriptionINFOID:0000000001327016
Electric throttle control actuator
consists of throttle control motor,
th INFINITI FX35 2008 Service Manual
EC-1116
< SERVICE INFORMATION >[VK45DE]
DTC P2135 TP SENSOR
DTC P2135 TP SENSOR
Component DescriptionINFOID:0000000001327016
Electric throttle control actuator
consists of throttle control motor,
th](/manual-img/42/57017/w960_57017-2355.png)
EC-1116
< SERVICE INFORMATION >[VK45DE]
DTC P2135 TP SENSOR
DTC P2135 TP SENSOR
Component DescriptionINFOID:0000000001327016
Electric throttle control actuator
consists of throttle control motor,
throttle position sensor, etc. The throttle position sensor responds to
the throttle valve movement.
The throttle position sensor has t he two sensors. These sensors are
a kind of potentiometers which transform the throttle valve position
into output voltage, and emit the voltage signal to the ECM. In addi-
tion, these sensors detect the opening and closing speed of the
throttle valve and feed the voltage signals to the ECM. The ECM
judges the current opening angle of the throttle valve from these sig-
nals and the ECM controls the throttle control motor to make the
throttle valve opening angle properly in response to driving condi-
tion.
CONSULT-III Reference Value in Data Monitor ModeINFOID:0000000001327017
Specification data are reference values.
*: Throttle position sensor 2 signal is converted by ECM internally. Thus, it differs from ECM terminal voltage signal.
On Board Diagn osis LogicINFOID:0000000001327018
This self-diagnosis has the one trip detection logic.
FAIL-SAFE MODE
When the malfunction is detected, ECM enters fail-safe mode and the MIL lights up.
DTC Confirmation ProcedureINFOID:0000000001327019
NOTE:
If DTC Confirmation Procedure has been previously conduc ted, always turn ignition switch OFF and wait at
least 10 seconds before conducting the next test.
TESTING CONDITION:
Before performing the following procedure, confirm that battery voltage is more than 8V at idle.
1. Start engine and let it idle for 1 second.
2. Check DTC.
3. If DTC is detected, go to EC-1118, "
Diagnosis Procedure".
PBIB0145E
MONITOR ITEM CONDITION SPECIFICATION
TP SEN 1-B1
TP SEN 2-B1* Ignition switch: ON
(Engine stopped)
Selector lever: D Accelerator pedal: Fully released More than 0.36V
Accelerator pedal: Fully depressed Less than 4.75V
DTC No. Trouble diagnosis name DTC detecting condition Possible cause
P2135
2135 Throttle position sensor
circuit range/perfor-
mance Rationally incorrect voltage is sent to ECM
compared with the signals from TP sensor 1
and TP sensor 2. Harness or connector
(TP sensor 1 and 2 circuit is open or
shorted.)
(APP sensor 2 circuit is shorted.)
Electric throttle control actuator
(TP sensor 1 and 2)
Accelerator pedal position sensor (APP sensor 2)
Engine operation condition in fail-safe mode
The ECM controls the electric throttle control actuator in regulating the throttle opening in order for the idle position to be within +10
degrees.
The ECM regulates the opening speed of the throttle valve to be slower than the normal condition.
So, the acceleration will be poor.
3AA93ABC3ACD3AC03ACA3AC03AC63AC53A913A773A893A873A873A8E3A773A983AC73AC93AC03AC3
3A893A873A873A8F3A773A9D3AAF3A8A3A8C3A863A9D3AAF3A8B3A8C
Page 2362 of 3924
![INFINITI FX35 2008 Service Manual
EC-1122
< SERVICE INFORMATION >[VK45DE]
DTC P2138 APP SENSOR
DTC P2138 APP SENSOR
Component DescriptionINFOID:0000000001327024
The accelerator pedal position sensor is installed on the upper end
of t INFINITI FX35 2008 Service Manual
EC-1122
< SERVICE INFORMATION >[VK45DE]
DTC P2138 APP SENSOR
DTC P2138 APP SENSOR
Component DescriptionINFOID:0000000001327024
The accelerator pedal position sensor is installed on the upper end
of t](/manual-img/42/57017/w960_57017-2361.png)
EC-1122
< SERVICE INFORMATION >[VK45DE]
DTC P2138 APP SENSOR
DTC P2138 APP SENSOR
Component DescriptionINFOID:0000000001327024
The accelerator pedal position sensor is installed on the upper end
of the accelerator pedal assembly. The sensor detects the accelera-
tor position and sends a signal to the ECM.
Accelerator pedal position sensor has two sensors. These sensors
are a kind of potentiometers which transform the accelerator pedal
position into output voltage, and emit the voltage signal to the ECM.
In addition, these sensors detect the opening and closing speed of
the accelerator pedal and feed the voltage signals to the ECM. The
ECM judges the current opening angle of the accelerator pedal from
these signals and controls the throttle control motor based on these
signals.
Idle position of the accelerato
r pedal is determined by the ECM
receiving the signal from the accelerator pedal positi on sensor. The ECM uses this signal for the engine oper-
ation such as fuel cut.
CONSULT-III Reference Value in Data Monitor ModeINFOID:0000000001327025
Specification data are reference values.
*: Accelerator pedal position sensor 2 signal is converted by ECM internally. Thus, it differs from ECM terminal voltage.
On Board Diagn osis LogicINFOID:0000000001327026
This self-diagnosis has the one trip detection logic.
NOTE:
If DTC P2138 is displayed with DTC P0643, first pe rform the trouble diagnosis for DTC P0643. Refer to
EC-1009
.
FAIL-SAFE MODE
When the malfunction is detected, ECM enters fail-safe mode and the MIL lights up.
PBIB1741E
MONITOR ITEM CONDITION SPECIFICATION
ACCEL SEN 1 Ignition switch: ON
(Engine stopped) Accelerator pedal: Fully released 0.5 - 1.0V
Accelerator pedal: Fully depressed 4.0 - 4.8V
ACCEL SEN 2* Ignition switch: ON
(Engine stopped) Accelerator pedal: Fully released 0.3 - 1.2V
Accelerator pedal: Fully depressed 3.9 - 4.8V
CLSD THL POS Ignition switch: ON
(Engine stopped) Accelerator pedal:
Fully released ON
Accelerator pedal: Slightly depressed OFF
DTC No. Trouble diagnosis name DTC detecting condition Possible cause
P2138
2138 Accelerator pedal posi-
tion sensor circuit range/
performance Rationally incorrect voltage is sent to ECM
compared with the sign
als from APP sensor 1
and APP sensor 2. Harness or connector
(APP sensor 1 and 2 circuit is open or
shorted.)
(TP sensor circuit is shorted.)
Accelerator pedal position sensor
(APP sensor 1 and 2)
Electric throttle control actuator (TP sensor 1 and 2)
Engine operating condition in fail-safe mode
The ECM controls the electric throttle control actuator in regulating the throttle opening in order for the idle position to be within +10
degrees.
The ECM regulates the opening speed of the throttle valve to be slower than the normal condition.
So, the acceleration will be poor.
3AA93ABC3ACD3AC03ACA3AC03AC63AC53A913A773A893A873A873A8E3A773A983AC73AC93AC03AC3
3A893A873A873A8F3A773A9D3AAF3A8A3A8C3A863A9D3AAF3A8B3A8C
Page 2436 of 3924
![INFINITI FX35 2008 Service Manual
EC-1196
< SERVICE INFORMATION >[VK45DE]
SERVICE DATA AND SPECIFICATIONS (SDS)
SERVICE DATA AND SPECIFICATIONS (SDS)
Fuel PressureINFOID:0000000001327089
Idle Speed and Ignition TimingINFOID:000000000 INFINITI FX35 2008 Service Manual
EC-1196
< SERVICE INFORMATION >[VK45DE]
SERVICE DATA AND SPECIFICATIONS (SDS)
SERVICE DATA AND SPECIFICATIONS (SDS)
Fuel PressureINFOID:0000000001327089
Idle Speed and Ignition TimingINFOID:000000000](/manual-img/42/57017/w960_57017-2435.png)
EC-1196
< SERVICE INFORMATION >[VK45DE]
SERVICE DATA AND SPECIFICATIONS (SDS)
SERVICE DATA AND SPECIFICATIONS (SDS)
Fuel PressureINFOID:0000000001327089
Idle Speed and Ignition TimingINFOID:0000000001327090
*: Under the following conditions:
Air conditioner switch: OFF
Electric load: OFF (Lights, heater fan & rear window defogger)
Steering wheel: Kept in straight-ahead position
Calculated Load ValueINFOID:0000000001327091
Mass Air Flow SensorINFOID:0000000001327092
*: Engine is warmed up to normal operating temperature and running under no load.
Intake Air Temperature SensorINFOID:0000000001327093
Engine Coolant Te
mperature SensorINFOID:0000000001327094
Fuel Tank Temperature SensorINFOID:0000000001327095
Fuel pressure at idling kPa (kg/cm2, psi) Approximately 350 (3.57, 51)
Target idle speed No load* (in P or N position) 650
±50 rpm
Air conditioner: ON In P or N position 700 rpm or more
Ignition timing In P or N position 12 ° ± 5 ° BTDC
Condition Calculated load value% (Using CONSULT-III or GST)
At idle 14.0 - 33.0
At 2,500 rpm 12.0 - 25.0
Supply voltageBattery voltage (11 - 14V)
Output voltage at idle 1.0 - 1.3V*
Mass air flow (Using CONSULT-III or GST) 2.0 - 6.0 g·m/sec at idle*
7.0 - 20.0 g·m/sec at 2,500 rpm*
Temperature °C ( °F) Resistance k Ω
25 (77) 1.800 - 2.200
Temperature °C ( °F) Resistance k Ω
20 (68) 2.1 - 2.9
50 (122) 0.68 - 1.00
90 (194) 0.236 - 0.260
Temperature °C ( °F) Resistance k Ω
20 (68) 2.3 - 2.7
50 (122) 0.79 - 0.90
3AA93ABC3ACD3AC03ACA3AC03AC63AC53A913A773A893A873A873A8E3A773A983AC73AC93AC03AC3
3A893A873A873A8F3A773A9D3AAF3A8A3A8C3A863A9D3AAF3A8B3A8C
Page 2893 of 3924

SERVICE INFORMATION FOR ELECTRICAL INCIDENTGI-31
< SERVICE INFORMATION >
C
DE
F
G H
I
J
K L
M B
GI
N
O P
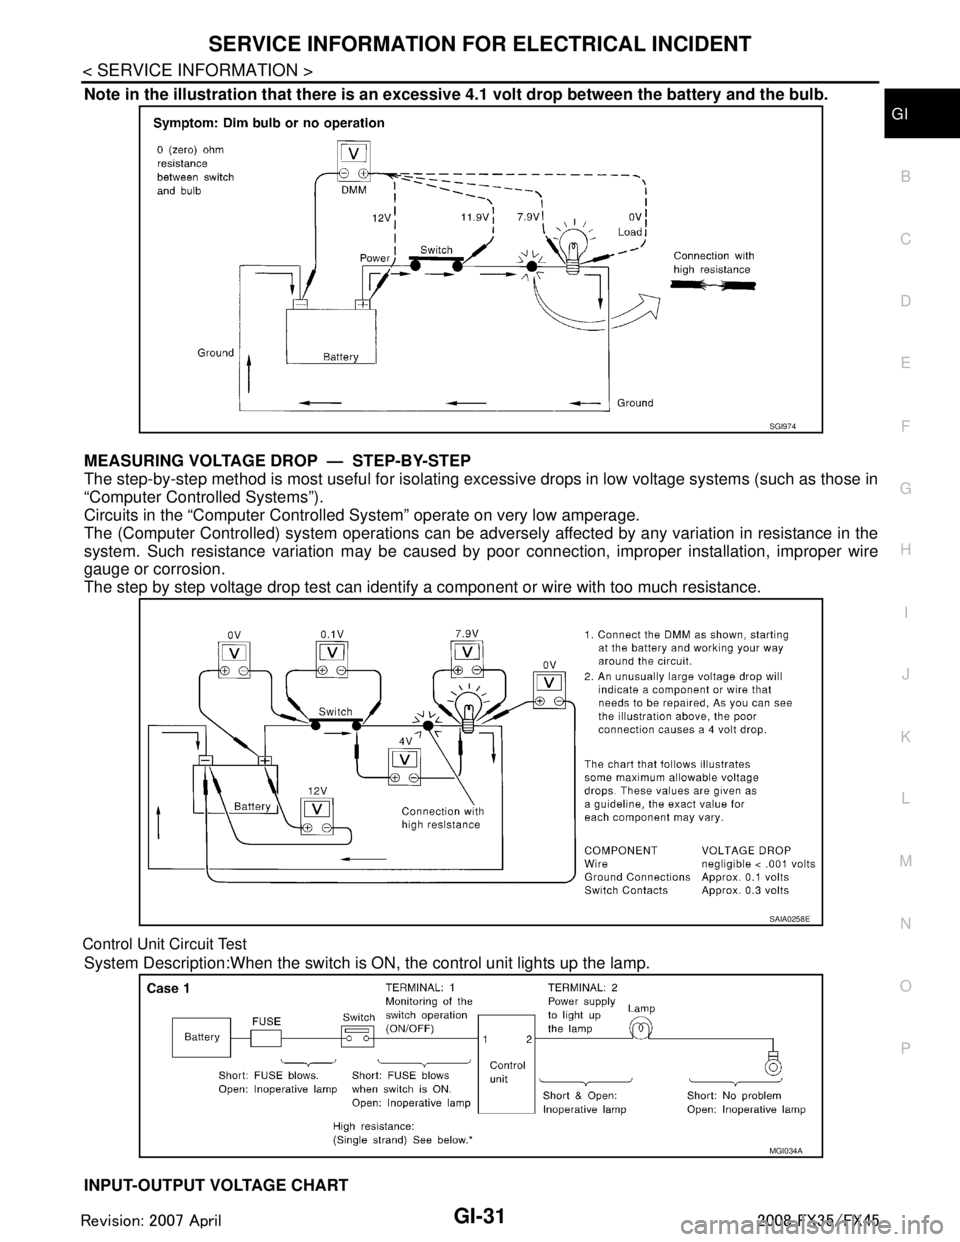
Note in the illustration that there is an excessi ve 4.1 volt drop between the battery and the bulb.
MEASURING VOLTAGE DRO P — STEP-BY-STEP
The step-by-step method is most useful for isolating ex cessive drops in low voltage systems (such as those in
“Computer Controlled Systems”).
Circuits in the “Computer Controlled System” operate on very low amperage.
The (Computer Controlled) system oper ations can be adversely affected by any variation in resistance in the
system. Such resistance variation may be caused by poor connection, improper installation, improper wire
gauge or corrosion.
The step by step voltage drop test can identify a component or wire with too much resistance.
Control Unit Circuit Test
System Description:When the switch is ON, the control unit lights up the lamp.
INPUT-OUTPUT VOLTAGE CHART
SGI974
SAIA0258E
MGI034A
3AA93ABC3ACD3AC03ACA3AC03AC63AC53A913A773A893A873A873A8E3A773A983AC73AC93AC03AC3
3A893A873A873A8F3A773A9D3AAF3A8A3A8C3A863A9D3AAF3A8B3A8C
Page 3120 of 3924

LT-18
< SERVICE INFORMATION >
HEADLAMP - XENON TYPE -
NOTE:
Perform monitoring of IPDM E/R data with ignition switch ON. When ignition switch is at ACC, display may not
be correct.
ACTIVE TEST
Headlamp Does Not Change To High Beam (Both Sides)INFOID:0000000001381742
1.CHECK COMBINATION SWITCH INPUT SIGNAL
CONSULT-III DATA MONITOR
1. Select “HI BEAM SW” of BCM data monitor item.
2. With operating the lighting switch, check the monitor status.
CHECK THE COMBINATION SWITCH
Refer to LT-104, "
Combination Switch Inspection".
OK or NG
OK >> GO TO 2.
NG >> Check combination switch (lighting switch). Refer to LT-104, "
Combination Switch Inspection".
2.HEADLAMP ACTIVE TEST
CONSULT-III ACTIVE TEST
1. Select “LAMPS” of IPDM E/R active test item.
2. With operating the test item, check the headlamp high beam operation.
IPDM E/R AUTO ACTIVE TEST
1. Start auto active test. Refer to PG-20, "
Auto Active Test".
2. Check that the headlamp high beam operation.
OK or NG
OK >> GO TO 3.
NG >> GO TO 4.
3.CHECK IPDM E/R
Item name CONSULT-III
screen display Display
or unit Monitor item selection
Description
ALL
SIGNALS MAIN
SIGNALS SELECTION
FROM MENU
Position lights request TAIL & CLR REQ ON/OFF ×× ×Signal status input from BCM
Headlamp low beam request HL LO REQ ON/OFF ×× ×Signal status input from BCM
Headlamp high beam request HL HI REQ ON/OFF ×× ×Signal status input from BCM
Front fog lights request FR FOG REQ ON/OFF ×× ×Signal status input from BCM
Te s t i t e mCONSULT-III
screen display Description
Headlamp relay (HI, LO) output
LAMPSAllows headlamp relay (HI, LO) to operate by switching operation (OFF, HI ON,
LO ON) at your option (Headlamp high beam repeats ON-OFF every 1 second).
Front fog lamp relay output Allows front fog lamp relay to operate by switching operation ON-OFF at your op-
tion.
Tail lamp relay output TAIL LAMP Allows tail lamp relay to operate by switching operation ON-OFF at your option.
When lighting switch is
HIGH BEAM : HI BEAM SW ON
Headlamp high beam should operate.
(Headlamp high beam repeats ON-OFF every 1 second).
Headlamp high beam should operate.
3AA93ABC3ACD3AC03ACA3AC03AC63AC53A913A773A893A873A873A8E3A773A983AC73AC93AC03AC3
3A893A873A873A8F3A773A9D3AAF3A8A3A8C3A863A9D3AAF3A8B3A8C
Page 3129 of 3924

HEADLAMP - XENON TYPE -LT-27
< SERVICE INFORMATION >
C
DE
F
G H
I
J
L
M A
B
LT
N
O P
Xenon Headlamp Trouble DiagnosisINFOID:0000000001328286
1.CHECK 1: XENON HEADLAMP LIGHTING
Install normal xenon bulb to corresponding xenon bulb headlamp, and check if lamp lights up.
OK or NG
OK >> Replace xenon bulb.
NG >> GO TO 2.
2.CHECK 2: XENON HEADLAMP LIGHTING
Install normal HID control unit to corresponding xenon headlamp, and check if lamp lights up.
OK or NG
OK >> Replace HID control unit.
NG >> GO TO 3.
3.CHECK 3: XENON HEADLAMP LIGHTING
Install normal xenon lamp housing assembly to corresponding xenon headlamp, and check if lamp lights up.
OK or NG
OK >> Replace xenon headlamp housing assembly. [Malfunction in starter (boosting circuit) in xenon headlamp housing]
NG >> INSPECTION END
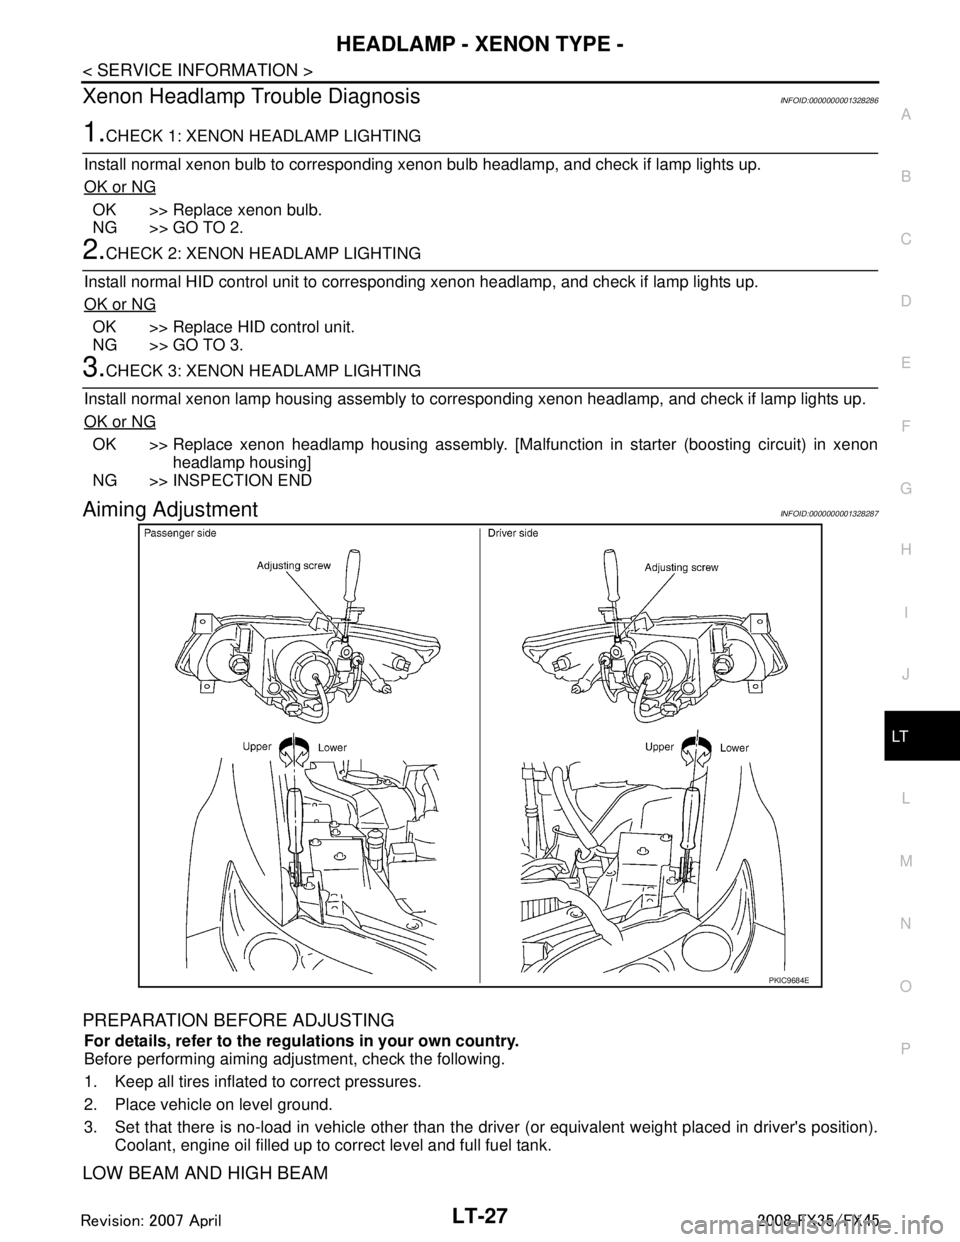
Aiming AdjustmentINFOID:0000000001328287
PREPARATION BEFORE ADJUSTING
For details, refer to the regulations in your own country.
Before performing aiming adjustment, check the following.
1. Keep all tires inflated to correct pressures.
2. Place vehicle on level ground.
3. Set that there is no-load in vehicle other than the driv er (or equivalent weight placed in driver's position).
Coolant, engine oil filled up to correct level and full fuel tank.
LOW BEAM AND HIGH BEAM
PKIC9684E
3AA93ABC3ACD3AC03ACA3AC03AC63AC53A913A773A893A873A873A8E3A773A983AC73AC93AC03AC3
3A893A873A873A8F3A773A9D3AAF3A8A3A8C3A863A9D3AAF3A8B3A8C
Page 3144 of 3924

LT-42
< SERVICE INFORMATION >
DAYTIME LIGHT SYSTEM
OK >> GO TO 2.
NG >> If fuse is blown, be sure to eliminate cause of malfunction before installing new fuse. Refer to PG-
3.
2.CHECK POWER SUPPLY CIRCUIT
1. Turn ignition switch OFF.
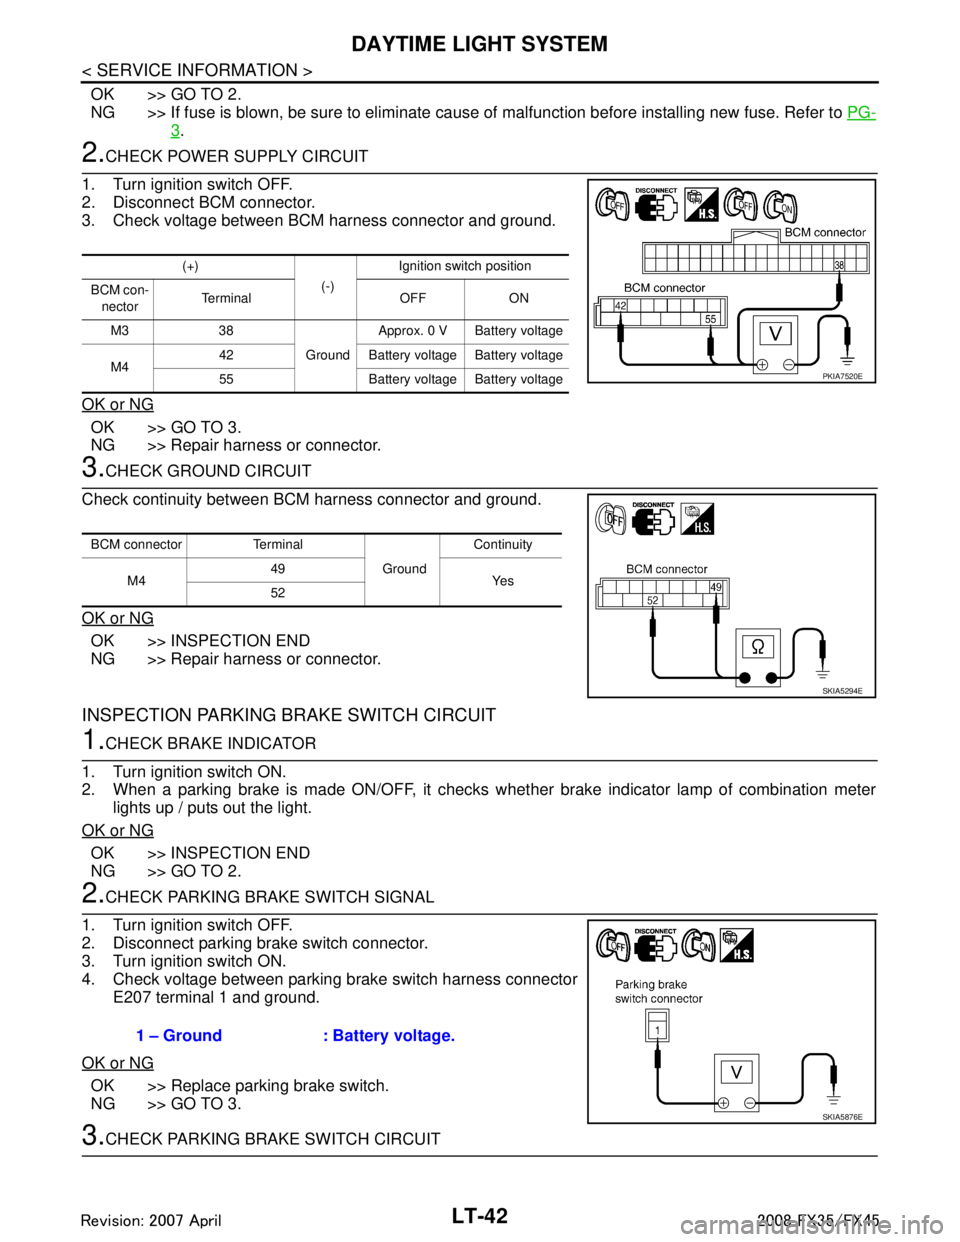
2. Disconnect BCM connector.
3. Check voltage between BCM harness connector and ground.
OK or NG
OK >> GO TO 3.
NG >> Repair harness or connector.
3.CHECK GROUND CIRCUIT
Check continuity between BCM harness connector and ground.
OK or NG
OK >> INSPECTION END
NG >> Repair harness or connector.
INSPECTION PARKING BRAKE SWITCH CIRCUIT
1.CHECK BRAKE INDICATOR
1. Turn ignition switch ON.
2. When a parking brake is made ON/OFF, it checks w hether brake indicator lamp of combination meter
lights up / puts out the light.
OK or NG
OK >> INSPECTION END
NG >> GO TO 2.
2.CHECK PARKING BRAKE SWITCH SIGNAL
1. Turn ignition switch OFF.
2. Disconnect parking brake switch connector.
3. Turn ignition switch ON.
4. Check voltage between parking brake switch harness connector E207 terminal 1 and ground.
OK or NG
OK >> Replace parking brake switch.
NG >> GO TO 3.
3.CHECK PARKING BRAKE SWITCH CIRCUIT
(+) (-)Ignition switch position
BCM con- nector Te r m i n a l O F F O N
M3 38 GroundApprox. 0 V Battery voltage
M4 42 Battery voltage Battery voltage
55 Battery voltage Battery voltage
PKIA7520E
BCM connector Terminal
GroundContinuity
M4 49
Ye s
52
SKIA5294E
1 – Ground : Battery voltage.
SKIA5876E
3AA93ABC3ACD3AC03ACA3AC03AC63AC53A913A773A893A873A873A8E3A773A983AC73AC93AC03AC3
3A893A873A873A8F3A773A9D3AAF3A8A3A8C3A863A9D3AAF3A8B3A8C