2008 INFINITI FX35 air condition
[x] Cancel search: air conditionPage 2953 of 3924
GW-40
< SERVICE INFORMATION >
POWER WINDOW SYSTEM
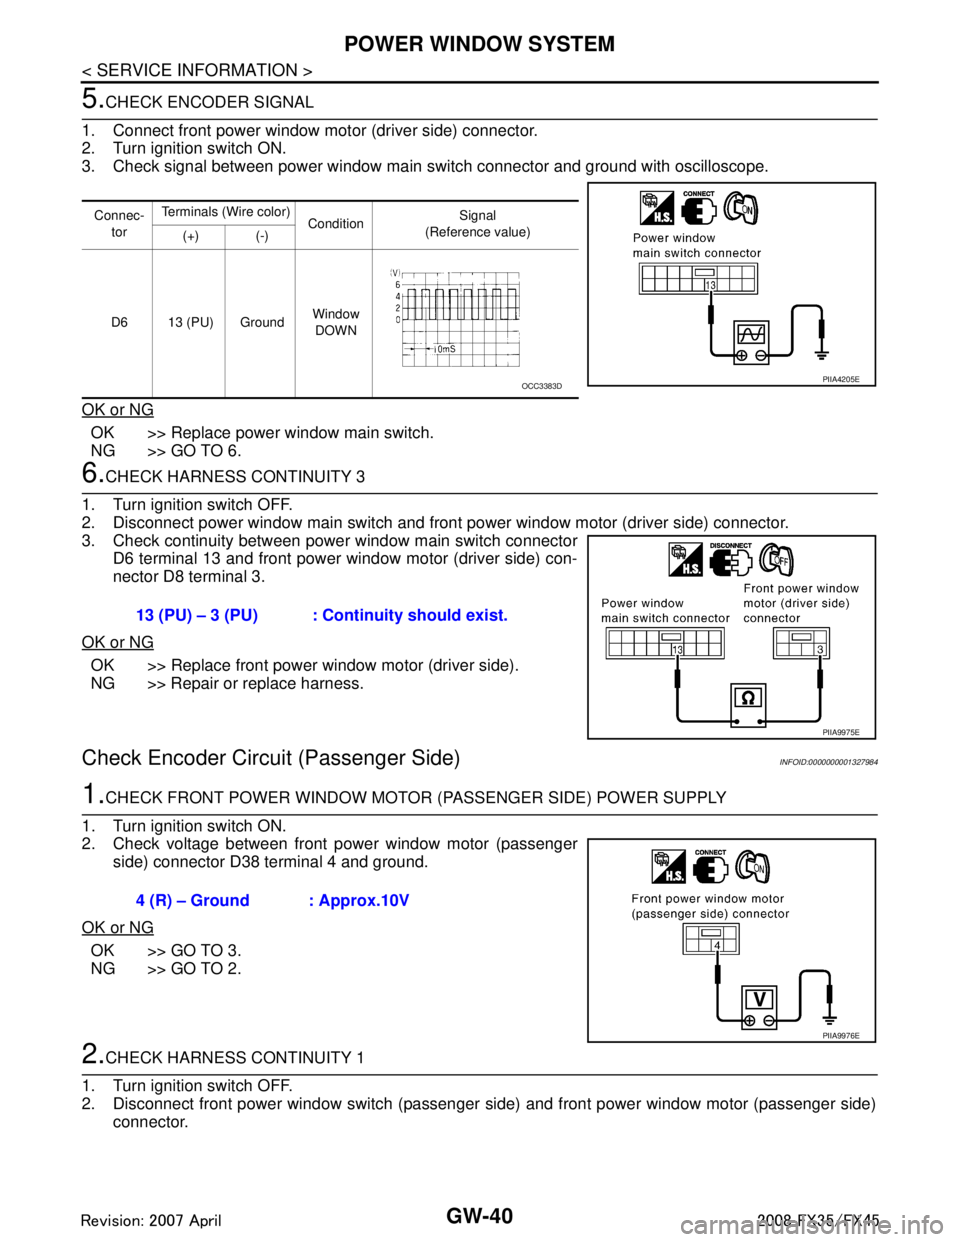
5.CHECK ENCODER SIGNAL
1. Connect front power window motor (driver side) connector.
2. Turn ignition switch ON.
3. Check signal between power window main switch connector and ground with oscilloscope.
OK or NG
OK >> Replace power window main switch.
NG >> GO TO 6.
6.CHECK HARNESS CONTINUITY 3
1. Turn ignition switch OFF.
2. Disconnect power window main switch and front power window motor (driver side) connector.
3. Check continuity between power window main switch connector D6 terminal 13 and front power window motor (driver side) con-
nector D8 terminal 3.
OK or NG
OK >> Replace front power window motor (driver side).
NG >> Repair or replace harness.
Check Encoder Circuit (Passenger Side)INFOID:0000000001327984
1.CHECK FRONT POWER WINDOW MOTOR (PASSENGER SIDE) POWER SUPPLY
1. Turn ignition switch ON.
2. Check voltage between front power window motor (passenger side) connector D38 terminal 4 and ground.
OK or NG
OK >> GO TO 3.
NG >> GO TO 2.
2.CHECK HARNESS CONTINUITY 1
1. Turn ignition switch OFF.
2. Disconnect front power window switch (passenger side) and front power window motor (passenger side) connector.
Connec-
tor Terminals (Wire color)
Condition Signal
(Reference value)
(+) (-)
D6 13 (PU) Ground Window
DOWN
PIIA4205EOCC3383D
13 (PU) – 3 (PU) : Continuity should exist.
PIIA9975E
4 (R) – Ground : Approx.10V
PIIA9976E
3AA93ABC3ACD3AC03ACA3AC03AC63AC53A913A773A893A873A873A8E3A773A983AC73AC93AC03AC3
3A893A873A873A8F3A773A9D3AAF3A8A3A8C3A863A9D3AAF3A8B3A8C
Page 2954 of 3924
POWER WINDOW SYSTEMGW-41
< SERVICE INFORMATION >
C
DE
F
G H
J
K L
M A
B
GW
N
O P
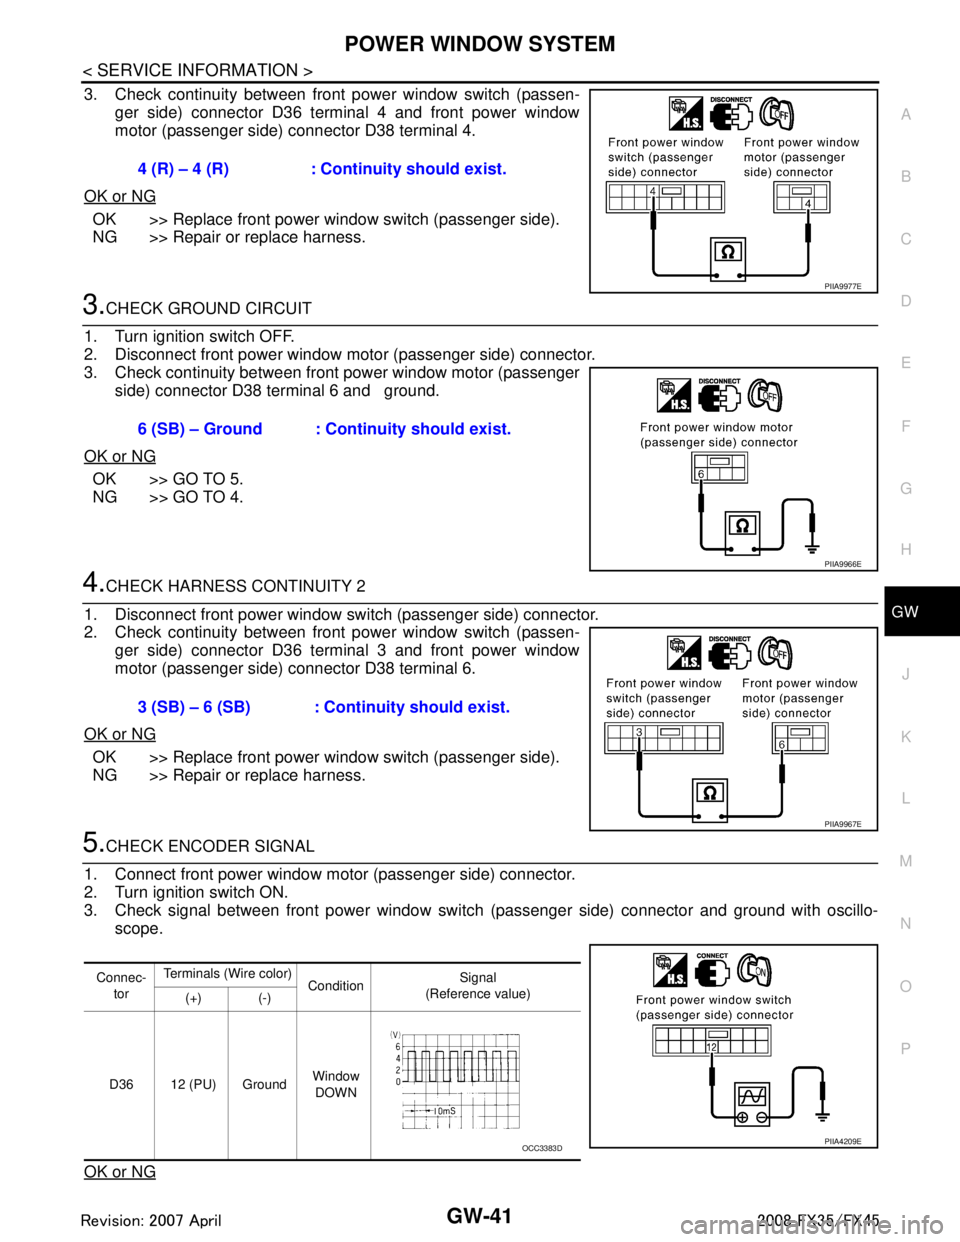
3. Check continuity between front power window switch (passen- ger side) connector D36 terminal 4 and front power window
motor (passenger side) connector D38 terminal 4.
OK or NG
OK >> Replace front power window switch (passenger side).
NG >> Repair or replace harness.
3.CHECK GROUND CIRCUIT
1. Turn ignition switch OFF.
2. Disconnect front power window motor (passenger side) connector.
3. Check continuity between front power window motor (passenger side) connector D38 terminal 6 and ground.
OK or NG
OK >> GO TO 5.
NG >> GO TO 4.
4.CHECK HARNESS CONTINUITY 2
1. Disconnect front power window switch (passenger side) connector.
2. Check continuity between front power window switch (passen- ger side) connector D36 terminal 3 and front power window
motor (passenger side) connector D38 terminal 6.
OK or NG
OK >> Replace front power window switch (passenger side).
NG >> Repair or replace harness.
5.CHECK ENCODER SIGNAL
1. Connect front power window motor (passenger side) connector.
2. Turn ignition switch ON.
3. Check signal between front power window switch (passenger side) connector and ground with oscillo-
scope.
OK or NG
4 (R) – 4 (R) : Continuity should exist.
PIIA9977E
6 (SB) – Ground : Continuity should exist.
PIIA9966E
3 (SB) – 6 (SB) : Continuity should exist.
PIIA9967E
Connec- tor Terminals (Wire color)
Condition Signal
(Reference value)
(+) (-)
D36 12 (PU) Ground Window
DOWN
PIIA4209EOCC3383D
3AA93ABC3ACD3AC03ACA3AC03AC63AC53A913A773A893A873A873A8E3A773A983AC73AC93AC03AC3
3A893A873A873A8F3A773A9D3AAF3A8A3A8C3A863A9D3AAF3A8B3A8C
Page 2955 of 3924
GW-42
< SERVICE INFORMATION >
POWER WINDOW SYSTEM
OK >> Replace front power window switch (passenger side).
NG >> GO TO 6.
6.CHECK HARNESS CONTINUITY 3
1. Turn ignition switch OFF.
2. Disconnect front power window switch (passenger side) and front power window motor (passenger side) connector.
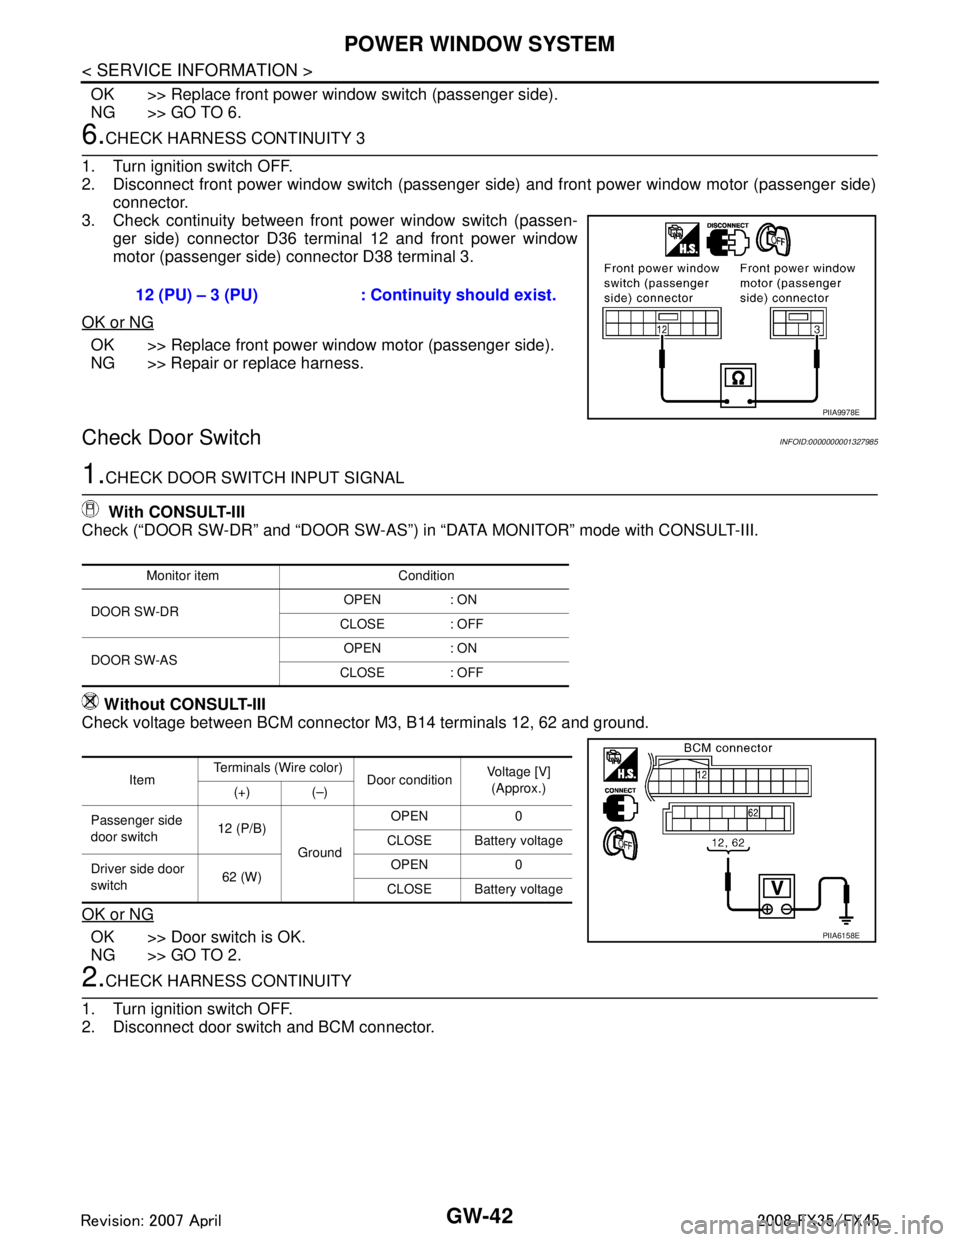
3. Check continuity between front power window switch (passen- ger side) connector D36 terminal 12 and front power window
motor (passenger side) connector D38 terminal 3.
OK or NG
OK >> Replace front power window motor (passenger side).
NG >> Repair or replace harness.
Check Door SwitchINFOID:0000000001327985
1.CHECK DOOR SWITCH INPUT SIGNAL
With CONSULT-III
Check (“DOOR SW-DR” and “DOOR SW-AS”) in “DATA MONITOR” mode with CONSULT-III.
Without CONSULT-III
Check voltage between BCM connector M3, B14 terminals 12, 62 and ground.
OK or NG
OK >> Door switch is OK.
NG >> GO TO 2.
2.CHECK HARNESS CONTINUITY
1. Turn ignition switch OFF.
2. Disconnect door switch and BCM connector. 12 (PU) – 3 (PU) : Continuity should exist.
PIIA9978E
Monitor item Condition
DOOR SW-DR OPEN : ON
CLOSE : OFF
DOOR SW-AS OPEN : ON
CLOSE : OFF
Item Terminals (Wire color)
Door conditionVoltage [V]
(Approx.)
(+) (–)
Passenger side
door switch 12 (P/B)
Ground OPEN 0
CLOSE Battery voltage
Driver side door
switch 62 (W) OPEN 0
CLOSE Battery voltage
PIIA6158E
3AA93ABC3ACD3AC03ACA3AC03AC63AC53A913A773A893A873A873A8E3A773A983AC73AC93AC03AC3
3A893A873A873A8F3A773A9D3AAF3A8A3A8C3A863A9D3AAF3A8B3A8C
Page 2957 of 3924
GW-44
< SERVICE INFORMATION >
POWER WINDOW SYSTEM
Without CONSULT-III
1. Turn ignition switch OFF.
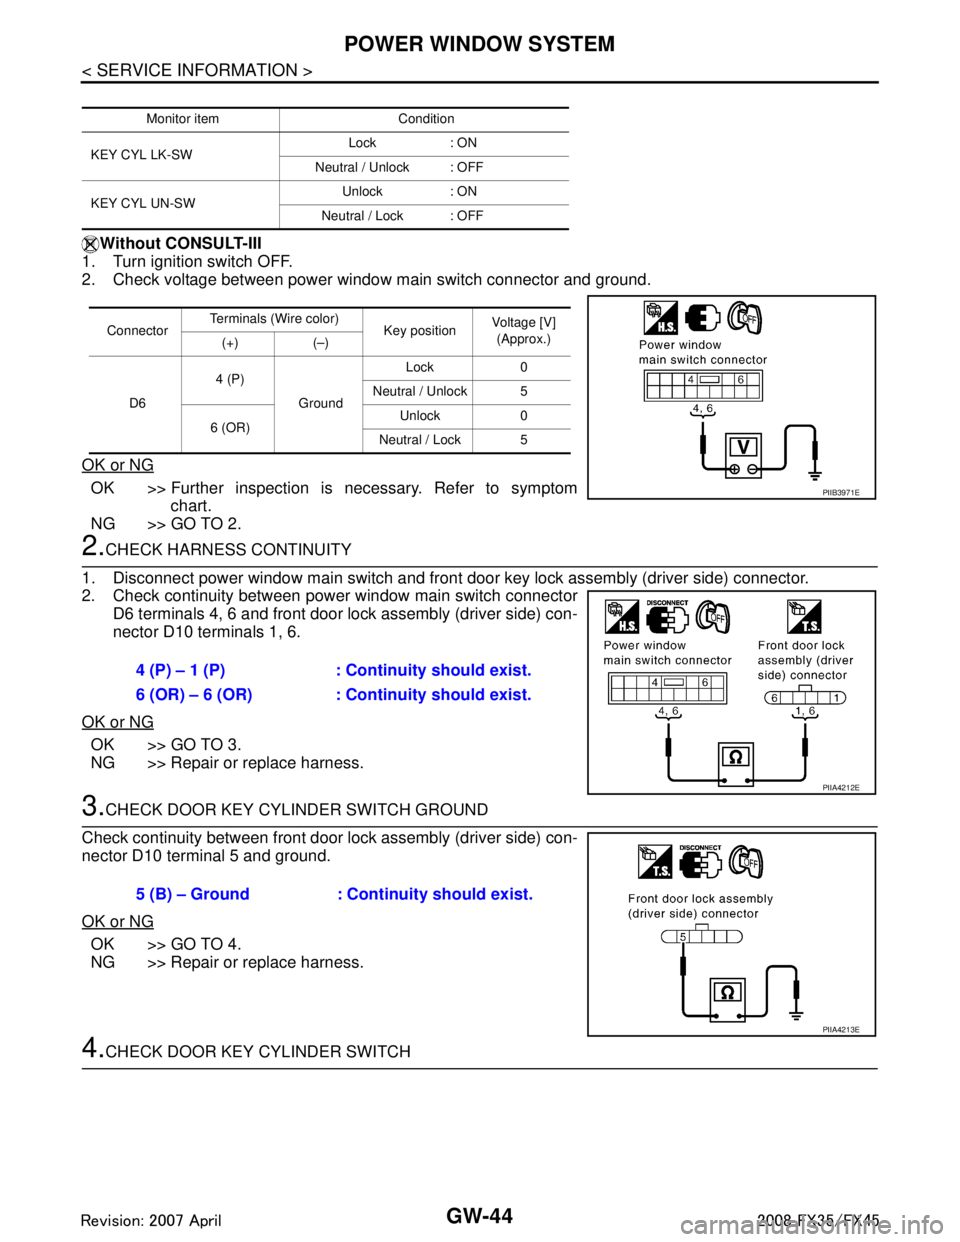
2. Check voltage between power window main switch connector and ground.
OK or NG
OK >> Further inspection is necessary. Refer to symptom chart.
NG >> GO TO 2.
2.CHECK HARNESS CONTINUITY
1. Disconnect power window main switch and front door key lock assembly (driver side) connector.
2. Check continuity between power window main switch connector D6 terminals 4, 6 and front door lock assembly (driver side) con-
nector D10 terminals 1, 6.
OK or NG
OK >> GO TO 3.
NG >> Repair or replace harness.
3.CHECK DOOR KEY CYLINDER SWITCH GROUND
Check continuity between front door lock assembly (driver side) con-
nector D10 terminal 5 and ground.
OK or NG
OK >> GO TO 4.
NG >> Repair or replace harness.
4.CHECK DOOR KEY CYLINDER SWITCH
Monitor item Condition
KEY CYL LK-SW Lock : ON
Neutral / Unlock : OFF
KEY CYL UN-SW Unlock : ON
Neutral / Lock : OFF
Connector Terminals (Wire color)
Key position Voltage [V]
(Approx.)
(+) (–)
D6 4 (P)
Ground Lock 0
Neutral / Unlock 5
6 (OR) Unlock 0
Neutral / Lock 5
PIIB3971E
4 (P) – 1 (P) : Conti nuity should exist.
6 (OR) – 6 (OR) : Cont inuity should exist.
PIIA4212E
5 (B) – Ground : Continuity should exist.
PIIA4213E
3AA93ABC3ACD3AC03ACA3AC03AC63AC53A913A773A893A873A873A8E3A773A983AC73AC93AC03AC3
3A893A873A873A8F3A773A9D3AAF3A8A3A8C3A863A9D3AAF3A8B3A8C
Page 2981 of 3924
GW-68
< SERVICE INFORMATION >
REAR WINDOW DEFOGGER
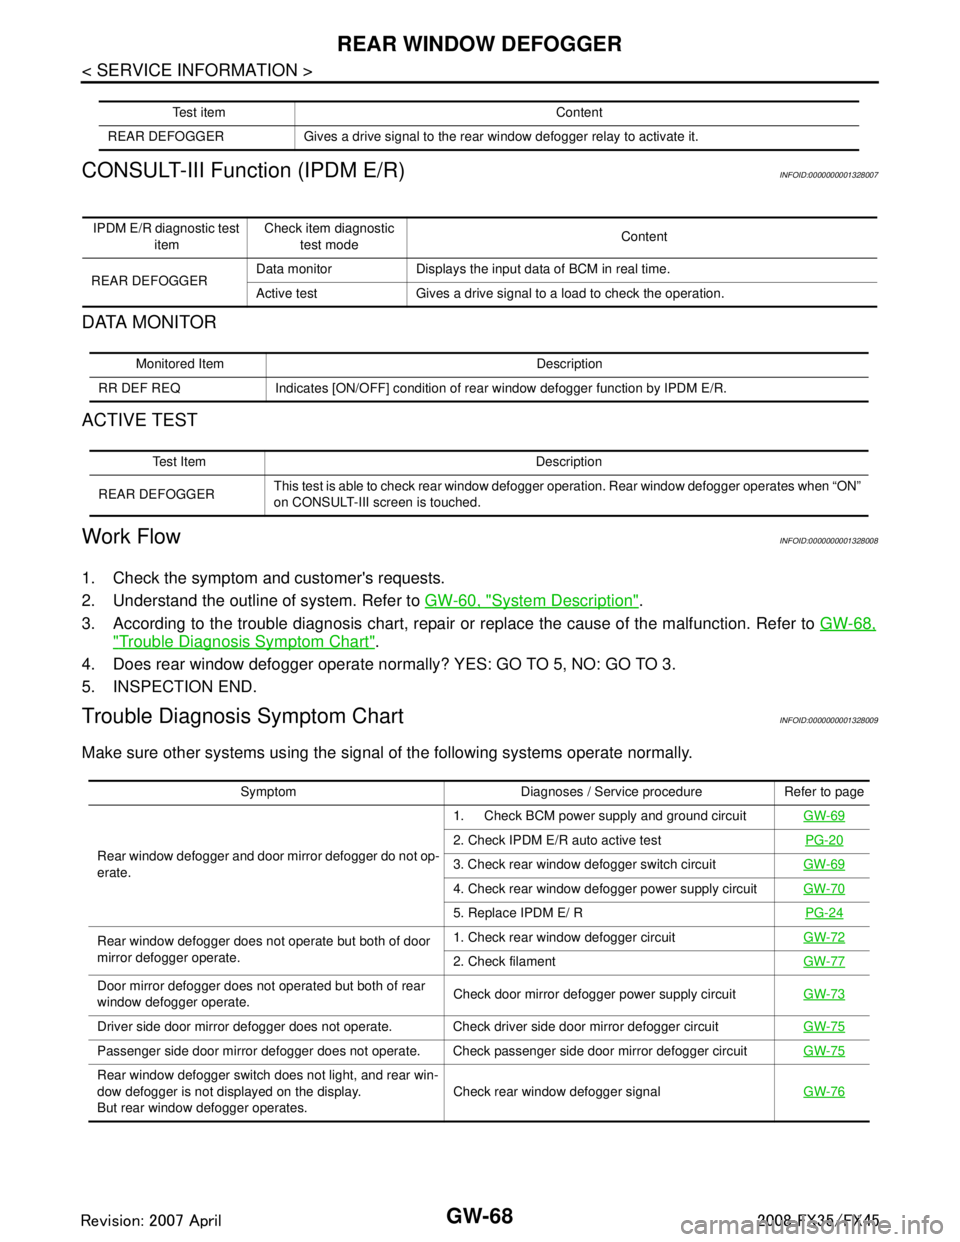
CONSULT-III Function (IPDM E/R)
INFOID:0000000001328007
DATA MONITOR
ACTIVE TEST
Work FlowINFOID:0000000001328008
1. Check the symptom and customer's requests.
2. Understand the outline of system. Refer to GW-60, "
System Description".
3. According to the trouble diagnosis chart, repair or replace the cause of the malfunction. Refer to GW-68,
"Trouble Diagnosis Symptom Chart".
4. Does rear window defogger operate no rmally? YES: GO TO 5, NO: GO TO 3.
5. INSPECTION END.
Trouble Diagnosis Symptom ChartINFOID:0000000001328009
Make sure other systems us ing the signal of the following systems operate normally.
Test item Content
REAR DEFOGGER Gives a drive sign al to the rear window defogger rela y to activate it.
IPDM E/R diagnostic test
item Check item diagnostic
test mode Content
REAR DEFOGGER Data monitor Displays the input data of BCM in real time.
Active test Gives a drive signal to a load to check the operation.
Monitored Item Description
RR DEF REQ Indicates [ON/OFF] condition of rear window defogger function by IPDM E/R.
Test Item Description
REAR DEFOGGER This test is able to check rear window defogger operation. Rear window defogger operates when “ON”
on CONSULT-III screen is touched.
Symptom Diagnoses / Service procedure Refer to page
Rear window defogger and door mirror defogger do not op-
erate. 1. Check BCM power supply and ground circuit
GW-69
2. Check IPDM E/R auto active test PG-20
3. Check rear window defogger switch circuit GW-69
4. Check rear window defogger power supply circuit GW-70
5. Replace IPDM E/ R PG-24
Rear window defogger does not operate but both of door
mirror defogger operate. 1. Check rear window defogger circuit
GW-72
2. Check filament GW-77
Door mirror defogger does not operated but both of rear
window defogger operate. Check door mirror defogger power supply circuit
GW-73
Driver side door mirror defogger does not operate. Check driver side door mirror defogger circuit GW-75
Passenger side door mirror defogger does not operate. Check passenger side door mirror defogger circuit GW-75
Rear window defogger switch does not light, and rear win-
dow defogger is not displayed on the display.
But rear window defogger operates. Check rear window defogger signal
GW-76
3AA93ABC3ACD3AC03ACA3AC03AC63AC53A913A773A893A873A873A8E3A773A983AC73AC93AC03AC3
3A893A873A873A8F3A773A9D3AAF3A8A3A8C3A863A9D3AAF3A8B3A8C
Page 2983 of 3924
GW-70
< SERVICE INFORMATION >
REAR WINDOW DEFOGGER
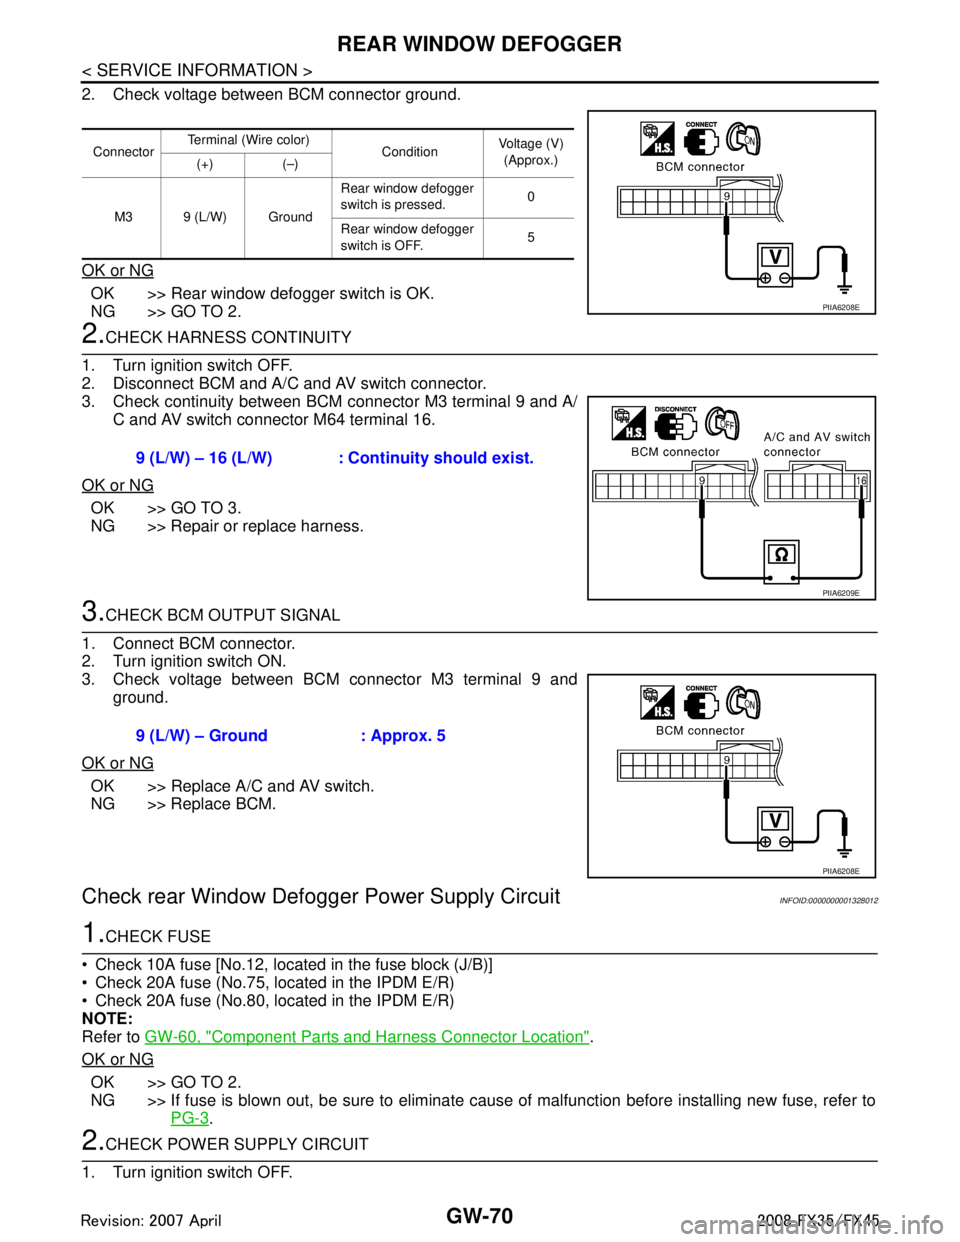
2. Check voltage between BCM connector ground.
OK or NG
OK >> Rear window defogger switch is OK.
NG >> GO TO 2.
2.CHECK HARNESS CONTINUITY
1. Turn ignition switch OFF.
2. Disconnect BCM and A/C and AV switch connector.
3. Check continuity between BCM connector M3 terminal 9 and A/ C and AV switch connector M64 terminal 16.
OK or NG
OK >> GO TO 3.
NG >> Repair or replace harness.
3.CHECK BCM OUTPUT SIGNAL
1. Connect BCM connector.
2. Turn ignition switch ON.
3. Check voltage between BCM connector M3 terminal 9 and ground.
OK or NG
OK >> Replace A/C and AV switch.
NG >> Replace BCM.
Check rear Window Defogger Power Supply CircuitINFOID:0000000001328012
1.CHECK FUSE
Check 10A fuse [No.12, located in the fuse block (J/B)]
Check 20A fuse (No.75, located in the IPDM E/R)
Check 20A fuse (No.80, located in the IPDM E/R)
NOTE:
Refer to GW-60, "
Component Parts and Harness Connector Location".
OK or NG
OK >> GO TO 2.
NG >> If fuse is blown out, be sure to eliminate cause of malfunction before installing new fuse, refer to PG-3
.
2.CHECK POWER SUPPLY CIRCUIT
1. Turn ignition switch OFF.
Connector Terminal (Wire color)
ConditionVoltage (V)
(Approx.)
(+) (–)
M3 9 (L/W) Ground Rear window defogger
switch is pressed.
0
Rear window defogger
switch is OFF. 5
PIIA6208E
9 (L/W) – 16 (L/W) : Cont
inuity should exist.
PIIA6209E
9 (L/W) – Ground : Approx. 5
PIIA6208E
3AA93ABC3ACD3AC03ACA3AC03AC63AC53A913A773A893A873A873A8E3A773A983AC73AC93AC03AC3
3A893A873A873A8F3A773A9D3AAF3A8A3A8C3A863A9D3AAF3A8B3A8C
Page 2984 of 3924
REAR WINDOW DEFOGGERGW-71
< SERVICE INFORMATION >
C
DE
F
G H
J
K L
M A
B
GW
N
O P
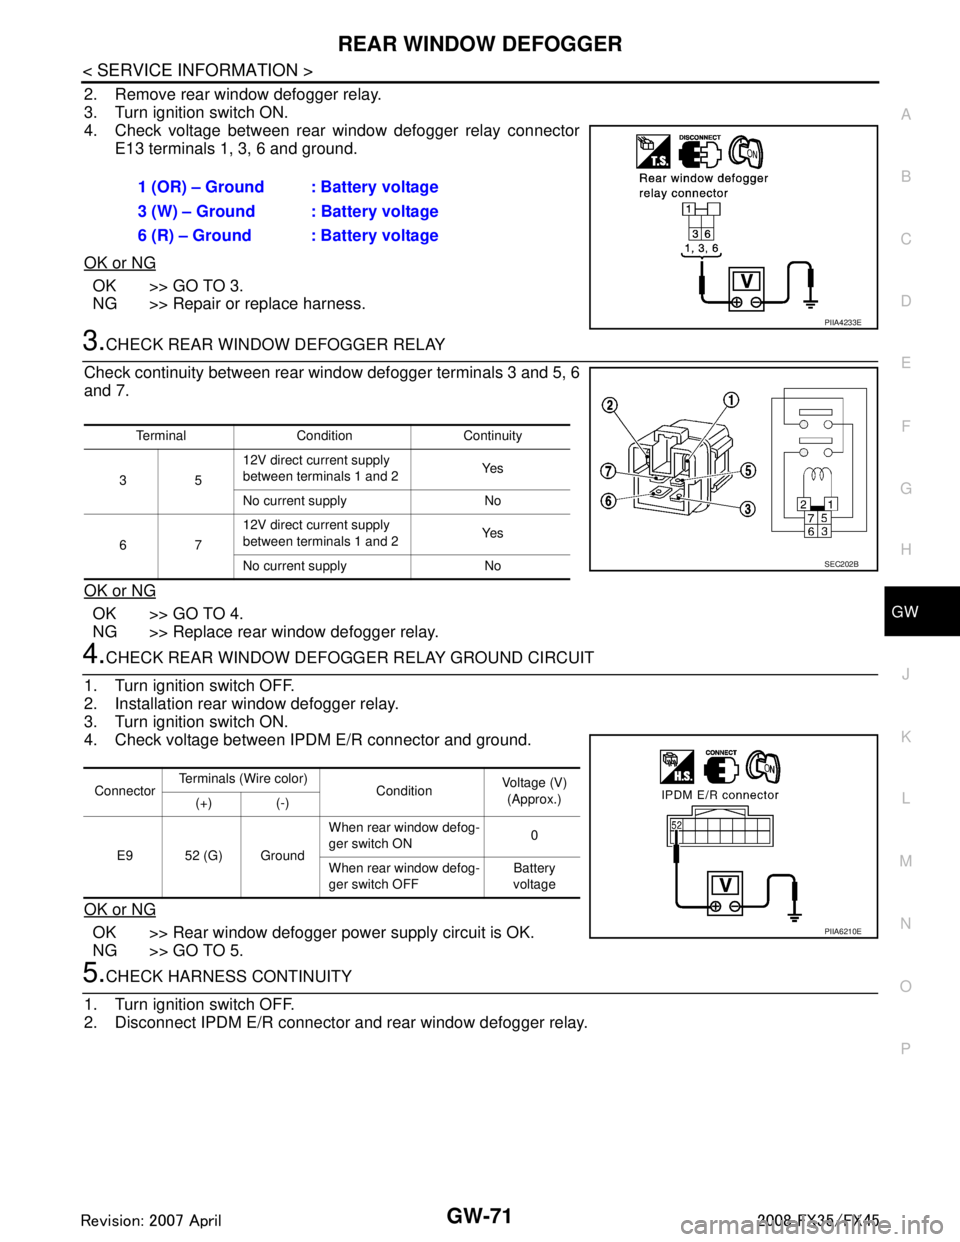
2. Remove rear window defogger relay.
3. Turn ignition switch ON.
4. Check voltage between rear window defogger relay connector E13 terminals 1, 3, 6 and ground.
OK or NG
OK >> GO TO 3.
NG >> Repair or replace harness.
3.CHECK REAR WINDOW DEFOGGER RELAY
Check continuity between rear wi ndow defogger terminals 3 and 5, 6
and 7.
OK or NG
OK >> GO TO 4.
NG >> Replace rear window defogger relay.
4.CHECK REAR WINDOW DEFOGG ER RELAY GROUND CIRCUIT
1. Turn ignition switch OFF.
2. Installation rear window defogger relay.
3. Turn ignition switch ON.
4. Check voltage between IPDM E/R connector and ground.
OK or NG
OK >> Rear window defogger power supply circuit is OK.
NG >> GO TO 5.
5.CHECK HARNESS CONTINUITY
1. Turn ignition switch OFF.
2. Disconnect IPDM E/R connector and rear window defogger relay. 1 (OR) – Ground : Battery voltage
3 (W) – Ground : Battery voltage
6 (R) – Ground : Battery voltage
PIIA4233E
Terminal Condition Continuity
35 12V direct current supply
between terminals 1 and 2
Ye s
No current supply No
67 12V direct current supply
between terminals 1 and 2
Ye s
No current supply No
SEC202B
Connector Terminals (Wire color)
ConditionVoltage (V)
(Approx.)
(+) (-)
E9 52 (G) Ground When rear window defog-
ger switch ON
0
When rear window defog-
ger switch OFF Battery
voltage
PIIA6210E
3AA93ABC3ACD3AC03ACA3AC03AC63AC53A913A773A893A873A873A8E3A773A983AC73AC93AC03AC3
3A893A873A873A8F3A773A9D3AAF3A8A3A8C3A863A9D3AAF3A8B3A8C
Page 2985 of 3924

GW-72
< SERVICE INFORMATION >
REAR WINDOW DEFOGGER
3. Check continuity between IPDM E/R connector E9 terminal 52and rear window defogger relay connector E13 terminal 2.
OK or NG
OK >> GO TO 6.
NG >> Repair or replace harness.
6.CHECK REAR WINDOW DEFOGGER RELAY OUTPUT SIGNAL
1. Connect IPDM E/R connector and rear window defogger relay.
2. Turn ignition switch ON.
3. Check voltage between IPDM E/R connector E9 terminal 52 and ground.
OK or NG
OK >> Check condition of harness and connector.
NG >> Replace IPDM E/R.
Check Rear Window Defogger CircuitINFOID:0000000001328013
1.CHECK POWER SUPPLY CIRCUIT 1
1. Turn ignition switch OFF.
2. Disconnect rear window defogger connector.
3. Turn ignition switch ON.
4. Check voltage between rear window defogger connector and ground.
OK or NG
OK >> GO TO 2.
NG >> GO TO 3.
2.CHECK GROUND CIRCUIT
1. Turn ignition switch OFF. 52 (G) – 2 (G) : Continuity should exist.
PIIA6211E
52 (G) – Ground : Battery voltage
PIIA6210E
Connector
Terminal (Wire color)
ConditionVoltage (V)
(Approx.)
(+) (–)
D104 1(W) Ground Rear window defogger
switch ON.
Battery voltage
Rear window defogger
switch OFF. 0
PIIA9347E
3AA93ABC3ACD3AC03ACA3AC03AC63AC53A913A773A893A873A873A8E3A773A983AC73AC93AC03AC3
3A893A873A873A8F3A773A9D3AAF3A8A3A8C3A863A9D3AAF3A8B3A8C