2008 INFINITI FX35 recommended oil
[x] Cancel search: recommended oilPage 2692 of 3924
![INFINITI FX35 2008 Service Manual
EM-208
< SERVICE INFORMATION >[VK45DE]
TIMING CHAIN
b. Apply a continuous bead of liquid gasket with tube presser
(commercial service tool) to front cover as shown in the figure.
Use Genuine RTV Sili INFINITI FX35 2008 Service Manual
EM-208
< SERVICE INFORMATION >[VK45DE]
TIMING CHAIN
b. Apply a continuous bead of liquid gasket with tube presser
(commercial service tool) to front cover as shown in the figure.
Use Genuine RTV Sili](/manual-img/42/57017/w960_57017-2691.png)
EM-208
< SERVICE INFORMATION >[VK45DE]
TIMING CHAIN
b. Apply a continuous bead of liquid gasket with tube presser
(commercial service tool) to front cover as shown in the figure.
Use Genuine RTV Silicone Seal ant or equivalent. Refer to
GI-44, "
Recommended Chemical Product and Sealant".
c. make sure again that the mating marks on timing chain and that on each sprocket are aligned. Then, install front cover.
CAUTION:
Be careful to avoid interferen ce with the front end of oil
pump drive spacer. Such interf erence may damage front oil
seal.
d. Tighten mounting bolts in numerical order as shown in the fig- ure.
There are four type mounting bolts.
e. After all mounting bolts are tightened, retighten t hem in numerical order as shown in the figure.
CAUTION:
Be sure to wipe off any excessive liquid gasket leaking onto surface mating with oil pan.
11. Install intake valve timing control cover as follows:
a. At the back of intake valve timing control cover, in stall new seal rings (three for each bank) to the area to
be inserted into camshaft sprocket (INT).
CAUTION:
Do not spread seal ring excessively to avoid breaks and deformation.
b. Install new O-rings on front cover.
PBIC0062E
KBIA0354J
PBIC1681E
SBIA0374E
3AA93ABC3ACD3AC03ACA3AC03AC63AC53A913A773A893A873A873A8E3A773A983AC73AC93AC03AC3
3A893A873A873A8F3A773A9D3AAF3A8A3A8C3A863A9D3AAF3A8B3A8C
Page 2693 of 3924
![INFINITI FX35 2008 Service Manual
TIMING CHAINEM-209
< SERVICE INFORMATION > [VK45DE]
C
D
E
F
G H
I
J
K L
M A
EM
NP
O
c. Apply a continuous bead of liquid gasket with tube presser
(commercial service tool) to intake valve timing cont INFINITI FX35 2008 Service Manual
TIMING CHAINEM-209
< SERVICE INFORMATION > [VK45DE]
C
D
E
F
G H
I
J
K L
M A
EM
NP
O
c. Apply a continuous bead of liquid gasket with tube presser
(commercial service tool) to intake valve timing cont](/manual-img/42/57017/w960_57017-2692.png)
TIMING CHAINEM-209
< SERVICE INFORMATION > [VK45DE]
C
D
E
F
G H
I
J
K L
M A
EM
NP
O
c. Apply a continuous bead of liquid gasket with tube presser
(commercial service tool) to intake valve timing control covers as
shown in the figure.
Use Genuine RTV Silicone Seal ant or equivalent. Refer to
GI-44, "
Recommended Chemical Product and Sealant".
d. Tighten mounting bolts in numerical order as shown in the fig- ure.
12. Install intake valve timing control position sensor, intake valve timing control solenoid valve and camshaft position sensor (PHASE) to intake valve timing control cover and front cover if removed.
Be sure to tighten mounting bolts with flanges completely seated.
13. Install oil pan and oil strainer. Refer to EM-183, "
Component".
14. Install crankshaft pulley as follows:
a. Fix crankshaft with ring gear stopper [SST: J-45476].
b. Install crankshaft pulley, taking care not to damage front oil seal. Install according to dowel pin of oil pump drive spacer.
Lightly tapping its center with plastic hammer, insert pulley.CAUTION:
Do not tap pulley on the side surface where belt is installed (outer circumference).
c. Apply engine oil onto threaded parts of crankshaft pulley bolt and seating area.
d. Tighten crankshaft pulley bolt.
e. Put a paint mark on crankshaft pulley aligning with angle mark on crankshaft pulley bolt.
f. Further tighten by 90 degrees. (Angle tightening) Check the tightening angle by referencing to the notches. Theangle between two notches is 90 degrees.
15. Rotate crankshaft pulley in normal direction (clockwise when viewed from engine front) to confirm it turns smoothly.
16. Install in the reverse order of removal after this step. NOTE:
SBIA0375E
PBIC0051E
: 93.1 N·m (9.5 kg-m, 69 ft-lb)
PBIC2346E
3AA93ABC3ACD3AC03ACA3AC03AC63AC53A913A773A893A873A873A8E3A773A983AC73AC93AC03AC3
3A893A873A873A8F3A773A9D3AAF3A8A3A8C3A863A9D3AAF3A8B3A8C
Page 2729 of 3924
![INFINITI FX35 2008 Service Manual
CYLINDER BLOCKEM-245
< SERVICE INFORMATION > [VK45DE]
C
D
E
F
G H
I
J
K L
M A
EM
NP
O
Before loosening main bearing cap bolts, measure the crankshaft end play. Refer to
EM-256, "Inspec-
tion After INFINITI FX35 2008 Service Manual
CYLINDER BLOCKEM-245
< SERVICE INFORMATION > [VK45DE]
C
D
E
F
G H
I
J
K L
M A
EM
NP
O
Before loosening main bearing cap bolts, measure the crankshaft end play. Refer to
EM-256, "Inspec-
tion After](/manual-img/42/57017/w960_57017-2728.png)
CYLINDER BLOCKEM-245
< SERVICE INFORMATION > [VK45DE]
C
D
E
F
G H
I
J
K L
M A
EM
NP
O
Before loosening main bearing cap bolts, measure the crankshaft end play. Refer to
EM-256, "Inspec-
tion After Disassembly".
Loosen main bearing cap bolts in several different steps.
a. Remove cover attached to the rear left side of cylinder block (next to the starter motor housing).
NOTE:
Bolts (No. 27 shown in the figure) are installed on the inside of
cover.
b. Loosen side bolts (M10) starting from 30 to 21 to remove.
c. Loosen main bearing cap sub bolts (M9) starting from 20 to 11 to remove.
d. Loosen main bearing cap bolts (M12) starting from 10 to 1 to remove.
e. Using main bearing cap remover (SST), remove main bearing cap.
15. Remove crankshaft.
16. Remove main bearings and thrust bearings from cylinder block and main bearing caps. CAUTION:
Identify installation po sitions, and store them without mixing them up.
17. If pilot converter must be remov ed, remove it from the rear end
of the crankshaft using pilot bushing puller (SST).
It is possible to remove pilot converter without hoisting engine with engine stand.
ASSEMBLY
1. Fully air-blow engine coolant and engine oil passages in cylinder block, cylinder bore and crankcase to remove any foreign material.
CAUTION:
Use a goggles to protect your eye.
2. Install each plug to the cylinder block. (Only screwed-type plugs are shown in the figure.)
Apply sealant to the thread of each plug “A” and “D”.
Use Genuine High Strength Locking Sealant or equiva-
lent. Refer to GI-44, "
Recommended Chemical Product
and Sealant".
Apply sealant to the thread of each plug “B” and “C”. Use Anaerobic Liquid Gasket or equivalent. Refer to GI-
44, "Recommended Chemical Product and Sealant".
Replace copper washers with new ones.
PBIC0090E
PBIC0091E
PBIC0092E
PBIC1265E
3AA93ABC3ACD3AC03ACA3AC03AC63AC53A913A773A893A873A873A8E3A773A983AC73AC93AC03AC3
3A893A873A873A8F3A773A9D3AAF3A8A3A8C3A863A9D3AAF3A8B3A8C
Page 2732 of 3924
![INFINITI FX35 2008 Service Manual
EM-248
< SERVICE INFORMATION >[VK45DE]
CYLINDER BLOCK
Install rear oil seal to rear oil seal retainer with rear oil seal drift
(commercial service tool).
Tap until flattened with front edge of re INFINITI FX35 2008 Service Manual
EM-248
< SERVICE INFORMATION >[VK45DE]
CYLINDER BLOCK
Install rear oil seal to rear oil seal retainer with rear oil seal drift
(commercial service tool).
Tap until flattened with front edge of re](/manual-img/42/57017/w960_57017-2731.png)
EM-248
< SERVICE INFORMATION >[VK45DE]
CYLINDER BLOCK
Install rear oil seal to rear oil seal retainer with rear oil seal drift
(commercial service tool).
Tap until flattened with front edge of rear oil seal retainer. Do not damage or scratch outer ci rcumference of oil seal.
Make sure the garter spring is in position and seal lips not inverted.
9. Install rear oil seal retainer. Apply new engine oil to both oil seal lip and dust seal lip.
Apply a continuous bead of liquid gasket with tube presser(commercial service tool) to rear oil seal retainer as shown in
the figure.
Use Genuine RTV Silicone Seal ant or equivalent. Refer to
GI-44, "
Recommended Chemical Product and Sealant".
10. Install piston to connecting rod.
a. Using snap ring pliers, install new snap ri ng to the groove of the piston rear side.
Insert it fully into groove to install.
b. Install piston to connecting rod. Using industrial use drier or similar tool, heat piston until piston pin can be pushed in by hand without
excess force [approx. 60 to 70 °C (140 to 158 °F)]. From the front to the rear, insert piston pin into piston
and connecting rod.
Assemble so that the front mark on the piston head and the oil holes and the cylinder No. on connecting rod are positioned as
shown in the figure.
c. Using snap ring pliers, install new snap rings to the groove of the piston front side.
Insert it fully into groove to install.
After installing, make sure that connecting rod movessmoothly.
11. Using piston ring expander (commercial service tool), install pis- ton rings.
CAUTION:
When installing piston ring s, be careful not to damage
piston.
Be careful not to damage pi ston rings by expending them
excessively. Rear oil seal drift
Outer diameter : 102 mm (4.02 in)
Inner diameter : 86 mm (3.39 in)
PBIC0097E
SBIA0391E
PBIC0099E
PBIC0087E
3AA93ABC3ACD3AC03ACA3AC03AC63AC53A913A773A893A873A873A8E3A773A983AC73AC93AC03AC3
3A893A873A873A8F3A773A9D3AAF3A8A3A8C3A863A9D3AAF3A8B3A8C
Page 2810 of 3924

FRONT FINAL DRIVE ASSEMBLYFFD-19
< SERVICE INFORMATION >
CEF
G H
I
J
K L
M A
B
FFD
N
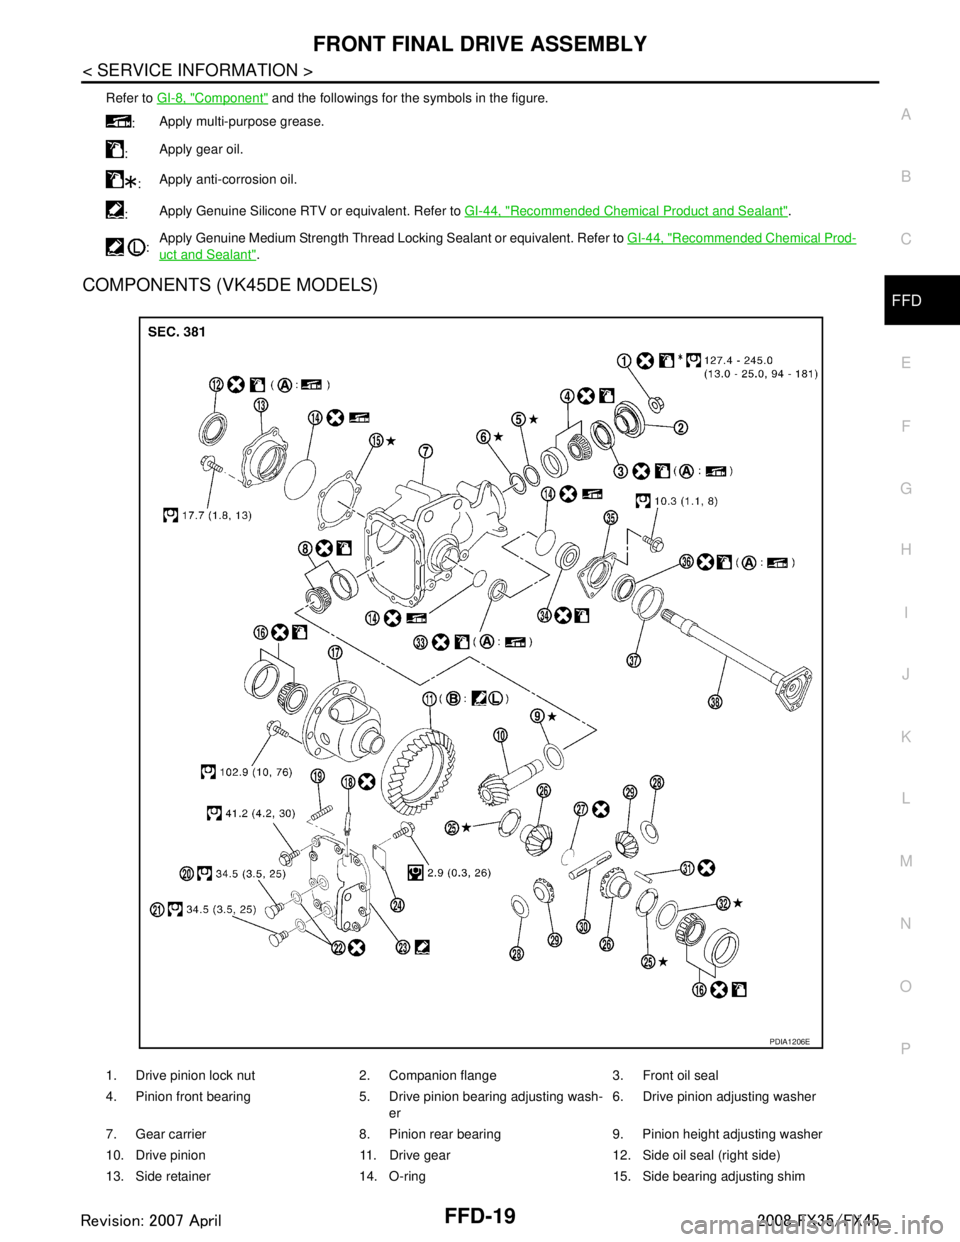
O PCOMPONENTS (VK45DE MODELS)
Refer to GI-8, "Component" and the followings for the symbols in the figure.
: Apply multi-purpose grease.
: Apply gear oil.
: Apply anti-corrosion oil.
: Apply Genuine Silicone RTV or equivalent. Refer to
GI-44, "
Recommended Chemical Product and Sealant".
: Apply Genuine Medium Strength Thread Locking Sealant or equivalent. Refer to
GI-44, "
Recommended Chemical Prod-
uct and Sealant".
1. Drive pinion lock nut 2. Companion flange 3. Front oil seal
4. Pinion front bearing 5. Drive pinion bearing adjusting wash-
er6. Drive pinion adjusting washer
7. Gear carrier 8. Pinion rear bearing 9. Pinion height adjusting washer
10. Drive pinion 11. Drive gear 12. Side oil seal (right side)
13. Side retainer 14. O-ring 15. Side bearing adjusting shim
PDIA1206E
3AA93ABC3ACD3AC03ACA3AC03AC63AC53A913A773A893A873A873A8E3A773A983AC73AC93AC03AC3
3A893A873A873A8F3A773A9D3AAF3A8A3A8C3A863A9D3AAF3A8B3A8C
Page 2811 of 3924

FFD-20
< SERVICE INFORMATION >
FRONT FINAL DRIVE ASSEMBLY
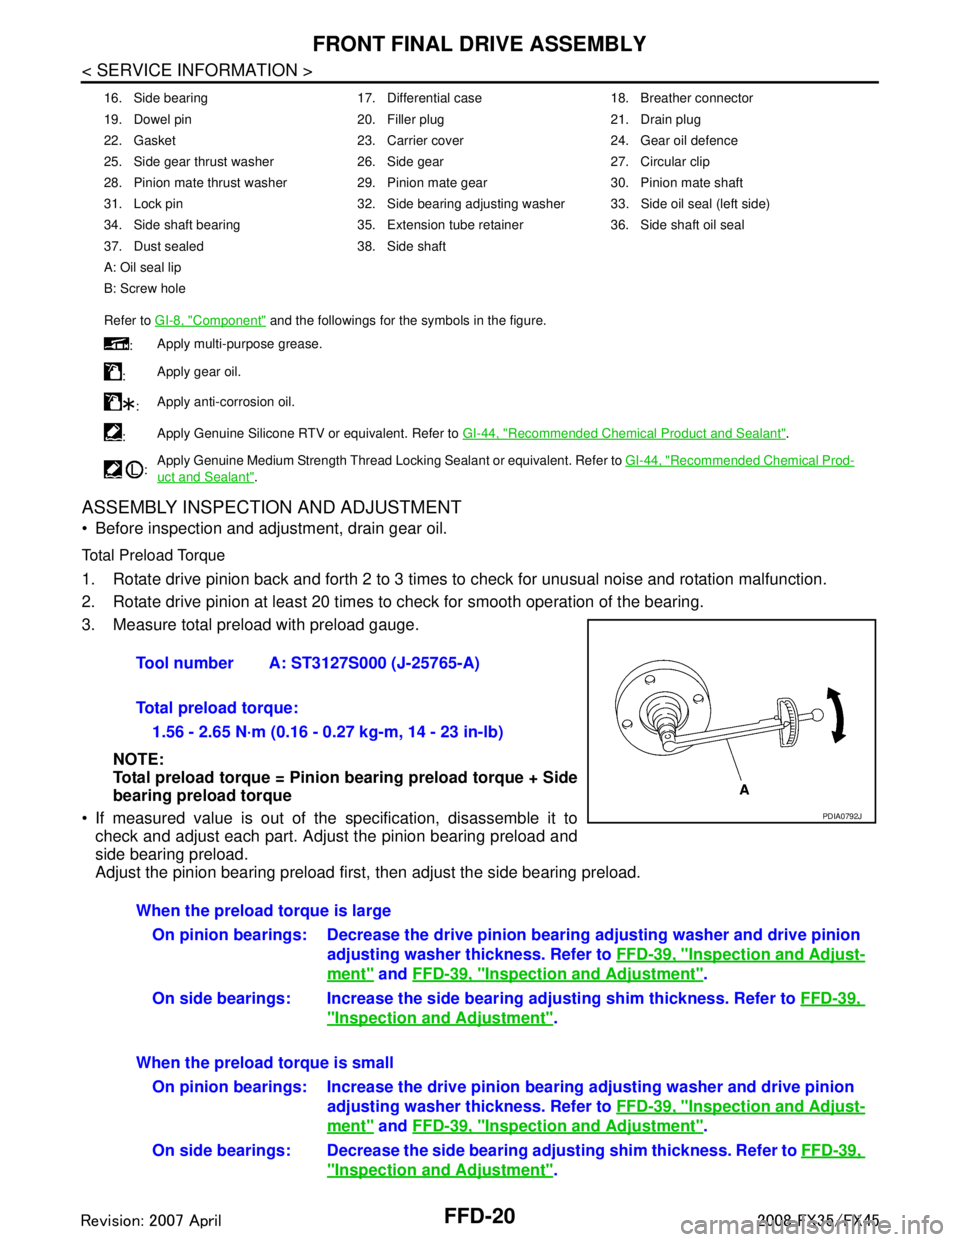
ASSEMBLY INSPECTION AND ADJUSTMENT
Before inspection and adjustment, drain gear oil.
Total Preload Torque
1. Rotate drive pinion back and forth 2 to 3 times to check for unusual noise and rotation malfunction.
2. Rotate drive pinion at least 20 times to check for smooth operation of the bearing.
3. Measure total preload with preload gauge.NOTE:
Total preload torque = Pinion bearing preload torque + Side
bearing preload torque
If measured value is out of the specification, disassemble it to check and adjust each part. Adjust the pinion bearing preload and
side bearing preload.
Adjust the pinion bearing preload first, then adjust the side bearing preload.
16. Side bearing 17. Differential case 18. Breather connector
19. Dowel pin 20. Filler plug 21. Drain plug
22. Gasket 23. Carrier cover 24. Gear oil defence
25. Side gear thrust washer 26. Side gear 27. Circular clip
28. Pinion mate thrust washer 29. Pinion mate gear 30. Pinion mate shaft
31. Lock pin 32. Side bearing adjusting washer 33. Side oil seal (left side)
34. Side shaft bearing 35. Extension tube retainer 36. Side shaft oil seal
37. Dust sealed 38. Side shaft
A: Oil seal lip
B: Screw hole
Refer to GI-8, "
Component" and the followings for the symbols in the figure.
: Apply multi-purpose grease.
: Apply gear oil.
: Apply anti-corrosion oil.
: Apply Genuine Silicone RTV or equivalent. Refer to
GI-44, "
Recommended Chemical Product and Sealant".
: Apply Genuine Medium Strength Thread Locking Sealant or equivalent. Refer to
GI-44, "
Recommended Chemical Prod-
uct and Sealant".
Tool number A: ST3127S000 (J-25765-A)
Total preload torque:
1.56 - 2.65 N·m (0.16 - 0.27 kg-m, 14 - 23 in-lb)
PDIA0792J
When the preload torque is largeOn pinion bearings: Decrease the drive pinion bearing adjusting washer and drive pinion
adjusting washer thickness. Refer to FFD-39, "
Inspection and Adjust-
ment" and FFD-39, "Inspection and Adjustment".
On side bearings: Increase the side bear ing adjusting shim thickness. Refer to FFD-39,
"Inspection and Adjustment".
When the preload torque is small On pinion bearings: Increase the drive pinion bearing adjusting washer and drive pinion
adjusting washer thickness. Refer to FFD-39, "
Inspection and Adjust-
ment" and FFD-39, "Inspection and Adjustment".
On side bearings: Decrease the side bearin g adjusting shim thickness. Refer to FFD-39,
"Inspection and Adjustment".
3AA93ABC3ACD3AC03ACA3AC03AC63AC53A913A773A893A873A873A8E3A773A983AC73AC93AC03AC3
3A893A873A873A8F3A773A9D3AAF3A8A3A8C3A863A9D3AAF3A8B3A8C
Page 2829 of 3924

FFD-38
< SERVICE INFORMATION >
FRONT FINAL DRIVE ASSEMBLY
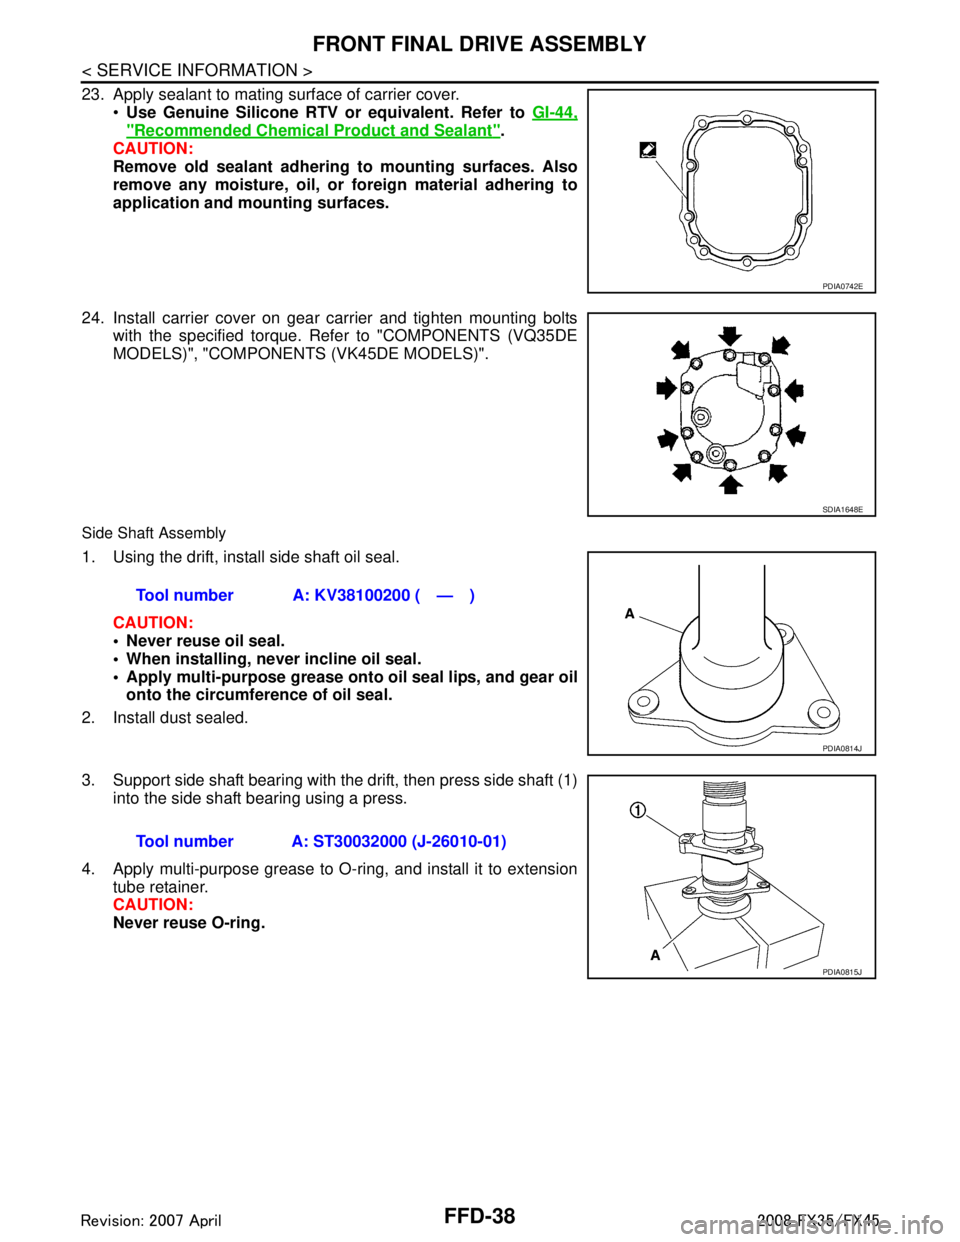
23. Apply sealant to mating surface of carrier cover.Use Genuine Silicone RTV or equivalent. Refer to GI-44,
"Recommended Chemical Product and Sealant".
CAUTION:
Remove old sealant adhering to mounting surfaces. Also
remove any moisture, oil, or foreign material adhering to
application and mounting surfaces.
24. Install carrier cover on gear carrier and tighten mounting bolts with the specified torque. Refer to "COMPONENTS (VQ35DE
MODELS)", "COMPONENT S (VK45DE MODELS)".
Side Shaft Assembly
1. Using the drift, install side shaft oil seal.
CAUTION:
Never reuse oil seal.
When installing, n ever incline oil seal.
Apply multi-purpose grease onto oil seal lips, and gear oil
onto the circumference of oil seal.
2. Install dust sealed.
3. Support side shaft bearing with the drift, then press side shaft (1) into the side shaft bearing using a press.
4. Apply multi-purpose grease to O-ring, and install it to extension tube retainer.
CAUTION:
Never reuse O-ring.
PDIA0742E
SDIA1648E
Tool number A: KV38100200 ( — )
PDIA0814J
Tool number A: ST30032000 (J-26010-01)
PDIA0815J
3AA93ABC3ACD3AC03ACA3AC03AC63AC53A913A773A893A873A873A8E3A773A983AC73AC93AC03AC3
3A893A873A873A8F3A773A9D3AAF3A8A3A8C3A863A9D3AAF3A8B3A8C
Page 2849 of 3924

FRONT SUSPENSION ASSEMBLYFSU-5
< SERVICE INFORMATION >
C
DF
G H
I
J
K L
M A
B
FSU
N
O P
FRONT SUSPENSION ASSEMBLY
On-Vehicle Inspection and ServiceINFOID:0000000001327537
Make sure the mounting conditions (looseness, back lash) of each component and component conditions
(wear, damage) are normal.
INSPECTION LOWER BALL JOINT END PLAY
1. Set front wheels in a straight-ahead position. Do not depress brake pedal.
2. Place an iron bar or similar tool bet ween transverse link and steering knuckle.
3. Measure axial end play by prying it up and down.
CAUTION:
Be careful not to damage ball joint boot.
STRUT INSPECTION
Check strut for oil leakage, damage and replace if there are. Refer to FSU-10.
Wheel Alignment InspectionINFOID:0000000001327538
DESCRIPTION
Measure wheel alignment under unladen conditions.
NOTE:
Unladen conditions mean that fuel, engine coolant, and l ubricant are full. Spare tire, jack, hand tools and
mats are designated positions.
PRELIMINARY CHECK
Check tires for improper air pressure and wear.
Check road wheels for runout.
Check wheel bearing axial end play.
Check ball joint axial end play of compression rod, upper link, and steering knuckle
Check shock absorber operation.
Check each mounting part of axle and suspension for looseness and deformation.
Check each link, rod and member for cracks, deformation and other damage.
Check vehicle posture.
GENERAL INFORMATION AND RECOMMENDATIONS
A four-wheel thrust alignment should be performed.
- This type of alignment is recomm ended for any NISSAN/INFINITI vehicle.
- The four-wheel “thrust” process helps ensure that t he vehicle is properly aligned and the steering wheel is
centered.
- The alignment rack itself should be capable of accepting any NISSAN/INFINITI vehicle.
- The rack should be checked to ensure that it is level.
Make sure the machine is properly calibrated.
- Your alignment equipment should be regularly ca librated in order to give correct information.
- Check with the manufacturer of your specific equi pment for their recommended Service/Calibration Sched-
ule.
THE ALIGNMENT PROCESS
IMPORTANT:
Use only the alignment specificati ons listed in this Service Manual.
When displaying the alignment settings, many alignment machines use “indicators”: (Green/red, plus or
minus, Go/No Go). Do NOT use these indicators.
- The alignment specifications programmed into your machine that operate these indicators may not be cor-
rect.
- This may result in an ERROR.
Some newer alignment machines are equipped with an optional “Rolling Compensation” method to “com-
pensate” the sensors (alignment targets or head units). DO NOT use this “Rolling Compensation”
method. Axial end play : 0 mm (0 in)
3AA93ABC3ACD3AC03ACA3AC03AC63AC53A913A773A893A873A873A8E3A773A983AC73AC93AC03AC3
3A893A873A873A8F3A773A9D3AAF3A8A3A8C3A863A9D3AAF3A8B3A8C