2008 INFINITI FX35 power supply
[x] Cancel search: power supplyPage 2941 of 3924
![INFINITI FX35 2008 Service Manual
GW-28
< SERVICE INFORMATION >
POWER WINDOW SYSTEM
Check BCM Power Suppl y and Ground Circuit
INFOID:0000000001327974
1.CHECK FUSE
Check 15A fuse [No. 1, located in fuse block (J/B)]
Check 15A fus INFINITI FX35 2008 Service Manual
GW-28
< SERVICE INFORMATION >
POWER WINDOW SYSTEM
Check BCM Power Suppl y and Ground Circuit
INFOID:0000000001327974
1.CHECK FUSE
Check 15A fuse [No. 1, located in fuse block (J/B)]
Check 15A fus](/manual-img/42/57017/w960_57017-2940.png)
GW-28
< SERVICE INFORMATION >
POWER WINDOW SYSTEM
Check BCM Power Suppl y and Ground Circuit
INFOID:0000000001327974
1.CHECK FUSE
Check 15A fuse [No. 1, located in fuse block (J/B)]
Check 15A fuse [No. 22, located in fuse block (J/B)]
Check 50A fusible link (letter M, located in the fuse and fusible link box).
NOTE:
Refer to GW-15, "
Component Parts and Harness Connector Location".
OK or NG
OK >> GO TO 2.
NG >> If fuse is blown out, be sure to eliminate cause of malfunction before installing new fuse. Refer to PG-3
.
2.CHECK POWER SUPPLY CIRCUIT
Check voltage between BCM connector and ground.
OK or NG
OK >> GO TO 3.
NG >> Check BCM power supply circuit for open or short.
3.CHECK GROUND CIRCUIT
1. Turn ignition switch OFF.
2. Disconnect BCM connector.
3. Check continuity between BCM connector M4 terminal 49, 52 and ground.
OK or NG
OK >> Power supply and ground circuit are OK.
NG >> Check BCM ground circuit for open or short.
Check Power Window Main S witch Power Supply CircuitINFOID:0000000001327975
1.CHECK POWER SUPPLY CIRCUIT
1. Turn ignition switch ON.
Power window lock switch does not function Check power window lock switch GW-46
Auto operation does not operate but manual operates normally
(driver side)1. Check encoder ci
rcuit (driver side) GW-39
2. Replace power window main switch. —
Auto operation does not operate but manual operates normally
(passenger side) 1. Check encoder circuit (passenger side)
GW-40
2. Replace front power window switch (passen-
ger side) —
Symptom Repair order Refer to page
Connector
Terminal (Wire color)
Condition of
ignition switchVoltage [V]
(Approx.)
(+) (–)
M3 38 (W/L) GroundON
Battery
voltage
M4 42 (L/R)
OFF
55 (G)
PIIB1383E
49 (B) – Ground : Conti nuity should exist.
52 (B) – Ground : Conti nuity should exist.
PIIA6161E
3AA93ABC3ACD3AC03ACA3AC03AC63AC53A913A773A893A873A873A8E3A773A983AC73AC93AC03AC3
3A893A873A873A8F3A773A9D3AAF3A8A3A8C3A863A9D3AAF3A8B3A8C
Page 2942 of 3924
POWER WINDOW SYSTEMGW-29
< SERVICE INFORMATION >
C
DE
F
G H
J
K L
M A
B
GW
N
O P
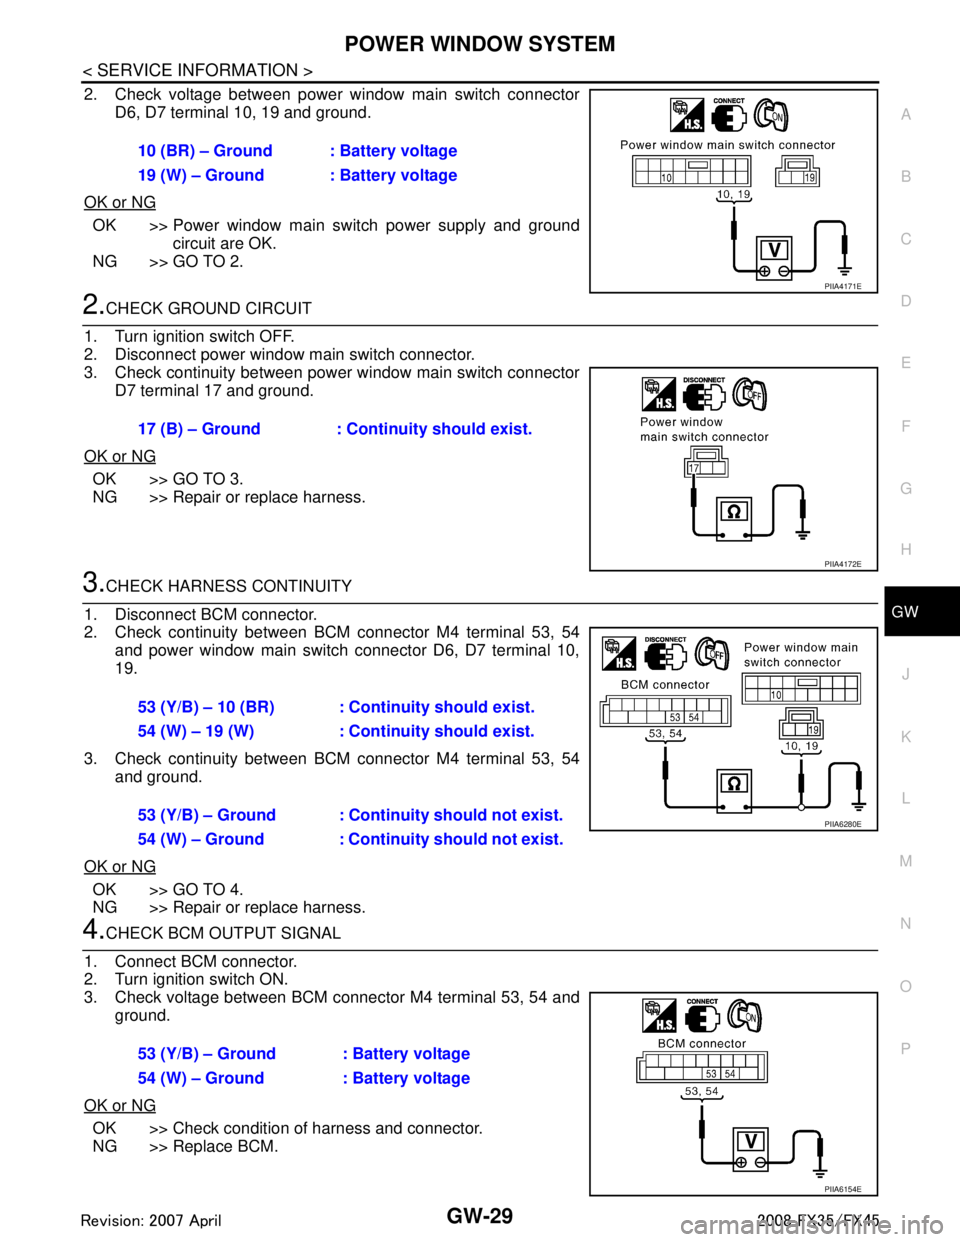
2. Check voltage between power window main switch connector D6, D7 terminal 10, 19 and ground.
OK or NG
OK >> Power window main switch power supply and ground circuit are OK.
NG >> GO TO 2.
2.CHECK GROUND CIRCUIT
1. Turn ignition switch OFF.
2. Disconnect power window main switch connector.
3. Check continuity between power window main switch connector D7 terminal 17 and ground.
OK or NG
OK >> GO TO 3.
NG >> Repair or replace harness.
3.CHECK HARNESS CONTINUITY
1. Disconnect BCM connector.
2. Check continuity between BCM connector M4 terminal 53, 54 and power window main switch connector D6, D7 terminal 10,
19.
3. Check continuity between BCM connector M4 terminal 53, 54 and ground.
OK or NG
OK >> GO TO 4.
NG >> Repair or replace harness.
4.CHECK BCM OUTPUT SIGNAL
1. Connect BCM connector.
2. Turn ignition switch ON.
3. Check voltage between BCM connector M4 terminal 53, 54 and ground.
OK or NG
OK >> Check condition of harness and connector.
NG >> Replace BCM. 10 (BR) – Ground : Battery voltage
19 (W) – Ground : Battery voltage
PIIA4171E
17 (B) – Ground : Continuity should exist.
PIIA4172E
53 (Y/B) – 10 (BR) : Continuity should exist.
54 (W) – 19 (W) : Continuity should exist.
53 (Y/B) – Ground : Continuity should not exist.
54 (W) – Ground : Continui
ty should not exist.
PIIA6280E
53 (Y/B) – Ground : Battery voltage
54 (W) – Ground : Battery voltage
PIIA6154E
3AA93ABC3ACD3AC03ACA3AC03AC63AC53A913A773A893A873A873A8E3A773A983AC73AC93AC03AC3
3A893A873A873A8F3A773A9D3AAF3A8A3A8C3A863A9D3AAF3A8B3A8C
Page 2943 of 3924
GW-30
< SERVICE INFORMATION >
POWER WINDOW SYSTEM
Check Front Power Window Switch (Pa ssenger Side) Power Supply and Ground Cir-
cuit
INFOID:0000000001327976
1.CHECK POWER SUPPLY CIRCUIT
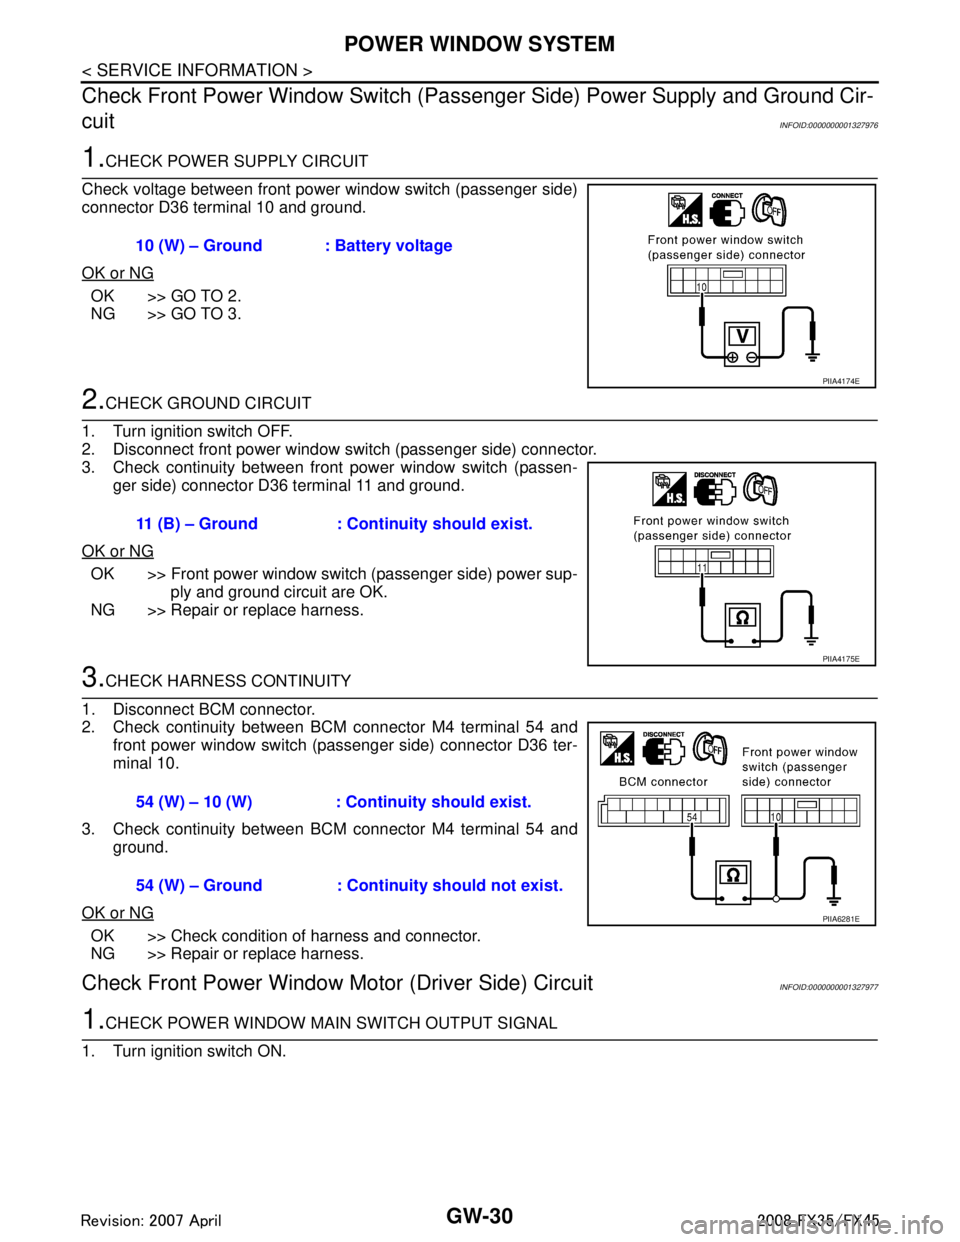
Check voltage between front power window switch (passenger side)
connector D36 terminal 10 and ground.
OK or NG
OK >> GO TO 2.
NG >> GO TO 3.
2.CHECK GROUND CIRCUIT
1. Turn ignition switch OFF.
2. Disconnect front power window switch (passenger side) connector.
3. Check continuity between front power window switch (passen- ger side) connector D36 terminal 11 and ground.
OK or NG
OK >> Front power window switch (passenger side) power sup- ply and ground circuit are OK.
NG >> Repair or replace harness.
3.CHECK HARNESS CONTINUITY
1. Disconnect BCM connector.
2. Check continuity between BCM connector M4 terminal 54 and front power window switch (passenger side) connector D36 ter-
minal 10.
3. Check continuity between BCM connector M4 terminal 54 and ground.
OK or NG
OK >> Check condition of harness and connector.
NG >> Repair or replace harness.
Check Front Power Window Motor (Driver Side) CircuitINFOID:0000000001327977
1.CHECK POWER WINDOW MAIN SWITCH OUTPUT SIGNAL
1. Turn ignition switch ON. 10 (W) – Ground : Battery voltage
PIIA4174E
11 (B) – Ground : Continuity should exist.
PIIA4175E
54 (W) – 10 (W) : Conti
nuity should exist.
54 (W) – Ground : Continuity should not exist.
PIIA6281E
3AA93ABC3ACD3AC03ACA3AC03AC63AC53A913A773A893A873A873A8E3A773A983AC73AC93AC03AC3
3A893A873A873A8F3A773A9D3AAF3A8A3A8C3A863A9D3AAF3A8B3A8C
Page 2945 of 3924
GW-32
< SERVICE INFORMATION >
POWER WINDOW SYSTEM
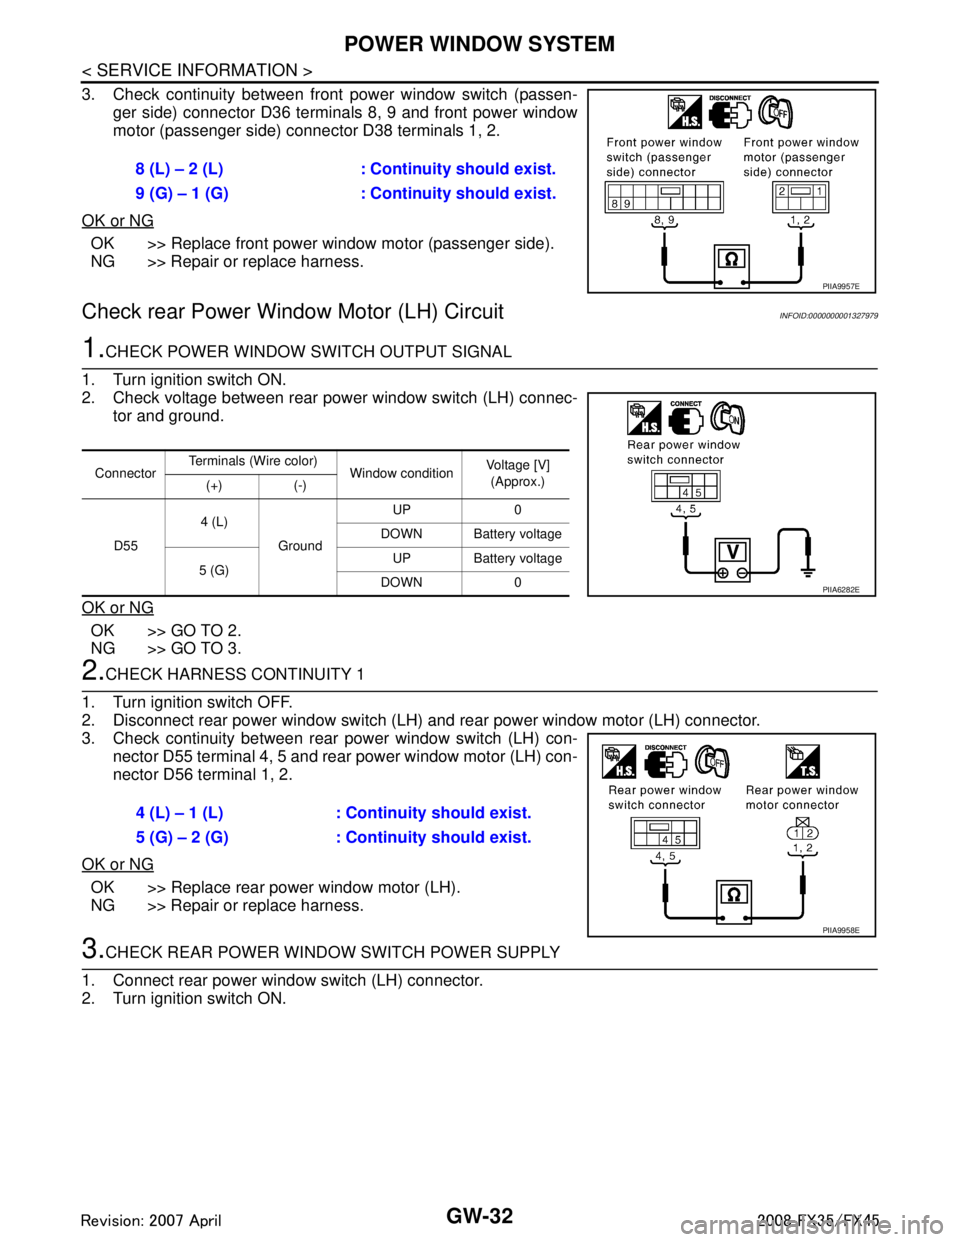
3. Check continuity between front power window switch (passen-ger side) connector D36 terminals 8, 9 and front power window
motor (passenger side) connector D38 terminals 1, 2.
OK or NG
OK >> Replace front power window motor (passenger side).
NG >> Repair or replace harness.
Check rear Power Window Motor (LH) CircuitINFOID:0000000001327979
1.CHECK POWER WINDOW SWITCH OUTPUT SIGNAL
1. Turn ignition switch ON.
2. Check voltage between rear power window switch (LH) connec- tor and ground.
OK or NG
OK >> GO TO 2.
NG >> GO TO 3.
2.CHECK HARNESS CONTINUITY 1
1. Turn ignition switch OFF.
2. Disconnect rear power window switch (LH) and rear power window motor (LH) connector.
3. Check continuity between rear power window switch (LH) con- nector D55 terminal 4, 5 and rear power window motor (LH) con-
nector D56 terminal 1, 2.
OK or NG
OK >> Replace rear power window motor (LH).
NG >> Repair or replace harness.
3.CHECK REAR POWER WINDOW SWITCH POWER SUPPLY
1. Connect rear power window switch (LH) connector.
2. Turn ignition switch ON. 8 (L) – 2 (L) : Continuity should exist.
9 (G) – 1 (G) : Continuity should exist.
PIIA9957E
Connector
Terminals (Wire color)
Window conditionVoltage [V]
(Approx.)
(+) (-)
D55 4 (L)
Ground UP 0
DOWN Battery voltage
5 (G) UP Battery voltage
DOWN 0
PIIA6282E
4 (L) – 1 (L) : Conti nuity should exist.
5 (G) – 2 (G) : Conti nuity should exist.
PIIA9958E
3AA93ABC3ACD3AC03ACA3AC03AC63AC53A913A773A893A873A873A8E3A773A983AC73AC93AC03AC3
3A893A873A873A8F3A773A9D3AAF3A8A3A8C3A863A9D3AAF3A8B3A8C
Page 2947 of 3924
GW-34
< SERVICE INFORMATION >
POWER WINDOW SYSTEM
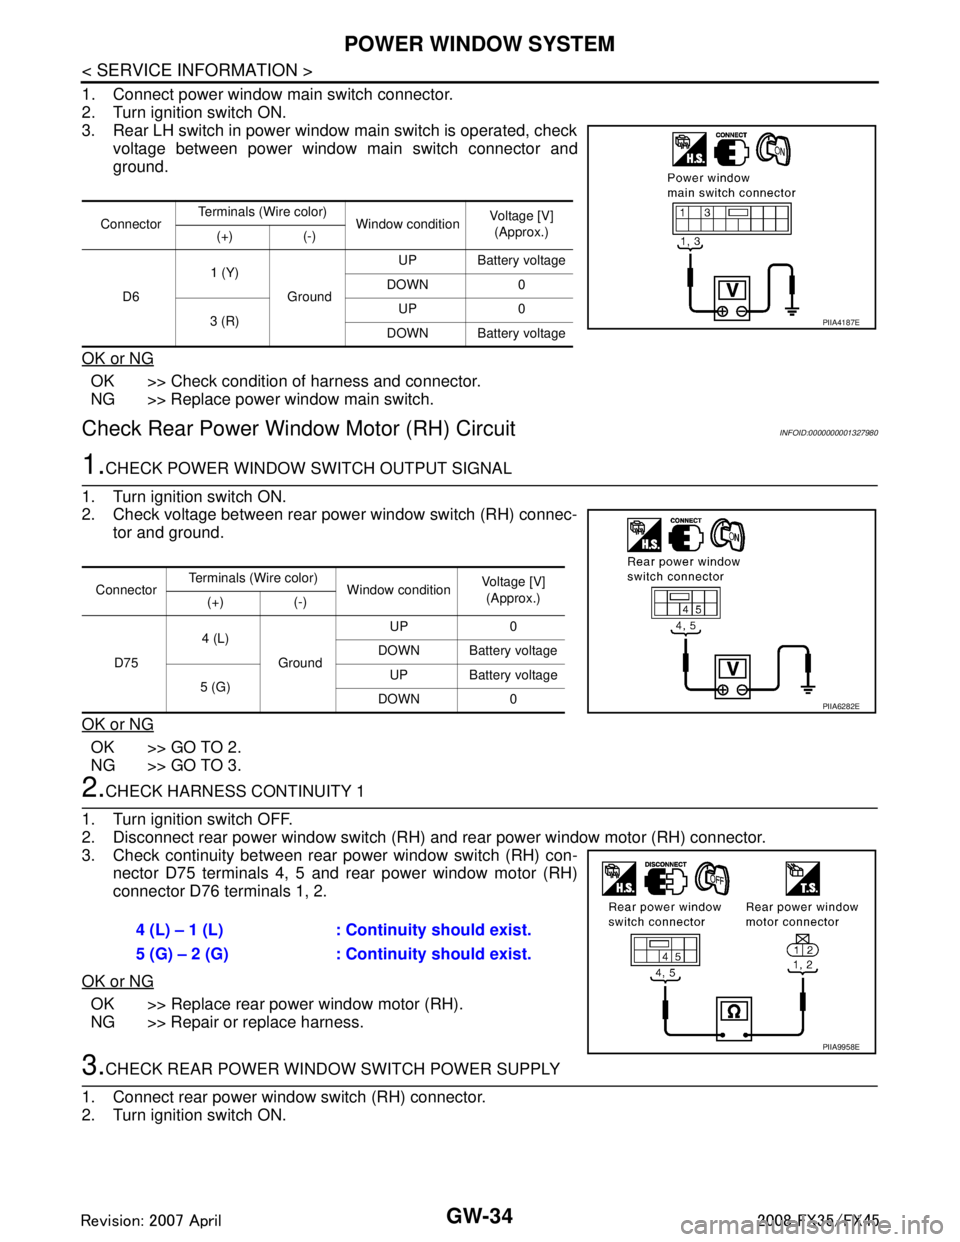
1. Connect power window main switch connector.
2. Turn ignition switch ON.
3. Rear LH switch in power window main switch is operated, checkvoltage between power window main switch connector and
ground.
OK or NG
OK >> Check condition of harness and connector.
NG >> Replace power window main switch.
Check Rear Power Windo w Motor (RH) CircuitINFOID:0000000001327980
1.CHECK POWER WINDOW SWITCH OUTPUT SIGNAL
1. Turn ignition switch ON.
2. Check voltage between rear power window switch (RH) connec- tor and ground.
OK or NG
OK >> GO TO 2.
NG >> GO TO 3.
2.CHECK HARNESS CONTINUITY 1
1. Turn ignition switch OFF.
2. Disconnect rear power window switch (RH) and rear power window motor (RH) connector.
3. Check continuity between rear power window switch (RH) con- nector D75 terminals 4, 5 and rear power window motor (RH)
connector D76 terminals 1, 2.
OK or NG
OK >> Replace rear power window motor (RH).
NG >> Repair or replace harness.
3.CHECK REAR POWER WINDOW SWITCH POWER SUPPLY
1. Connect rear power window switch (RH) connector.
2. Turn ignition switch ON.
Connector Terminals (Wire color)
Window conditionVoltage [V]
(Approx.)
(+) (-)
D6 1 (Y)
Ground UP Battery voltage
DOWN 0
3 (R) UP 0
DOWN Battery voltage
PIIA4187E
Connector Terminals (Wire color)
Window conditionVoltage [V]
(Approx.)
(+) (-)
D75 4 (L)
Ground UP 0
DOWN Battery voltage
5 (G) UP Battery voltage
DOWN 0
PIIA6282E
4 (L) – 1 (L) : Conti nuity should exist.
5 (G) – 2 (G) : Conti nuity should exist.
PIIA9958E
3AA93ABC3ACD3AC03ACA3AC03AC63AC53A913A773A893A873A873A8E3A773A983AC73AC93AC03AC3
3A893A873A873A8F3A773A9D3AAF3A8A3A8C3A863A9D3AAF3A8B3A8C
Page 2952 of 3924
POWER WINDOW SYSTEMGW-39
< SERVICE INFORMATION >
C
DE
F
G H
J
K L
M A
B
GW
N
O P
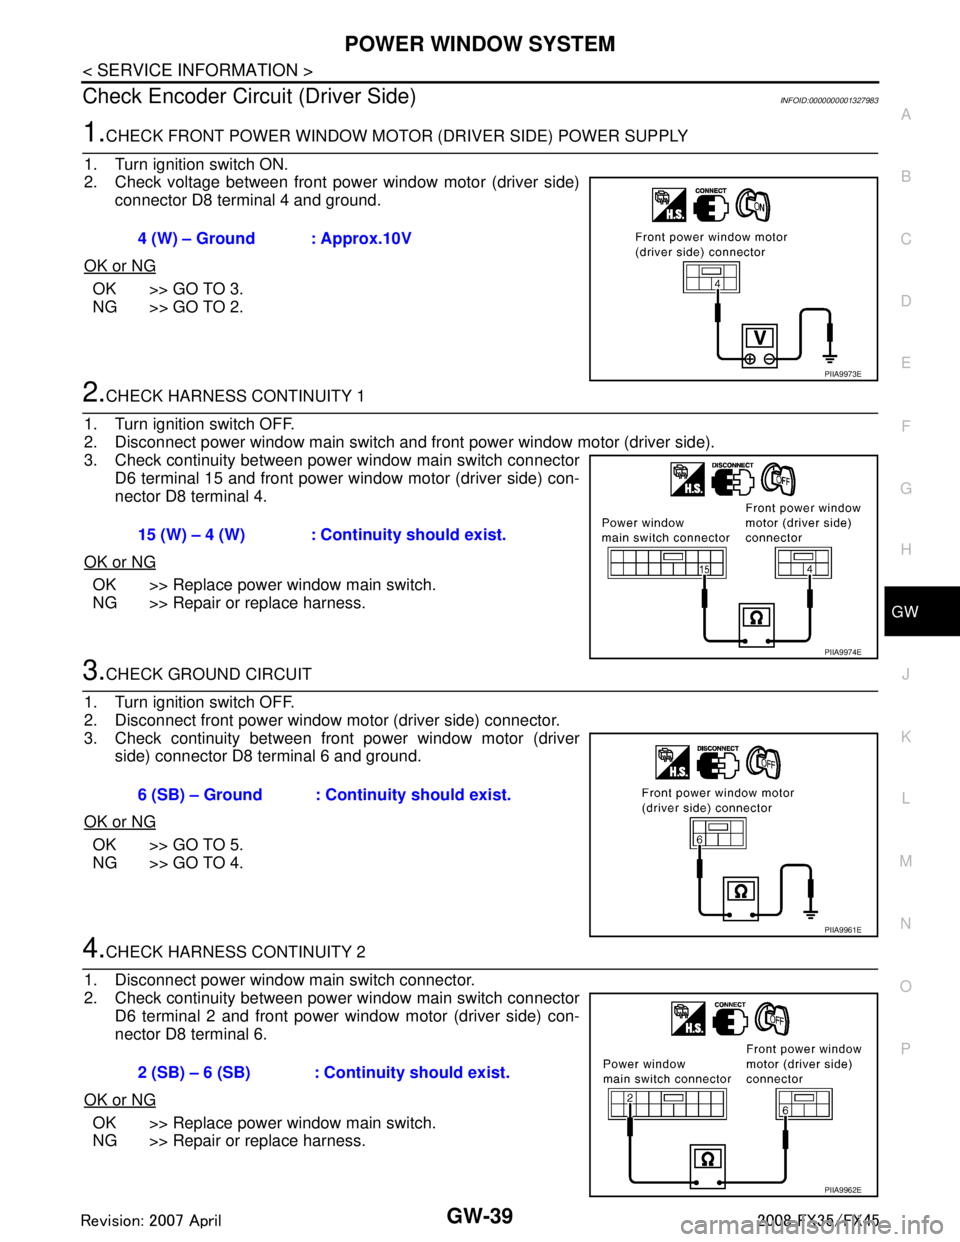
Check Encoder Circ uit (Driver Side)INFOID:0000000001327983
1.CHECK FRONT POWER WINDOW MOTO R (DRIVER SIDE) POWER SUPPLY
1. Turn ignition switch ON.
2. Check voltage between front power window motor (driver side) connector D8 terminal 4 and ground.
OK or NG
OK >> GO TO 3.
NG >> GO TO 2.
2.CHECK HARNESS CONTINUITY 1
1. Turn ignition switch OFF.
2. Disconnect power window main switch and front power window motor (driver side).
3. Check continuity between power window main switch connector D6 terminal 15 and front power window motor (driver side) con-
nector D8 terminal 4.
OK or NG
OK >> Replace power window main switch.
NG >> Repair or replace harness.
3.CHECK GROUND CIRCUIT
1. Turn ignition switch OFF.
2. Disconnect front power window motor (driver side) connector.
3. Check continuity between front power window motor (driver side) connector D8 terminal 6 and ground.
OK or NG
OK >> GO TO 5.
NG >> GO TO 4.
4.CHECK HARNESS CONTINUITY 2
1. Disconnect power window main switch connector.
2. Check continuity between power window main switch connector D6 terminal 2 and front power window motor (driver side) con-
nector D8 terminal 6.
OK or NG
OK >> Replace power window main switch.
NG >> Repair or replace harness. 4 (W) – Ground : Approx.10V
PIIA9973E
15 (W) – 4 (W) : Continuity should exist.
PIIA9974E
6 (SB) – Ground : Continuity should exist.
PIIA9961E
2 (SB) – 6 (SB) : Continuity should exist.
PIIA9962E
3AA93ABC3ACD3AC03ACA3AC03AC63AC53A913A773A893A873A873A8E3A773A983AC73AC93AC03AC3
3A893A873A873A8F3A773A9D3AAF3A8A3A8C3A863A9D3AAF3A8B3A8C
Page 2953 of 3924
GW-40
< SERVICE INFORMATION >
POWER WINDOW SYSTEM
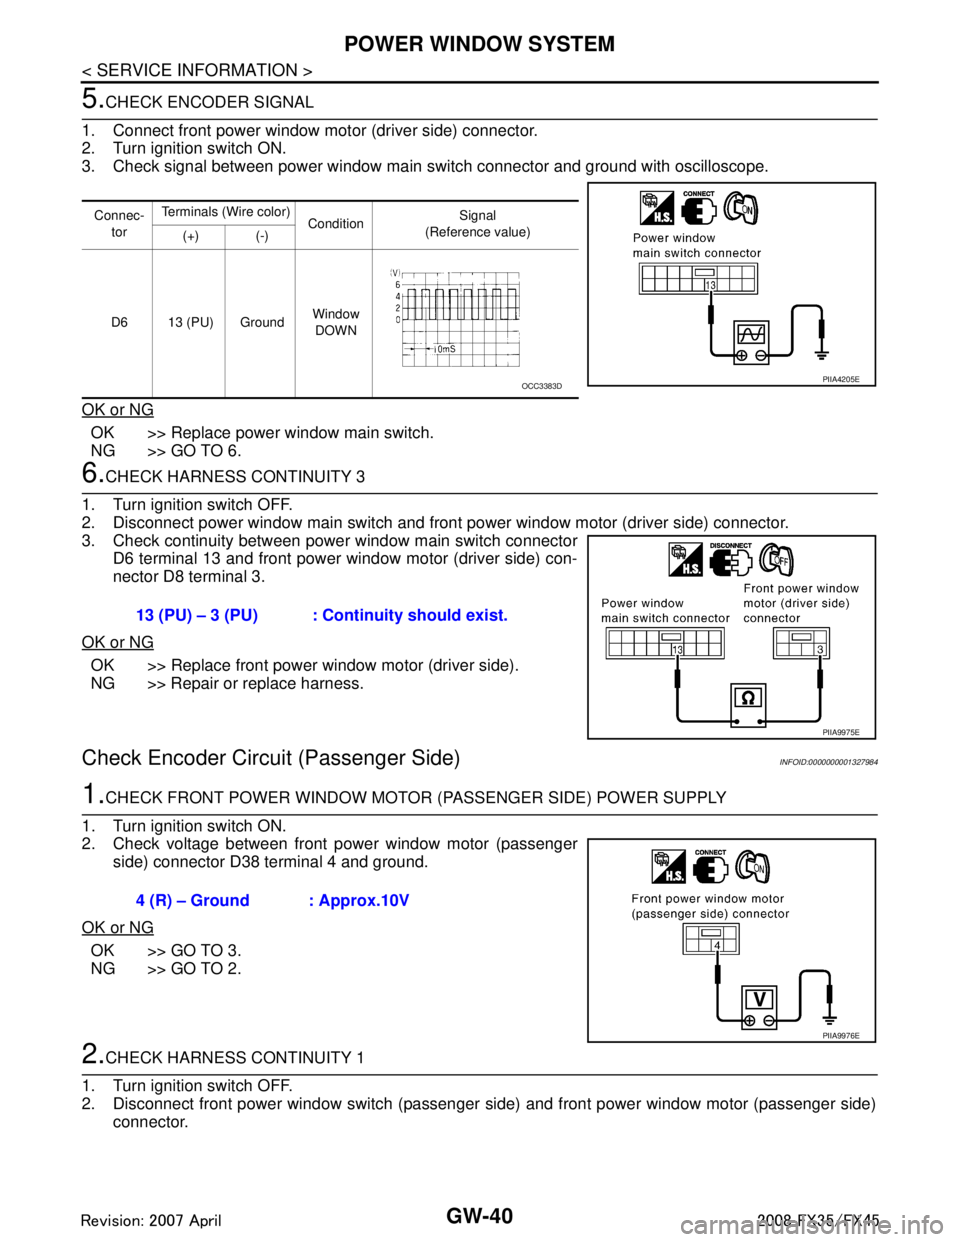
5.CHECK ENCODER SIGNAL
1. Connect front power window motor (driver side) connector.
2. Turn ignition switch ON.
3. Check signal between power window main switch connector and ground with oscilloscope.
OK or NG
OK >> Replace power window main switch.
NG >> GO TO 6.
6.CHECK HARNESS CONTINUITY 3
1. Turn ignition switch OFF.
2. Disconnect power window main switch and front power window motor (driver side) connector.
3. Check continuity between power window main switch connector D6 terminal 13 and front power window motor (driver side) con-
nector D8 terminal 3.
OK or NG
OK >> Replace front power window motor (driver side).
NG >> Repair or replace harness.
Check Encoder Circuit (Passenger Side)INFOID:0000000001327984
1.CHECK FRONT POWER WINDOW MOTOR (PASSENGER SIDE) POWER SUPPLY
1. Turn ignition switch ON.
2. Check voltage between front power window motor (passenger side) connector D38 terminal 4 and ground.
OK or NG
OK >> GO TO 3.
NG >> GO TO 2.
2.CHECK HARNESS CONTINUITY 1
1. Turn ignition switch OFF.
2. Disconnect front power window switch (passenger side) and front power window motor (passenger side) connector.
Connec-
tor Terminals (Wire color)
Condition Signal
(Reference value)
(+) (-)
D6 13 (PU) Ground Window
DOWN
PIIA4205EOCC3383D
13 (PU) – 3 (PU) : Continuity should exist.
PIIA9975E
4 (R) – Ground : Approx.10V
PIIA9976E
3AA93ABC3ACD3AC03ACA3AC03AC63AC53A913A773A893A873A873A8E3A773A983AC73AC93AC03AC3
3A893A873A873A8F3A773A9D3AAF3A8A3A8C3A863A9D3AAF3A8B3A8C
Page 2980 of 3924

REAR WINDOW DEFOGGERGW-67
< SERVICE INFORMATION >
C
DE
F
G H
J
K L
M A
B
GW
N
O P
Terminal and Reference Value for BCMINFOID:0000000001328004
Terminal and Reference Value for IPDM E/RINFOID:0000000001328005
CONSULT-III Function (BCM)INFOID:0000000001328006
DATA MONITOR
ACTIVE TEST
Te r m i n a l Wire col-
or ItemSignal In-
put/
Output Condition
Voltage (V)
(Approx.)
9L/W Rear window defogger
switch signal InputWhen rear window defogger switch is
pressed.
0
When rear window defogger switch is OFF. 5
38 W/L Ignition switch ON or START Input Ignition switch (ON or START position) Battery voltage
39 L CAN − H Input/
Output ——
40 P CAN − L Input/
Output ——
42 L/R Power source (Fuse) Input — Battery voltage
49 B Ground (signal) — — 0
52 B Ground (power) — — 0
55 G Power source (Fusible link) Input — Battery voltage
Te r m i n a l Wire col-
or Item Signal
Input/
Output Condition
Voltage (V)
(Approx.)
5 R Battery power supply Output — Battery voltage
6 W Battery power supply Output — Battery voltage
38 B Ground (Power) — — 0
48 L CAN − H Input/
Output ——
49 R CAN − L Input/
Output ——
52 G Rear window defogger relay
control signal
InputWhen rear window defogger switch is ON. 0
When rear window defogger switch is
OFF.
Battery voltage
60 B Ground (Signal) — — 0
BCM diagnostic test item Check item diagnostic test mode Content
REAR DEFOGGER Data monitor Displays the input data of BCM in real time.
Active test Gives a drive signal to a load to check the operation.
Monitor item Content
REAR DEF SW Displays “Press (ON)/others (OFF)” status determined with the rear window defogger switch.
IGN ON SW Displays “IGN (ON)/OFF” status determined with the ignition switch signal.
3AA93ABC3ACD3AC03ACA3AC03AC63AC53A913A773A893A873A873A8E3A773A983AC73AC93AC03AC3
3A893A873A873A8F3A773A9D3AAF3A8A3A8C3A863A9D3AAF3A8B3A8C