2008 INFINITI FX35 service indicator
[x] Cancel search: service indicatorPage 2747 of 3924
![INFINITI FX35 2008 Service Manual
CYLINDER BLOCKEM-263
< SERVICE INFORMATION > [VK45DE]
C
D
E
F
G H
I
J
K L
M A
EM
NP
O
If corrected, measure the bearing oil clearance of the corrected main journal and/or pin journal. Then select
t INFINITI FX35 2008 Service Manual
CYLINDER BLOCKEM-263
< SERVICE INFORMATION > [VK45DE]
C
D
E
F
G H
I
J
K L
M A
EM
NP
O
If corrected, measure the bearing oil clearance of the corrected main journal and/or pin journal. Then select
t](/manual-img/42/57017/w960_57017-2746.png)
CYLINDER BLOCKEM-263
< SERVICE INFORMATION > [VK45DE]
C
D
E
F
G H
I
J
K L
M A
EM
NP
O
If corrected, measure the bearing oil clearance of the corrected main journal and/or pin journal. Then select
the main bearing and/or connecting rod bearing. Refer to "MAIN BEARING OIL CLEARANCE" and/or
"CONNECTING ROD BEARING OIL CLEARANCE".
CRANKSHAFT RUNOUT
Place V-block on precise flat table, and support the journals on the both end of crankshaft.
Place dial indicator straight up on the No. 3 journal.
While rotating crankshaft, read the movement of the pointer on dial indicator. (Total indicator reading)
If it exceeds the limit, replace crankshaft.
CONNECTING ROD BEARING OIL CLEARANCE
Method by Calculation
Install connecting rod bearings to connecting rod and cap, and tighten connecting rod bolts to the specified torque. Refer to EM-
242, "Disassembly and Assembly" for the tightening procedure.
Measure the inner diameter of connecting rod bearing with inside micrometer.
(Bearing oil clearance) = (Connecting rod bearing inner diameter) –
(Crankshaft pin journal diameter)
If the calculated value exceeds the limit, select proper connecting rod bearing according to connecting rod
big end diameter and crankshaft pin journal diameter to obtain the specified bearing oil clearance. Refer to
EM-250, "
How to Select Piston and Bearing".
Method of Using Plastigage
Remove oil and dust on crankshaft pin journal and the surfaces of each bearing completely.
Cut plastigage slightly shorter than the bearing width, and place it in crankshaft axial direction, avoiding oil
holes.
Install connecting rod bearings to connecting rod and cap, and tighten connecting rod bolts to the specified
torque. Refer to EM-242, "
Disassembly and Assembly" for the tightening procedure.
CAUTION:
Do not rotate crankshaft.
Remove connecting rod bearing cap and bearing, and using scale
on plastigage bag, measure the plastigage width.
NOTE:
The procedure when the measured value exceeds the limit is
same as that described in the “Method by Calculation”.
MAIN BEARING OIL CLEARANCE
Method by Calculation
Limit : 0.10 mm (0.0039 in)
PBIC2378E
Standard : 0.020 - 0.045 mm (0.0008 - 0.0018 in) (actu-
al clearance)
Limit : 0.055 mm (0.0022 in)
PBIC1642E
PBIC1149E
3AA93ABC3ACD3AC03ACA3AC03AC63AC53A913A773A893A873A873A8E3A773A983AC73AC93AC03AC3
3A893A873A873A8F3A773A9D3AAF3A8A3A8C3A863A9D3AAF3A8B3A8C
Page 2751 of 3924
![INFINITI FX35 2008 Service Manual
SERVICE DATA AND SPECIFICATIONS (SDS)
EM-267
< SERVICE INFORMATION > [VK45DE]
C
D
E
F
G H
I
J
K L
M A
EM
NP
O
Unit: mm (in)
SPARK PLUG
CAMSHAFT AND CAMSHAFT BEARING
Unit: mm (in)
*: Total indicator r INFINITI FX35 2008 Service Manual
SERVICE DATA AND SPECIFICATIONS (SDS)
EM-267
< SERVICE INFORMATION > [VK45DE]
C
D
E
F
G H
I
J
K L
M A
EM
NP
O
Unit: mm (in)
SPARK PLUG
CAMSHAFT AND CAMSHAFT BEARING
Unit: mm (in)
*: Total indicator r](/manual-img/42/57017/w960_57017-2750.png)
SERVICE DATA AND SPECIFICATIONS (SDS)
EM-267
< SERVICE INFORMATION > [VK45DE]
C
D
E
F
G H
I
J
K L
M A
EM
NP
O
Unit: mm (in)
SPARK PLUG
CAMSHAFT AND CAMSHAFT BEARING
Unit: mm (in)
*: Total indicator reading
Valve Lifter
Unit: mm (in)
Valve Clearance
Unit: mm (in)
Items Limit
Surface distortion Intake manifold (upper) 0.1 (0.004)
Intake manifold (lower) 0.1 (0.004)
Exhaust manifold 0.3 (0.012)
Make
NGK
Standard type PLFR5A-11
Hot type PLFR4A-11
Cold type PLFR6A-11
Gap (Nominal) 1.1 mm (0.043 in)
Items Standard Limit
Camshaft journal clearance No. 1 0.045 - 0.083 (0.0018 - 0.0033) —
No. 2, 3, 4, 5 0.030 - 0.068 (0.0012 - 0.0027) —
Camshaft journal diameter No. 1 25.938 - 25.955 (1.0212 - 1.0218) —
No. 2, 3, 4, 5 25.953 - 25.970 (1.0218 - 1.0224) —
Camshaft bracket inner diameter 26.000 - 26.021 (1.0236 - 1.0244) —
Camshaft end play 0.115 - 0.188 (0.0045 - 0.0074) —
Cam height “A” Intake 44.865 - 45.055 (1.7663 - 1.7738) 0.2 (0.008)
Exhaust 43.925 - 44.115 (1.7293 - 1.7368) 0.2 (0.008)
Camshaft runout (TIR*) — 0.02 (0.001)
Camshaft sprocket runout (TIR*) — 0.15 (0.059)
SEM671
Items Standard
Valve lifter outer diameter 33.977 - 33.987 (1.3377 - 1.3381)
Valve lifter hole diameter 34.000 - 34.016 (1.3386 - 1.3392)
Valve lifter clearance 0.013 - 0.039 (0.0005 - 0.0015)
Items Cold Hot* (reference data)
3AA93ABC3ACD3AC03ACA3AC03AC63AC53A913A773A893A873A873A8E3A773A983AC73AC93AC03AC3
3A893A873A873A8F3A773A9D3AAF3A8A3A8C3A863A9D3AAF3A8B3A8C
Page 2759 of 3924
![INFINITI FX35 2008 Service Manual
SERVICE DATA AND SPECIFICATIONS (SDS)
EM-275
< SERVICE INFORMATION > [VK45DE]
C
D
E
F
G H
I
J
K L
M A
EM
NP
O
*: Total indicator reading
MAIN BEARING
Unit: mm (in)
Pin journal diameter “Dp”
Grade INFINITI FX35 2008 Service Manual
SERVICE DATA AND SPECIFICATIONS (SDS)
EM-275
< SERVICE INFORMATION > [VK45DE]
C
D
E
F
G H
I
J
K L
M A
EM
NP
O
*: Total indicator reading
MAIN BEARING
Unit: mm (in)
Pin journal diameter “Dp”
Grade](/manual-img/42/57017/w960_57017-2758.png)
SERVICE DATA AND SPECIFICATIONS (SDS)
EM-275
< SERVICE INFORMATION > [VK45DE]
C
D
E
F
G H
I
J
K L
M A
EM
NP
O
*: Total indicator reading
MAIN BEARING
Unit: mm (in)
Pin journal diameter “Dp”
Grade No. 0 51.968 - 51.974 (2.0460 - 2.0462)
Grade No. 1 51.962 - 51.968 (2.0457 - 2.0460)
Grade No. 2 51.956 - 51.962 (2.0455 - 2.0457)
Center distance “r” 41.31 - 41.39 (1.6264 - 1.6295)
Out-of-round (Difference between “X” and “Y”) Limit 0.015 (0.0006)
Taper (Difference between “A” and “B”) Limit 0.010 (0.0004)
Runout (TIR*) Limit 0.10 (0.0039)
Crankshaft end play Standard 0.10 - 0.25 (0.0039 - 0.0098)
Limit 0.30 (0.0118)
Grade number Thickness Identification color Remarks
0 2.483 - 2.486 (0.0978 - 0.0979) Black
Grade and color are the same
for upper and lower bearings.
1 2.486 - 2.489 (0.0979 - 0.0980) Brown
2 2.489 - 2.492 (0.0980 - 0.0981) Green
3 2.492 - 2.495 (0.0981 - 0.0982) Yellow
4 2.495 - 2.498 (0.0982 - 0.0983) Blue
5 2.498 - 2.501 (0.0983 - 0.0985) Pink
6 2.501 - 2.504 (0.0985 - 0.0986) Purple
7 2.504 - 2.507 (0.0986 - 0.0987) White
8 2.507 - 2.510 (0.0987 - 0.0988) Red
PBIC0189E
3AA93ABC3ACD3AC03ACA3AC03AC63AC53A913A773A893A873A873A8E3A773A983AC73AC93AC03AC3
3A893A873A873A8F3A773A9D3AAF3A8A3A8C3A863A9D3AAF3A8B3A8C
Page 2812 of 3924

FRONT FINAL DRIVE ASSEMBLYFFD-21
< SERVICE INFORMATION >
CEF
G H
I
J
K L
M A
B
FFD
N
O P
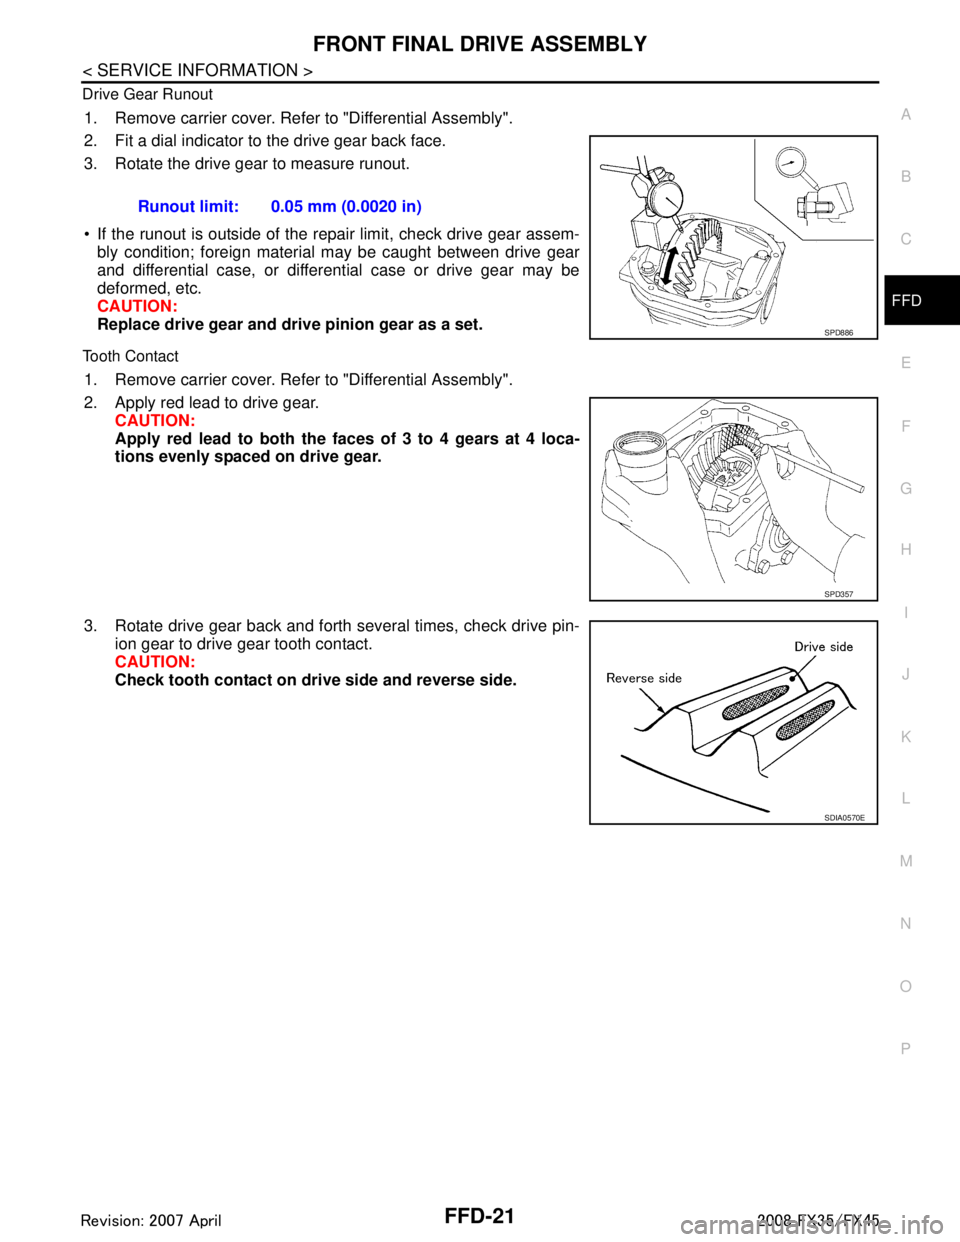
Drive Gear Runout
1. Remove carrier cover. Refer to "Differential Assembly".
2. Fit a dial indicator to the drive gear back face.
3. Rotate the drive gear to measure runout.
If the runout is outside of the repair limit, check drive gear assem-
bly condition; foreign material may be caught between drive gear
and differential case, or differential case or drive gear may be
deformed, etc.
CAUTION:
Replace drive gear and dri ve pinion gear as a set.
Tooth Contact
1. Remove carrier cover. Refer to "Differential Assembly".
2. Apply red lead to drive gear.
CAUTION:
Apply red lead to both the f aces of 3 to 4 gears at 4 loca-
tions evenly spaced on drive gear.
3. Rotate drive gear back and forth several times, check drive pin- ion gear to drive gear tooth contact.
CAUTION:
Check tooth contact on dri ve side and reverse side.
Runout limit: 0.05 mm (0.0020 in)
SPD886
SPD357
SDIA0570E
3AA93ABC3ACD3AC03ACA3AC03AC63AC53A913A773A893A873A873A8E3A773A983AC73AC93AC03AC3
3A893A873A873A8F3A773A9D3AAF3A8A3A8C3A863A9D3AAF3A8B3A8C
Page 2814 of 3924

FRONT FINAL DRIVE ASSEMBLYFFD-23
< SERVICE INFORMATION >
CEF
G H
I
J
K L
M A
B
FFD
N
O P
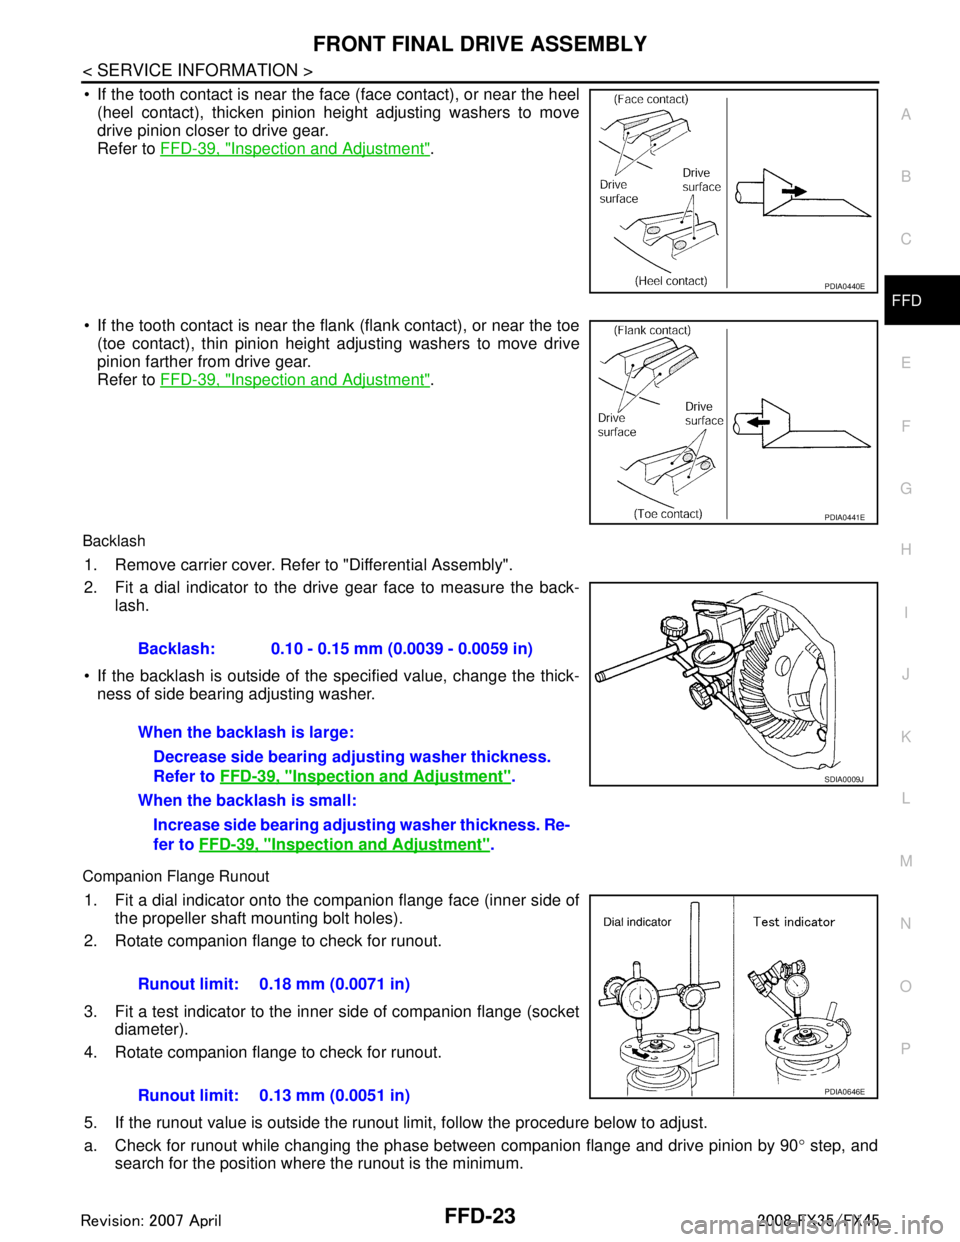
If the tooth contact is near the face (face contact), or near the heel (heel contact), thicken pinion height adjusting washers to move
drive pinion closer to drive gear.
Refer to FFD-39, "
Inspection and Adjustment".
If the tooth contact is near the flank (flank contact), or near the toe
(toe contact), thin pinion height adjusting washers to move drive
pinion farther from drive gear.
Refer to FFD-39, "
Inspection and Adjustment".
Backlash
1. Remove carrier cover. Refer to "Differential Assembly".
2. Fit a dial indicator to the drive gear face to measure the back-
lash.
If the backlash is outside of the specified value, change the thick- ness of side bearing adjusting washer.
Companion Flange Runout
1. Fit a dial indicator onto the companion flange face (inner side of the propeller shaft mounting bolt holes).
2. Rotate companion flange to check for runout.
3. Fit a test indicator to the inner side of companion flange (socket diameter).
4. Rotate companion flange to check for runout.
5. If the runout value is outside the runout limit, follow the procedure below to adjust.
a. Check for runout while changing the phase between companion flange and drive pinion by 90 ° step, and
search for the position where the runout is the minimum.
PDIA0440E
PDIA0441E
Backlash: 0.10 - 0.15 mm (0.0039 - 0.0059 in)
When the backlash is large:
Decrease side bearing adju sting washer thickness.
Refer to FFD-39, "
Inspection and Adjustment".
When the backlash is small: Increase side bearing adjust ing washer thickness. Re-
fer to FFD-39, "
Inspection and Adjustment".
SDIA0009J
Runout limit: 0.18 mm (0.0071 in)
Runout limit: 0.13 mm (0.0051 in)
PDIA0646E
3AA93ABC3ACD3AC03ACA3AC03AC63AC53A913A773A893A873A873A8E3A773A983AC73AC93AC03AC3
3A893A873A873A8F3A773A9D3AAF3A8A3A8C3A863A9D3AAF3A8B3A8C
Page 2849 of 3924

FRONT SUSPENSION ASSEMBLYFSU-5
< SERVICE INFORMATION >
C
DF
G H
I
J
K L
M A
B
FSU
N
O P
FRONT SUSPENSION ASSEMBLY
On-Vehicle Inspection and ServiceINFOID:0000000001327537
Make sure the mounting conditions (looseness, back lash) of each component and component conditions
(wear, damage) are normal.
INSPECTION LOWER BALL JOINT END PLAY
1. Set front wheels in a straight-ahead position. Do not depress brake pedal.
2. Place an iron bar or similar tool bet ween transverse link and steering knuckle.
3. Measure axial end play by prying it up and down.
CAUTION:
Be careful not to damage ball joint boot.
STRUT INSPECTION
Check strut for oil leakage, damage and replace if there are. Refer to FSU-10.
Wheel Alignment InspectionINFOID:0000000001327538
DESCRIPTION
Measure wheel alignment under unladen conditions.
NOTE:
Unladen conditions mean that fuel, engine coolant, and l ubricant are full. Spare tire, jack, hand tools and
mats are designated positions.
PRELIMINARY CHECK
Check tires for improper air pressure and wear.
Check road wheels for runout.
Check wheel bearing axial end play.
Check ball joint axial end play of compression rod, upper link, and steering knuckle
Check shock absorber operation.
Check each mounting part of axle and suspension for looseness and deformation.
Check each link, rod and member for cracks, deformation and other damage.
Check vehicle posture.
GENERAL INFORMATION AND RECOMMENDATIONS
A four-wheel thrust alignment should be performed.
- This type of alignment is recomm ended for any NISSAN/INFINITI vehicle.
- The four-wheel “thrust” process helps ensure that t he vehicle is properly aligned and the steering wheel is
centered.
- The alignment rack itself should be capable of accepting any NISSAN/INFINITI vehicle.
- The rack should be checked to ensure that it is level.
Make sure the machine is properly calibrated.
- Your alignment equipment should be regularly ca librated in order to give correct information.
- Check with the manufacturer of your specific equi pment for their recommended Service/Calibration Sched-
ule.
THE ALIGNMENT PROCESS
IMPORTANT:
Use only the alignment specificati ons listed in this Service Manual.
When displaying the alignment settings, many alignment machines use “indicators”: (Green/red, plus or
minus, Go/No Go). Do NOT use these indicators.
- The alignment specifications programmed into your machine that operate these indicators may not be cor-
rect.
- This may result in an ERROR.
Some newer alignment machines are equipped with an optional “Rolling Compensation” method to “com-
pensate” the sensors (alignment targets or head units). DO NOT use this “Rolling Compensation”
method. Axial end play : 0 mm (0 in)
3AA93ABC3ACD3AC03ACA3AC03AC63AC53A913A773A893A873A873A8E3A773A983AC73AC93AC03AC3
3A893A873A873A8F3A773A9D3AAF3A8A3A8C3A863A9D3AAF3A8B3A8C
Page 2911 of 3924

TERMINOLOGYGI-49
< SERVICE INFORMATION >
C
DE
F
G H
I
J
K L
M B
GI
N
O P
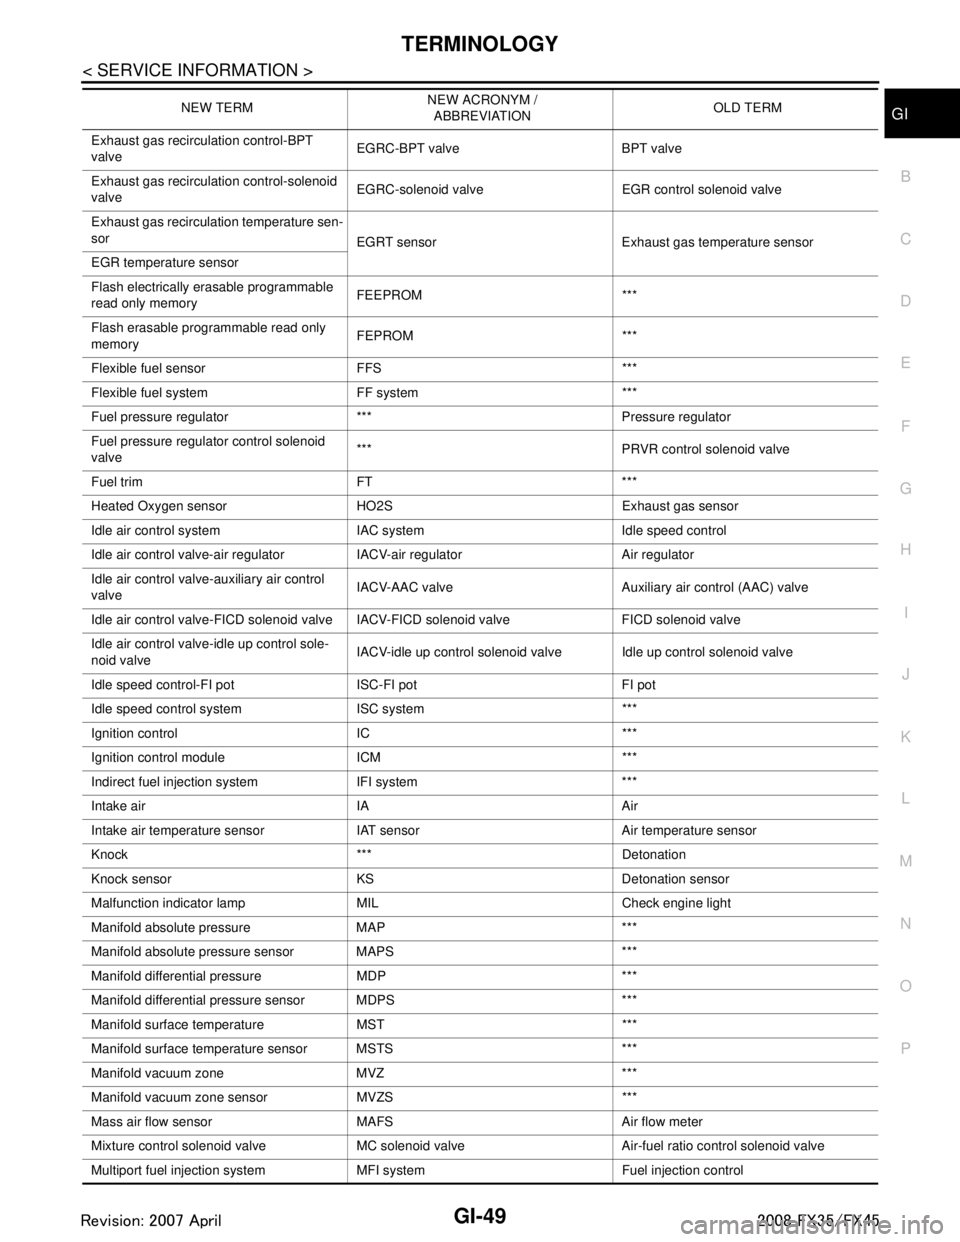
Exhaust gas recirculation control-BPT
valve EGRC-BPT valve BPT valve
Exhaust gas recirculation control-solenoid
valve EGRC-solenoid valve EGR control solenoid valve
Exhaust gas recirculation temperature sen-
sor EGRT sensor Exhaust gas temperature sensor
EGR temperature sensor
Flash electrically erasable programmable
read only memory FEEPROM ***
Flash erasable programmable read only
memory FEPROM ***
Flexible fuel sensor FFS ***
Flexible fuel system FF system ***
Fuel pressure regulato r *** Pressure regulator
Fuel pressure regulator control solenoid
valve *** PRVR control solenoid valve
Fuel trim FT ***
Heated Oxygen sensor HO2S Exhaust gas sensor
Idle air control system IAC system Idle speed control
Idle air control valve-air regulato r IACV-air regulator Air regulator
Idle air control valve-auxiliary air control
valve IACV-AAC valve Auxiliary
air control (AAC) valve
Idle air control valve-FICD solenoid valve IACV-FICD solenoid valve FICD solenoid valve
Idle air control valve-idle up control sole-
noid valve IACV-idle up control solenoid valve Idle up control solenoid valve
Idle speed control-FI pot ISC-FI pot FI pot
Idle speed control system ISC system ***
Ignition control IC ***
Ignition control module ICM ***
Indirect fuel injection system IFI system ***
Intake air IA Air
Intake air temperature sensor IAT sensor Air temperature sensor
Knock *** Detonation
Knock sensor KS Detonation sensor
Malfunction indicator lamp MIL Check engine light
Manifold absolute pressure MAP ***
Manifold absolute pressure sensor MAPS ***
Manifold differential pressure MDP ***
Manifold differential pressure sensor MDPS ***
Manifold su rface temperature MST ***
Manifold surface temperature sensor MSTS ***
Manifold vacuum zone MVZ ***
Manifold vacuum zone sensor MVZS ***
Mass air flow sensor MAFS Air flow meter
Mixture control solenoid valve MC solenoid valve Air-fuel ratio control solenoid valve
Multiport fuel injection system MFI system Fuel injection control NEW TERM
NEW ACRONYM /
ABBREVIATION OLD TERM
3AA93ABC3ACD3AC03ACA3AC03AC63AC53A913A773A893A873A873A8E3A773A983AC73AC93AC03AC3
3A893A873A873A8F3A773A9D3AAF3A8A3A8C3A863A9D3AAF3A8B3A8C
Page 2912 of 3924

GI-50
< SERVICE INFORMATION >
TERMINOLOGY
Nonvolatile random access memory NVRAM ***
On board diagnostic system OBD system Self-diagnosis
Open loop OL Open loop
Oxidation catalyst OC Catalyst
Oxidation catalytic converter system OC system ***
Oxygen sensor O2S Exhaust gas sensor
Park position switch *** Park switch
Park/neutral position switch PNP switchPark/neutral switch
Inhibitor switch
Neutral position switch
Periodic trap oxidizer system PTOX system ***
Positive crankcase ventilation PCV Positive crankcase ventilation
Positive crankcase ventilation valve PCV valve PCV valve
Powertrain cont rol module PCM ***
Programmable read only memory PROM ***
Pulsed secondary air injection control sole-
noid valve PAIRC solenoid valve AIV control solenoid valve
Pulsed secondary air injection system PAIR system Air induction valve (AIV) control
Pulsed secondary air injection valve PAIR valve Air induction valve
Random access memory RAM ***
Read only memory ROM ***
Scan tool ST ***
Secondary air injection pump AIR pump ***
Secondary air injection system AIR system ***
Sequential multiport fuel injection system SFI system Sequential fuel injection
Service reminder indicator SRI ***
Simultaneous multiport fuel injection sys-
tem *** Simultaneous fuel injection
Smoke puff limiter system SPL system ***
Supercharger SC ***
Supercharger bypass SCB ***
System readiness test SRT ***
Thermal vacuum valve TVV Thermal vacuum valve
Three way catalyst TWC Catalyst
Three way catalytic converter system TWC system ***
Three way + oxidation catalyst TWC + OC Catalyst
Three way + oxidation catalytic converter
system TWC + OC system ***
Throttle body TB Throttle chamber
SPI body
Throttle body fuel injection system TBI system Fuel injection control
Throttle position TP Throttle position
Throttle position sensor TPS Throttle sensor
Throttle position switch TP switch Throttle switch
Torque converter clutch solenoid valve TCC solenoid valve Lock-up cancel solenoid
Lock-up solenoid
NEW TERM
NEW ACRONYM /
ABBREVIATION OLD TERM
3AA93ABC3ACD3AC03ACA3AC03AC63AC53A913A773A893A873A873A8E3A773A983AC73AC93AC03AC3
3A893A873A873A8F3A773A9D3AAF3A8A3A8C3A863A9D3AAF3A8B3A8C