2008 INFINITI FX35 engine
[x] Cancel search: enginePage 2868 of 3924
GI-6
< SERVICE INFORMATION >
PRECAUTIONS
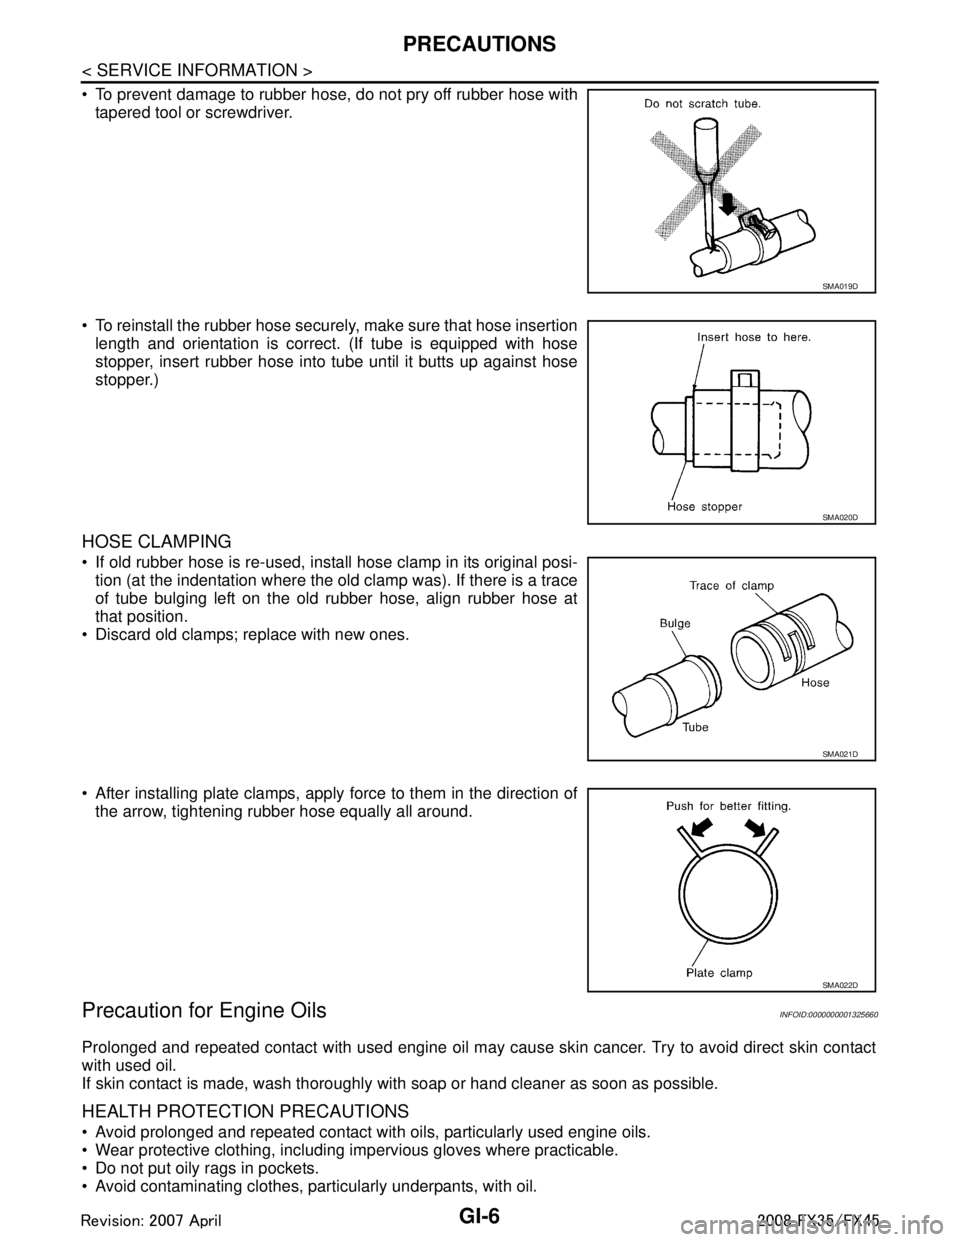
To prevent damage to rubber hose, do not pry off rubber hose withtapered tool or screwdriver.
To reinstall the rubber hose securely, make sure that hose insertion length and orientation is correct. (If tube is equipped with hose
stopper, insert rubber hose into tube until it butts up against hose
stopper.)
HOSE CLAMPING
If old rubber hose is re-used, install hose clamp in its original posi-tion (at the indentation where the old clamp was). If there is a trace
of tube bulging left on the old rubber hose, align rubber hose at
that position.
Discard old clamps; replace with new ones.
After installing plate clamps, apply force to them in the direction of the arrow, tightening rubber hose equally all around.
Precaution for Engine OilsINFOID:0000000001325660
Prolonged and repeated contact with used engine oil may cause skin cancer. Try to avoid direct skin contact
with used oil.
If skin contact is made, wash thoroughly with soap or hand cleaner as soon as possible.
HEALTH PROTECTION PRECAUTIONS
Avoid prolonged and repeated contact with oils, particularly used engine oils.
Wear protective clothing, including impervious gloves where practicable.
Do not put oily rags in pockets.
Avoid contaminating clothes, pa rticularly underpants, with oil.
SMA019D
SMA020D
SMA021D
SMA022D
3AA93ABC3ACD3AC03ACA3AC03AC63AC53A913A773A893A873A873A8E3A773A983AC73AC93AC03AC3
3A893A873A873A8F3A773A9D3AAF3A8A3A8C3A863A9D3AAF3A8B3A8C
Page 2883 of 3924

HOW TO USE THIS MANUALGI-21
< SERVICE INFORMATION >
C
DE
F
G H
I
J
K L
M B
GI
N
O PLH, RH Left-Hand, Right-Hand M/T Manual Transaxle/TransmissionOD Overdrive
P/S Power Steering
SAE Society of Automotive Engineers, Inc.
SDS Service Data and Specifications SST Special Service Tools
2WD 2-Wheel Drive 2
22nd range 2nd gear
2
12nd range 1st gear
1
21st range 2nd gear
1
11st range 1st gear
ABBREVIATION DESCRIPTION
3AA93ABC3ACD3AC03ACA3AC03AC63AC53A913A773A893A873A873A8E3A773A983AC73AC93AC03AC3
3A893A873A873A8F3A773A9D3AAF3A8A3A8C3A863A9D3AAF3A8B3A8C
Page 2887 of 3924
SERVICE INFORMATION FOR ELECTRICAL INCIDENTGI-25
< SERVICE INFORMATION >
C
DE
F
G H
I
J
K L
M B
GI
N
O P
How to Perform Efficient Diagnos is for an Electrical IncidentINFOID:0000000001325672
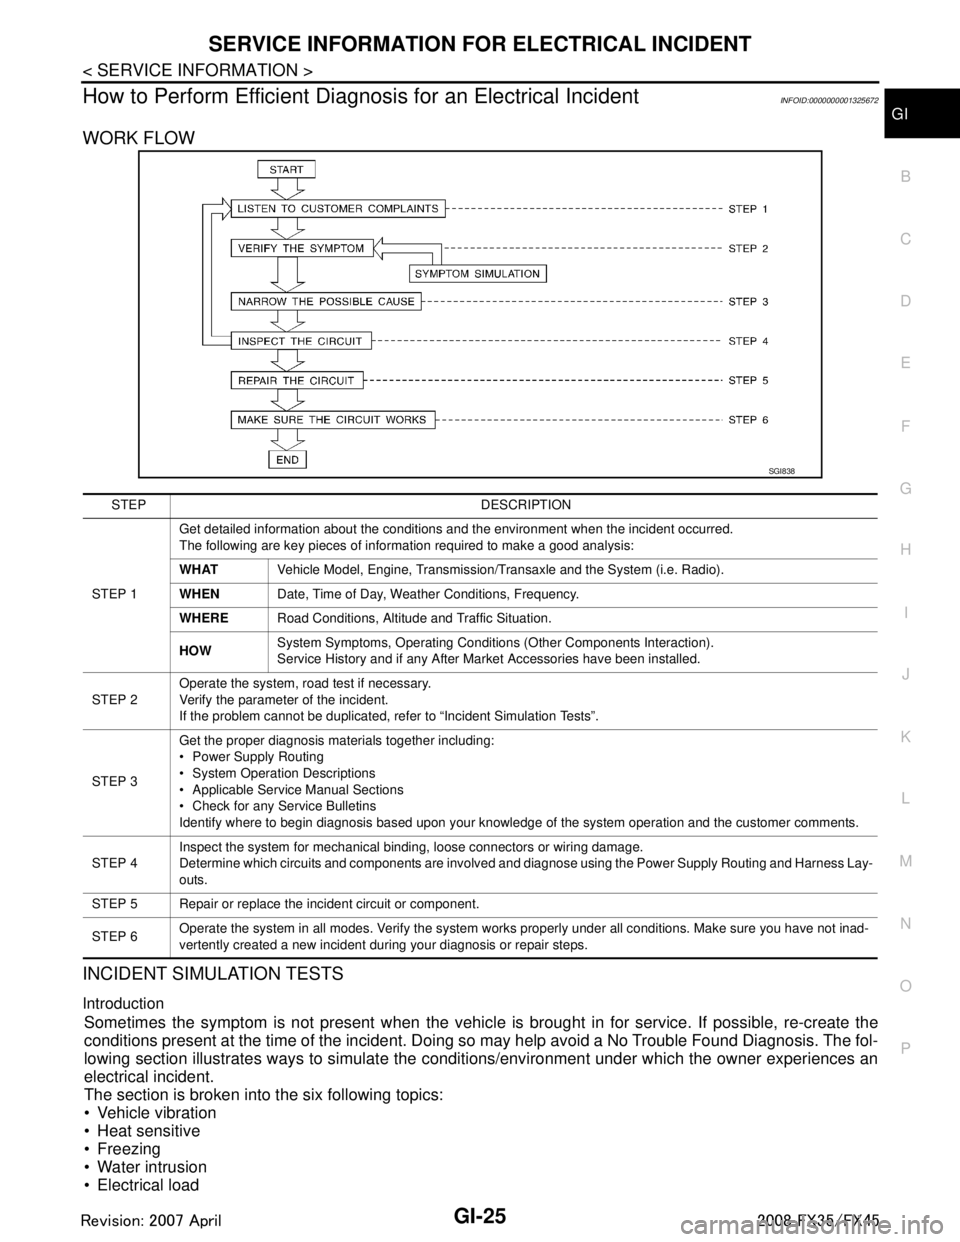
WORK FLOW
INCIDENT SIMULATION TESTS
Introduction
Sometimes the symptom is not present when the vehicle is brought in for service. If possible, re-create the
conditions present at the time of the incident. Doi ng so may help avoid a No Trouble Found Diagnosis. The fol-
lowing section illustrates ways to simulate the c onditions/environment under which the owner experiences an
electrical incident.
The section is broken into the six following topics:
Vehicle vibration
Heat sensitive
Freezing
Water intrusion
Electrical load
SGI838
STEP DESCRIPTION
STEP 1 Get detailed information about the conditions and the environment when the incident occurred.
The following are key pieces of information required to make a good analysis:
WHAT
Vehicle Model, Engine, Transmission/Transaxle and the System (i.e. Radio).
WHEN Date, Time of Day, Weather Conditions, Frequency.
WHERE Road Conditions, Altitude and Traffic Situation.
HOW System Symptoms, Operating Conditions (Other Components Interaction).
Service History and if any After Market Accessories have been installed.
STEP 2 Operate the system, road test if necessary.
Verify the parameter of the incident.
If the problem cannot be duplicated, refer to “Incident Simulation Tests”.
STEP 3 Get the proper diagnosis materials together including:
Power Supply Routing
System Operation Descriptions
Applicable Service Manual Sections
Check for any Service Bulletins
Identify where to begin diagnosis based upon your knowledge of the system operation and the customer comments.
STEP 4 Inspect the system for mechanical binding, loose connectors or wiring damage.
Determine which circuits and components are involved and diagnose using the Power Supply Routing and Harness Lay-
outs.
STEP 5 Repair or replace the incident circuit or component.
STEP 6 Operate the system in all modes. Verify the system works properly under all conditions. Make sure you have not inad-
vertently created a new incident during your diagnosis or repair steps.
3AA93ABC3ACD3AC03ACA3AC03AC63AC53A913A773A893A873A873A8E3A773A983AC73AC93AC03AC3
3A893A873A873A8F3A773A9D3AAF3A8A3A8C3A863A9D3AAF3A8B3A8C
Page 2888 of 3924
GI-26
< SERVICE INFORMATION >
SERVICE INFORMATION FOR ELECTRICAL INCIDENT
Cold or hot start up
Get a thorough description of the incident from the customer. It is important for simulating the conditions of the
problem.
Vehicle Vibration
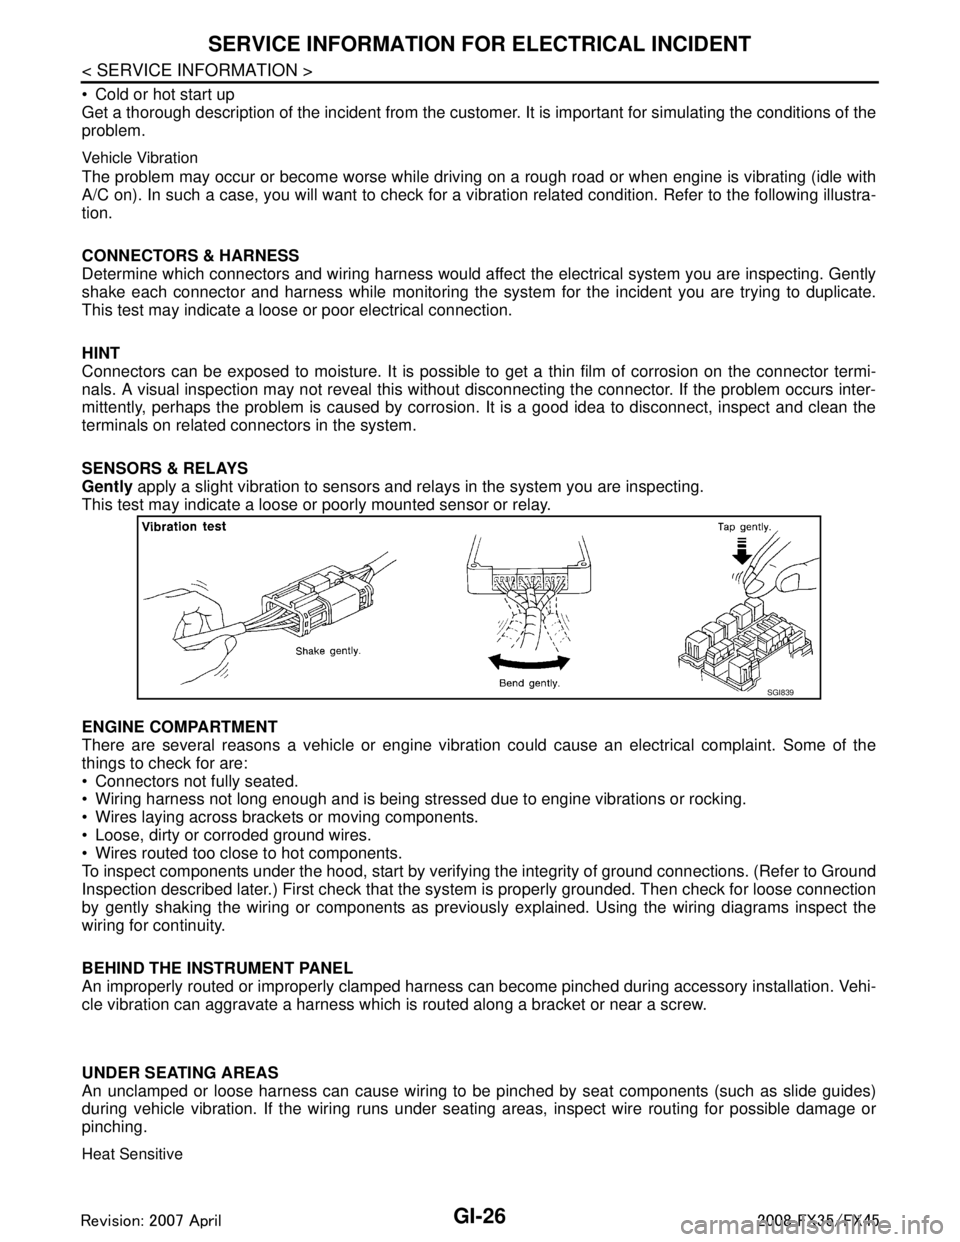
The problem may occur or become worse while drivi ng on a rough road or when engine is vibrating (idle with
A/C on). In such a case, you will want to check for a vi bration related condition. Refer to the following illustra-
tion.
CONNECTORS & HARNESS
Determine which connectors and wiring harness would affect the electrical system you are inspecting. Gently
shake each connector and harness while monitoring the sy stem for the incident you are trying to duplicate.
This test may indicate a loose or poor electrical connection.
HINT
Connectors can be exposed to moisture. It is possible to get a thin film of corrosion on the connector termi-
nals. A visual inspection may not reveal this without disconnecting the connector. If the problem occurs inter-
mittently, perhaps the problem is caused by corrosion. It is a good idea to disconnect, inspect and clean the
terminals on related connectors in the system.
SENSORS & RELAYS
Gently apply a slight vibration to sensors and relays in the system you are inspecting.
This test may indicate a loose or poorly mounted sensor or relay.
ENGINE COMPARTMENT
There are several reasons a vehicle or engine vibration could cause an e\
lectrical complaint. Some of the
things to check for are:
Connectors not fully seated.
Wiring harness not long enough and is being stressed due to engine vibrations or rocking.
Wires laying across brackets or moving components.
Loose, dirty or corroded ground wires.
Wires routed too close to hot components.
To inspect components under the hood, start by verifyi ng the integrity of ground connections. (Refer to Ground
Inspection described later.) First check that the system is properly grounded. Then check for loose connection
by gently shaking the wiring or components as previous ly explained. Using the wiring diagrams inspect the
wiring for continuity.
BEHIND THE INSTRUMENT PANEL
An improperly routed or improperly clamped harness can become pinched during accessory installation. Vehi-
cle vibration can aggravate a harness which is routed along a bracket or near a screw.
UNDER SEATING AREAS
An unclamped or loose harness can cause wiring to be pinched by seat components (such as slide guides)
during vehicle vibration. If the wiring runs under s eating areas, inspect wire routing for possible damage or
pinching.
Heat Sensitive
SGI839
3AA93ABC3ACD3AC03ACA3AC03AC63AC53A913A773A893A873A873A8E3A773A983AC73AC93AC03AC3
3A893A873A873A8F3A773A9D3AAF3A8A3A8C3A863A9D3AAF3A8B3A8C
Page 2896 of 3924
GI-34
< SERVICE INFORMATION >
CONSULT-III/GST CHECKING SYSTEM
CONSULT-III/GST CHECKING SYSTEM
DescriptionINFOID:0000000001572193
When CONSULT-III/GST is connected with a data link connector
(A) equipped on the vehicle side, it will communicate with the con-
trol unit equipped in the vehicle and then enable various kinds of
diagnostic tests.
Refer to CONSULT-III Operation Manual for more information.
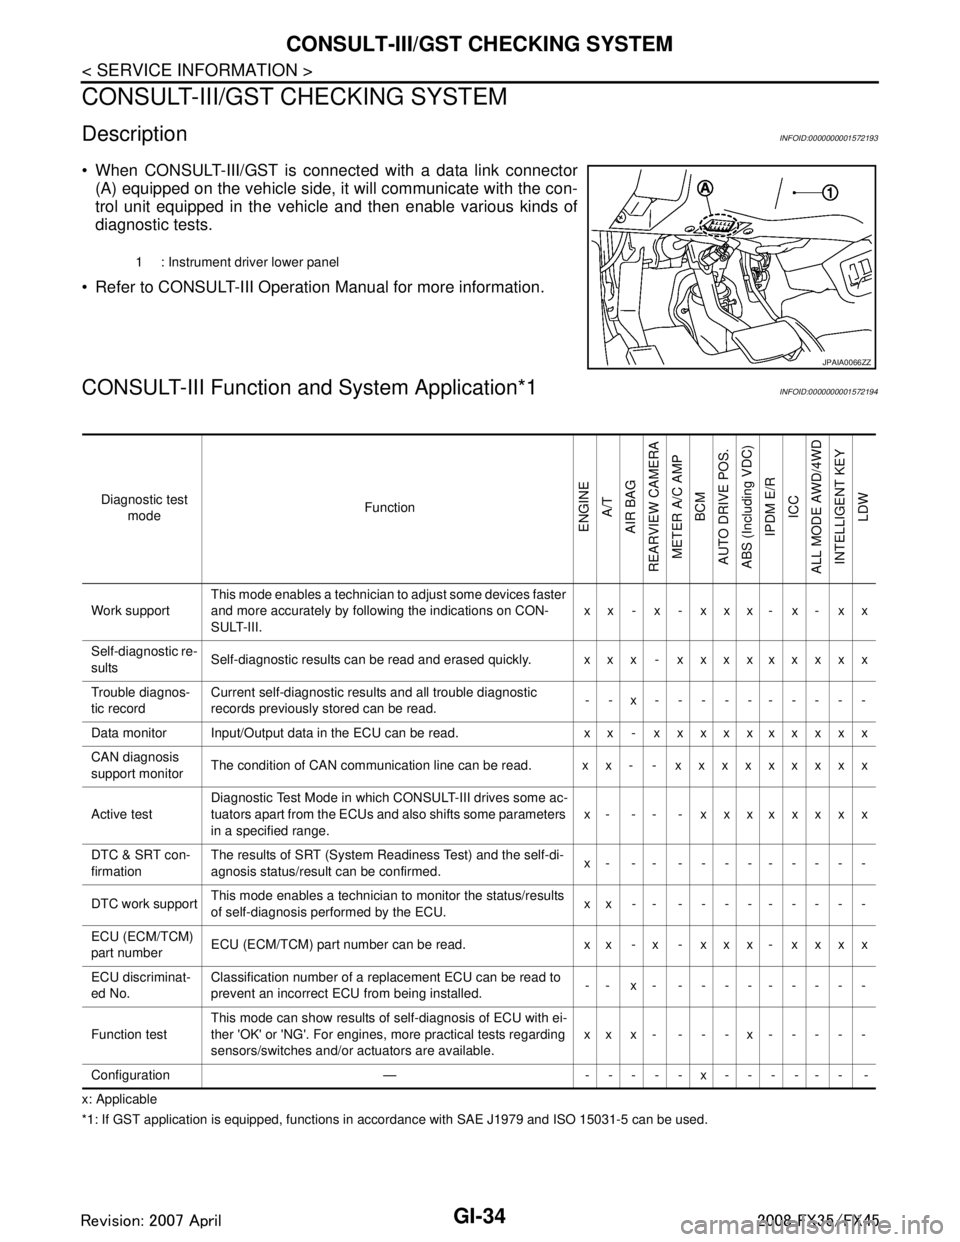
CONSULT-III Function a nd System Application*1INFOID:0000000001572194
x: Applicable
*1: If GST application is eq uipped, functions in accordance with SAE J1979 and ISO 15031-5 can be used.
1 : Instrument driver lower panel
JPAIA0066ZZ
Diagnostic test
mode Function
ENGINE
A/T
AIR BAG
REARVIEW CAMERA
METER A/C AMP BCM
AUTO DRIVE POS.
ABS (Including VDC) IPDM E/R
ICC
ALL MODE AWD/4WD INTELLIGENT KEY LDW
Work support This mode enables a technician to adjust some devices faster
and more accurately by following the indications on CON-
SULT-III. xx - x - xxx- x- xx
Self-diagnostic re-
sults Self-diagnostic results can be read and erased quickly. xxx - xxxxxxxxx
Trouble diagnos-
tic record Current self-diagnostic results and all trouble diagnostic
records previously stored can be read.
--x----------
Data monitor Input/Output data in the ECU can be read. xx - xxxxxxxxxx
CAN diagnosis
support monitor The condition of CAN communication line can be read. xx- - xxxxxxxxx
Active test Diagnostic Test Mode in whic
h CONSULT-III drives some ac-
tuators apart from the ECUs and also shifts some parameters
in a specified range. x- -- - xxxxxxxx
DTC & SRT con-
firmation The results of SRT (System Readiness Test) and the self-di-
agnosis status/result can be confirmed.
x- -- ---------
DTC work support This mode enables a technician to monitor the status/results
of self-diagnosis performed by the ECU. xx-- ---------
ECU (ECM/TCM)
part number ECU (ECM/TCM) part number can be read. x x - x - x x x - x x x x
ECU discriminat-
ed No. Classification number of a replacement ECU can be read to
prevent an incorrect ECU from being installed.
-- x- ---------
Function test This mode can show results of self-diagnosis of ECU with ei-
ther 'OK' or 'NG'. For engines, more practical tests regarding
sensors/switches and/or actuators are available.
xxx- ---x-----
Configuration — -----x------ -
3AA93ABC3ACD3AC03ACA3AC03AC63AC53A913A773A893A873A873A8E3A773A983AC73AC93AC03AC3
3A893A873A873A8F3A773A9D3AAF3A8A3A8C3A863A9D3AAF3A8B3A8C
Page 2899 of 3924
LIFTING POINTGI-37
< SERVICE INFORMATION >
C
DE
F
G H
I
J
K L
M B
GI
N
O PLIFTING POINT
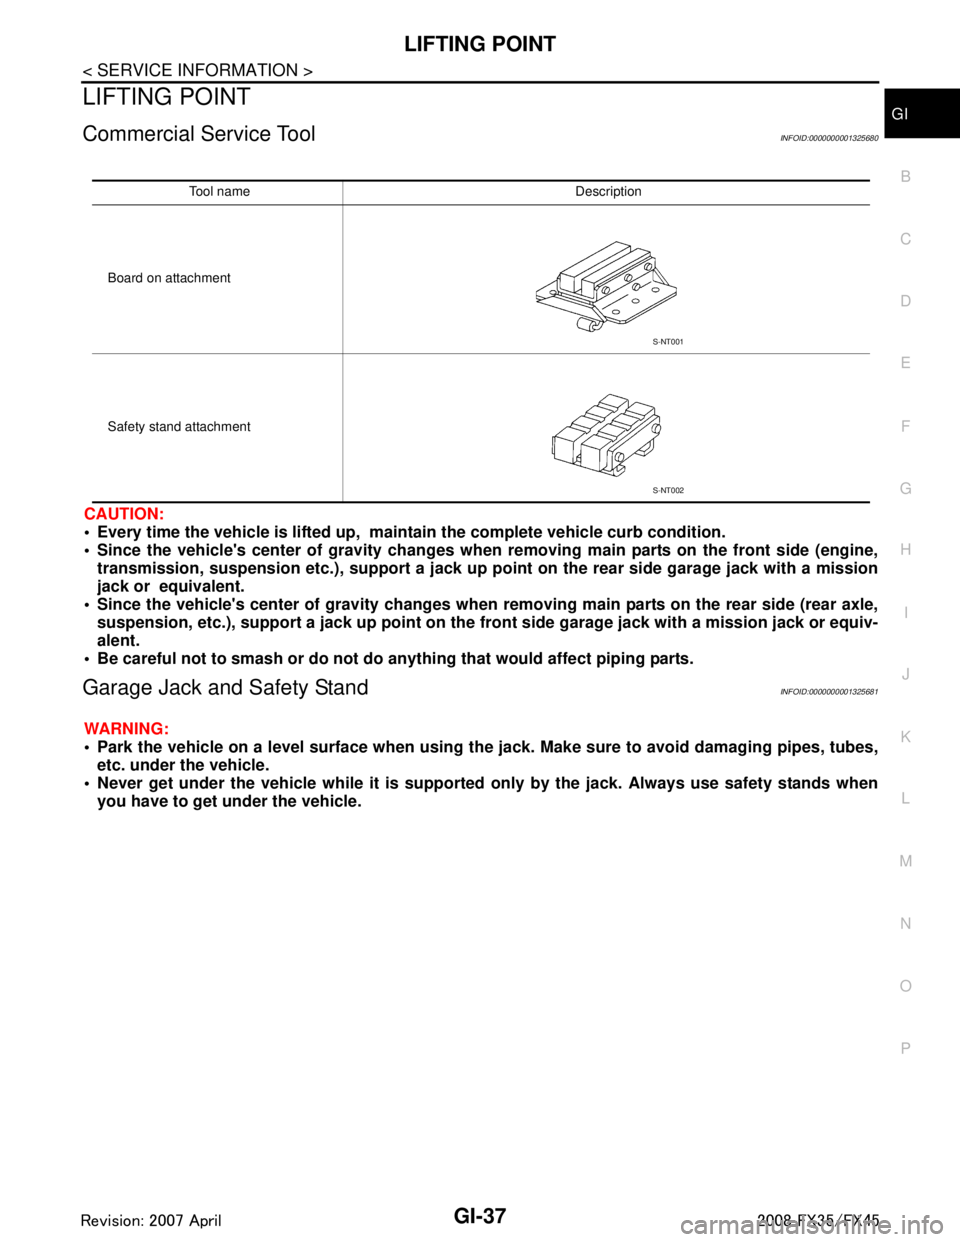
Commercial Service ToolINFOID:0000000001325680
CAUTION:
Every time the vehicle is lifted up, main tain the complete vehicle curb condition.
Since the vehicle's center of gravity changes when removing main parts on the front side (engine,
transmission, suspension etc.), support a jack up poi nt on the rear side garage jack with a mission
jack or equivalent.
Since the vehicle's center of gravity changes when removing main parts on the rear side (rear axle,
suspension, etc.), support a jack up point on the fr ont side garage jack with a mission jack or equiv-
alent.
Be careful not to smash or do not do an ything that would affect piping parts.
Garage Jack and Safety StandINFOID:0000000001325681
WARNING:
Park the vehicle on a level surface when using th e jack. Make sure to avoid damaging pipes, tubes,
etc. under the vehicle.
Never get under the vehicle while it is supported only by the jack. Always use safety stands when
you have to get under the vehicle.
Tool name Description
Board on attachment
Safety stand attachment
S-NT001
S-NT002
3AA93ABC3ACD3AC03ACA3AC03AC63AC53A913A773A893A873A873A8E3A773A983AC73AC93AC03AC3
3A893A873A873A8F3A773A9D3AAF3A8A3A8C3A863A9D3AAF3A8B3A8C
Page 2907 of 3924
IDENTIFICATION INFORMATIONGI-45
< SERVICE INFORMATION >
C
DE
F
G H
I
J
K L
M B
GI
N
O PIDENTIFICATION INFORMATION
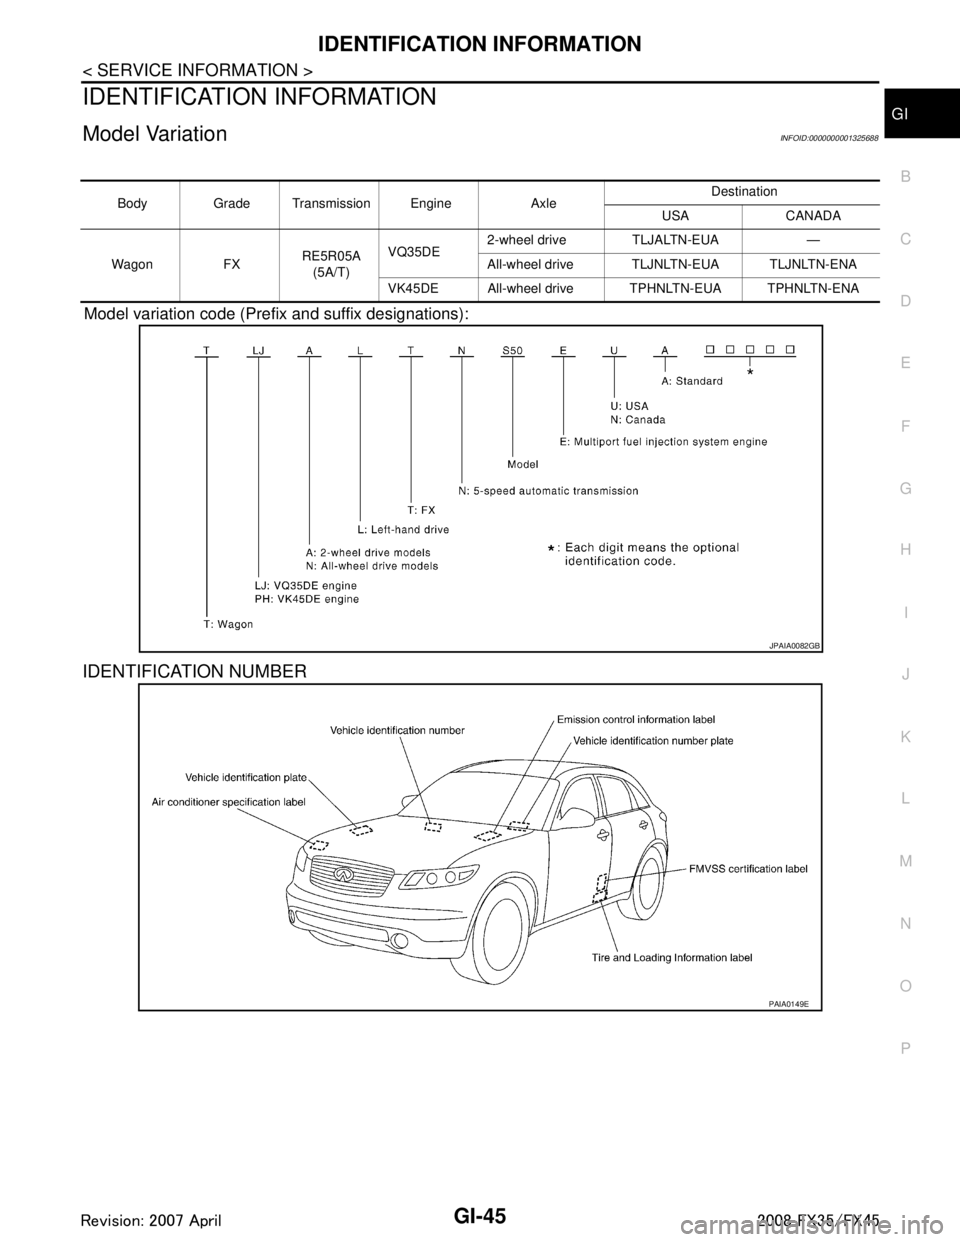
Model VariationINFOID:0000000001325688
Model variation code (Prefix and suffix designations):
IDENTIFICATION NUMBER
Body Grade Transmission Engine Axle Destination
USA CANADA
Wagon FX RE5R05A
(5A/T) VQ35DE
2-wheel drive TLJALTN-EUA —
All-wheel drive TLJNLTN-EUA TLJNLTN-ENA
VK45DE All-wheel drive TPHNLTN-EUA TPHNLTN-ENA
JPAIA0082GB
PAIA0149E
3AA93ABC3ACD3AC03ACA3AC03AC63AC53A913A773A893A873A873A8E3A773A983AC73AC93AC03AC3
3A893A873A873A8F3A773A9D3AAF3A8A3A8C3A863A9D3AAF3A8B3A8C
Page 2908 of 3924
GI-46
< SERVICE INFORMATION >
IDENTIFICATION INFORMATION
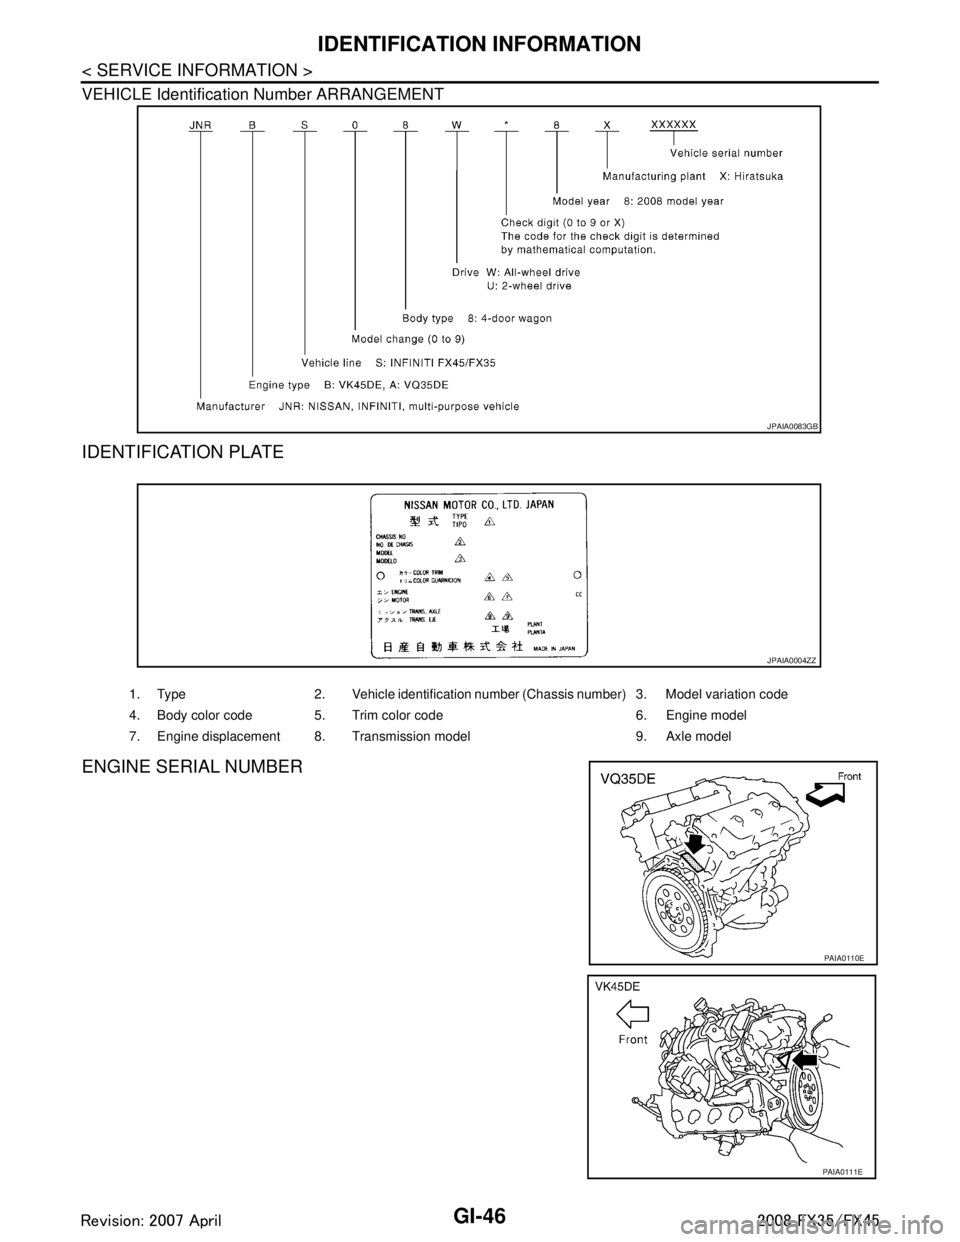
VEHICLE Identification Number ARRANGEMENT
IDENTIFICATION PLATE
ENGINE SERIAL NUMBER
JPAIA0083GB
1. Type 2. Vehicle identification number (Chassis number) 3. Model variation code
4. Body color code 5. Trim color code 6. Engine model
7. Engine displacement 8. Transmission model 9. Axle model
JPAIA0004ZZ
PAIA0110E
PAIA0111E
3AA93ABC3ACD3AC03ACA3AC03AC63AC53A913A773A893A873A873A8E3A773A983AC73AC93AC03AC3
3A893A873A873A8F3A773A9D3AAF3A8A3A8C3A863A9D3AAF3A8B3A8C