Page 180 of 329

The security system helps to protect
your vehicle and valuables f rom thef t.
The horn sounds and a combination
of headlights, parking lights, side
marker lights, and taillights f lash if
someone attempts to break into your
vehicle. This alarm continues for 2
minutes, then the system resets. To
reset an alarm system bef ore the 2
minutes have elapsed, unlock the
driver’s f ront door with the key or
the remote transmitter.The security system will not set if
the hood, the tailgate, or any door is
not f ully closed. If the system will not
set, check the Door and Tailgate
Open Monitor on the instrument
panel (see page ) to see if the
doors and the tailgate are f ully
closed. Since it is not part of the
monitor display, manually check the
hood.
Do not attempt to alter this system
or add other devices to it.
The security system automatically
sets 15 seconds after you lock the
doors, hood, and the tailgate. For the
system to activate, you must lock the
doors f rom the outside with the key,
lock tab, door lock switch, or remote
transmitter. The security system
indicator next to the driver’s door
lock starts blinking immediately to
show you the system is setting itself . Once the security system is set,
opening any door, the tailgate, or the
hood without using the key or the
remote transmitter, will cause it to
alarm. It also alarms if the radio is
removed f rom the dashboard or the
wiring is cut. 66
On EX, EX-L and EX-SE models
Security System
176
SECURITY SYSTEM INDICATOR
�\f���—�\f���—�\f���y�
�
�����������y���
�(���+�����\f�y�\f�
���
�y
2008 Pilot
Page 186 of 329
�Ý
�Û
When in reverse, the touch screen
and navigation system ‘‘hard’’
buttons are locked out, except the
‘‘ZOOM’’ button. Touching the ‘‘ ’’
or ‘‘ ’’ button allows you to adjust
the brightness of the rearview
camera image. Since the rearview camera display
area is limited, you should always
back up slowly and caref ully, and
look behind you f or obstacles.
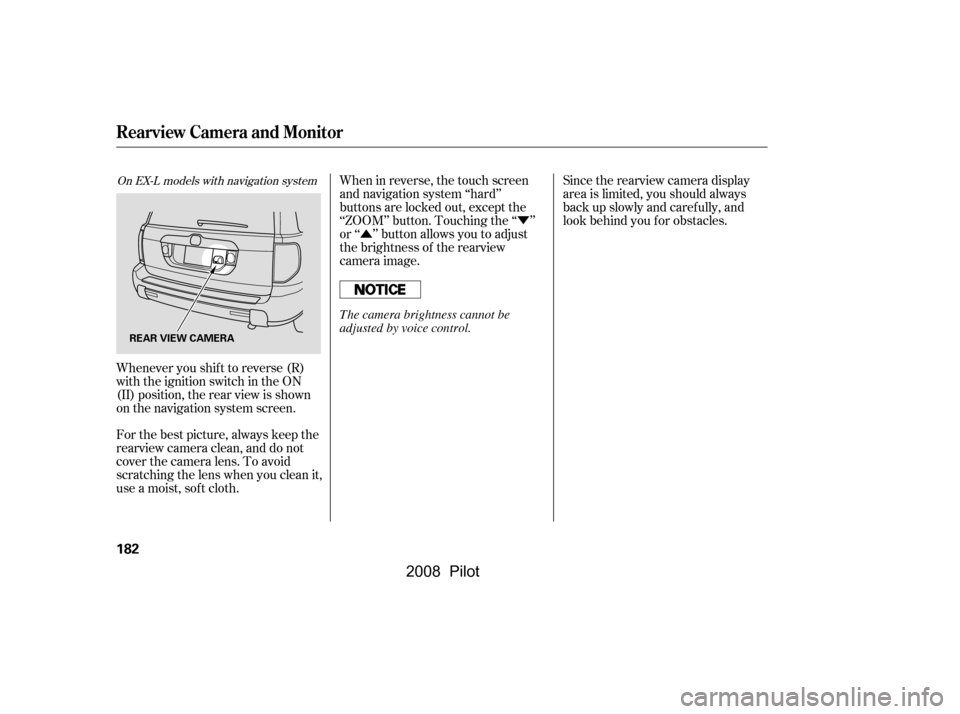
Whenever you shif t to reverse (R)
with the ignition switch in the ON
(II) position, the rear view is shown
on the navigation system screen.
For the best picture, always keep the
rearview camera clean, and do not
cover the camera lens. To avoid
scratching the lens when you clean it,
use a moist, sof t cloth.
On EX-L models with navigation system
Rearview Camera and Monitor
182
REAR VIEW CAMERA
The camera brightness cannot be
adjusted by voice control.
�\f���—�\f���—�\f���y�
�
�������
���y���
�(���+�����\f�y�\f�
�����y
2008 Pilot
Page 188 of 329

Press and hold the remote
transmitter button and one of the
HomeLink buttons at the same
time.transmitter button and one of the
time. While continuing to hold the
HomeLink button, press and
release the remote transmitter
button every 2 seconds.If the red indicator in HomeLink
continues to f lash slowly (does
not f lash rapidly), your remote
transmitting after a short time.
If the red indicator in HomeLink
begins to f lash slowly at f irst,
then rapidly, release both If the red indicator in HomeLink
then rapidly, release both
If the red indicator in HomeLink
not begin to f lash rapidly),
184
�\f���—�\f���—�\f���y�
�
�����������y���
�(���+�����\f�y�\f�
�����y
Homelink® Universal Transceiver
2.
buttons, and go to step 4. Go to step 3.
transmitter may stop
Press and hold the remote
HomeLink buttons at the same
begins to f lash slowly at f irst,
3.
buttons, and go to step 4.
repeat steps 1 thru 3.
continues to f lash slowly (does
�µ
If you just
received your vehicle and have not
trained any of the buttons in
HomeLink bef ore, you should erase
any previously learned codes bef ore
training the first button. To do this,
press and hold the two outside
buttons on the HomeLink
transceiver for about 20 seconds,
until the red indicator f lashes.
Release the buttons, then proceed to
step 1.
If you are training the second or
Holdtheendof thegaragedoor
inches f rom HomeLink. Make
sure you are not blocking your
view of the red indicator in
HomeLink.
1.
Bef ore you begin
third buttons, go directly to step 1.
opener remote transmitter 1 to 3
T raining HomeL ink
2008 Pilot
Page 200 of 329

Your dealer has Honda accessories
that allow you to personalize your
vehicle. These accessories have
been designed and approved f or your
vehicle, and are covered by warranty.Bef ore installing any accessory:
Modif ying your vehicle, or installing
some non-Honda accessories, can
make it unsaf e. Bef ore you make any
modif ications or add any accessories,
be sure to read the f ollowing
inf ormation.
Although non-Honda accessories
may f it on your vehicle, they may not
meet f actory specif ications, and
could adversely af f ect your vehicle’s
handling and stability. When properly installed, cellular
phones, alarms, two-way radios, and
low-powered audio systems should
not interf ere with your vehicle’s
computer controlled systems, such
as your airbags, anti-lock brakes, and
tire pressure monitoring system.
Do not install accessories on the
side pillars or across the rear
windows. Accessories installed in
theseareasmayinterferewith
proper operation of the side
curtain airbags.
Bef ore installing any electronic
accessory, have the installer
contact your dealer for assistance.
If possible, have your dealer
inspect the f inal installation.
Be sure electronic accessories do
not overload electrical circuits
(see page ) or interf ere with
proper operation of your vehicle.
Make sure the accessory does not
obscure any lights, or interf ere
with proper vehicle operation or
perf ormance.
289
A ccessories
A ccessories and Modif ications
196
Improper accessories or
modifications can affect your
vehicle’s handling, stability, and
performance, and cause a
crash in which you can be hurt
or killed.
Follow all instructions in this
owner’s manual regarding
accessories and modifications.
�\f���—�\f���—�\f���y�
�
�����������y���
�(���+�����\f�y�\f���\f�
�y
2008 Pilot
Page 201 of 329

Removing parts f rom your vehicle,
or replacing components with
non-Honda components could
seriously af f ect your vehicle’s
handling, stability, and reliability.Raising your vehicle with a
non-Honda suspension kit can
af f ect the handling and stability.
Herearesomeexamples:
Lowering your vehicle with a
non-Honda suspension kit that
signif icantly reduces ground
clearance can allow the
undercarriage to hit speed bumps
or other raised objects, which
could cause the airbags to deploy. If you plan to modif y your vehicle,
consult your dealer.Modif ying your steering wheel or
any other part of your vehicle’s
safety features can make the
systems inef f ective.
Larger or smaller wheels and tires
can interf ere with the operation of
your vehicle’s anti-lock brakes and
other systems.
Non-Honda wheels, because they
are a universal design, can cause
excessive stress on suspension
components and will not be
compatible with the tire pressure
monitoring system (TPMS).
Modif ying Your Vehicle
A ccessories and Modif ications
Bef ore Driving
197
�\f���—�\f���—�\f���y�
�
�����������y���
�(���+�����\f�y�\f���\f���y
2008 Pilot
Page 207 of 329

This section gives you tips on
starting the engine under various
conditions, and how to operate the
automatic transmission. It also
includes important inf ormation on
parking your vehicle, the braking
system, the VTM-4 system (4WD
models only), the vehicle stability
assist (VSA) system, the tire
pressure monitoring system (TPMS),
and f acts you need if you are
planning to tow a trailer or drive off-
highway.........................
Driving Guidelines .204
.......................
Starting the Engine .205
..............
Automatic Transmission .206
..............................
VTM-4 System .210
Tire Pressure Monitoring
........................
System (TPMS) .211
...........................................
Parking .214
.............................
Braking System .215
...............
Anti-lock Brakes (ABS) .216
Vehicle Stability Assist (VSA)
....................................
System .218
.........................
VSA Of f Switch .219
...........................
Towing a Trailer .220
Of f -Highway Driving
..................................
Guidelines .230
Driving
Driving
203
�\f���—�\f���—�\f���y�
�
����\f������y���
�(���+�����\f�y�\f���\f���y
2008 Pilot
Page 209 of 329

If the engine does not start within
15 seconds, or starts but stalls
right away, repeat step 4 with the
accelerator pedal pressed halfway
down. If the engine starts, release
pressure on the accelerator pedal
so the engine does not race.
If the engine fails to start, press
the accelerator pedal all the way
down, and hold it there while
starting to clear flooding. If the
engine still does not start, return
to step 5.
Without touching the accelerator
pedal, turn the ignition key to the
START (III) position. Do not hold
the key in the START (III)
position f or more than 15 seconds
at a time. If the engine does not
start right away, pause for at least
10 seconds bef ore trying again.
Make sure the shif t lever is in
Park. Press on the brake pedal.
In cold weather, turn of f all
electrical accessories to reduce
the drain on the battery.
Apply the parking brake.
When you start the engine, check
the gauges and indicators in the
instrument panel (see page ).
Fasten your seat belt. Check that
your passengers have f astened
their seat belts (see page ).
Make sure the doors and the
tailgate are securely closed and
locked.
Check the steering wheel
adjustment (see page ).
Check the adjustment of the
inside and outside mirrors (see
page ). 5.
6.
1.
2.
3.
4.
15
6.
7.
8.
9.
10. 92
78
61
Driving Guidelines, Starting the Engine
Starting the Engine
Driving
205
The engine is harder to start in cold
weather. Also, the thinner air f ound at
altitudes above 8,000 f eet (2,400
meters) adds to this problem.
T he immobilizer system protects your
vehicle f rom thef t. If an improperly-
coded key (or other device) is used, the
engine’s f uel system is disabled. For
more inf ormation, see page . 80
�\f���—�\f���—�\f���y�
�
����\f������y���
�(���+�����\f�y�\f���
�\f�y
2008 Pilot
Page 210 of 329
If the malf unction indicator lamp
comes on along with the ‘‘D’’
indicator, there is a problem with the
automatic transmission control
system. Avoid rapid acceleration, and
have the transmission checked by
your dealer as soon as possible.
These indicators on the instrument
panel show which position the shif t
lever is in.
The ‘‘D’’ indicator comes on f or a
f ew seconds when you turn the
ignition switch to the ON (II)
position. If it f lashes while driving (in
any shif t position), it indicates a
possible problem in the transmission. To shif t f rom Park to any position,
pressfirmlyonthebrakepedal,and
pull the shif t lever toward you. You
cannot shif t out of Park when the
ignition switch is in the LOCK (0) or
ACCESSORY (I) position.
Automatic Transmission
Shif t L ever Position Indicators Shif ting
206
SHIFT LEVER
�\f���—�\f���—�\f���y�
�
����\f������y���
�(���+�����\f�y�\f���
�
�y
2008 Pilot