Page 118 of 329
�µ
�µ
�µ
Theclimatecontrolsystemhastwo
sensors. A sunlight sensor is in the
top of the dashboard, and a
temperature sensor is next to the
steering column. Do not cover the
sensors or spill any liquid on them.
OFF (center) The rear A/C unit
shuts off.
Warm Air Turn this dial clockwise
to increase the temperature.
Cool Air Turn this dial
counterclockwise to decrease the
temperature.
On EX, EX-L, and EX-SE models
Sunlight and T emperature
Sensors
Vents, Heating, and A/C
114
SUNLIGHT SENSOR TEMPERATURE SENSOR
COOL AIR WARM AIR
�\f���—�\f���—�\f���y�
�
�����������y���
�(���+�����\f�y�\f�
�
���y
2008 Pilot
Page 132 of 329
The XM satellites are in orbit over
the equator; therefore, objects south
of the vehicle may cause satellite
reception interruptions. To help
compensate f or this, ground-based
repeaters are placed in major
metropolitan areas.
Satellite signals are more likely to be
blocked by tall buildings and
mountains the f arther north you
travel f rom the equator. Carrying
large items on a roof rack can also
block the signal.
Playing the XMSatellite Radio
128
Signal may be blocked by
mountains or large obstacles to
the south.Signal weaker in
these areas.
SATELLITE GROUND REPEATER
�\f���—�\f���—�\f���y�
�
����\f������y���
�(���+�����\f�y�\f�
�����y
2008 Pilot
Page 146 of 329
Setting the Clock
142
CLOCKH BUTTON
M BUTTON
CLOCK CLOCK BUTTON
H BUTTON RESET BUTTON
M BUTTON
SET BUTTON
LX models
LX-VP, EX, EX-L, and EX-SE models
(U.S. EX model shown)
�\f���—�\f���—�\f���y�
�
�����������y���
�(���+�����\f�y�\f�
�����y
2008 Pilot
Page 147 of 329

buttonsetstheclockba")
�µ�´
You can quickly set the time to the
nearest hour. If the displayed time is
bef ore the half hour, pressing and
holding the clock button, then
pressing the RESET (preset 6)
buttonsetstheclockbacktothe
previous hour. If the displayed time
is af ter the half hour, the clock sets
f orward to the beginning of the next
hour.
For example: 1:06 will reset to 1:00
1:52 will reset to 2:00 The display shows the time when the
ignition is in the ACCESSORY (I) or
the ON (II) position.
Press and hold the SET (TUNE)
button until the numbers f lash.
Change the hours by pressing the
H ( ) button until the numbers
advance to the desired time. Change
the minutes by pressing the M ( )
button until the numbers advance to
the desired time. When you are
finished, press the SET button again.
Refer to the navigation system
manual f or how to adjust the time.
Press and hold the CLOCK (SCAN/
RPT) button. Change the hours by
pressing the H (preset 4) button
until the numbers advance to the
desired time. Change the minutes by
pressing the M (preset 5) button
until the numbers advance to the
desired time. When you are f inished,
release the CLOCK button.
LX models
Except f or LX models
On models with navigation system
Setting the Clock
Features
143
�\f���—�\f���—�\f���y�
�
�����������y���
�(���+�����\f�y�\f�
�����y
2008 Pilot
Page 150 of 329

�Î
�Î
To operate the rear entertainment
system from the front panel, turn the
RR CTRL knob clockwise. The
amber RR LED comes on to show
that the control panel is enabled.The DVD player in your rear
entertainment system can play DVD
video discs and CDs. It features
Dolby noise reduction.
Open the overhead screen by
pushing the OPEN button. The
screen will swing down part-way.
Pivot the screen the rest of the way.
If you pivot the screen too f ar
f orward, past the second detent, the
display will turn of f . Pivot the screen
back to the second or first detent to
turn the display back on. To close
the screen, pivot it up until it latches.
To play the radio, the buttons for the
f ront entertainment system have the
same f unctions.
If aCDisloadedinthemainCD
player or CD changer, select CD/
CHG.If theCDisloadedinthe
lower player, select DVD/AUX.
Dolby noise reduction is manufactured under
license from Dolby Laboratories Licensing
Corporation. ‘‘DOLBY’’ and the double-D symbol are trademarks of Dolby Laboratories
Licensing Corporation.
To Select Rear Entertainment
f rom the Front Control Panel Operating the DVD Player f rom
the Front Control Panel
Rear Entertainment System
146
REAR CONTROL PANEL
OPEN BUTTON
OVERHEAD SCREEN
�\f���—�\f���—�\f���y�
�
�����������y���
�(���+�����\f�y�\f�
���
�y
2008 Pilot
Page 151 of 329
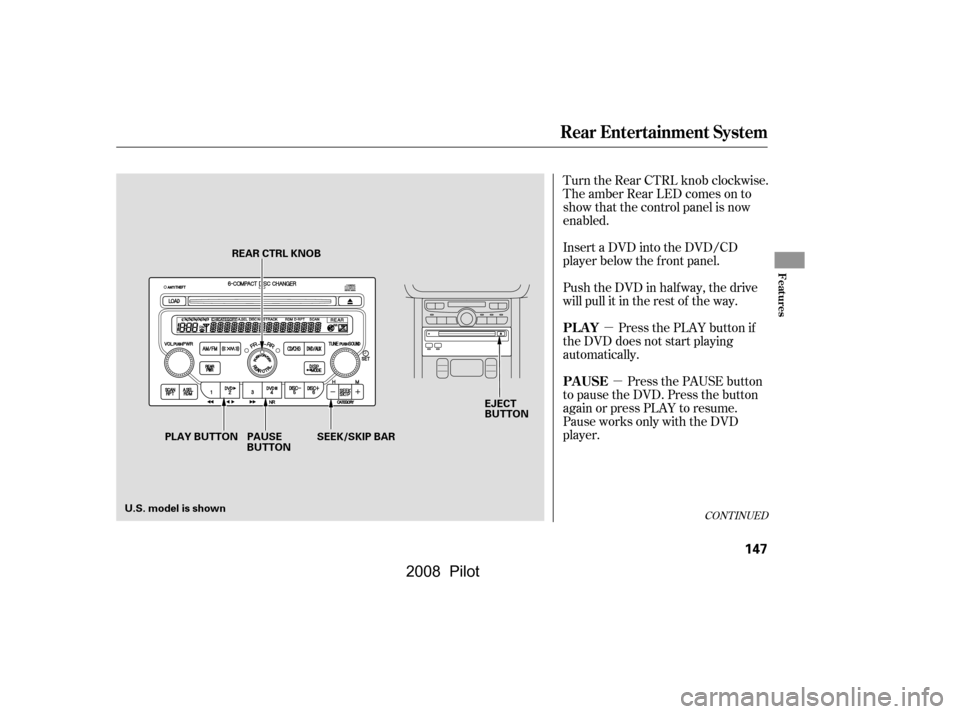
�µ�µ
Turn the Rear CTRL knob clockwise.
The amber Rear LED comes on to
show that the control panel is now
enabled.
Insert a DVD into the DVD/CD
player below the f ront panel.
Push the DVD in half way, the drive
will pull it in the rest of the way.
Press the PLAY button if
the DVD does not start playing
automatically.
Press the PAUSE button
to pause the DVD. Press the button
again or press PLAY to resume.
Pause works only with the DVD
player.
CONT INUED
PL AY
PAUSE
Rear Entertainment System
Features
147
EJECT
BUTTON
PLAY BUTTON PAUSE BUTTON
REAR CTRL KNOB
SEEK/SKIP BAR
U.S. model is shown
�\f���—�\f���—�\f���y�
�
�����������y���
�(���+�����\f�y�\f�
�����y
2008 Pilot
Page 152 of 329

�µ
�µ
�´
�µ
�´ �µPress the eject button to
remove the DVD from the drive.
Press and hold the
button to move f orward; you will
see ‘‘CUE’’ in the display. Press and
hold the button to move
backward; you will see ‘‘REV’’ in the
display. Release the button when the
system reaches the point you want.
Each time you press and release the
button of the SEEK/SKIP, the
system skips f orward to the
beginning of the next track or
chapter. Press and release the
buttontoskipbackwardtothe
beginning of the current track or
chapter. Press it again to skip to the
beginning of the previous track or
chapter. To return f ront panel control to the
front audio system, turn the REAR
CTRL knob counterclockwise.
To turn on the rear entertainment
system f rom the rear control panel,
press the PWR button. Use the AM/
FM button, XM button (U.S. models),
CD button, DVD/AUX button (U.S.
models), or AUX button (Canadian
models) to select the entertainment
source. The selected source will be
shown in the display. Make sure the
rear control operation has not been
disabled with the REAR CTRL knob
on the f ront panel.
Rear Entertainment System
EJECT
SEEK /SK IP
To Return to Front Audio
ControlsUsing the Rear Control Panel
148
�\f���—�\f���—�\f���y�
�
�������\f���y���
�(���+�����\f�y�\f�
�����y
2008 Pilot
Page 179 of 329
There are three headphone
connectors f or the third seat
passengers. Each connector has its
own volume control.
The system will accept auxiliary
inputs f rom standard video games
and video equipment.
V=Videojack
L = Lef t audio jack
R = Right audio jack
Auxiliary input jacks and headphone
connectors f or the rear
entertainment system are on the
back of the center console
compartment.
Remove the battery. Install the new
battery in the earpiece as shown in
the diagram next to the battery slot.
Slide the cover back into place on the
earpiece, then press down on the
back edge to lock it in place.
An improperly disposed of battery
can hurt the environment.
Always conf irm local regulations f or
battery disposal. Auxiliary Input Jacks
Rear Entertainment System
Features
175
AUXILIARY INPUT JACKS
BATTERY COVER
HEADPHONE CONNECTORS
VOLUME
DIALS
�\f���—�\f���—�\f���y�
�
���������
�y���
�(���+�����\f�y�\f�
���\f�y
2008 Pilot