Page 286 of 392
![GEELY CK 2008 Workshop Manual 279 4 DTC 00283, 00285,00287, 00290 Like ly Cause s
[De s cription]
When there is recognized open
or short circuit in the sensor, this DTC is set.
[Hint]
The likely c ause ma y be the poor
c onn GEELY CK 2008 Workshop Manual 279 4 DTC 00283, 00285,00287, 00290 Like ly Cause s
[De s cription]
When there is recognized open
or short circuit in the sensor, this DTC is set.
[Hint]
The likely c ause ma y be the poor
c onn](/manual-img/58/57159/w960_57159-285.png)
279 4 DTC 00283, 00285,00287, 00290 Like ly Cause s
[De s cription]
When there is recognized open
or short circuit in the sensor, this DTC is set.
[Hint]
The likely c ause ma y be the poor
c onne ction of the sensor, short circ uit in the coil
or wire ha rne ss, or fault in the se nsor signa l
proce ssing c irc uit in the ABS ECU�z Ope n c irc uit in the se nsor c onne ctor or coil
�z Short circuit in the sensor coil
�z The se nsor c onne ctor or wire harne ss is short to
ground or powe r supply
�z Fault in the sensor signal processing circuit in the
ABS ECURepair the connectorCheck the sensor on each wheelRemove the ABS ECU connector, check
whether the resistances among the following
terminals is within the specification?
Standard:
1.0~1.3K
LF: 1-2K
RF: 19-20K
LR: 5-6K
RR: 22-23K Check the corresponding sensor connectorDoes the fault reoccur?Check the wire harness between the ECU and
the sensor Refer to "Occasional Prob-
lem Service Key Points"Replace the ABS ECU
Abn.
Abn. Normal
Normal
Normal
Ye s Normal Ω,
Ω,
Ω,
Ω,
Ω,
Page 309 of 392

302Section 3 A/C controlling systemI. Introduction and CompositionIn order to ensure the effective opeation of the A/C system in any operating condition, some advanced
electric control devices are used to protect the A/C system in adverse engine operating condition.
The electrical control part consists of: A/C switch, relay, evaporator temperature sensor, water temperature
sensor, pressure switch, ECU...etc.
A/C system circuit diagram is shown in Figure 6.II. controlling system feature(1) The condenser fan's power is 90W;
(2) The performance of the condenser fan is controlled by ECU, pressure switch;
(3) Cut off the electrical power of the A/C compressor clutch when the water temperature reaches 109°C;
(4) Connect blower switch 9 to rotate the blower motor 6 to ensure A/C normal operation. Connect A/C
switch 10 to output A/C request signal to ECU.
(5) After ECU receives the request signal and the one from the evaporator temperature sensor 17, if the
engine is at idle, ECU first increases the engine speed to 950 ± 50r/min, lest the A/C operation enhance
the load and lower the engine speed or result in engine off. And then the ECU can respond. If the engine
is in accelerating condition, ECU does not respond immediately either, and respond 5 seconds later after
the end of the accelerating condition. ECU send out a A/C control signal from pin 22 to relay 7, command
the relay to suction in. With the low pressure switch 11 closed, the compressor 12 starts to work when the
magnetic clutch suction on. The condenser relay holds in and condenser blower 13 rotates. When high
pressure switch 15 is closed, have the relay 7 hold in and the water tank fan 14 rotates. When the water
temperature sensor 16's temperature is higher than 109°C, ECU shut off the output signal of the pin 22
and A/C stops operation.
(6) When the Refrigeration system pressure is over 1.7MPa, radiator fan will rotato. Disconnect A/C
compressor Refrigeration system power supply when the pressure is over 2.6MPa or less than 0.25MPa;
Page 321 of 392

314Have a focus inspection on the following area:
a. Each pipe union joint and valve connection.
b. All hose, especially near the pipe union.
c. Compressor shaft seal, front and rear cover, gasket, oil fill plug.
d. Area on the surface of the condenser and evaporator that is scratched, bruised or damaged.
e. Expansion valve inlet and outlet connection and temperature sensor element and the welding position.
3. Check the Refrigerant
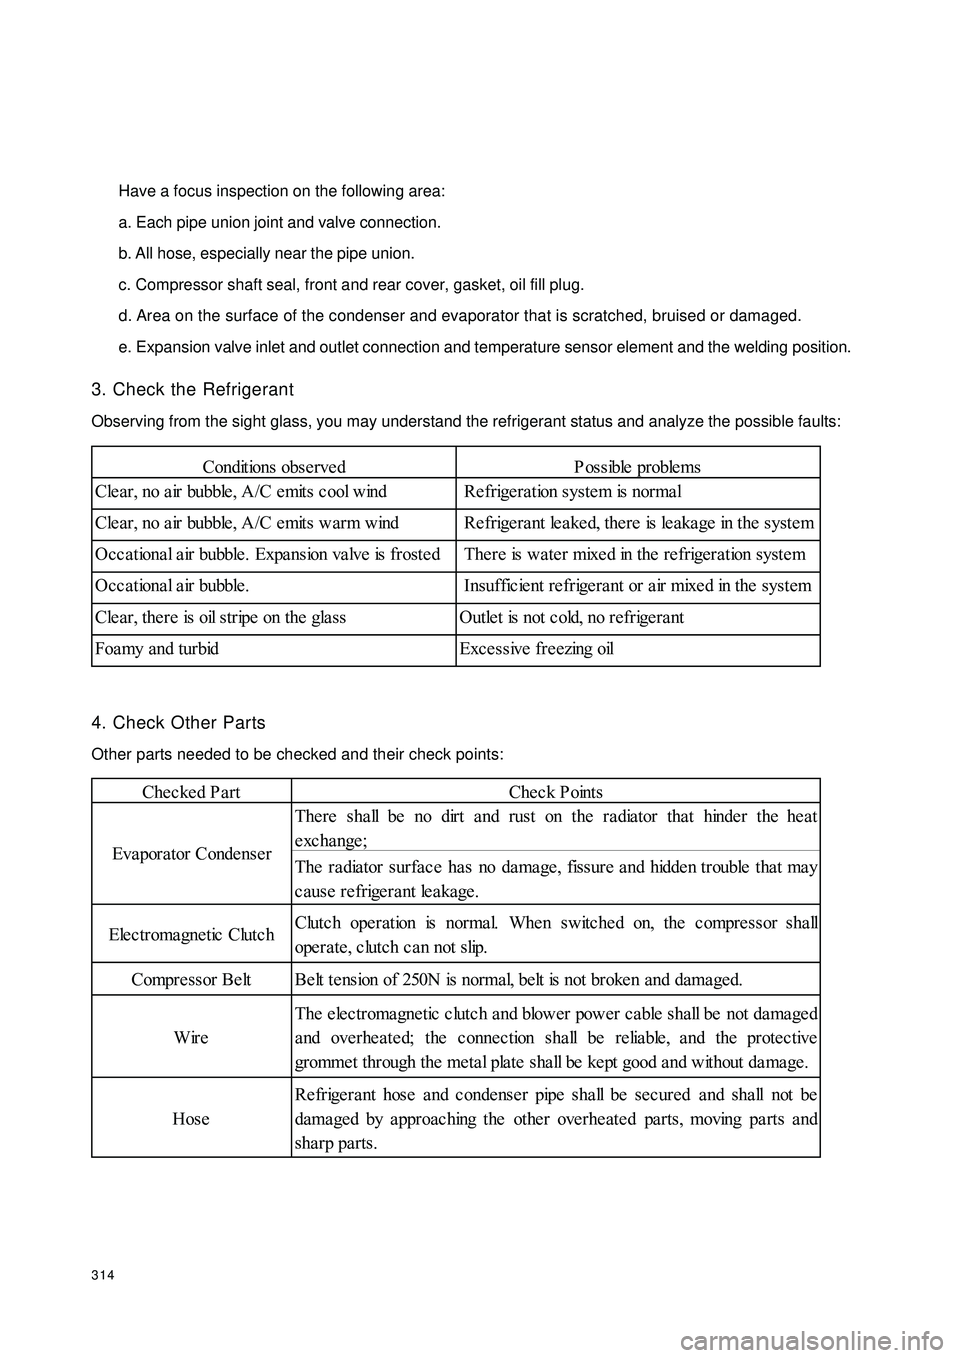
Observing from the sight glass, you may understand the refrigerant status and analyze the possible faults:
4. Check Other Parts
Other parts needed to be checked and their check points:Conditions obse rvedP ossible proble ms
Cle ar, no a ir bubble , A/C e mits c ool wind Re frige ra tion system is normal
Cle ar, no a ir bubble , A/C e mits warm wind Re frige ra nt le a ke d, the re is le aka ge in the syste m
Occ a tiona l a ir bubble . Expa nsion va lve is froste d There is wa te r mixe d in the re frigeration syste m
Occational air bubble. Insufficient refrigerant or air mixed in the system
Cle ar, the re is oil stripe on the gla ss Outle t is not c old, no refrige ra nt
Foamy and turbid Excessive freezing oilChecked PartCheck Points
The re sha ll be no dirt and rust on the radiator tha t hinde r the he at
exchange;
The ra dia tor surfa ce ha s no da mage , fissure a nd hidde n trouble tha t ma y
cause refrigerant leakage.
Elec tromagne tic Clutc hClutc h ope ration is norma l. Whe n switche d on, the c ompre ssor sha ll
operate, clutch can not slip.
Compre ssor Be lt Be lt te nsion of 250N is normal, belt is not broke n and dama ged.
WireThe electromagnetic clutch and blower power cable shall be not damaged
and overheated; the connection shall be reliable, and the protective
gromme t through the me tal plate sha ll be ke pt good a nd without da ma ge .
HoseRefrigerant hose and condenser pipe shall be secured and shall not be
dama ged by a pproac hing the othe r ove rhe ate d pa rts, moving pa rts a nd
sha rp parts. Eva pora tor Conde nse r
Page 337 of 392
3302.Notice On Removing The Rear Bumper
(1) Pull the rear bumper out to separate it from the bumper rail.Warning
If only one side of the rear bumper is separated from the bumper rail, the bumper may drop and
result in body injury. Be careful not to make the bumper drop before separating the rear bumper
from the bumper rail.3.Notice On Installing The Rear Bumper(1) Press the rear bumper joint into the vehicle body to connect the rear bumper mounting bracket assembly
and the bumper rail.
(2) Insert the rear bumper end tab into the corresponding hole of the rear fender to flush with the outer
surface.
Page 350 of 392
343(IX) A pillar inside trim and front door sillA pillar inside trim and front door sill diagram
A pillar inside trim and front door sill diagram
1. Right A Pillar Inside Trim 2. Left A Pillar Inside Trim 3. Right Front Door Sill
4. Left Front Door Sill5.D-Clip 6. Steel Clip7. Cross Slot Head Self-tapping Screw
1. Removal
1Remove the installed right front door sill, left front door sill self-tapping screw cross screwdriver;
2Use an opener to remove the right A pillar inside trim, A pillar inside trim, right front door sill, left frontdoor sill.
2. Installation
1 Install the right A pillar inside trim, A pillar inside trim, right front door sill , left front door sill to the
corresponding position with clip and steel clip;
2Fix the right front door sill , left front door sill with a tapping screw. 1 2
3
6
4 57
Page 351 of 392

344(X) B pillar inside trimB pillar inside trim diagram:
B Pillar Inside Trim Diagram
1. Right B Pillar Upper Inside Trim 2. Left B Pillar Upper Inside Trim 3. Right Deflector
4. Left Deflector5. Right B Pillar Lower Inside Trim 6. Left B Pillar Lower Inside Trim
7. Right B Pillar Lower Inside Trim Sound Insulator 8. Left B Pillar Lower Inside Trim Sound Insulator
9. Cross Pan Head Tapping Screw10. Steel Clip
1.Removal
1Remove the installed left B pillar lower inside trim, right B pillar lower inside trim tapping screw with a
cross screwdriver;
2Remove the left B pillar lower inside trim, right B pillar lower inside trim with a opener ;
3Remove the seat belt swing ring;
4Remove the right B pillar upper inside trim, leftB pillar upper inside trim tapping screw with the cross
screwdriver;
5Remove the right B pillar upper inside trim, leftB pillar upper inside trim with a opener.
2.Installation
1Clip B pillar inside trim to the corresponding position with clip and steel clip in order;
2Fix the upper inside trim and lower inside trim to the vehicle body with a tapping screw.
2
453
1
6
10
8 79
Page 352 of 392

345(XI) Cpillar inside trim and rear door sillC pillar inside trim and rear door sill diagram:
C pillar inside trim& rear door sill diagramdiagram
1.Right C Pillar Upper Inside Trim 2.Left C Pillar Upper Inside Trim 3. Right C Pillar Upper Inside
Trim Sound Insulator 4. Left Sound Insulator 5. Right C Pillar Lower Inside Trim 6. Left C Pillar
Lower Inside Trim 7. Right Rear Door Sill 8. Left Rear Door Sill9. E-Clip10. Cross Pan
Head Self-tapping Screw 11. D-Clip
1. Removal
1Remove the installed door sill and C pillar lower inside trim tapping screw and E-clip with a cross
screwdriver;
2Remove C pillar upper inside trim with a opener ;
3Remove C pillar lower inside trim with a opener
2.Installation
1 Clip C pillar inside trim and rear door sill onto the corresponding position in order;
2Tap C pillar upper inside trim and C pillar lower inside trim lightly with a rubber hammer to ensure D-clip
clipped in the vehicle inner panel;
3Fix the rear door sill onto the vehicle body with a tapping screw.112 110843
57
96
Page 353 of 392

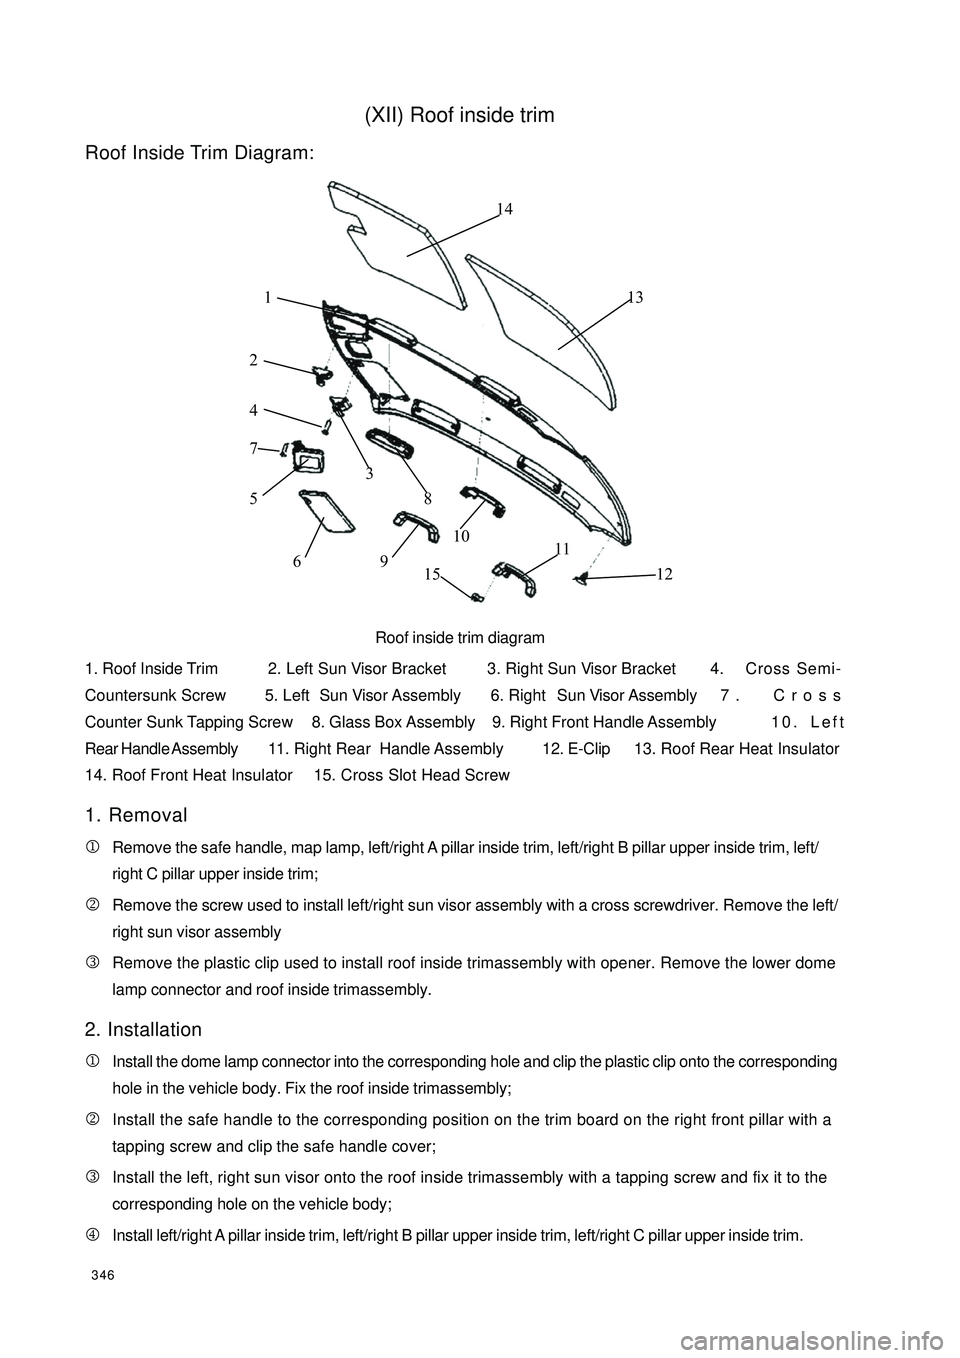
346(XII) Roof inside trimRoof Inside Trim Diagram:
Roof inside trim diagram
1. Roof Inside Trim2. Left Sun Visor Bracket 3. Right Sun Visor Bracket 4. Cross Semi-
Countersunk Screw 5. Left Sun Visor Assembly 6. Right Sun Visor Assembly 7 . Cross
Counter Sunk Tapping Screw 8. Glass Box Assembly 9. Right Front Handle Assembly10. Left
Rear Handle Assembly11. Right Rear Handle Assembly12. E-Clip13. Roof Rear Heat Insulator
14. Roof Front Heat Insulator15. Cross Slot Head Screw
1. Removal
1Remove the safe handle, map lamp, left/right A pillar inside trim, left/right B pillar upper inside trim, left/
right C pillar upper inside trim;
2Remove the screw used to install left/right sun visor assembly with a cross screwdriver. Remove the left/
right sun visor assembly
3Remove the plastic clip used to install roof inside trimassembly with opener. Remove the lower dome
lamp connector and roof inside trimassembly.
2. Installation
1Install the dome lamp connector into the corresponding hole and clip the plastic clip onto the corresponding
hole in the vehicle body. Fix the roof inside trimassembly;
2Install the safe handle to the corresponding position on the trim board on the right front pillar with a
tapping screw and clip the safe handle cover;
3Install the left, right sun visor onto the roof inside trimassembly with a tapping screw and fix it to the
corresponding hole on the vehicle body;
4Install left/right A pillar inside trim, left/right B pillar upper inside trim, left/right C pillar upper inside trim. 2 13 4
5
6 7
8
9 10
11
12 13 1415