Page 89 of 216

92
III
Setting the timeImmediate startAdjusting the operating duration
After displaying the time, using buttons 1, within 10 seconds press buttons 4 and 5 simultaneously
Press button 5 (ON) until the "OK"message appears.
When the signal has been received, the "OK" message is displayed together with the operating dura-tion.
Press buttons 1 to display the oper-ating duration.
P R O G R A M M A B L E H E A T I N G
T h i s s y m b o l fl a s h e s .
Set the time using buttons 1. Press buttons 4 and 5 simultaneously to store the setting.
This symbol is displayed (constant).
The heater starts and this symbol is displayed.
To stop operation, press button 4 (OFF) until the "OK" message appears
This symbol goes off.
If the "FAIL" message appears dur-ing these operations, this indicates that the signal was not received. Go to a different location and then repeat the procedure.
This symbol is displayed.
After displaying the operating dura-tion, within 10 seconds press but-tons 4 and 5 simultaneously.
T h i s s y m b o l fl a s h e s .
Set the duration using buttons 1(adjustment in steps of 10 mins up to a maximum of 30 mins).
Press buttons 4 and 5 simultane-ously to store the duration setting.
This symbol is displayed (constant).
The factory setting is 30 minutes.
Page 90 of 216

93
III
Programming the heaterActivation - deactivation Stopping the heater
You should programme your depar-ture time so that the system can automatically calculate the opti-mum start time for the heater.
Programming your departure time
The "HTM" symbol stays on.
P R O G R A M M A B L E H E A T I N G
Press buttons 1 to display the pro-gramme time.
This symbol is displayed.
After displaying the programme time, within 10 seconds press but-tons 4 and 5 simultaneously.
T h i s s y m b o l fl a s h e s .
Adjust the time by pressing buttons 1 and press buttons 4 and 5 simul-taneously to store the setting.
This symbol is displayed (constant).
When the signal has been received, the "OK" mes-sage is displayed together with the "HTM" symbol.
This symbol is displayed when the heater starts.
After displaying the programme time using buttons 1, press button 5 (ON) until the "OK" message appears.
HTM: Heat Thermo Management (heater control system).
To cancel a programme, press but-ton 5 (OFF) until the "OK" mes-sage appears
The "HTM" symbol goes off.
If the "FAIL" message appears dur-ing these operations, this indicates that the signal was not received.
Go to a different location and then repeat the procedure.
Press button 5 (ON).
M o d i fi c a t i o n o f t h e h e a t i n g level
The system offers 5 levels of heat-ing (C1, the lowest level, to C5, the highest level).
After displaying the heating level using buttons 1, press buttons 4 and 5 simultaneously.
The letter "C" fl a s h e s .
Adjust the level of heating using buttons 1.
Press buttons 4 and 5 simultane-ously to store the level setting cho-sen. The letter "C" is displayed (constant).
The factory settings are replaced by the new values entered. The times programmed are memorised u n t i l t h e n e x t m o d i fi c a t i o n .
When the departure time is acti-vated, it is not possible to modify the heating level. The departure t i m e s h o u l d fi r s t b e d e a c t i v a t e d .
Page 91 of 216

94
III
Replacing the battery
The remote control is powered by a 6V-28L battery cell, which is included.
Information appears on the screen when this battery should be replaced.
Unclip the casing and replace the battery.
The remote control must then be re-initialised, as described on this page.
Do not discard old batteries; take them to an approved recycling point.
Re-initialisation of the remote control
Always switch off the program-mable heating while refuelling in o r d e r t o a v o i d t h e r i s k o f fi r e o r explosion.
To avoid the risk of intoxication or asphyxiation, the program-mable heating should not be used, even for a short time, in an enclosed space such as a garage, or workshop without exhaust gas extraction.
Do not park the vehicle over i n fl a m m a b l e m a t e r i a l s ( d r y grass, dead leaves, papers…), a s t h e r e i s a r i s k o f fi r e .
The programmable heating sys-tem is supplied by the vehicle’s fuel tank. Before using it, ensure t h a t t h e r e i s s u f fi c i e n t f u e l i n t h e tank. If the low fuel warning lamp is on we strongly recommend that you do not programme the heating to come on.
P R O G R A M M A B L E H E A T I N G
If the battery is disconnected or replaced, the remote control must be re-initialised.
A f t e r s w i t c h i n g o n , w i t h i n fi v e s e c -onds press button 4 (OFF) for 1 second.
If the operation is successful, the "OK" message appears in the remote control screen.
If not, the "FAIL" message appears. Repeat the procedure.
As a secondary advantage, use of your programmable heating sys-tem allows it to be used to pre-heat the passenger compartment
Page 92 of 216
95
IIIC
D
R E A R S E A T S
REAR HEAD RESTRAINTS
The rear head restraints have two positions:A stowed position for when the seat is not occupied.
A deployed position for safety of passengers, locking into place including for a forward-facing child seat.
To lower the head retraints, press on the tab at the base.
To raise them, pull them upwards to their maximum height, pressing the unlocking button.
Page 93 of 216
96
III
1
2
R E A R S E A T S
FOLDING BENCHSEAT
The whole or just part of the benchseat can be folded. It is necessary to remove the head restraints.
Seat cushion
Use the strap to lift the seat cushion, then rest it against the front seat back-rests. When repositioning the seat cushion, make sure that the seat belt buckles are correctly in place.
FLAP FOR TRANSPORT OF LONG OBJECTS
A fl a p i n t h e b a c k r e s t , l o c a t e d t o the rear of the armrest, facilitates the carrying of long objects.
Before installing any long objects, fold the interior blind and then make sure that the loads are prop-erly secured, not obstructing the movements of the gear lever.
T h i s fl a p c a n b e c o n c e a l e d b y means of a foldable cover with a tab.
Page 94 of 216

97
III
A
BC
D
R E A R S E A T S
Seat cushion folded.
Stow the head restraints.
Press the control A located at the end of the backrest and fully tilt for-wards.
The benchseat backrest can be folded in two sections. When you reposition the backrest, make sure that it locks in place.
Your vehicle's boot can be kept isolated from the passenger com-partment.
To lock the access to the boot:1. Place the benchseat in its correct position.The red warning lamp on control A should no longer be visible.
2. Insert the ignition key in the lock.3. Lock it.
Before moving the seats
So as to avoid damaging the seat belts by jamming them, take care to keep them to the sides of the backrest.
LOCKING/UNLOCKING OF THE ACCESS INTO THE BOOT VIA THE REAR BENCHSEATREAR CENTRAL SEAT BELT
For easier opening of the seat belt cover D , y o u s h o u l d fi r s t r a i s e t h e central head restraint.
I n s e r t t h e fi r s t f a s t e n i n g C into the front left hand(black) buckle, then insert the second fastening B into the front right hand buckle.
Page 95 of 216

98
III
B
A
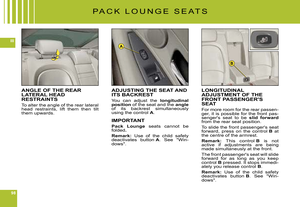
P A C K L O U N G E S E A T S
ANGLE OF THE REAR LATERAL HEAD RESTRAINTS
To alter the angle of the rear lateral head restraints, lift them then tilt them upwards.
LONGITUDINAL ADJUSTMENT OF THE FRONT PASSENGER'S SEAT
For more room for the rear passen-ger, it is possible for the front pas-senger's seat to be slid forwardfrom the rear seat position.
To slide the front passenger's seat forward, press on the control B at the centre of the armrest.
Remark: This control B is not active if adjustments are being made simultaneusly at the front.
The front passenger's seat will slide forward for as long as you keep control B pressed. It stops immedi-ately you release control B.
Remark: Use of the child safety deactivates button B. See "Win-dows".
ADJUSTING THE SEAT AND ITS BACKREST
You can adjust the longitudinal position of the seat and the angleof its backrest simultaneously using the control A.
IMPORTANT
Pack Lounge seats cannot be folded.
Remark: Use of the child safety deactivates button A. See "Win-dows".
Page 96 of 216
99
IIIA
A I R B A G S
AIRBAG EQUIPMENT
Your vehicle has:A driver's front airbag.
A driver's knees airbag.A front passenger's airbag which can be deactivated.
Front lateral airbags.
Front and rear curtain airbags.Rear lateral airbags.
Deployment of your airbags is dependent on the degree of vio-lence of the collision.