Page 57 of 172

Reference
At a glance
Controls
Driving tips
Mobility
55
Turn signals/
headlamp flasher
1High beams
2Headlamp flasher
3Turn signals
Using turn signals
Press the lever beyond the resistance point.
To turn off manually, press the lever to the
resistance point.
Unusually rapid flashing of the indicator
lamp indicates that a turn signal indicator
has failed.<
Indicating a turn briefly
Press the lever as far as the resistance point for
as long as you wish to indicate a turn.
Triple turn signal activation
Press the lever as far as the resistance point.
The turn signals flash three times.
You can activate or deactivate this function.
1.Switch on the ignition, refer to page46.
2.Lightly push button1 in the turn indicator
lever up or down repeatedly until the sym-bol appears in the display accompanied by
the word "SET".
3.Press button 2.
4.Lightly push button1 in the turn indicator
lever down repeatedly until the symbol
appears in the display.
5.Press button 2.
6.Use button 1 to select:
>
Turn signals flash once.
>
Triple turn signal.
7.Press button 2.
The setting is stored for the remote control
currently in use.
Page 58 of 172

Driving
56
Wiper system
1Switching on wipers
2Switching off wipers or brief wipe
3Activating/deactivating intermittent wipe or
rain sensor
*
4Cleaning windshield and headlamps
5Setting speed for intermittent wipe, or sen-
sitivity of the rain sensor
Switching on wipers
Press the lever upward, arrow 1.
The lever automatically returns to its initial posi-
tion when released.
Normal wiper speed
Press once.
The system switches to operation in the inter-
mittent mode when the vehicle is stationary.
Fast wiper speed
Press twice or press beyond the resistance
point.
The system switches to normal speed when the
vehicle is stationary.
Intermittent wipe or rain sensor*
If the car is not equipped with a rain sensor, the
intermittent-wipe time is a preset.
If the car is equipped with a rain sensor, the time
between wipes is controlled automatically and
depends on the intensity of the rainfall. The rain
sensor is mounted on the windshield, directly in
front of the interior rearview mirror.
Activating intermittent wipe or rain
sensor
Press the button, arrow3. The LED in the but-
ton lights up.
Setting speed for intermittent wipe or
sensitivity of the rain sensor
Turn knurled wheel5 up or down.
Deactivating intermittent wipe or rain
sensor
Press the button again, arrow3.
The LED goes out.
Deactivate the rain sensor before enter-
ing an automatic car wash. Failure to do
so could result in damage caused by undesired
wiper activation.<
Cleaning windshield and headlamps
Pull the lever, arrow 4.
Washer fluid is sprayed onto the windshield and
the wipers are operated for a short time.
When the vehicle lighting system is switched
on, the headlamps are cleaned at regular and
appropriate intervals.
Do not use the washers if there is any
danger that the fluid will freeze on the
windshield. If you do, your vision could be
obscured. Antifreeze should therefore be
added to the fluid, refer to Washer fluid.
Do not use the washers when the washer fluid
reservoir is empty, otherwise you will damage
the washer pump.<
Page 59 of 172

Reference
At a glance
Controls
Driving tips
Mobility
57
Windshield washer nozzles
The windshield washer nozzles are heated
automatically while the engine is running or the
ignition is switched on.
Washer fluid
Washer fluid antifreeze is flammable.
Therefore, keep it away from ignition
sources and only store it in the closed original
container that is kept out of reach of children,
otherwise there is a risk of personal injury.
Comply with the instructions on the con-
tainer.<
Washer fluid filler neck
Only refill washer fluid when the engine is
cool to avoid contact with hot engine
parts. Otherwise, fluid spills constitute a fire
hazard and a risk to personal safety.<
All washer nozzles are supplied with washer
fluid by the same reservoir.
Fill with water and, if required, with a washer
antifreeze, according to manufacturer's recom-
mendations.
Mix the water and antifreeze before filling
the washer fluid reservoir to make sure
the correct concentration is maintained.<
Capacity
Approx. 4.8USquarts/4.5liters.
Cruise control
The concept
Cruise control is available for use at speeds of
approx. 20 mph or 30 km/h. The car then stores
and maintains the speed that you specify using
the lever on the steering column.
Do not use cruise control when driving at
constant speed is prevented by adverse
conditions, e.g. winding roads, dense traffic or
poor road conditions due to, e.g., snow, rain, ice
or loose surfaces. Otherwise you could lose
control of the vehicle and cause an accident as a
result.<
One lever for all functions
1Storing and maintaining speed or accelerat-
ing
2Storing and maintaining speed or deceler-
ating
3Deactivating cruise control
4Resuming a speed stored beforehand
Maintaining current speed
Tap the lever, arrow 1, or pull it briefly, arrow 2.
The car's current speed is stored and main-
tained. It is displayed on the speedometer and
briefly in the instrument cluster. This function is
not available when DSC is switched off.
On uphill gradients, it may prove impossible to
maintain the set speed if current engine power
output is insufficient. If engine braking power is
insufficient on a downhill grade, the stored
speed may be exceeded.
Page 60 of 172

Driving
58
Increasing desired speed
Repeatedly press the lever to the resistance
point or beyond, arrow1, until the desired
speed is reached.
>Each time the lever is pressed lightly to the
resistance point, the desired speed is
increased by approx. 1 mph or 1 km/h.
>Each time the lever is pressed beyond the
resistance point, the desired speed is
increased by up to 5 mph or 10 km/h.
The system stores and maintains the speed.
Accelerating using the lever
Accelerate slightly, increase speed steadily:
Press the lever to the resistance point, arrow 1,
until the desired speed is reached.
Accelerate strongly, increase speed in intervals
of 10:
Press the lever beyond the resistance point,
arrow 1, until the desired speed is reached.
The vehicle accelerates without pressure on
the accelerator pedal. The system stores and
maintains the speed.
Decreasing speed
Repeatedly pull the lever to the resistance point
or beyond, arrow 2, until the desired speed is
displayed.
>Each time the lever is pulled to the resis-
tance point, the desired speed is decreased
by approx. 1 mph or 1 km/h.
>Each time the lever is pulled beyond the
resistance point, the desired speed is
reduced by up to 5 mph or 10 km/h until the
minimum speed of 20 mph or 30 km/h is
achieved.
The system stores and maintains the speed.
Deactivating cruise control
Tap the lever upwards or downwards, arrow3.
The displays on the speedometer disappear.
In addition, the system is automatically deacti-
vated:
>When you brake the vehicle>When you shift or depress the clutch
>When you deactivate DSC
>When DSC or ABS is intervening
Cruise control is not deactivated by depressing
the accelerator pedal. Once the accelerator
pedal is released, the stored speed is achieved
again and maintained.
Resuming a speed stored beforehand
Press the button, arrow4.
The stored speed is resumed and maintained.
When the ignition is switched off, the stored
speed value is cleared and can no longer be
called up.
Displays in the instrument cluster
1Stored speed
2Selected speed is displayed briefly
Page 61 of 172

Reference
At a glance
Controls
Driving tips
Mobility
59
Everything under control
Odometer, outside
temperature display, clock
1Knob in the instrument cluster
2Outside temperature and clock, refer to
Computer on page60
3Odometer and trip odometer
Knob in the instrument cluster
>To reset the trip odometer while the ignition
is switched on
>To display the time, outside temperature
and odometer briefly while the ignition is
switched off
Units of measure
T o s e l e c t t h e r e s p e c t i v e u n i t s o f m e a s u r e , m i l e s
or km for the odometer as well as 7 or 6 for
the outside temperature, refer to page62.
The setting is stored for the remote control cur-
rently in use.
Time, outside temperature display
Setting the time, refer to page64.
Outside temperature warning
When the displayed temperature sinks to
approx. +377/+36, a signal sounds and a
warning lamp lights up. There is an increased
risk of black ice.
Black ice can also form at temperatures
above +377/+36. You should there-
fore drive carefully on bridges and shaded roads, for example, otherwise there is an
increased risk of an accident.<
Odometer and trip odometer
Resetting trip odometer:
With the ignition switched on, press button1 in
the instrument cluster.
When the vehicle is parked
If you still want to view the time, outside tem-
perature and odometer reading briefly after the
remote control has been taken out of the igni-
tion lock:
Press button 1 in the instrument cluster.
Tachometer
The prewarning field, arrow 1, and the red warn-
ing field, arrow2, change in relation to the
engine temperature. The permissible engine
speed increases with increased engine temper-
ature. Avoid engine speeds in the prewarning
field, if possible.
Page 62 of 172

Everything under control
60 Never drive at engine speeds in the red warning
field. In this range, the engine speed is limited to
protect the engine.
Coolant temperature
A warning lamp will come on if the coolant, and
therefore the engine, becomes too hot.
Check coolant level, refer to page119.
Engine oil temperature
When the engine is at normal operating temper-
ature, the engine oil temperature is between
approx. 1757/806 and approx. 2507/
1206.
If the engine oil temperature is too high, a warn-
ing lamp comes on in the instrument cluster.
Fuel gauge
Fuel tank capacity: approx. 16.6 US gal/
63 liters.
You can find information on refueling on
page108.If the tilt of the vehicle varies for a longer period,
when you are driving in mountainous areas, for
example, the indicator may fluctuate slightly.
Reserve
Once the fuel level has fallen to the reserve
zone of approx. 3.3 US gal/12.5 liters, the indi-
cator lamp and cruising range for the remaining
amount of fuel are displayed briefly. The indica-
tor lamp remains permanently on when the
remaining range is less than approx. 30 miles/
50 km.
Refuel as soon as possible once your
cruising range falls below 30 miles/
50 km, otherwise engine functions are not
ensured and damage can occur.<
Computer
Displays in the instrument cluster
Calling up information
Press the button in the turn indicator lever.
The following items of information are dis-
played in the order listed:
>Cruising range
>Oil level, refer to Checking oil level on
page117
>Average fuel consumption
>Speed
>No information
M dual clutch transmission:
Outside temperature, time, cruising
range, oil level, average fuel consumption and
speed appear in the top display.<
Page 63 of 172

Reference
At a glance
Controls
Driving tips
Mobility
61
To set the corresponding units of measure,
refer to Formats and units of measure on
page62.
Cruising range
Displays the estimated cruising range available
with the remaining fuel. The range is calculated
on the basis of the way the car has been driven
over the last 18 miles/30 km and the amount of
fuel currently in the tank.Refuel as soon as possible once your
cruising range falls below 30 miles/
50 km, otherwise engine functions are not
ensured and damage can occur.
The average fuel consumption is calculated for
the time during which the engine is running.
To reset average fuel consumption: press the
button in the turn indicator lever for approx.
2seconds.
Settings and information
Operating principle
Certain settings and information can only be
made or called up when the ignition is switched
on. A number of settings cannot be made while
driving.
1Button for:
>Selecting display
>Setting values2Button for:
>Confirming selected display or set val-
ues
>Calling up computer information60
3When the lights are on: instrument lighting
brightness78
4Calling up Check Control65
5Setting the time64
6Setting the date64
7Viewing service requirement display63
Page 64 of 172

Everything under control
62 8Setting formats and units of measure,
resetting to factory settings62
9Adjusting settings
>Confirmation signals when locking and
unlocking the vehicle21
>Response during unlocking
procedure19
>Automatic locking23
>Pathway lighting76
>Daytime running lamps77
>Triple turn signal activation55
>Seat memory39
10Switching Shift Lights
* on/off53
Exiting displays
The outside-temperature reading and the time
reappear when you press button2 or if you
make no entries within approx. 15 seconds. If
required, complete the current setting first.
Formats and units of measure
You can set formats and units of measure.
1.Switch on the ignition, refer to page46.
2.Lightly push button1 in the turn indicator
lever up or down repeatedly until the sym-
bol appears in the display accompanied by
the word "SET".
3.Press button 2.
4.Use button 1 to select desired format or
desired unit of measure, e.g. for fuel con-
sumption.> Fuel consumption: mpg, km/l,
l/100km
> Distance covered: mls, km
> Time: 12h, 24h format
> Date: day.month dd.mm,
month/day mm/dd
> Temperature: 7, 6
5.Press button 2.
6.Use button 1 to make the setting.
7.Press button 2.
The setting is stored for the remote control
currently in use.Resetting to factory settings
You can reset the settings for formats and units
of measure to factory settings.
1.Lightly push button1 in the turn indicator
lever up or down repeatedly until the sym-
bol appears in the display accompanied by
the word "SET".
2.Press button 2.
3.Use button1 to select "RESET".
 1
1 2
2 3
3 4
4 5
5 6
6 7
7 8
8 9
9 10
10 11
11 12
12 13
13 14
14 15
15 16
16 17
17 18
18 19
19 20
20 21
21 22
22 23
23 24
24 25
25 26
26 27
27 28
28 29
29 30
30 31
31 32
32 33
33 34
34 35
35 36
36 37
37 38
38 39
39 40
40 41
41 42
42 43
43 44
44 45
45 46
46 47
47 48
48 49
49 50
50 51
51 52
52 53
53 54
54 55
55 56
56 57
57 58
58 59
59 60
60 61
61 62
62 63
63 64
64 65
65 66
66 67
67 68
68 69
69 70
70 71
71 72
72 73
73 74
74 75
75 76
76 77
77 78
78 79
79 80
80 81
81 82
82 83
83 84
84 85
85 86
86 87
87 88
88 89
89 90
90 91
91 92
92 93
93 94
94 95
95 96
96 97
97 98
98 99
99 100
100 101
101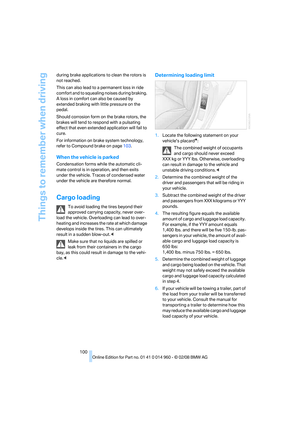 102
102 103
103 104
104 105
105 106
106 107
107 108
108 109
109 110
110 111
111 112
112 113
113 114
114 115
115 116
116 117
117 118
118 119
119 120
120 121
121 122
122 123
123 124
124 125
125 126
126 127
127 128
128 129
129 130
130 131
131 132
132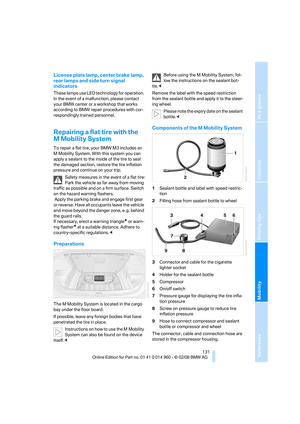 133
133 134
134 135
135 136
136 137
137 138
138 139
139 140
140 141
141 142
142 143
143 144
144 145
145 146
146 147
147 148
148 149
149 150
150 151
151 152
152 153
153 154
154 155
155 156
156 157
157 158
158 159
159 160
160 161
161 162
162 163
163 164
164 165
165 166
166 167
167 168
168 169
169 170
170 171
171