Page 113 of 172

Reference
At a glance
Controls
Driving tips
Mobility
111
Coupe: tire inflation pressures
Convertible: tire inflation pressures
Tire size Pressure specifications in psi/kPa
Traveling speeds
up to a max. of
100 mph / 160 km/hTraveling speeds
including those exceeding
100mph / 160km/h
All pressure specifications in
the table are indicated in
psi/kilopascal with cold tires.
Cold = ambient temperature
235/40 R 18 M+S 33/230 36/250 33/230 36/250 38/260 44/300
Front: 245/40 ZR 18 33/230 - 33/230 - 39/270 -
Rear: 265/40 ZR 18 - 35/240 - 35/240 - 44/300
Front: 245/35 ZR 19 33/230 - 33/230 - 41/280 -
Rear: 265/35 ZR 19 - 35/240 - 35/240 - 44/300
More details on the permissible load and weights can be found on page155.
Tire size Pressure specifications in psi/kPa
Traveling speeds
up to a max. of
100 mph / 160 km/hTraveling speeds
including those exceeding
100mph / 160km/h
All pressure specifications in
the table are indicated in
psi/kilopascal with cold tires.
Cold = ambient temperature
235/40 R 18 M+S 36/250 42/290 36/250 42/290 41/280 51/350
Front: 245/40 ZR 18 33/230 - 35/240 - 41/280 -
Rear: 265/40 ZR 18 - 35/240 - 35/240 - 46/320
Front: 245/35 ZR 19 36/250 - 35/240 - 42/290 -
Rear: 265/35 ZR 19 - 38/260 - 35/240 - 46/320
More details on the permissible load and weights can be found on page155.
Page 114 of 172

Wheels and tires
112
Tire identification marks
Knowledge of the labeling on the side of the tire
makes it easier to identify and choose the right
tires.
Tire size
Speed code letter
Q = up to 100 mph/160 km/h
T = up to 118 mph/190 km/h
H = up to 131 mph/210 km/h
V = up to 150 mph/240 km/h
W = up to 167 mph/270 km/h
Y = up to 186 mph/300 km/h
Z = over 150 mph/240 km/h
Tire Identification Number
Tires with DOT codes meet the guidelines of
the US Department of Transportation.
DOT code:
Tire age
The manufacturing date of tires is contained in
the tire coding: DOT … 0708 means that the
tire was manufactured in week 7 of 2008.BMW recommends that you replace all tires
after 6 years at most, even if some tires may last
for 10 years.
Uniform Tire Quality Grading
Quality grades can be found where applicable
on the tire sidewall between tread shoulder and
maximum section width. For example:
Tread wear 200 Traction AA
Temperature A
DOT Quality Grades
Tread wear
Traction AA A B C
Temperature A B C
All passenger car tires must conform to
Federal Safety Requirements in addition
to these grades.<
Tread wear
The tread wear grade is a comparative rating
based on the wear rate of the tire when tested
under controlled conditions on a specified gov-
ernment test course. For example, a tire graded
150 would wear one and one-half (1γ) times as
well on the government course as a tire graded
100. The relative performance of tires depends
upon the actual conditions of their use, how-
ever, and may depart significantly from the
norm due to variations in driving habits, service
practices and differences in road characteris-
tics and climate.
Traction
The traction grades, from highest to lowest, are
AA, A, B, and C.
Those grades represent the tire's ability to stop
on wet pavement as measured under controlled
conditions on specified government test sur-
faces of asphalt and concrete. A tire marked C
may have poor traction performance.
The traction grade assigned to this tire is
based on straight-ahead braking traction
tests, and does not include acceleration, cor-
nering, hydroplaning, or peak traction charac-
teristics.< e.g.
Nominal width in mm
Aspect ratio in Ξ
Radial belt construction
Rim diameter in inches
Load rating,
not on ZR tires
Speed code letter, in
front of the R on ZR tires
235/40 R18100 V
245/35 ZR19
e.g.
Manufacturer's code
for tire make
Tire size and
tire design
Tire ageDOT xxxx xxx 4607
Page 115 of 172

Reference
At a glance
Controls
Driving tips
Mobility
113
Temperature
The temperature grades are A, the highest, B,
and C, representing the tire's resistance to the
generation of heat and its ability to dissipate
heat when tested under controlled conditions
on a specified indoor laboratory test wheel.
Sustained high temperature can cause the
material of the tire to degenerate and reduce
tire life, and excessive temperature can lead to
sudden tire failure. The grade C corresponds to
a level of performance which all passenger car
tires must meet under the Federal Motor Vehi-
cle Safety Standard No. 109. Grades B and A
represent higher levels of performance on the
laboratory test wheel than the minimum
required by law.
The temperature grade for this tire is
established for a tire that is properly
inflated and not overloaded. Excessive speed,
underinflation, or excessive loading, either sep-
arately or in combination, can cause heat
buildup and possible tire failure.<
M+S
Winter and all-season tires.
These have better winter properties than sum-
mer tires.
XL
Designation for specially reinforced tires.
Tire condition
Inspect your tires frequently for tread wear,
signs of damage and for foreign objects lodged
in the tread. Check the tread depth.
Minimum tread depth
The tread depth should not drop below 1/8 in/
3 mm, although, for example, European legisla-
tion only specifies a minimum tread depth of
1/16 in/1.6 mm. At tread depths below 1/8 in/
3 mm there is an increased risk of high-speed
hydroplaning, even when only small amounts of
water are present on the road surface.
When winter tires wear down past a tread depth
of 1/6 in/4 mm, they become perceptibly less suitable for winter conditions. In the interest of
safety, new tires should be installed.
Wear indicators in the base of the tread groove
are distributed around the tire's circumference;
the letters TWI, for Tread Wear Indicator, on the
tire's sidewalls identify tires that incorporate
these wear indicators. Once the tire tread has
worn down to the wear indicators, the tire has
worn to a depth of 1/16 in/1.6 mm.
Wheel/tire damage
Please note that low-profile tires cause wheels,
tires and suspension parts to be more suscep-
tible to road hazard and consequential dam-
ages.
Unusual vibrations encountered during normal
vehicle operation can indicate tire failure or
some other vehicle defect. This can, for exam-
ple, be caused by driving over curbs. The same
applies to any other abnormal road behavior,
such as pulling severely to the right or left.
In these cases, reduce speed immedi-
ately and have wheels and tires thor-
oughly checked. To do so, drive carefully to the
nearest BMW center or tire shop that works
according to BMW repair procedures with cor-
respondingly trained personnel. If necessary,
have the vehicle towed there.
Otherwise, tire damage can pose a lethal hazard
to vehicle occupants and other road users.<
New wheels and tires
Have new wheels and tires installed only
by your BMW center or tire shop that
works according to BMW repair procedures
with correspondingly trained personnel. If this
Page 116 of 172

Wheels and tires
114 work is not carried out properly, there is a dan-
ger of subsequent damage and related safety
h a z a r d s . M a k e s u re t h a t t h e n e w w h ee l s a r e b a l-
anced.<
Retreaded tires
BMW recommends that you do not use
retreaded tires, since driving safety may
be impaired. The causes for this include poten-
tially different tire casing structures and often
wide variations in tire age, which can result in a
limited service life.<
Correct wheels and tires
BMW recommends that you use only
wheel and tire combinations that BMW
has tested and approved for your particular
vehicle. Variations in factors such as manufac-
turing tolerances mean that even wheels and
tires with identical official size ratings could
actually have different dimensions, which could
lead to body contact and thus to severe acci-
dents. When selecting tires, also take their load
capacity into account. If non-approved wheels
and tires are used, BMW cannot evaluate their
suitability, and therefore cannot guarantee their
driving safety.<
You can inquire about the right wheel/tire com-
bination at your BMW center.
The correct combination of wheels and tires is
also necessary to ensure reliable operation of
various vehicle systems such as ABS or DSC.
To maintain good handling and vehicle
response, use only tires of a single brand and
tread configuration. After a tire has been dam-
aged, mount the previous wheel and tire combi-
nation again as soon as possible.
Wheels with Tire Pressure Monitor
TPM electronics
When mounting new tires or changing over
from summer to winter tires, or vice versa, only
use wheels with TPM electronics; otherwise the
Tire Pressure Monitor may not be able to detect
a puncture, refer to page70. Your BMW center
will be glad to advise you.
Recommended tire brands
Certain makes of tire are recommended by
BMW for each tire size. They are marked with a
clearly visible BMW designation on the sidewall
of the tire.
When properly used, these tires meet the high-
est standards in terms of safety and handling
characteristics.
Special characteristics of winter tires
BMW recommends winter tires for use in cold
winter driving conditions. Although all-season
M+S tires provide better winter traction than
summer tires, they generally fail to provide the
same levels of cold-weather performance as
winter tires.
Pay attention to speed
Always comply with the speed limit for the
winter tires mounted on your car; failure
to do so could result in tire damage and acci-
dents.<
Storage
Store wheels and tires in a cool, dry place with
as little exposure to light as possible. Always
protect tires against all contact with oil, grease
and fuels. Do not exceed the maximum tire
inflation pressure indicated on the sidewall of
the tire.
Swapping wheels between axles
BMW advises against swapping wheels
between the front and rear axles, even if all tires
have the same size, as this could impair driving
characteristics. With standard-equipment tires
Page 117 of 172
Reference
At a glance
Controls
Driving tips
Mobility
115
and other mixed tire sizes, swapping wheels
between the axles is not permissible.
Snow chains*
Only certain fine-link snow chains have been
tested by BMW, classified as safe for use and
recommended. Consult your BMW center for
more information.
Snow chains must be mounted in pairs and on
the rear wheels only. Observe the manufac-
turer's instructions when mounting snow
chains. Do not exceed a speed of 30 mph or
50 km/h.
Ensure that the snow chains are sufficiently
tensioned at all times. If necessary, retension as
specified by the snow chain manufacturer.
Do not initialize the Flat Tire Monitor if
snow chains are mounted, otherwise the
instrument might issue an incorrect reading.<
Page 118 of 172

Under the hood
116
Under the hood
Do not work on the car unless you pos-
sess the necessary technical knowledge.
If you are unfamiliar with the statutory guide-
lines, have any work on the vehicle performed
only by a BMW center or by a workshop that
work according to BMW repair procedures with
correspondingly trained personnel. If this work
is not carried out properly, there is a danger of
subsequent damage and related safety haz-
ards.<
Hood
Releasing
Pull the lever.
Opening
To avoid damage, make sure that the
wiper arms are against the windshield
before you open the engine compartment. Do
not open the engine hood before the engine has
cooled down, otherwise injuries may result.<
Press the release handle and open the hood.
Closing
Close the hood from a height of approx. 20 in/
50 cm with momentum. It must be clearly heard
to engage.
Make sure that the closing path of the
hood is clear, otherwise injuries may
result.
If you see any signs while driving your vehicle
that the hood is not completely closed, stop at
once and close it securely.<
Page 119 of 172
Reference
At a glance
Controls
Driving tips
Mobility
117
Important parts of the engine compartment
1Expansion tank for coolant, refer to
page119
2Washer fluid filler neck for headlamp clean-
ing system and window washer system,
refer to page573Jump-starting connection, refer to
page136
4Filler neck for engine oil, refer to Adding
engine oil
Engine oil
The engine oil consumption is dependent on
driving style and driving conditions.
Checking oil level
Your car is equipped with an electronic oil-level
monitor.
The oil level can be displayed when the engine
is warm. Continuous short distance travel or a
very sporty driving style may make measure-
ment impossible.
You can have the oil level reading displayed in
the instrument cluster.1Oil level
2Maximum mark
3Minimum mark
4Computer button
Press button 4 in the turn indicator lever repeat-
edly until the oil level display appears in the
instrument cluster.
Page 120 of 172

Under the hood
118 M dual clutch transmission: the oil level
appears in the top display.<
The oil level must be between the two mark-
ings.
A new measurement is taken automatically
each time the engine is started.
Possible displays
1Oil level OK.
2Oil level is being checked.
This can take about 1 minute if the car is at
a standstill on a level surface, or about
5 minutes while the car is moving.
If engine oil was added, it can take up to
30 minutes to get an oil level reading.
3Oil level down to minimum:
Add engine oil at the next opportunity, but
no more than 1 US quart/1 liter, refer also to
Adding engine oil on page118. Add at least
0.5 US quart/0.5 liters, otherwise the oil-
level monitor will be unable to display the
new value reliably.
If the oil level is below the minimum value,
add engine oil immediately to avoid engine
damage.
4Oil level is too high.Have the vehicle checked immedi-
ately, otherwise the excess oil may
lead to engine damage.<
5A value cannot be read at this time. The
engine is not yet warm.
Quick measurement
In addition to the automatic measurement, you
can also determine the current oil level manu-
ally, e. g. after adding engine oil, but such mea-
surements are less accurate.
1.Park the vehicle with a warm engine, i.e.
after an uninterrupted drive of at least
6 miles/10 km, on a horizontal surface.
2.Let the engine idle.
3.Press the computer button in the turn indi-
cator lever repeatedly until the oil level dis-
play appears in the instrument cluster.
4.Press the computer button for at least
2seconds.
The oil level is determined. A clock symbol
appears during measurement.
5.After approx. 1 minute, the current oil level
is displayed.
Adding engine oil
Do not add 1 US quart/1 liter of engine oil until
the display shows an oil level measurement of
"+1qt" or "+1l".
Add oil within the next 125 miles/200 km,
otherwise the engine could be damaged.
Add no more than 1 US quart/1 liter of oil, oth-
erwise too much engine oil can lead to engine
damage. Add at least 0.5 US quart/0.5 liters,
otherwise the oil-level monitor will be unable to
display the new value reliably.<
 1
1 2
2 3
3 4
4 5
5 6
6 7
7 8
8 9
9 10
10 11
11 12
12 13
13 14
14 15
15 16
16 17
17 18
18 19
19 20
20 21
21 22
22 23
23 24
24 25
25 26
26 27
27 28
28 29
29 30
30 31
31 32
32 33
33 34
34 35
35 36
36 37
37 38
38 39
39 40
40 41
41 42
42 43
43 44
44 45
45 46
46 47
47 48
48 49
49 50
50 51
51 52
52 53
53 54
54 55
55 56
56 57
57 58
58 59
59 60
60 61
61 62
62 63
63 64
64 65
65 66
66 67
67 68
68 69
69 70
70 71
71 72
72 73
73 74
74 75
75 76
76 77
77 78
78 79
79 80
80 81
81 82
82 83
83 84
84 85
85 86
86 87
87 88
88 89
89 90
90 91
91 92
92 93
93 94
94 95
95 96
96 97
97 98
98 99
99 100
100 101
101 102
102 103
103 104
104 105
105 106
106 107
107 108
108 109
109 110
110 111
111 112
112 113
113 114
114 115
115 116
116 117
117 118
118 119
119 120
120 121
121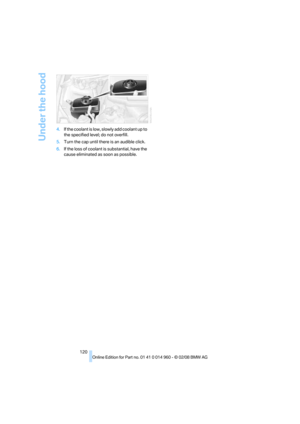 122
122 123
123 124
124 125
125 126
126 127
127 128
128 129
129 130
130 131
131 132
132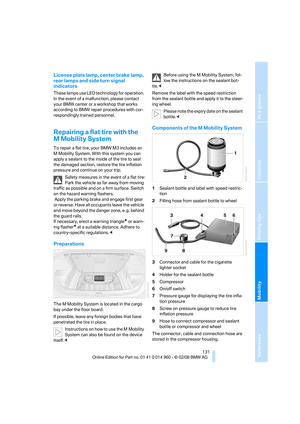 133
133 134
134 135
135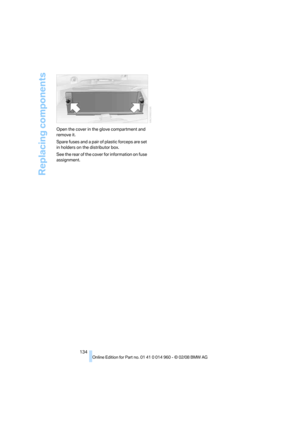 136
136 137
137 138
138 139
139 140
140 141
141 142
142 143
143 144
144 145
145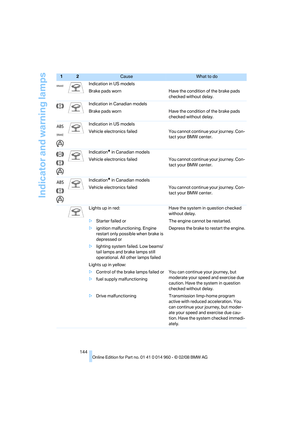 146
146 147
147 148
148 149
149 150
150 151
151 152
152 153
153 154
154 155
155 156
156 157
157 158
158 159
159 160
160 161
161 162
162 163
163 164
164 165
165 166
166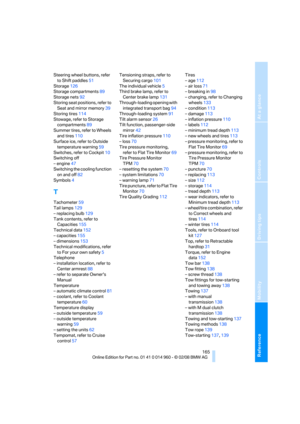 167
167 168
168 169
169 170
170 171
171
