Page 129 of 172

Reference
At a glance
Controls
Driving tips
Mobility
127
Replacing components
Onboard tool kit
Coupe
The onboard tool kit is stored in a compartment
on the right-hand side of the cargo bay.
Remove the cover.
Convertible
The onboard tool kit is stored in a pouch under
the cargo bay floor panel.
Wiper blades
1.Fold up the wiper arm.
2.Remove the cover. To do so, press the hook
on the bottom, see arrow.3.Fold the wiper blade upwards.
4.Remove the wiper blade in the direction of
the windshield, see arrow.
To avoid damage, make sure that the
wiper arms are against the windshield
before you open the engine compartment.<
Lamps and bulbs
Lamps and bulbs make an essential contribu-
tion to vehicle safety. They should, therefore,
be handled carefully. BMW recommends hav-
ing your BMW center perform any work that you
do not feel competent to perform yourself or
that is not described here.
Never touch the glass of new bulbs with
your bare fingers, as even minute
amounts of contamination will burn into the
bulb's surface and reduce its service life. Use a
clean tissue, cloth or something similar, or hold
the bulb by its base.<
You can obtain a selection of replacement bulbs
at your BMW center.
Only change bulbs while they are cool to
the touch, otherwise you could suffer
burns.<
When working on electrical systems,
always begin by switching off the con-
sumer in question, otherwise short-circuits
could result. To avoid possible injury or equip-
ment damage when replacing bulbs, observe
any instructions provided by the bulb manufac-
turer.<
Page 130 of 172

Replacing components
128 For care of the headlamps, please follow the
instructions in the chapter entitled 'Care'.
If the routine for changing a particular
bulb is not described here, please contact
your BMW center or a workshop that works
according to BMW repair procedures with cor-
respondingly trained personnel.<
Light-emitting diodes LED
Control elements, display components, part of
the exterior lighting and other interior equip-
ment in your vehicle are equipped with covered
light-emitting diodes as light sources. These
light-emitting diodes, which operate using a
concept similar to that applied in conventional
lasers, are officially designated as Class 1 light-
emitting diodes.
Do not remove the covers or expose the
eyes directly to the unfiltered light source
for several hours, otherwise this could cause
irritation to the retina.<
Xenon lamps
These bulbs have a very long service life and are
highly unlikely to fail.
Have any work on the xenon lamp system,
including bulb replacements, performed
o n ly b y a BM W c e n t e r o r a w o r k s h o p t h a t w o r k s
according to BMW repair procedures with cor-
respondingly trained personnel. Otherwise, if
such work is carried out improperly, the high
voltage in the system presents the danger of
fatal injuries.<
Access to the lamps
1.Switch off the lamps and take the remote
control out of the ignition lock.
2.Remove the upper cover from the head-
lamp. To do so, use a screwdriver to press the catches towards the rear, see arrows,
and pull the cover forward and out.
Follow the same steps in reverse order to reat-
tach the cover.
Be careful when installing the cover, oth-
erwise leaks could occur and cause dam-
age to the headlamp system.<
Parking lamps and roadside parking
lamps, daytime running lamps
H8 bulb, 35 watts
1.Remove the cover, refer to Access to the
lamps.
2.Turn the bulb approx. 90°, see arrow, and
take it out.
3.Disconnect the plug, change the bulb and
reconnect the plug.
4.Insert the bulb and turn it until it stops.
5.Reattach the cover.
Corner-illuminating lamp*
H3 bulb, 55 watts
1.Switch off the lamps and take the remote
control out of the ignition lock.
2.Remove the cover, refer to Access to the
lamps.
Page 131 of 172

Reference
At a glance
Controls
Driving tips
Mobility
129
3.Push the wire bracket out of the anchor
towards the right and fold it up.
4.Disconnect the plug, change the bulb and
reconnect the plug.
5.Insert the bulb.
6.Fold the wire bracket down and engage it.
7.Reattach the cover.
Turn signals, front
PY24W Silver Vision bulb, 24 watts
The turn signal bulb can be changed via a cover
in the wheel arch.
1.Turn the respective wheel inwards.
2.Using a coin, turn both locks of the cover all
the way to the left, arrows 1, and remove the
cover.
3.Turn the bulb holder to the left, arrow2, and
take it out.
4.Turn the bulb socket in the bulb holder to
the right for removal and replacement.
5.Insert the bulb holder and lock it by turning
it to the right.
6.Attach the cover by positioning the bottom
edge first and then turning both locks all the
way to the right.
Tail lamps
>Turn signal:
PY21W bulb, 21 watts
>Brake lamp in the luggage compartment lid:
H21W bulb, 21 watts
>Other lamps:
W16W bulb, 16 watts
The tail lamps are divided in two parts. One part
is in the luggage compartment lid, the other is in
the fender.
1Turn signal
2Roadside parking lamp/tail lamp, LED
3Backup lamp
4Brake lamp, consisting of two individual
bulbs
5Brake Force Display
6Roadside parking lamp/tail lamp, LED
If the bulbs 2 and 6 malfunction, please contact
your BMW center or a workshop that works
according to BMW repair procedures with cor-
respondingly trained personnel.
Fender-mounted lamps
Coupe
1.Left-hand side: use a screwdriver to pry off
the cover in the cargo bay and remove the
cover.
Right-hand side: remove the cover from the
right-hand side panel of the cargo bay.
2.Loosen the bulb holder at the clip, see
arrow, and pull out.
Page 132 of 172

Replacing components
130 3.Turn signal indicator: apply gentle pressure
to the bulb while turning it to the left for
removal and replacement.
Backup lamps and brake lamps: take out
the bulbs and change them.
4.Re-engage the bulb holder so that it audibly
clicks into place.
5.Reattach the cover in the cargo bay.
Convertible
1.Turn the screws on the corresponding side,
see arrow, by 90° and remove the cover.
2.While applying light pressure, turn the bulb
holder of the turn signal bulb to the left.
3.Remove and replace the bulb.
4.Re-engage the bulb holder so that it audibly
clicks into place.5.Reattach the cover in the cargo bay.
Coupe:
Lamps in the luggage compartment lid
1.Using a screw driver, remove the fastening
plugs on the edge and in the handle
recesses of the luggage compartment lid
trim. To do so, first loosen the top part of the
plug, see arrow, and then completely
remove the plug by pulling on its bottom
part. Remove the trim.
2.Unlock the bulb holder by turning it to the
left, see arrow, and take it out.
3.Apply gentle pressure to the bulb while
turning it to the left for removal and replace-
ment.
4.Insert the bulb holder and lock it by turning
it to the right.
5.Attach the luggage compartment lid trim by
inserting the bottom part of the fastening
plug and then fixing the plug with its top
part.
Page 133 of 172

Reference
At a glance
Controls
Driving tips
Mobility
131
License plate lamp, center brake lamp,
rear lamps and side turn signal
indicators
These lamps use LED technology for operation.
In the event of a malfunction, please contact
your BMW center or a workshop that works
according to BMW repair procedures with cor-
respondingly trained personnel.
Repairing a flat tire with the
M Mobility System
To repair a flat tire, your BMW M3 includes an
M Mobility System. With this system you can
apply a sealant to the inside of the tire to seal
the damaged section, restore the tire inflation
pressure and continue on your trip.
Safety measures in the event of a flat tire:
Park the vehicle as far away from moving
traffic as possible and on a firm surface. Switch
on the hazard warning flashers.
Apply the parking brake and engage first gear
or reverse. Have all occupants leave the vehicle
and move beyond the danger zone, e. g. behind
the guard rails.
If necessary, erect a warning triangle
* or warn-
ing flasher
* at a suitable distance. Adhere to
country-specific regulations.<
Preparations
The M Mobility System is located in the cargo
bay under the floor board.
If possible, leave any foreign bodies that have
penetrated the tire in place.
Instructions on how to use the M Mobility
System can also be found on the device
itself.
low the instructions on the sealant bot-
tle.<
Remove the label with the speed restriction
from the sealant bottle and apply it to the steer-
ing wheel.
Please note the expiry date on the sealant
bottle.<
Components of the M Mobility System
1Sealant bottle and label with speed restric-
tion
2Filling hose from sealant bottle to wheel
3Connector and cable for the cigarette
lighter socket
4Holder for the sealant bottle
5Compressor
6On/off switch
7Pressure gauge for displaying the tire infla-
tion pressure
8Screw on pressure gauge to reduce tire
inflation pressure
9Hose to connect compressor and sealant
bottle or compressor and wheel
The connector, cable and connection hose are
stored in the compressor housing.
Page 134 of 172

Replacing components
132
Using the M Mobility System
To repair a flat tire with the M Mobility System,
proceed as follows:
>Fill the sealant, refer to page132.
>Distribute the sealant, refer to page132.
>Produce the tire inflation pressure, refer to
page132.
Filling the sealant
Strictly follow the specified sequence,
otherwise the sealant may escape under
high pressure.<
1.Shake the sealant bottle.
2.Screw connection hose 9 onto the connec-
tor of the sealant bottle.
3.Ensure that screw 8 on the pressure gauge
is closed.
4.Unscrew the dust cap from the valve of the
defective wheel and screw filling hose 2 of
the sealant bottle onto the valve.
5.Insert the sealant bottle into the housing of
the compressor so that the bottle is upright.
6.Ensure that the compressor is switched off,
position 0.
7.Insert connector 3 into the cigarette lighter
socket in the interior of the vehicle, refer to
page90.
8.With the ignition switched on:
Switch on the compressor and let it run for
approx. 3 minutes to fill the sealant. The
inflation pressure of the tire after filling is
unimportant.
9.Switch off the compressor.
10.Detach the hoses from the sealant bottle
connector and from the tire valve.Return the M Mobility System to its storage
location in the vehicle.
Distributing the sealant
Immediately drive approx. 2 miles/3 km to
evenly distribute the sealant in the tire.
Do not exceed a speed of 35 mph/
60 km/h. If possible, do not fall below a
speed of 12 mph/20 km/h.<
Producing the tire inflation pressure
1.After driving approx. 2 miles/3 km, stop at a
suitable location.
2.Connect connection hose9 of the com-
pressor directly to the tire valve.
3.Insert connector 3 into the cigarette lighter
socket in the interior of the vehicle.
4.Adjust the tire inflation pressure to 29 psi/
200 kPa. With the ignition switched on, pro-
ceed as follows:
>To increase the inflation pressure:
Switch on the compressor, position I. To
check the current inflation pressure set-
ting, briefly switch off the compressor.
Do not let the compressor run for
more than 10 minutes, otherwise the
device will overheat and may be dam-
aged.<
>To reduce the inflation pressure: turn
screw 8 on the pressure gauge.
If the inflation pressure is not maintained,
drive the vehicle a second time, refer to
Distributing the sealant. Then repeat steps 1 to
4.
Use of the M Mobility System may be ineffec-
tual for tire damage larger than approx. 0.16 in/
4 mm. Please contact the nearest BMW center,
refer to page135, or a workshop that works
according to BMW repair procedures with cor-
respondingly trained personnel if the tire can-
not be made roadworthy with the M Mobility
System.<
The tire inflation pressure must be at least
29 psi/200 kPa. If it is not, do not continue
driving.<
Page 135 of 172

Reference
At a glance
Controls
Driving tips
Mobility
133
Continuing your trip
Do not exceed the maximum allowable
speed of 50 mph/80 km/h to avoid the risk
of an accident.<
Reinitialize the Flat Tire Monitor, refer to
page69 for more information.
Have the faulty tire and the sealant bottle of the
M Mobility System replaced as soon as possi-
ble.<
Changing wheels
The tools for changing wheels are avail-
able as optional accessories from your
BMW center.<
Jack mounting points
The jacking points are at the positions shown in
the illustration.
Vehicle battery
Battery care
The battery is 100 % maintenance-free, the
electrolyte will last for the life of the battery
when the vehicle is operated in a temperate cli-
mate. Your BMW center will be glad to advise in
all matters concerning the battery.
Charging the battery
Only charge the battery in the vehicle via the
terminals in the engine compartment with the
engine off. Connections, refer to Jump starting
on page136.
Disposal
Have old batteries disposed of by your
BMW center or hand them in to a recy-
cling center. Maintain the battery in an upright
position for transport and storage. Always
secure the battery against tipping over during
transport.<
Power failure
After a temporary power loss, the functioning of
some equipment may be limited and require
reinitialization. Individual settings may likewise
have been lost and will have to be programmed:
>Time and date
These values must be updated, refer to
page64.
>Radio
Stations must be stored again, refer to the
separate Owner's Manual for Radio.
>Glass roof
It may happen that the roof can only be
raised. The system must be initialized.
Please contact your BMW center.
>Seat and mirror memory
The positions must be stored again, refer to
page39.
>Inside rearview mirror with digital compass
The system must be calibrated, refer to
page86.
Fuses
Never attempt to repair a blown fuse and
do not replace a defective fuse with a sub-
stitute of another color or amperage rating, oth-
erwise this could lead to a circuit overload, ulti-
mately resulting in a fire in the vehicle.<
Page 136 of 172
Replacing components
134 Open the cover in the glove compartment and
remove it.
Spare fuses and a pair of plastic forceps are set
in holders on the distributor box.
See the rear of the cover for information on fuse
assignment.
 1
1 2
2 3
3 4
4 5
5 6
6 7
7 8
8 9
9 10
10 11
11 12
12 13
13 14
14 15
15 16
16 17
17 18
18 19
19 20
20 21
21 22
22 23
23 24
24 25
25 26
26 27
27 28
28 29
29 30
30 31
31 32
32 33
33 34
34 35
35 36
36 37
37 38
38 39
39 40
40 41
41 42
42 43
43 44
44 45
45 46
46 47
47 48
48 49
49 50
50 51
51 52
52 53
53 54
54 55
55 56
56 57
57 58
58 59
59 60
60 61
61 62
62 63
63 64
64 65
65 66
66 67
67 68
68 69
69 70
70 71
71 72
72 73
73 74
74 75
75 76
76 77
77 78
78 79
79 80
80 81
81 82
82 83
83 84
84 85
85 86
86 87
87 88
88 89
89 90
90 91
91 92
92 93
93 94
94 95
95 96
96 97
97 98
98 99
99 100
100 101
101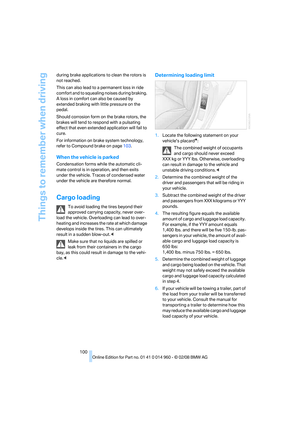 102
102 103
103 104
104 105
105 106
106 107
107 108
108 109
109 110
110 111
111 112
112 113
113 114
114 115
115 116
116 117
117 118
118 119
119 120
120 121
121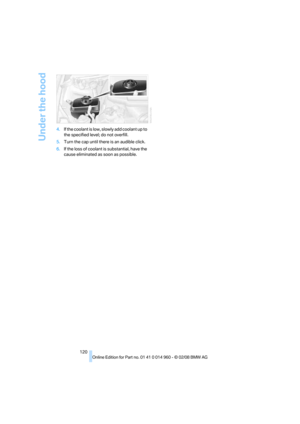 122
122 123
123 124
124 125
125 126
126 127
127 128
128 129
129 130
130 131
131 132
132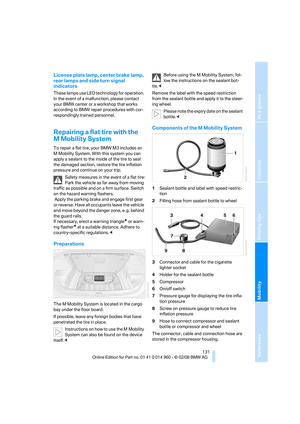 133
133 134
134 135
135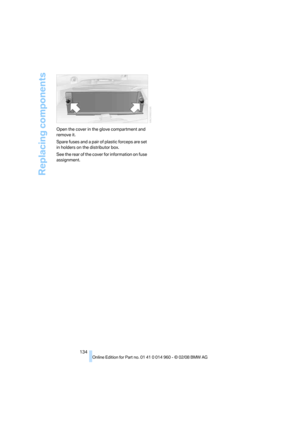 136
136 137
137 138
138 139
139 140
140 141
141 142
142 143
143 144
144 145
145 146
146 147
147 148
148 149
149 150
150 151
151 152
152 153
153 154
154 155
155 156
156 157
157 158
158 159
159 160
160 161
161 162
162 163
163 164
164 165
165 166
166 167
167 168
168 169
169 170
170 171
171