Page 33 of 72

6-1
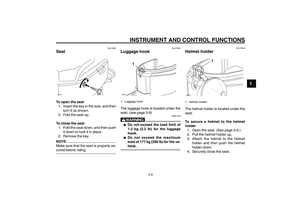
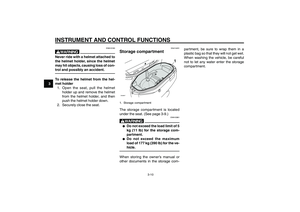
1
2
3
4
5
6
7
8
9
EAU17226
PERIODIC MAINTENANCE AND MINOR REPAIR
EAU17280
Safety is an obligation of the owner.
Periodic inspection, adjustment and lu-
brication will keep your vehicle in the
safest and most efficient condition pos-
sible. The most important points of in-
spection, adjustment, and lubrication
are explained on the following pages.
The intervals given in the periodic main-
tenance and lubrication chart should be
simply considered as a general guide
under normal riding conditions. How-
ever, DEPENDING ON THE
WEATHER, TERRAIN, GEOGRAPHI-
CAL LOCATION, AND INDIVIDUAL
USE, THE MAINTENANCE INTER-
VALS MAY NEED TO BE SHORT-
ENED.
EWA10320
wIf you are not familiar with mainte-
nance work, have a Yamaha dealer do
it for you.
EWA10330
wThis scooter is designed for use on
paved roads only. If this scooter is
operated in abnormally dusty, muddyor wet conditions, the air filter ele-
ment should be cleaned or replaced
more frequently, otherwise rapid en-
gine wear may result. Consult a
Yamaha dealer for proper mainte-
nance intervals.
EAU17226
PERIODIC MAINTENANCE AND MINOR REPAIR
15P-F8199-E0_ch6.pmd2007/06/21, 11:09 1
Page 34 of 72
6000")
6-2
1
2
3
4
5
6
7
8
9
EAU17226
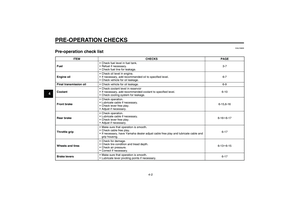
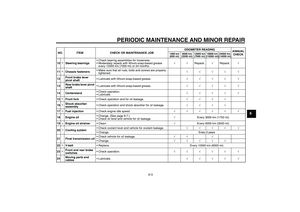
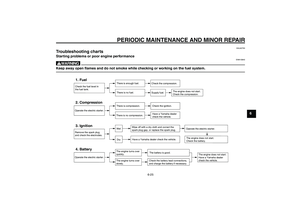
PERIODIC MAINTENANCE AND MINOR REPAIRPeriodic maintenance and lubrication chartNO. ITEM CHECK OR MAINTENANCE JOBODOMETER READING
ANNUAL
CHECK
1000 km
(600 mi)6000 km
(3500 mi)12000 km
(7000 mi)18000 km
(10500 mi)24000 km
(14000 mi)
1
*Fuel line• Check fuel hoses and vacuum hose for cracks or
damage.�—�—�—�— �—
2 Spark plug• Check condition.
• Clean and regap.�—�—
• Replace.�—�—
3*Valves• Check and adjust valve clearance when engine is cold.�—�—�—�—
4*Air filter element• Replace.�—�—�—�— �—
5*Front brake• Check operation and adjust brake lever free play.�—�— �— �— �— �—
• Replace brake shoes. Whenever worn to the limit
6*Rear brake• Check operation and adjust brake lever free play.�—�—�—�—�— �—
• Replace brake shoes. Whenever worn to the limit
7*Wheels• Check runout and for damage.�—�—�—�—
8*Tires• Check tread depth and for damage.
• Replace if necessary.
• Check air pressure.
• Correct if necessary.�—�—�—�— �—
9*Wheel bearings• Check bearing for looseness or damage.�—�—�—�—
EAU17715
Periodic maintenance and lubrication chartNOTE:● ●● ●
●
The annual checks must be performed every year, except if a kilometer-based maintenance, or for the UK, a
mileage-based maintenance, is performed instead.
●
From 30000 km (17500 mi), repeat the maintenance intervals starting from 6000 km (3500 mi).
Items marked with an asterisk should be performed by a Yamaha dealer as they require special tools, data and techni-
cal skills.
15P-F8199-E0_ch6.pmd2007/06/21, 11:09 2
Page 35 of 72

6-3
1
2
3
4
5
6
7
8
9
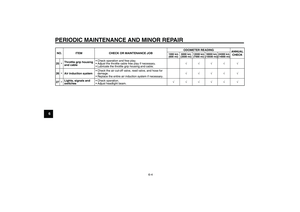
EAU17226
PERIODIC MAINTENANCE AND MINOR REPAIR
10
*Steering bearings• Check bearing assemblies for looseness.
• Moderately repack with lithium-soap-based grease
every 12000 km (7000 mi) or 24 months.�—�—Repack.�—Repack.�—
11*Chassis fasteners• Make sure that all nuts, bolts and screws are properly
tightened.�—�—�—�— �—
12Front brake lever
pivot shaft• Lubricate with lithium-soap-based grease.�—�—�—�— �—
13Rear brake lever pivot
shaft• Lubricate with lithium-soap-based grease.�—�—�—�— �—
14 Centerstand• Check operation.
• Lubricate.�—�—�—�— �—
15*Front fork• Check operation and for oil leakage.�—�—�—�—
16*Shock absorber
assembly• Check operation and shock absorber for oil leakage.�—�—�—�—
17*Fuel injection• Check engine idle speed.�—�—�—�—�— �—
18Engine oil• Change. (See page 6-7.)
• Check oil level and vehicle for oil leakage.�—Every 3000 km (1750 mi)
19
*Engine oil strainer•Clean.�—Every 6000 km (3500 mi)
20*Cooling system• Check coolant level and vehicle for coolant leakage.�—�—�—�— �—
• Change. Every 3 years
21 Final transmission oil• Check vehicle for oil leakage.�—�— �—
• Change.�—�—�—�—�—
22*V-belt• Replace. Every 10000 km (6000 mi)
23*Front and rear brake
switches• Check operation.�—�—�—�—�— �—
24Moving parts and
cables• Lubricate.�—�—�—�— �— NO. ITEM CHECK OR MAINTENANCE JOBODOMETER READING
ANNUAL
CHECK
1000 km
(600 mi)6000 km
(3500 mi)12000 km
(7000 mi)18000 km
(10500 mi)24000 km
(14000 mi)
15P-F8199-E0_ch6.pmd2007/06/21, 11:09 3
Page 36 of 72
6-4
1
2
3
4
5
6
7
8
9
EAU17226
PERIODIC MAINTENANCE AND MINOR REPAIR25
*Throttle grip housing
and cable• Check operation and free play.
• Adjust the throttle cable free play if necessary.
• Lubricate the throttle grip housing and cable.�—�—�—�— �—
26*Air induction system• Check the air cut-off valve, reed valve, and hose for
damage.
• Replace the entire air induction system if necessary.�—�—�—�— �—
27*Lights, signals and
switches• Check operation.
• Adjust headlight beam.�—�—�—�—�— �— NO. ITEM CHECK OR MAINTENANCE JOBODOMETER READING
ANNUAL
CHECK
1000 km
(600 mi)6000 km
(3500 mi)12000 km
(7000 mi)18000 km
(10500 mi)24000 km
(14000 mi)
15P-F8199-E0_ch6.pmd2007/06/21, 11:09 4
Page 37 of 72
6-5
1
2
3
4
5
6
7
8
9
EAU17226
PERIODIC MAINTENANCE AND MINOR REPAIR
EAU18771
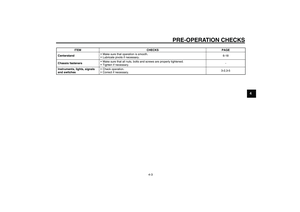
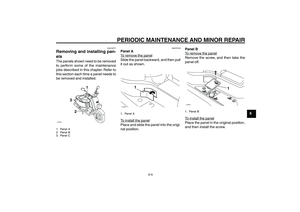
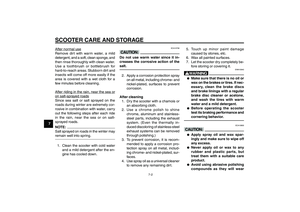
Removing and installing pan-
elsThe panels shown need to be removed
to perform some of the maintenance
jobs described in this chapter. Refer to
this section each time a panel needs to
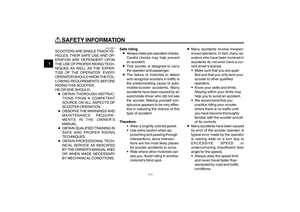
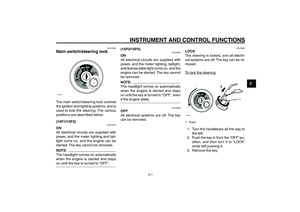
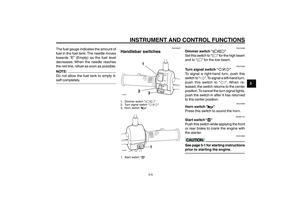
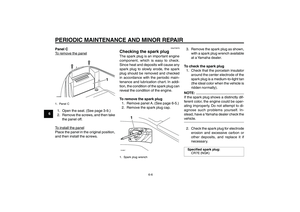
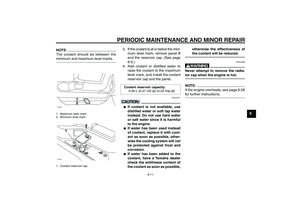
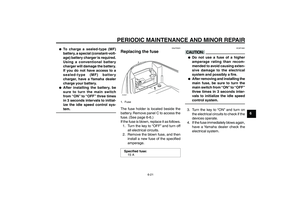
be removed and installed.ZAUM00**
3
1
2
1. Panel A
2. Panel B
3. Panel CPanels, removing and installing
EAUT2100
Panel ATo remo
ve the panel
Slide the panel backward, and then pull
it out as shown.
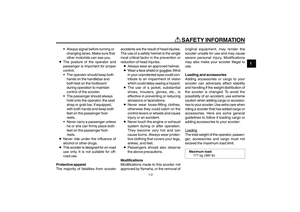
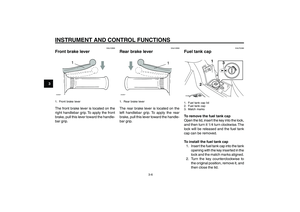
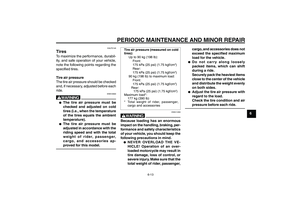
ZAUM00**
1
1. Panel ATo install the panel
Place and slide the panel into the origi-
nal position.Panel B
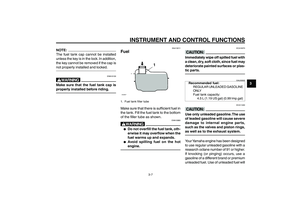
To remo
ve the panel
Remove the screw, and then take the
panel off.
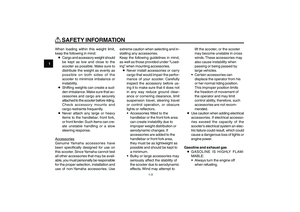
ZAUM00**
1
1. Panel BTo install the panel
Place the panel in the original position,
and then install the screw.
15P-F8199-E0_ch6.pmd2007/06/21, 11:09 5
Page 38 of 72

2. Remove the screws, and then take
the panel off")
6-6
1
2
3
4
5
6
7
8
9
EAU17226
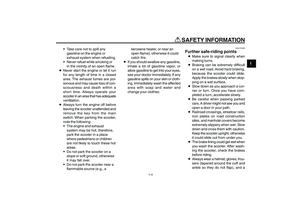
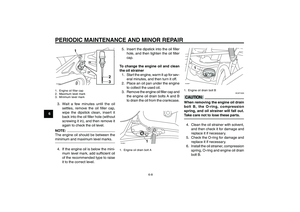
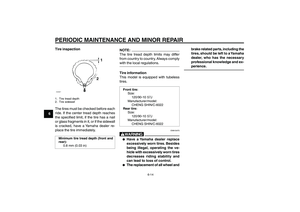
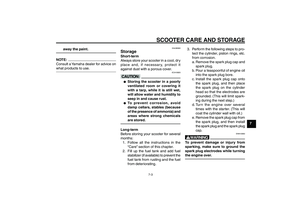
PERIODIC MAINTENANCE AND MINOR REPAIRPanel CTo remo
ve the panel
ZAUM00**
1
1. Panel C1. Open the seat. (See page 3-9.)
2. Remove the screws, and then take
the panel off.To install the panel
Place the panel in the original position,
and then install the screws.
EAUT2070
Checking the spark plugThe spark plug is an important engine
component, which is easy to check.
Since heat and deposits will cause any
spark plug to slowly erode, the spark
plug should be removed and checked
in accordance with the periodic main-
tenance and lubrication chart. In addi-
tion, the condition of the spark plug can
reveal the condition of the engine.
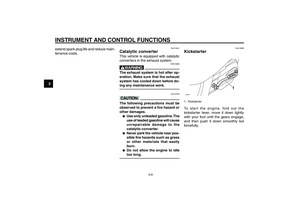
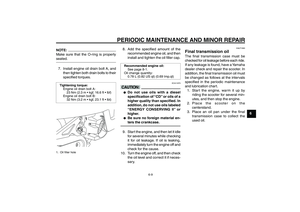
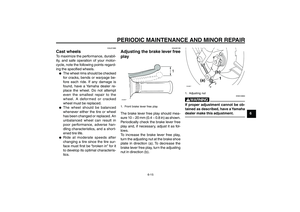
To remove the spark plug
1. Remove panel A. (See page 6-5.)
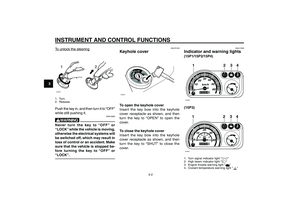
2. Remove the spark plug cap.ZAUM00**
1
1. Spark plug wrench
Spark plug, checking
3. Remove the spark plug as shown,
with a spark plug wrench available
at a Yamaha dealer.
To check the spark plug
1. Check that the porcelain insulator
around the center electrode of the
spark plug is a medium-to-light tan
(the ideal color when the vehicle is
ridden normally).
NOTE:
If the spark plug shows a distinctly dif-
ferent color, the engine could be oper-
ating improperly. Do not attempt to di-
agnose such problems yourself. In-
stead, have a Yamaha dealer check the
vehicle.2. Check the spark plug for electrode
erosion and excessive carbon or
other deposits, and replace it if
necessary.Specified spark plug:
CR7E (NGK)
15P-F8199-E0_ch6.pmd2007/06/21, 11:09 6
Page 39 of 72

6-7
1
2
3
4
5
6
7
8
9
EAU17226
PERIODIC MAINTENANCE AND MINOR REPAIR
To install the spark plug
1. Measure the spark plug gap with a
wire thickness gauge and, if nec-
essary, adjust the gap to specifi-
cation.Spark plug gap:
0.7 ~ 0.8 mm (0.028 ~ 0.031 in)2. Clean the surface of the spark plug
gasket and its mating surface, and
then wipe off any grime from the
spark plug threads.
3. Install the spark plug with the spark
plug wrench, and then tighten it to
the specified torque.Tightening torque:
Spark plug:
NOTE:
If a torque wrench is not available when
installing a spark plug, a good estimate
of the correct torque is 1/4~1/2 turn past
finger tight. However, the spark plug
should be tightened to the specified
torque as soon as possible.
4. Install the spark plug cap.
5. Install the panel.
EAUT1460
Engine oil and oil strainerThe engine oil level should be checked
before each ride. In addition, the oil must
be changed and the oil strainer cleaned
at the intervals specified in the periodic
maintenance and lubrication chart.
To check the engine oil level
1. Place the vehicle on the
centerstand.NOTE:
Make sure that the vehicle is positioned
straight up when checking the oil level.
A slight tilt to the side can result in a
false reading.2. Start the engine, warm it up for sev-
eral minutes, and then turn it off. Engine oil
15P-F8199-E0_ch6.pmd2007/06/21, 11:09 7
Page 40 of 72

6-8
1
2
3
4
5
6
7
8
9
EAU17226
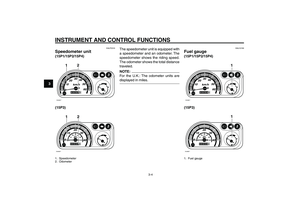
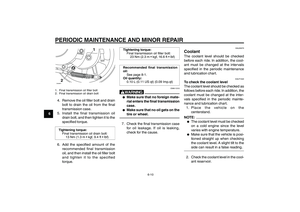
PERIODIC MAINTENANCE AND MINOR REPAIRZAUM00**
1
2
3
1. Engine oil filler cap
2. Maximum level mark
3. Minimum level mark3. Wait a few minutes until the oil
settles, remove the oil filler cap,
wipe the dipstick clean, insert it
back into the oil filler hole (without
screwing it in), and then remove it
again to check the oil level.NOTE:
The engine oil should be between the
minimum and maximum level marks.4. If the engine oil is below the mini-
mum level mark, add sufficient oil
of the recommended type to raise
it to the correct level.5. Insert the dipstick into the oil filler
hole, and then tighten the oil filler
cap.
To change the engine oil and clean
the oil strainer
1. Start the engine, warm it up for sev-
eral minutes, and then turn it off.
2. Place an oil pan under the engine
to collect the used oil.
3. Remove the engine oil filler cap and
the engine oil drain bolts A and B
to drain the oil from the crankcase.
ZAUM00**
1
1. Engine oil drain bolt A
ZAUM00**
1
1. Engine oil drain bolt B
ECAT1020
cCWhen removing the engine oil drain
bolt B, the O-ring, compression
spring, and oil strainer will fall out.
Take care not to lose these parts.4. Clean the oil strainer with solvent,
and then check it for damage and
replace it if necessary.
5. Check the O-ring for damage and
replace it if necessary.
6. Install the oil strainer, compression
spring, O-ring and engine oil drain
bolt B.
15P-F8199-E0_ch6.pmd2007/06/21, 11:09 8