Page 217 of 283
2007 Volvo XC70
Power steering fluid reservoir
The fluid level should always be between the ADD and FULL marks.
Fluid type: Volvo synthetic power steering fluid (Pentosin CHF 11S) P/N 1161529 or\
equivalent.
Replace: No fluid change required.
NOTE: If a problem should occur in the power steering system or if the vehicle\
has no electrical current
and must be towed, it is still possible to steer the vehicle. However, k\
eep in mind that greater effort will
be required to turn the steering wheel.
pg. 194 Maintenance and servicing
Wiper blades
file:///K|/ownersdocs/2007/2007_XC70/07xc70_09.htm (14 of 38)12/30/200\
6 5:51:43 PM
Page 218 of 283
2007 Volvo XC70
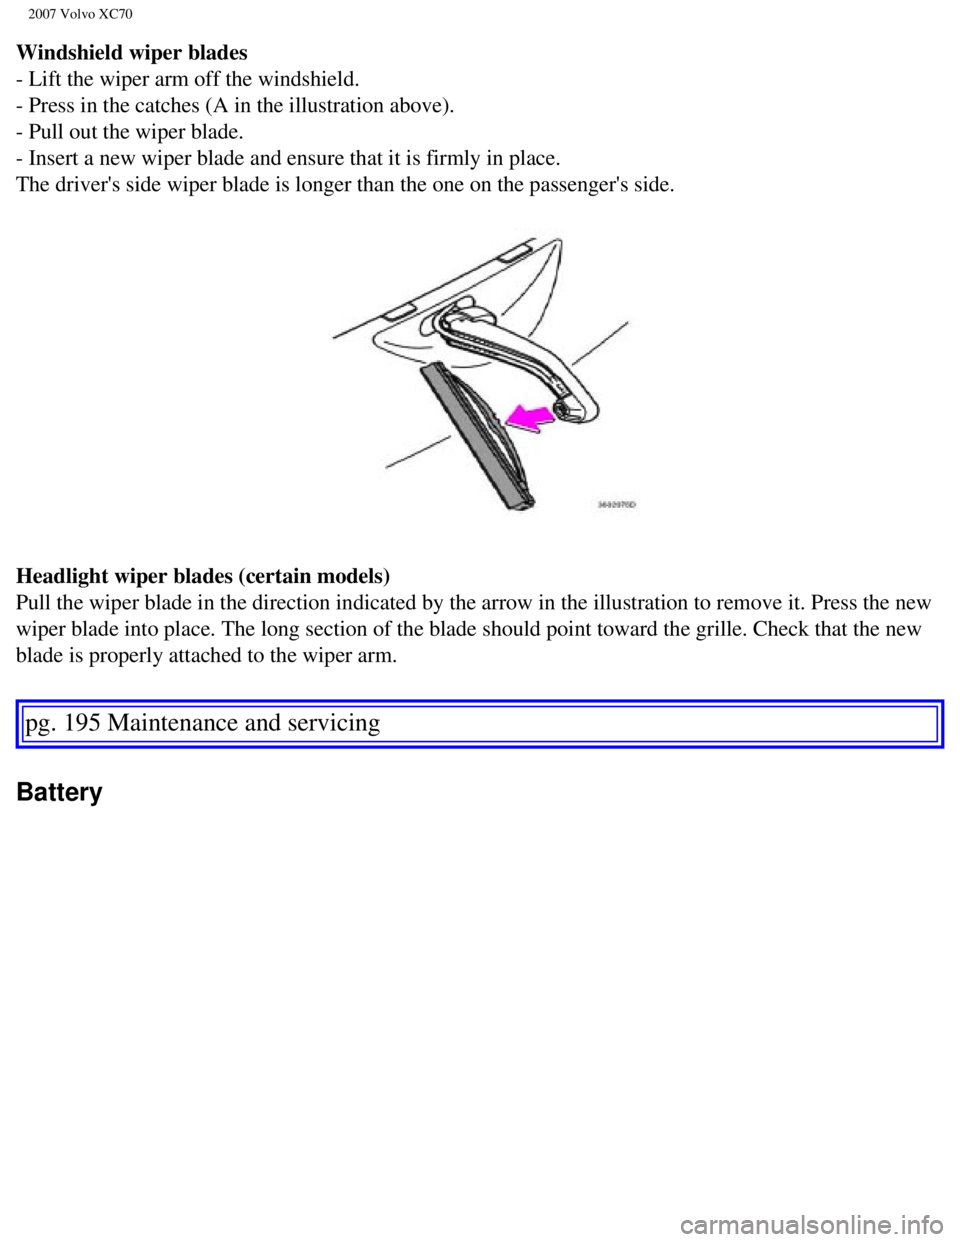
Windshield wiper blades
- Lift the wiper arm off the windshield.
- Press in the catches (A in the illustration above).
- Pull out the wiper blade.
- Insert a new wiper blade and ensure that it is firmly in place.
The driver's side wiper blade is longer than the one on the passenger's \
side.
Headlight wiper blades (certain models)
Pull the wiper blade in the direction indicated by the arrow in the illu\
stration to remove it. Press the new
wiper blade into place. The long section of the blade should point towar\
d the grille. Check that the new
blade is properly attached to the wiper arm.
pg. 195 Maintenance and servicing
Battery
file:///K|/ownersdocs/2007/2007_XC70/07xc70_09.htm (15 of 38)12/30/200\
6 5:51:43 PM
Page 219 of 283

2007 Volvo XC70
Battery maintenance
The battery in your vehicle is located under the floor of the trunk.
Driving habits and conditions, climate, the number of starts, etc. all a\
ffect the service life and function of
the battery. In order for your battery to perform satisfactorily, keep t\
he following in mind:
l Check the fluid level in each cell in the battery every 24 months or eve\
ry 15,0001 miles (24,000 km),
whichever is sooner. The fluid should be at the level shown in the illus\
trations (A)
2. Do not overfill.
l Use a screw driver to open the caps or cover and a flashlight to inspect\
the level.
l If necessary, add distilled water. The level should never be above the i\
ndicator (A).
l The fluid level should be checked if the battery has been recharged.
l After inspection, be sure the cap over each battery cell or the cover is\
securely in place.
l Check that the battery cables are correctly connected and properly tight\
ened. Route ventilation hose
through opening in floor (see
page 197)
l Never disconnect the battery when the engine is running, for example whe\
n changing the battery.
l The battery should be disconnected from the vehicle when a battery charg\
er is used directly on the
battery.
l However, if the battery is being charged via the connecting points in th\
e engine compartment (see
file:///K|/ownersdocs/2007/2007_XC70/07xc70_09.htm (16 of 38)12/30/200\
6 5:51:43 PM
Page 220 of 283

2007 Volvo XC70
page 197), the battery must be connected.
WARNING!
PROPOSITION 65 WARNING!
Battery posts, terminals, and related accessories contain lead and lead \
compounds, chemicals known
to the state of California to cause cancer and reproductive harm. Wash h\
ands after handling.
1. More frequently in warm climates.
2. The level indicator inside the battery could be designed in various w\
ays. See illustrations.
pg. 196 Maintenance and servicing
Battery
WARNING!
l Never expose the battery to open flame or electric spark.
l Do not smoke near the battery.
l Battery fluid contains sulfuric acid. Do not allow battery fluid to cont\
act eyes, skin, fabrics or
painted surfaces. If contact occurs, flush the affected area immediately\
with water. Obtain medical
help immediately if eyes are affected.
NOTE: Used batteries should be properly disposed of at a recycling station or\
similar facility, or taken
to your Volvo retailer.
file:///K|/ownersdocs/2007/2007_XC70/07xc70_09.htm (17 of 38)12/30/200\
6 5:51:43 PM
Page 221 of 283
2007 Volvo XC70
pg. 197 Maintenance and servicing
Battery
file:///K|/ownersdocs/2007/2007_XC70/07xc70_09.htm (18 of 38)12/30/200\
6 5:51:43 PM
Page 222 of 283

2007 Volvo XC70
Replacing the battery
- Switch off the ignition and remove the key.
- Wait at least 5 minutes after switching off the ignition before discon\
necting the battery so that all
information in the vehicle's electrical system can be stored in the cont\
rol modules.
- Remove the bolts on the retaining bracket over the battery and lift ou\
t the bracket.
- Fold up the plastic cover over the negative (ground) battery termina\
l. or unscrew the cover over the
battery.
- Disconnect the negative cable.
- Lift off the plastic cover if necessary and disconnect the positive ca\
ble.
- Pull the ventilation hose from the battery.
- Lift out the old battery.
Installing a new battery
- Put a new battery into place.
- Put the lower retaining bracket in place and retighten the bolt.
- Reconnect the positive cable.
- Press the cover for the positive battery terminal into place and fold \
down the lid of the plastic cover.
- Connect the negative (ground) cable and fold down the plastic cover \
if applicable.
- Be sure that the ventilation hose is securely connected to the battery\
and that the other end of the hose
is properly routed through the ventilation opening in the floor of the b\
attery compartment (see the
illustration).
- Reinstall the retaining bracket over the battery and retighten the nut\
s.
WARNING!
Ventilation hose:
l The battery generates hydrogen gas, which is flammable and explosive. Th\
e battery is fitted with a
ventilation hose which vents hydrogen gas out of the battery compartment\
through a ventilation
opening in the bottom of this compartment. If the battery must be replac\
ed, it is essential that the
ventilation hose is properly connected to the battery and that it is rou\
ted through the ventilation
opening provided (see illustration).
l Be sure the ventilation hose is free of debris.
l Only use replacement batteries equipped with a ventilation hose. Consult\
your Volvo retailer.
NOTE: After the battery has been disconnected or replaced, lock and unlock th\
e vehicle with the central
locking system's remote control to reactivate such features as the power\
windows, moonroof, courtesy
lighting, etc.
file:///K|/ownersdocs/2007/2007_XC70/07xc70_09.htm (19 of 38)12/30/200\
6 5:51:43 PM
Page 223 of 283

2007 Volvo XC70
pg. 198 Maintenance and servicing
Replacing bulbs
When replacing bulbs, keep the following points in mind:
l Never touch the glass of bulbs with your fingers. Grease and oils from y\
our fingers vaporize in the
heat and will leave a deposit on the reflector, which will damage it.
l The optional Active Bi-Xenon headlight bulbs contain trace amounts of me\
rcury. These bulbs should
always be disposed of by an authorized Volvo retailer.
l The following bulbs should only be replaced by an authorized Volvo servi\
ce technician:
- Active Bi-Xenon headlights,
- Courtesy (dome) lighting,
- Reading lights,
- Glove compartment lights
- Turn signals and courtesy lights in the side door mirrors
- High-mounted brake lights
- Diodes in the rear tail lights
Replacing bulbs at the front of the vehicle
All front bulbs (except the optional front fog lights) are replaced fr\
om the engine compartment.
WARNING!
Active Bi-Xenon headlights (option) - due to the high voltage used by \
these headlights, these bulbs
should only be replaced by an authorized Volvo service technician.
file:///K|/ownersdocs/2007/2007_XC70/07xc70_09.htm (20 of 38)12/30/200\
6 5:51:43 PM
Page 224 of 283
2007 Volvo XC70
Location of the bulbs in the headlight housing
1. Side marker light
2. Turn signal
3. Low beam headlight/parking light (halogen headlights)
4. High beam headlight, parking light (Active Bi-Xenon headlights)
Certain models may have a plastic tube that may hinder access to the bul\
bs. This tube can be broken off
and discarded.
NOTE: If you encounter difficulty when changing a bulb, please contact a Volv\
o workshop.
pg. 199 Maintenance and servicing
Replacing bulbs
Low beam headlight
(Halogen headlights)
Removing the defective bulb:
- Switch off the headlights and turn the ignition switch to position 0. \
- Remove the plastic cover.
file:///K|/ownersdocs/2007/2007_XC70/07xc70_09.htm (21 of 38)12/30/200\
6 5:51:43 PM