2007 NISSAN TIIDA checking oil
[x] Cancel search: checking oilPage 4256 of 5883
MA-16
< ON-VEHICLE MAINTENANCE >
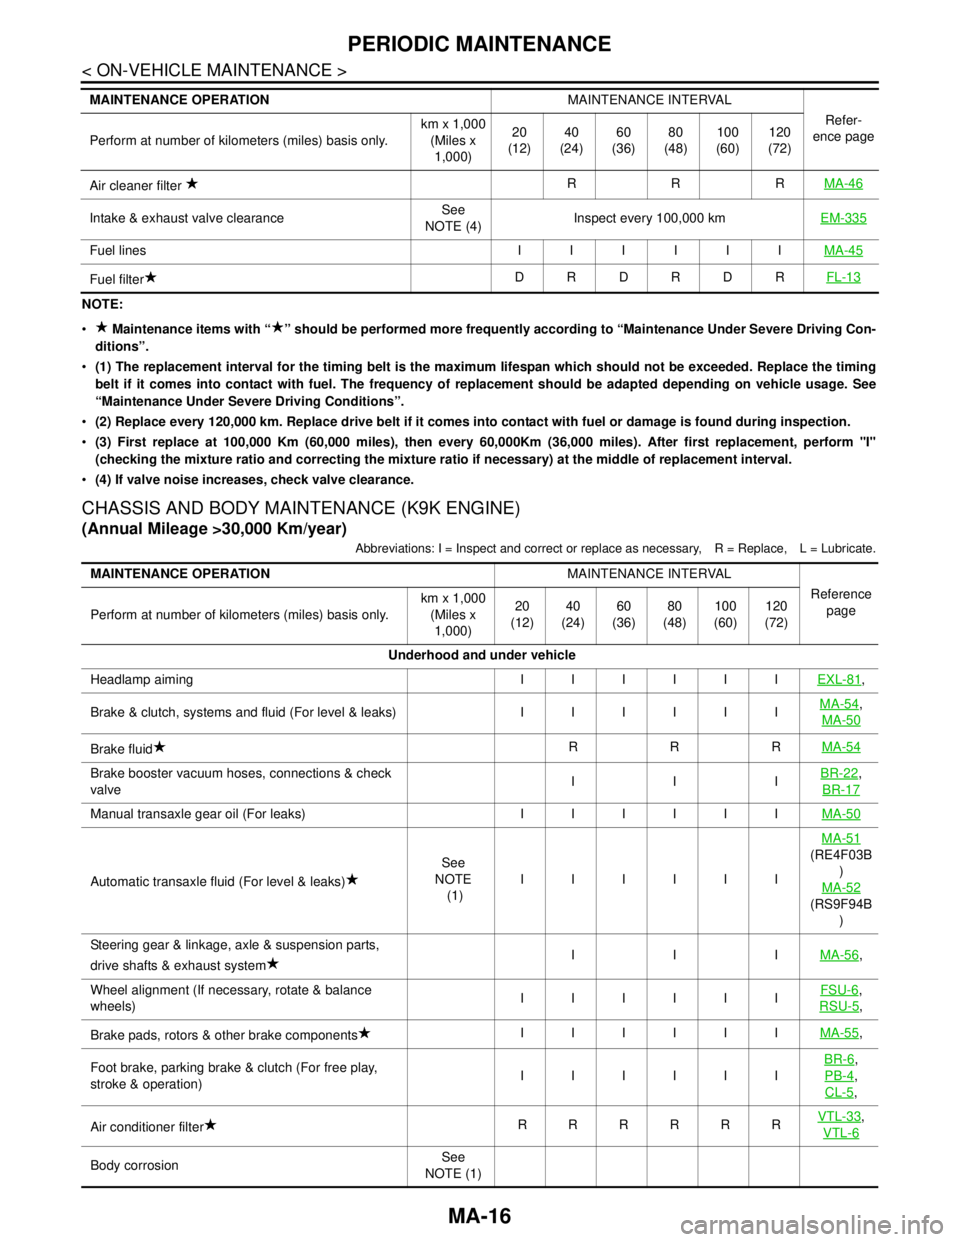
PERIODIC MAINTENANCE
NOTE:
Maintenance items with “ ” should be performed more frequently according to “Maintenance Under Severe Driving Con-
ditions”.
(1) The replacement interval for the timing belt is the maximum lifespan which should not be exceeded. Replace the timing
belt if it comes into contact with fuel. The frequency of replacement should be adapted depending on vehicle usage. See
“Maintenance Under Severe Driving Conditions”.
(2) Replace every 120,000 km. Replace drive belt if it comes into contact with fuel or damage is found during inspection.
(3) First replace at 100,000 Km (60,000 miles), then every 60,000Km (36,000 miles). After first replacement, perform "I"
(checking the mixture ratio and correcting the mixture ratio if necessary) at the middle of replacement interval.
(4) If valve noise increases, check valve clearance.
CHASSIS AND BODY MAINTENANCE (K9K ENGINE)
(Annual Mileage >30,000 Km/year)
Abbreviations: I = Inspect and correct or replace as necessary, R = Replace, L = Lubricate.
Air cleaner filter RRRMA-46
Intake & exhaust valve clearanceSee
NOTE (4)Inspect every 100,000 kmEM-335
Fuel lines IIIIIIMA-45
Fuel filterDRDRDRFL-13
MAINTENANCE OPERATIONMAINTENANCE INTERVAL
Refer-
ence page
Perform at number of kilometers (miles) basis only.km x 1,000
(Miles x
1,000)20
(12)40
(24)60
(36)80
(48)100
(60)120
(72)
MAINTENANCE OPERATIONMAINTENANCE INTERVAL
Reference
page
Perform at number of kilometers (miles) basis only.km x 1,000
(Miles x
1,000)20
(12)40
(24)60
(36)80
(48)100
(60)120
(72)
Underhood and under vehicle
Headlamp aiming IIIIIIEXL-81
,
Brake & clutch, systems and fluid (For level & leaks) I I I I I IMA-54
,
MA-50
Brake fluidRRRMA-54
Brake booster vacuum hoses, connections & check
valveIIIBR-22,
BR-17
Manual transaxle gear oil (For leaks) I I I I I IMA-50
Automatic transaxle fluid (For level & leaks)See
NOTE
(1)IIIIIIMA-51
(RE4F03B
)
MA-52
(RS9F94B
)
Steering gear & linkage, axle & suspension parts,
drive shafts & exhaust systemIIIMA-56
,
Wheel alignment (If necessary, rotate & balance
wheels)IIIIIIFSU-6
,
RSU-5
,
Brake pads, rotors & other brake componentsIIIIIIMA-55
,
Foot brake, parking brake & clutch (For free play,
stroke & operation)IIIIIIBR-6
,
PB-4
,
CL-5
,
Air conditioner filterRRRRRRVTL-33
,
VTL-6
Body corrosionSee
NOTE (1)
Page 4262 of 5883
MA-22
< ON-VEHICLE MAINTENANCE >
ENGINE MAINTENANCE (HR16DE)
ENGINE MAINTENANCE (HR16DE)
DRIVE BELTS
DRIVE BELTS : CheckingINFOID:0000000001730848
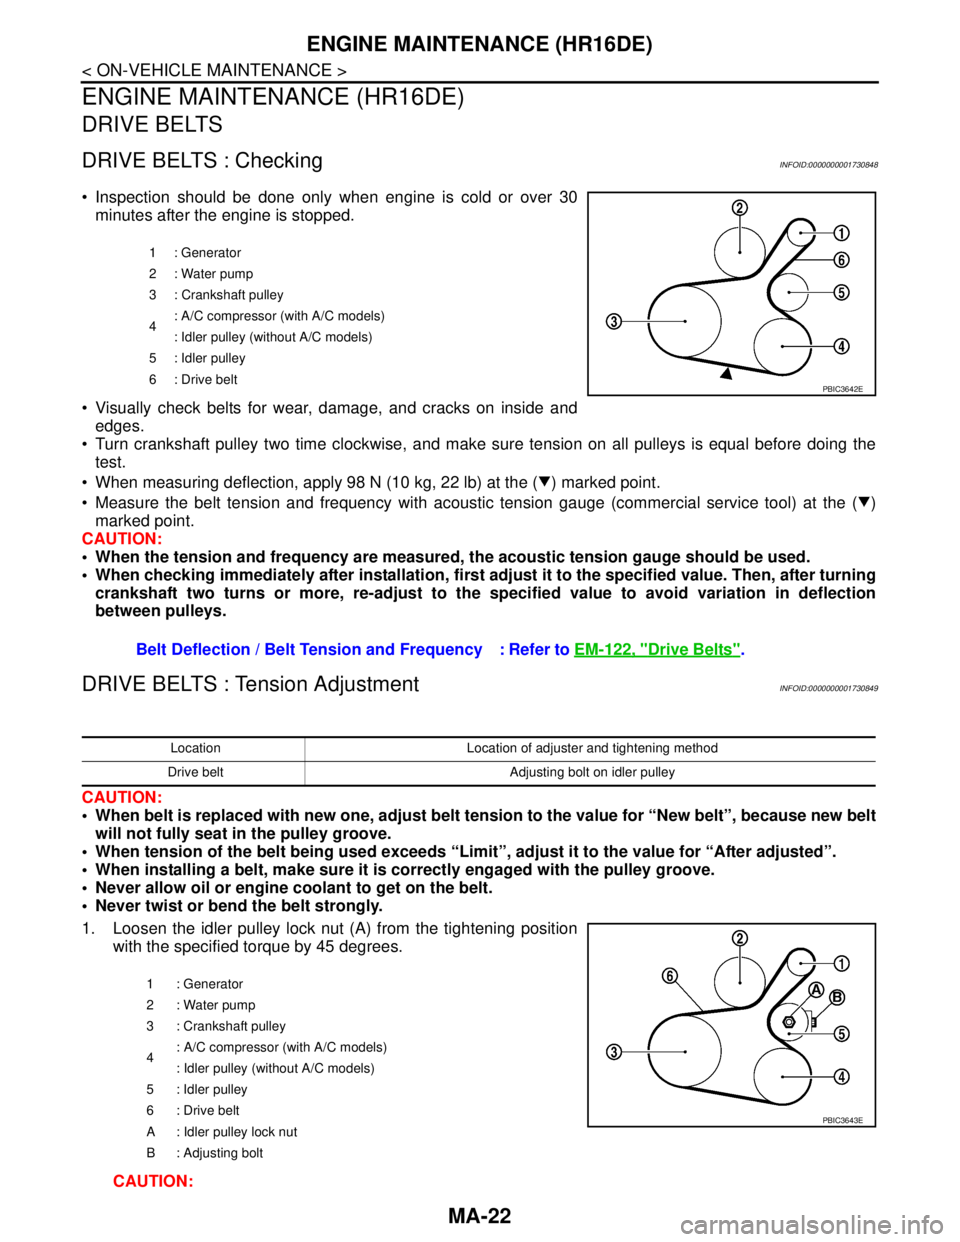
Inspection should be done only when engine is cold or over 30
minutes after the engine is stopped.
Visually check belts for wear, damage, and cracks on inside and
edges.
Turn crankshaft pulley two time clockwise, and make sure tension on all pulleys is equal before doing the
test.
When measuring deflection, apply 98 N (10 kg, 22 lb) at the ( ) marked point.
Measure the belt tension and frequency with acoustic tension gauge (commercial service tool) at the ( )
marked point.
CAUTION:
When the tension and frequency are measured, the acoustic tension gauge should be used.
When checking immediately after installation, first adjust it to the specified value. Then, after turning
crankshaft two turns or more, re-adjust to the specified value to avoid variation in deflection
between pulleys.
DRIVE BELTS : Tension AdjustmentINFOID:0000000001730849
CAUTION:
When belt is replaced with new one, adjust belt tension to the value for “New belt”, because new belt
will not fully seat in the pulley groove.
When tension of the belt being used exceeds “Limit”, adjust it to the value for “After adjusted”.
When installing a belt, make sure it is correctly engaged with the pulley groove.
Never allow oil or engine coolant to get on the belt.
Never twist or bend the belt strongly.
1. Loosen the idler pulley lock nut (A) from the tightening position
with the specified torque by 45 degrees.
CAUTION:
1 : Generator
2: Water pump
3 : Crankshaft pulley
4: A/C compressor (with A/C models)
: Idler pulley (without A/C models)
5 : Idler pulley
6: Drive belt
Belt Deflection / Belt Tension and Frequency : Refer to EM-122, "Drive Belts".
PBIC3642E
Location Location of adjuster and tightening method
Drive belt Adjusting bolt on idler pulley
1 : Generator
2: Water pump
3 : Crankshaft pulley
4: A/C compressor (with A/C models)
: Idler pulley (without A/C models)
5 : Idler pulley
6 : Drive belt
A : Idler pulley lock nut
B : Adjusting bolt
PBIC3643E
Page 4274 of 5883
MA-34
< ON-VEHICLE MAINTENANCE >
ENGINE MAINTENANCE (MR18DE)
RADIATOR : Checking Radiator Cap
INFOID:0000000001730871
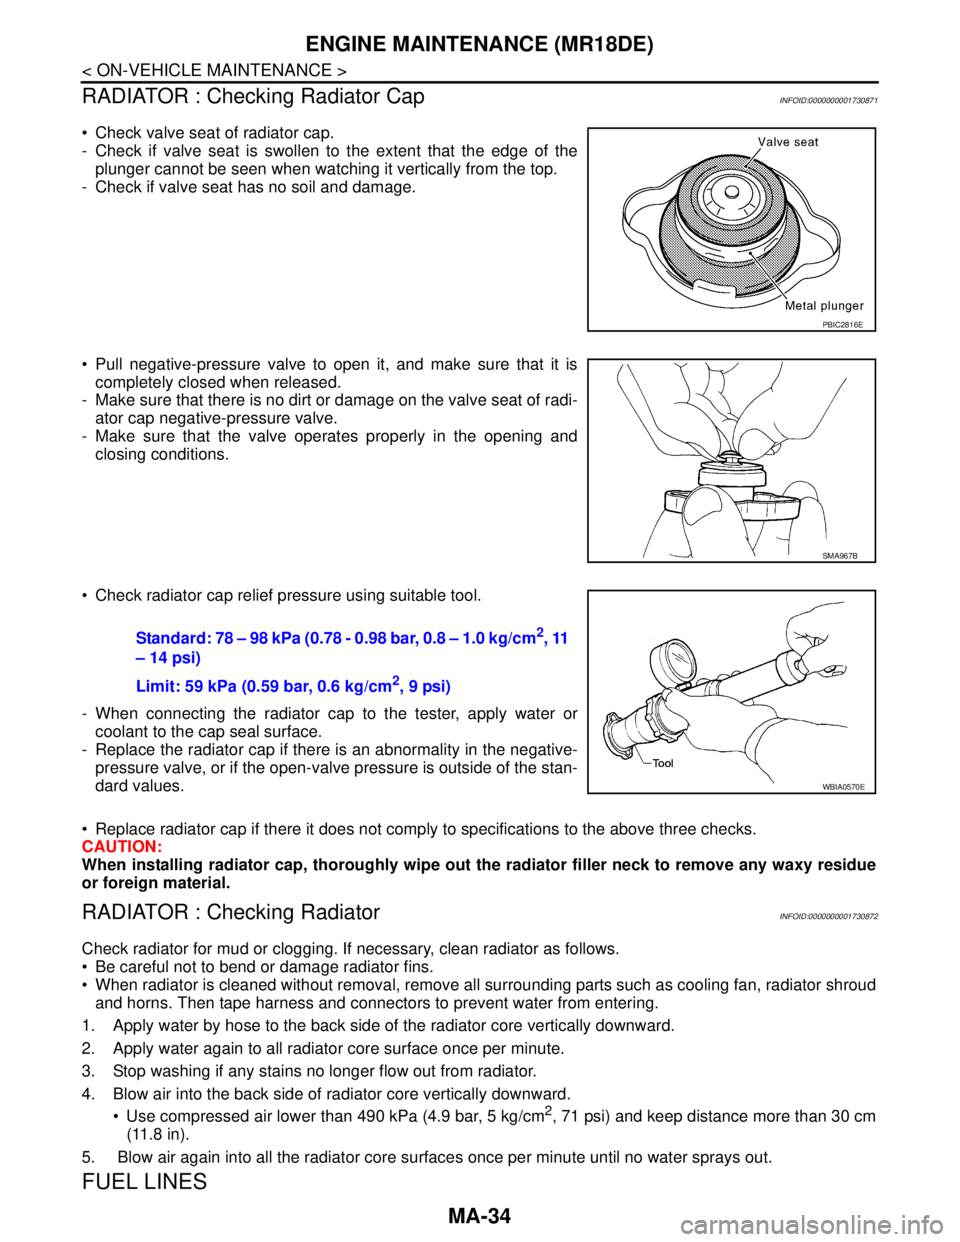
Check valve seat of radiator cap.
- Check if valve seat is swollen to the extent that the edge of the
plunger cannot be seen when watching it vertically from the top.
- Check if valve seat has no soil and damage.
Pull negative-pressure valve to open it, and make sure that it is
completely closed when released.
- Make sure that there is no dirt or damage on the valve seat of radi-
ator cap negative-pressure valve.
- Make sure that the valve operates properly in the opening and
closing conditions.
Check radiator cap relief pressure using suitable tool.
- When connecting the radiator cap to the tester, apply water or
coolant to the cap seal surface.
- Replace the radiator cap if there is an abnormality in the negative-
pressure valve, or if the open-valve pressure is outside of the stan-
dard values.
Replace radiator cap if there it does not comply to specifications to the above three checks.
CAUTION:
When installing radiator cap, thoroughly wipe out the radiator filler neck to remove any waxy residue
or foreign material.
RADIATOR : Checking RadiatorINFOID:0000000001730872
Check radiator for mud or clogging. If necessary, clean radiator as follows.
Be careful not to bend or damage radiator fins.
When radiator is cleaned without removal, remove all surrounding parts such as cooling fan, radiator shroud
and horns. Then tape harness and connectors to prevent water from entering.
1. Apply water by hose to the back side of the radiator core vertically downward.
2. Apply water again to all radiator core surface once per minute.
3. Stop washing if any stains no longer flow out from radiator.
4. Blow air into the back side of radiator core vertically downward.
Use compressed air lower than 490 kPa (4.9 bar, 5 kg/cm
2, 71 psi) and keep distance more than 30 cm
(11.8 in).
5. Blow air again into all the radiator core surfaces once per minute until no water sprays out.
FUEL LINES
PBIC2816E
SMA967B
Standard: 78 – 98 kPa (0.78 - 0.98 bar, 0.8 – 1.0 kg/cm2, 11
– 14 psi)
Limit: 59 kPa (0.59 bar, 0.6 kg/cm
2, 9 psi)
WBIA0570E
Page 4276 of 5883
MA-36
< ON-VEHICLE MAINTENANCE >
ENGINE MAINTENANCE (MR18DE)
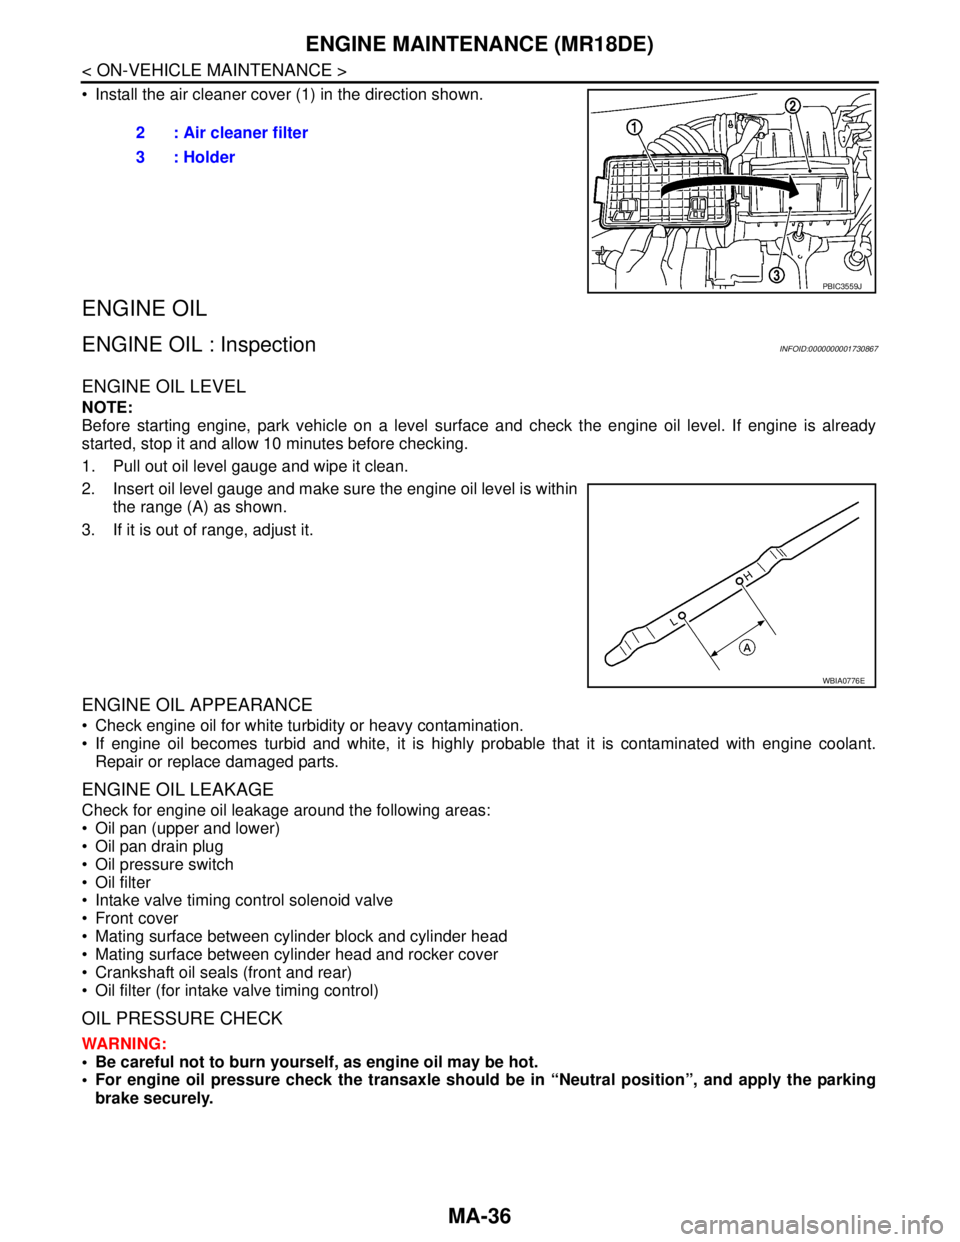
Install the air cleaner cover (1) in the direction shown.
ENGINE OIL
ENGINE OIL : InspectionINFOID:0000000001730867
ENGINE OIL LEVEL
NOTE:
Before starting engine, park vehicle on a level surface and check the engine oil level. If engine is already
started, stop it and allow 10 minutes before checking.
1. Pull out oil level gauge and wipe it clean.
2. Insert oil level gauge and make sure the engine oil level is within
the range (A) as shown.
3. If it is out of range, adjust it.
ENGINE OIL APPEARANCE
Check engine oil for white turbidity or heavy contamination.
If engine oil becomes turbid and white, it is highly probable that it is contaminated with engine coolant.
Repair or replace damaged parts.
ENGINE OIL LEAKAGE
Check for engine oil leakage around the following areas:
Oil pan (upper and lower)
Oil pan drain plug
Oil pressure switch
Oil filter
Intake valve timing control solenoid valve
Front cover
Mating surface between cylinder block and cylinder head
Mating surface between cylinder head and rocker cover
Crankshaft oil seals (front and rear)
Oil filter (for intake valve timing control)
OIL PRESSURE CHECK
WARNING:
Be careful not to burn yourself, as engine oil may be hot.
For engine oil pressure check the transaxle should be in “Neutral position”, and apply the parking
brake securely.2 : Air cleaner filter
3 : Holder
PBIC3559J
WBIA0776E
Page 4281 of 5883
ENGINE MAINTENANCE (MR18DE)
MA-41
< ON-VEHICLE MAINTENANCE >
C
D
E
F
G
H
I
J
K
L
MB
MAN
OA
INSPECTION AFTER REMOVAL
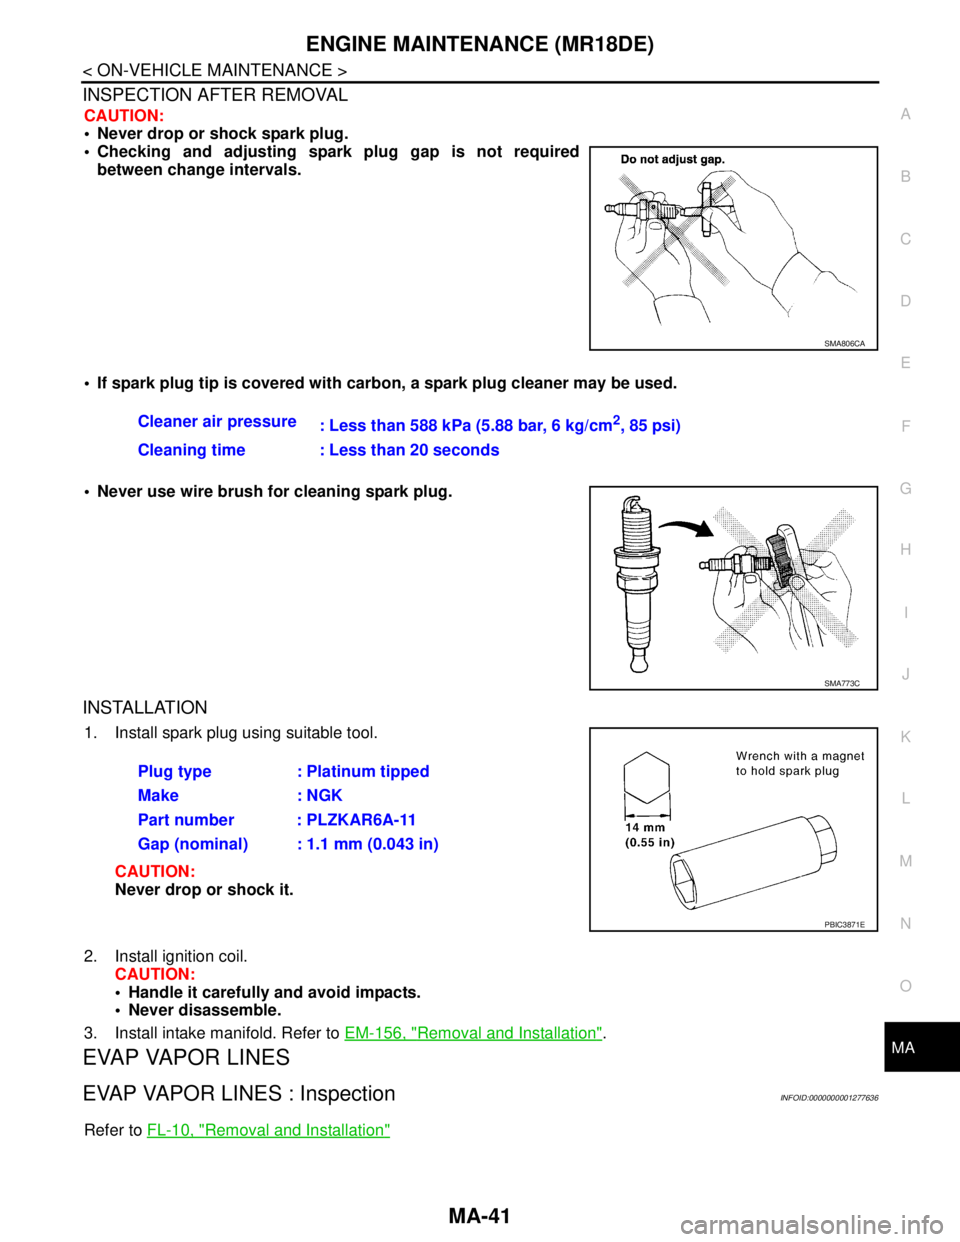
CAUTION:
Never drop or shock spark plug.
Checking and adjusting spark plug gap is not required
between change intervals.
If spark plug tip is covered with carbon, a spark plug cleaner may be used.
Never use wire brush for cleaning spark plug.
INSTALLATION
1. Install spark plug using suitable tool.
CAUTION:
Never drop or shock it.
2. Install ignition coil.
CAUTION:
Handle it carefully and avoid impacts.
Never disassemble.
3. Install intake manifold. Refer to EM-156, "
Removal and Installation".
EVAP VAPOR LINES
EVAP VAPOR LINES : InspectionINFOID:0000000001277636
Refer to FL-10, "Removal and Installation"
SMA806CA
Cleaner air pressure
: Less than 588 kPa (5.88 bar, 6 kg/cm2, 85 psi)
Cleaning time : Less than 20 seconds
SMA773C
Plug type : Platinum tipped
Make : NGK
Part number : PLZKAR6A-11
Gap (nominal) : 1.1 mm (0.043 in)
PBIC3871E
Page 4282 of 5883
MA-42
< ON-VEHICLE MAINTENANCE >
ENGINE MAINTENANCE (K9K)
ENGINE MAINTENANCE (K9K)
DRIVE BELTS
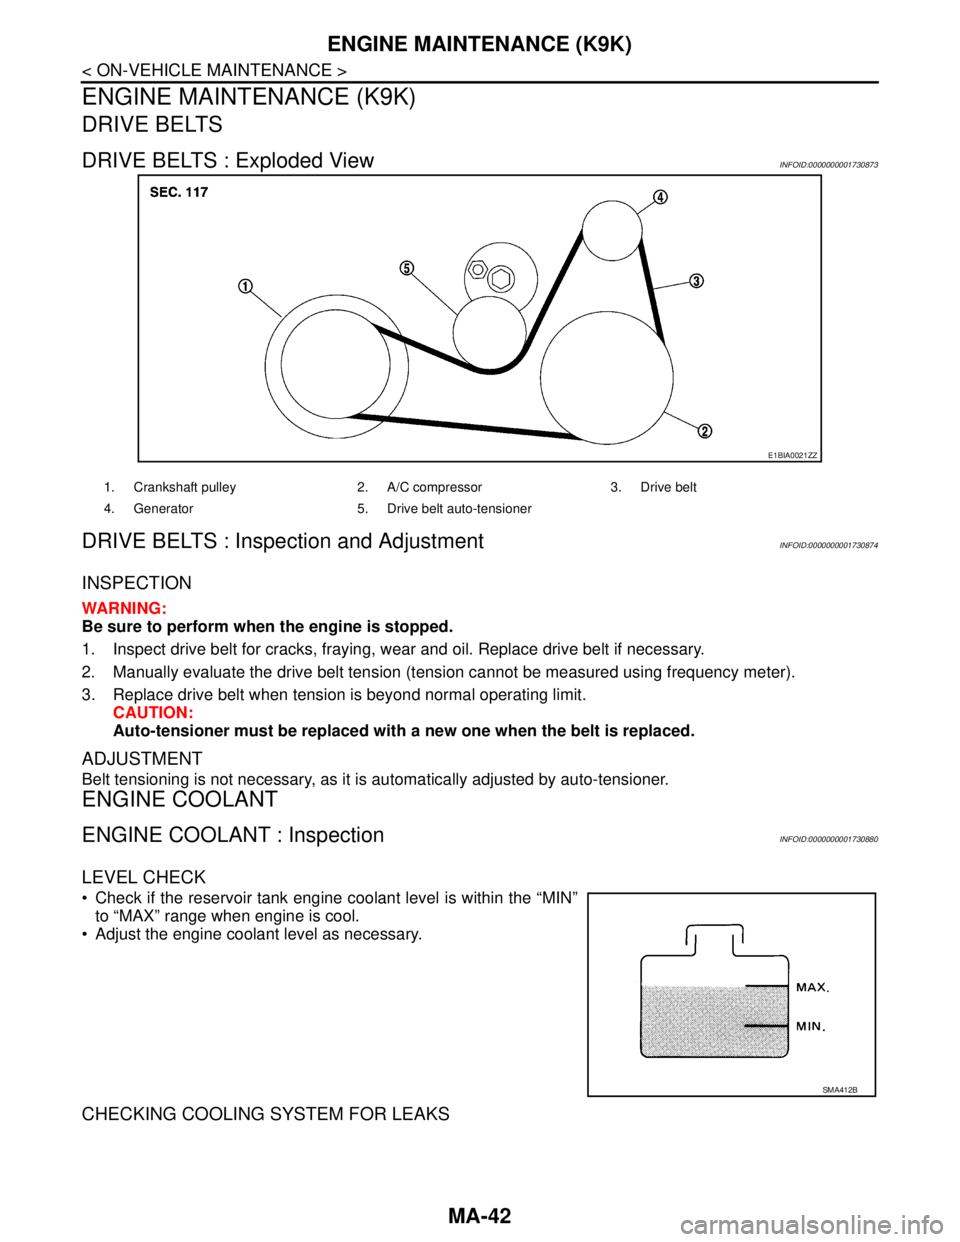
DRIVE BELTS : Exploded ViewINFOID:0000000001730873
DRIVE BELTS : Inspection and AdjustmentINFOID:0000000001730874
INSPECTION
WARNING:
Be sure to perform when the engine is stopped.
1. Inspect drive belt for cracks, fraying, wear and oil. Replace drive belt if necessary.
2. Manually evaluate the drive belt tension (tension cannot be measured using frequency meter).
3. Replace drive belt when tension is beyond normal operating limit.
CAUTION:
Auto-tensioner must be replaced with a new one when the belt is replaced.
ADJUSTMENT
Belt tensioning is not necessary, as it is automatically adjusted by auto-tensioner.
ENGINE COOLANT
ENGINE COOLANT : InspectionINFOID:0000000001730880
LEVEL CHECK
Check if the reservoir tank engine coolant level is within the “MIN”
to “MAX” range when engine is cool.
Adjust the engine coolant level as necessary.
CHECKING COOLING SYSTEM FOR LEAKS
E1BIA0021ZZ
1. Crankshaft pulley 2. A/C compressor 3. Drive belt
4. Generator 5. Drive belt auto-tensioner
SMA412B
Page 4284 of 5883
MA-44
< ON-VEHICLE MAINTENANCE >
ENGINE MAINTENANCE (K9K)
4. Start engine without closing reservoir tank cap and keep engine racing at 1,500 rpm for about 2-3 minutes.
If necessary, pour engine coolant up to MAX level.
If coolant overflows reservoir tank hole, install filler cap.
Watch engine coolant temperature gauge so as not overheat the engine.
WARNING:
Be careful not to be scaled with hot engine coolant or vacuum pump when operating.
Radiator fan blade can start at any time and cause personal injuries.
5. Turn off the engine and loosen air relief plug until coolant spills from air relief hole.
6. Close the air relief plug and run the engine at 2,000 rpm until the upper hose becomes hot and radiator
fan operates. Leave the engine running approximately 5 minutes at idle speed and check for sound of
coolant flow while running engine from idle up to 3,000 rpm.
Sound may be noticeable at heater water cock.
7. If sound is heard, bleed air from cooling system by repeating steps 4 to 6 until coolant level no longer
drops.
Check the radiator lower hose for any signs of leakage.
8. Turn off the engine and let it cool down.
Cool down using a fan to reduce the time.
9. After cooling period, loosen the air relief plug and check if coolant spills from the air relief hole. if not,
remove the air relief plug until the coolant spills, and then close the relief air plug. Bleed air from cooling
system by repeating steps 6 to 10 until the coolant spills immediately.
10. Check the engine coolant level when engine is cool and refill to MAX level line if the level is lower.
Clean excess coolant from engine.
11. Check that the reservoir tank cap is tightened.
ENGINE COOLANT : FlushingINFOID:0000000001730883
1. Install reservoir tank if removed.
If water drain plug on cylinder block is removed, close and tighten it. Refer to EM-314, "
Exploded
View".
2. Fill reservoir tank with water until water spills from the air relief hole, then close air relief plug. Reinstall
reservoir tank cap.
3. Run engine and warm it up to normal operating temperature.
4. Rev engine two or three times under no-load.
5. Stop engine and wait until it cools down.
6. Drain water.
7. Repeat steps 1 through 6 until clear water begins to drain from radiator.
8. Blow compressed air into cooling circuit through the reservoir tank valve hole to drain all the water.
RADIATOR
RADIATOR : Checking Radiator CapINFOID:0000000001730884
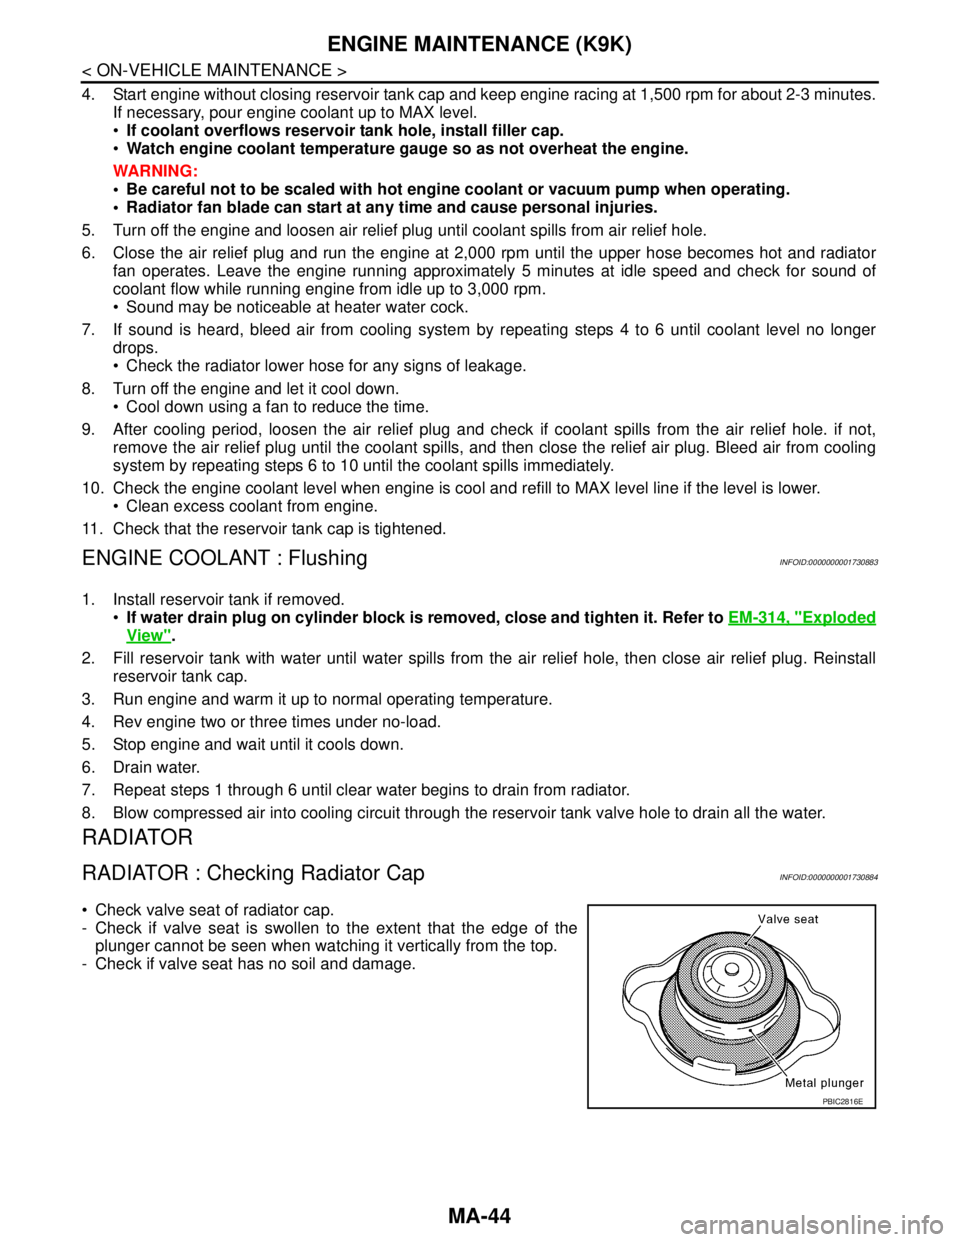
Check valve seat of radiator cap.
- Check if valve seat is swollen to the extent that the edge of the
plunger cannot be seen when watching it vertically from the top.
- Check if valve seat has no soil and damage.
PBIC2816E
Page 4287 of 5883
ENGINE MAINTENANCE (K9K)
MA-47
< ON-VEHICLE MAINTENANCE >
C
D
E
F
G
H
I
J
K
L
MB
MAN
OA
ENGINE OIL : InspectionINFOID:0000000001730878
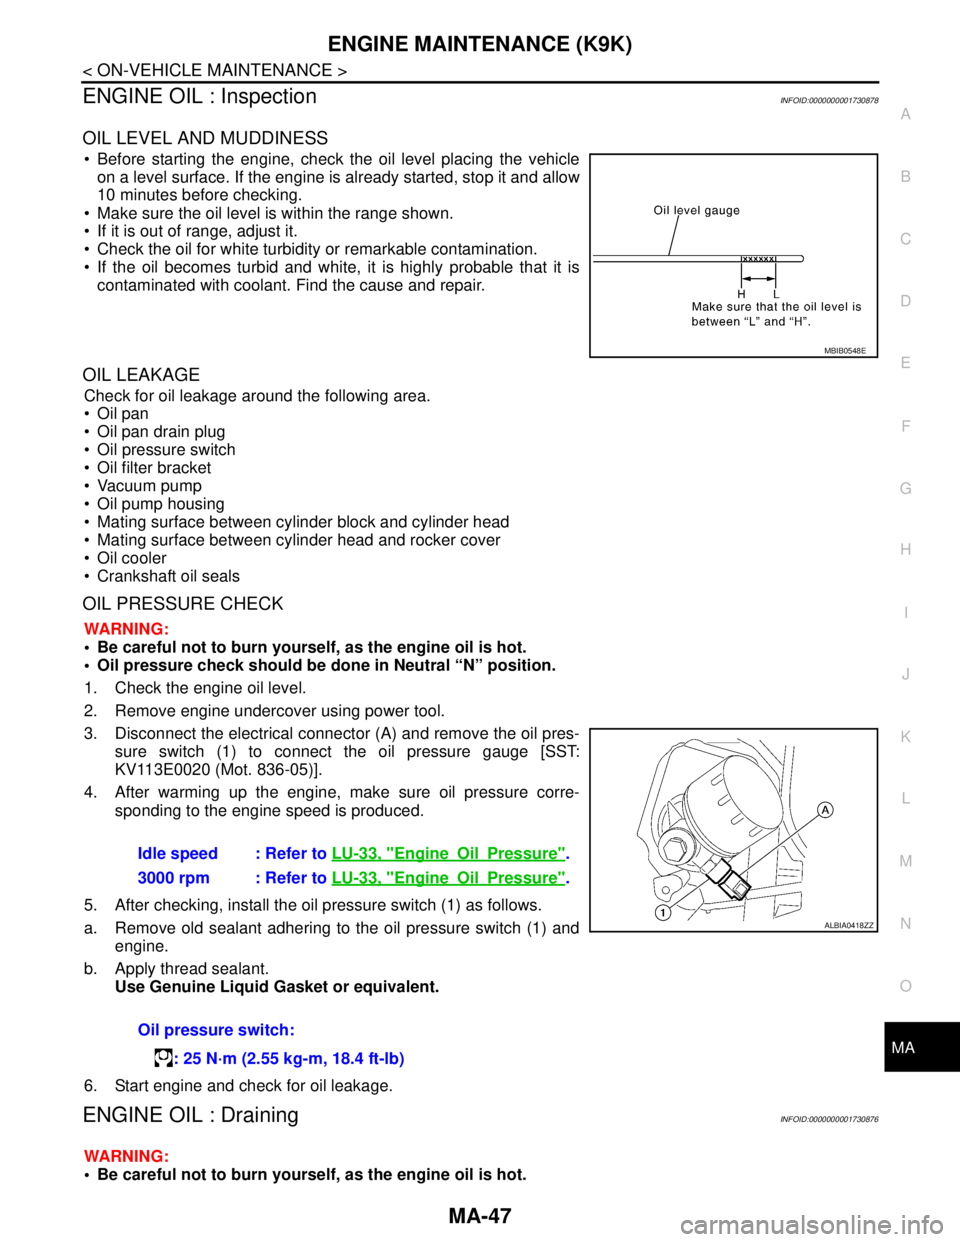
OIL LEVEL AND MUDDINESS
Before starting the engine, check the oil level placing the vehicle
on a level surface. If the engine is already started, stop it and allow
10 minutes before checking.
Make sure the oil level is within the range shown.
If it is out of range, adjust it.
Check the oil for white turbidity or remarkable contamination.
If the oil becomes turbid and white, it is highly probable that it is
contaminated with coolant. Find the cause and repair.
OIL LEAKAGE
Check for oil leakage around the following area.
Oil pan
Oil pan drain plug
Oil pressure switch
Oil filter bracket
Vacuum pump
Oil pump housing
Mating surface between cylinder block and cylinder head
Mating surface between cylinder head and rocker cover
Oil cooler
Crankshaft oil seals
OIL PRESSURE CHECK
WARNING:
Be careful not to burn yourself, as the engine oil is hot.
Oil pressure check should be done in Neutral “N” position.
1. Check the engine oil level.
2. Remove engine undercover using power tool.
3. Disconnect the electrical connector (A) and remove the oil pres-
sure switch (1) to connect the oil pressure gauge [SST:
KV113E0020 (Mot. 836-05)].
4. After warming up the engine, make sure oil pressure corre-
sponding to the engine speed is produced.
5. After checking, install the oil pressure switch (1) as follows.
a. Remove old sealant adhering to the oil pressure switch (1) and
engine.
b. Apply thread sealant.
Use Genuine Liquid Gasket or equivalent.
6. Start engine and check for oil leakage.
ENGINE OIL : DrainingINFOID:0000000001730876
WARNING:
Be careful not to burn yourself, as the engine oil is hot.
MBIB0548E
Idle speed : Refer to LU-33, "EngineOilPressure".
3000 rpm : Refer to LU-33, "
EngineOilPressure".
Oil pressure switch:
: 25 N·m (2.55 kg-m, 18.4 ft-lb)
ALBIA0418ZZ